Here’s a build thread if anyone is interested. I’ve started my GT40 style extractor scoop project and this is where I’m at today. I’ve got the buck made and just need to sand and finish it up. The scoop is to be functional and if I measure everything right, I will still be able to keep my spare tire up front. If someone will send me an e-mail, I’ll send you back a couple of pictures of the buck I made to put up here. The scoop will require that I either relocate or get a smaller overflow bottle. If anyone knows of a smaller bottle that works with these types of scoops, please let me know from what vehicle they can be had. I’ve got a feeling this is going to be one of those “love it or hate it” modifications. Those that have seen my car know it already fits into that ‘love it/hate it’ category. Looks like I’ll have to take care with the buck as my son-in-law wants one for his 87GT. And I'd like to thank those that have streed me towards the correct type of bondo-like stuff etc to use with the hood material.
IP: Logged
02:30 PM
PFF
System Bot
FieroBUZZ Member
Posts: 3320 From: Ontario, Canada Registered: Feb 2001
Thanks for puting the pics up and, ya it's a bigie. I'm kinda big on the functional race car look. Unless I change my mind, which I doubt, the car will be repainted black matalic and will have a silver matalic stripe through the nose inlet and up the scoop valley. In addition to the new scoop I've also moved the wing aft and lowered the car. What with the engine compartment extractor scoop, intercooler showing, enlarged side vent, lots of functional gauges etc and the new front scoop, I think it will look neat, though some may not agree, but that's why each do our cars the way we want. I was also going to put a new nose on it, but since it's a daily driver and I live in a Speed Bump happy community, I'll have to pass on that mod. Dang, but it takes a lot of sanding to get that mold perfect. More pics when I pop the first one off the buck.
I saw your roadster before and love it. I was going to go the same route (bending) with my scoop but I wanted it to curve down a lot so I could retain my spare tire up front (I have to keep room in my trunk for my golf clubs), but when I tried to get some CMC I had to bend the amount I needed, it kept cracking, so I decided to mold one instead. The buck will also allow for a nice radius where the sides meet the valley. Additionally; I'll probable add some ridges to it as I lay-up the fiber glass to make it stronger. Keep ya posted.
IP: Logged
07:21 AM
FierOmar Member
Posts: 1646 From: Glendale, California, USA Registered: Dec 2001
It would appear that the radius of the curve on yours changes, whereas ours is more constant (or course we were not concened about keeping the spare tire in place. Based on what I see, it appears that you will need to trim some part of the front lip on the spare tire well (front trunk). If so, how much? Will you be offering copies in the future? Could be a good seller, particularly if it is a drop in part.
------------------ FierOmar
IP: Logged
05:48 PM
Francis T Member
Posts: 6620 From: spotsylvania va. usa Registered: Oct 2003
Oh yah, I'll be cutting some of that wall away. I'm not really looking to sell them, but since I have to make two of them, I'm trying to make the mold super smooth so they'll come off easy and also not need much fineshing. That said; if they're also not too hard to make and there's an interest, I may do some. Then I may just let local Fiero guys come by and use the buck, we'll see how it works out.
IP: Logged
10:18 PM
Aug 31st, 2005
Francis T Member
Posts: 6620 From: spotsylvania va. usa Registered: Oct 2003
Yes! I got the scoop off the mold without damaging either and it looks really good. Maybe some pics Thursday. Sure took a while to lay up though, so I don't think I'll be making them to sell. I'll probably just let some folks come over and use the mold. Now I've been planning on mounting it to the hood with epoxy and some recessed screw that I can cover over. If that's not a good way to do it let me know. At any rate, I'll need the screws to hold it until the expoxy dries. I'm going to use 30 minute epoxy. I'm of cause open to better ideas.
IP: Logged
07:27 PM
Racer_JT Member
Posts: 1419 From: Lynchburg, Virginia, USA Registered: Apr 2002
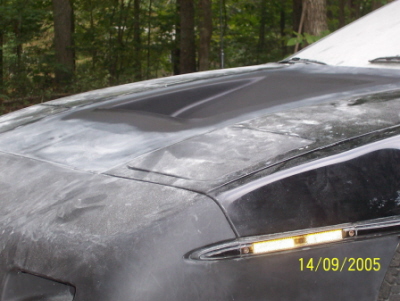
Here's a GT40 hood I made. I wanted to be able to keep the sunroof also. I made it so that I cut down the front wall to where I could take the sunroof shelf bracket and flip them upside down. It just clears the sunroof now.
IP: Logged
10:32 PM
Sep 1st, 2005
Francis T Member
Posts: 6620 From: spotsylvania va. usa Registered: Oct 2003
looks good jt. I'm also trying to keep as much trunk space as I can. Hopefully I'll be able to retain my spare tire, but it will be close. At worse the spare can go in the back and tools etc up front. If you want to make your scoop look a little more functional (not that it doesn't look really good now) put a small lip at the keading edge it flip the surface air up and work better, not that we really go fast enough for it to matter. Take a look at my son's monster MR2 (Sport Comp Mag) on tureleo.com and his extractor.
IP: Logged
07:08 AM
PFF
System Bot
Francis T Member
Posts: 6620 From: spotsylvania va. usa Registered: Oct 2003
OK I have some more pics and info, but I forgot who put them them up for me last time. I'm going to try to figure out how to post pictures again tonight. If you want ot them now send me an e-mail (rspiderii@aol.com) and I'll send them back at ya. On that topic; I have this really interesting thing I did with a dyno sheet, but can't seem to find anyone who knows how to put text and drawings/charts done in MS Word up on PFF.
IP: Logged
06:57 PM
Francis T Member
Posts: 6620 From: spotsylvania va. usa Registered: Oct 2003
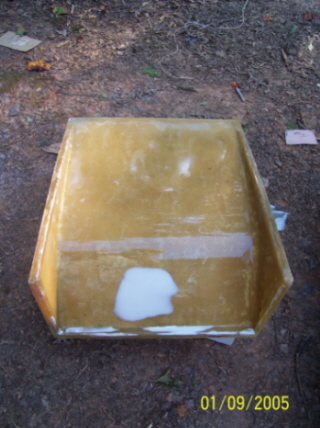
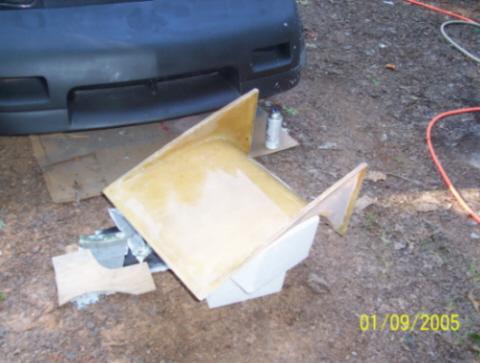
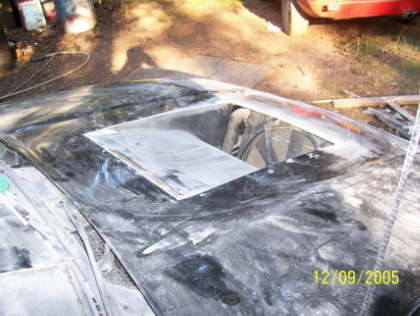
OK I have PIP loaded and runnning, so here goes nothing. The pictures I hope you'll see show where I cut the support ribs from my hood. For that job I used my air tool with a thin stone wheel. Cut through it like butter, but I looked like a snowman with all that powered on me. The top or side that you'll see when the hood is closed came out noce and smooth, save for a few small air pockets, hense the bondo. The under of cuase came our rough, but I just have to sand the bondo off to make it look nice on that side too. As you can see in the shots of the scoop by itself, I drops rather steeply and hopefully will retain trunk space while also venting the front good. Nuts, I am now to point where I can brows PIP for the picture I want. but when I post it, I get a "it's too big" error? It's just a dig cam picture so I must be doing something else wrong. Question; do I open a thread, and then try to post the pics while I have a reply to post open?
Francis, you're doing everything right to post a pic. Most digi cams these days take pics well over the max limit allowed by pip. Chances are that the pictures will have to be scaled down before it will allow you to post them.
IP: Logged
10:02 PM
HellYes Member
Posts: 736 From: CLifton, IL 60927 Registered: Mar 2005
Thanks hellyes. Well, i looked at my camera (Kodak cx6330) and did not find anything on how change the pix count. Didn't find it the book either so i sent question th kodak. Thought maybe I could just save the file that way, but could not. Until I hear back from kodak... Unless someone else wants to put them up.
IP: Logged
09:03 AM
Sep 4th, 2005
Francis T Member
Posts: 6620 From: spotsylvania va. usa Registered: Oct 2003
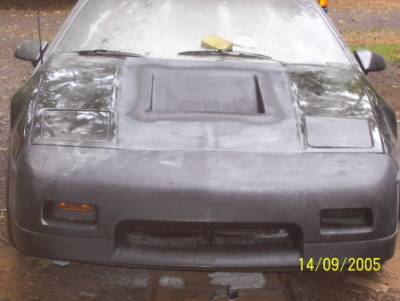
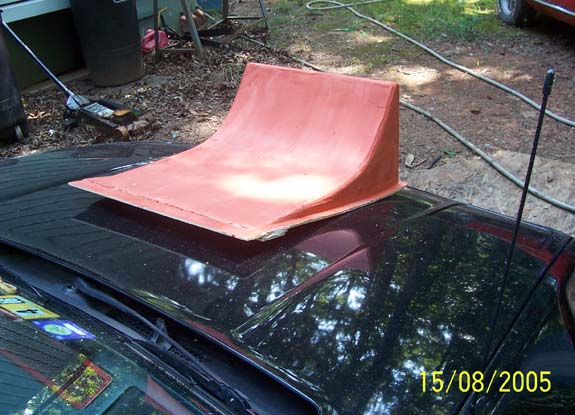
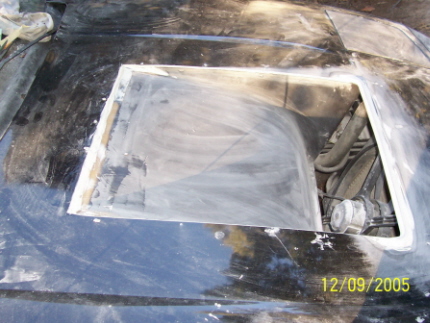
OK, I've resized the pictures and will now go try to put them up here again. If it works you'll a front view of the scoop. side view and a where it's going view. It has since been sanded and is amost ready to go in. Nuts, I didn't get any errors saying it's big a file this time but the did nopt appear when I clicked 'post it'. I'm surely not doing something I should. Question; after I get the pictures in up in the PIP box, how do Iget them up here in the post? If someone put the pics up or take me step by step through posting pics you folks can see where I'm at and I'll write some more on how the build was done or more aptly, is being done.
IP: Logged
10:34 PM
Sep 5th, 2005
Francis T Member
Posts: 6620 From: spotsylvania va. usa Registered: Oct 2003
Francis, I have to use "HP image zone plus" to down size all of my photos. Send them to me and I will resize them and post them, if you want. I will PM you my email address.
I am interested in this mod, I like these kinds of scoops, and the previous owner of my GT had already cut the spare tire forward edge for this type of vent. Good work.
IP: Logged
10:34 PM
HellYes Member
Posts: 736 From: CLifton, IL 60927 Registered: Mar 2005
Here's a GT40 hood I made. I wanted to be able to keep the sunroof also. I made it so that I cut down the front wall to where I could take the sunroof shelf bracket and flip them upside down. It just clears the sunroof now.
that's hawt.. /droool
IP: Logged
10:46 PM
t76racer Member
Posts: 233 From: Salt lake, Utah, Salt Lake Registered: Nov 2004
Fancis T looks good, I actually hit the "submit" button before I could preview it, but there you go. Lets see it from the other side, (top of the hood) Yeah I had to resize the cr*p out of them to fit.
IP: Logged
11:33 PM
Sep 6th, 2005
Francis T Member
Posts: 6620 From: spotsylvania va. usa Registered: Oct 2003
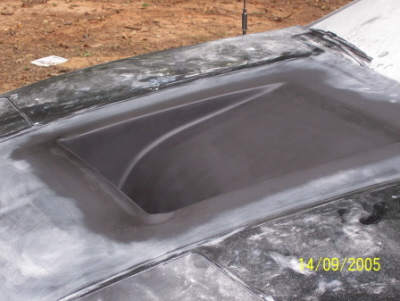
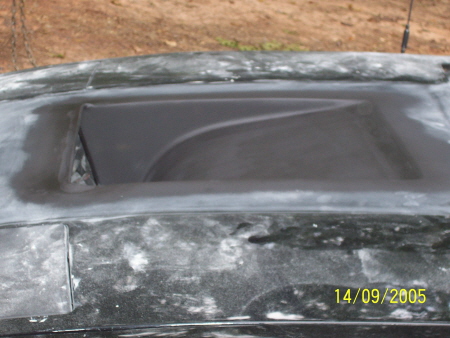
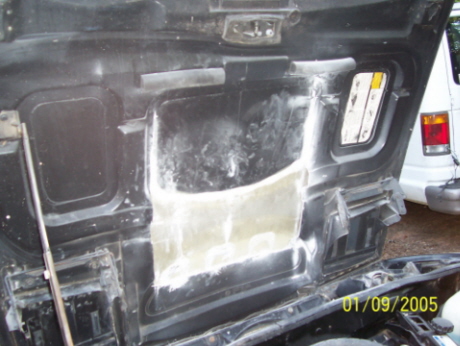
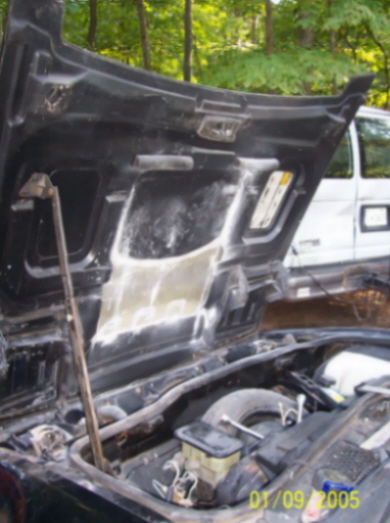
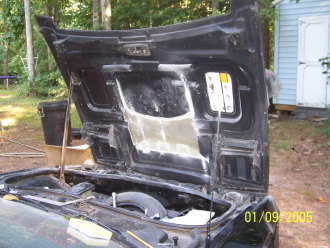
Thanks a lot t76. Now that we have a few pics here's some info on the build. When I started this project, I first had to decide how big to make it. I kept it to around 18" wide so as not to have it hit the master brake unit and so I could still have room for a small overflow bottle. I placed a sheet of cardboard vertical to the top of the hood and then taped a marker to a one inch block and ran it along the hood tracing the curve to the cardboard. Afterwhich I cut the cardboard and used the it as a template for the molds' playwood sides. The rest of the mold was pretty easy to make save for all the sanding. From under the car, with hood closed, I marked how far forward I could take the scoop and still clear the radiator shroud. I measured off and then cut the underside ribs off with a thin stone wheel in my air tool. If you use this method be careful as it will cut through CMC like butter, and no, I did'nt come through the top! I used a sharp putty knif and a hammer to seperate the ribs from the hood. GM sure used som strong glue on those. This week I hope to cut the hole in the hood and mount the scoop. I'm on a short vacation this week and the wife wants to go somewhere, so we'll how much I can get done...... I have something planned for the lip and if works, i think you'll like it. More to come.
IP: Logged
12:15 AM
Sep 12th, 2005
Francis T Member
Posts: 6620 From: spotsylvania va. usa Registered: Oct 2003
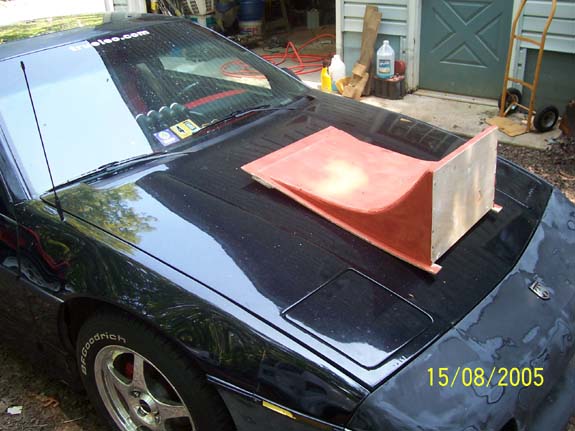
I made some more progress. I have it mounted and molded a lip at the front to chip the bondary layer air up as they do on race cars. Pics tonight maybe. Well I saved lots of space in my trunk as I had hopped, but it looks rather 'love or hate'. At least it will until I finesh molding it and get the car painted. Na... it will still look love or hate. I've never been one to worry too much what others think and always liked the functional race car look anyway. As my son Troy said when he saw it last night, "OMG, you sure make it look functional all right." Still a bunch of sanding to do and those screws are just temp.
IP: Logged
06:07 PM
Francis T Member
Posts: 6620 From: spotsylvania va. usa Registered: Oct 2003
Almost forgot, I may or may not put a mesh type grill between the fan and the scoop haven''t decided yet. I may simply paint or clean up the fan and radiator real nice and maybe put some more shrouding down there. I also need to have it all seal up good when the hood closes, shouldn't be too big a deal to do.
IP: Logged
06:20 PM
t76racer Member
Posts: 233 From: Salt lake, Utah, Salt Lake Registered: Nov 2004
Hahahahaha........No it's the real deal. Just painted it last weekend. No more decals either. It's all paint this time. Not the best paint job but what the hey.......My first full car paint and more important first custom paint. It's very close to the viper yellow but with gold pearl. The red is Boyd's Red. The colors did come out better than expected.
IP: Logged
08:53 PM
Sep 14th, 2005
Francis T Member
Posts: 6620 From: spotsylvania va. usa Registered: Oct 2003
There should be some more pics up soon. I just want to explain how I made the front boundery layer lip for anyone thinking of doing one. I can't say if it's was a great idea or not yet, only time will answer that one. Anyway, here's how it was made; I used a thick plastic coat hanger (yes that's what I said) and belt sanded one side flat. I then cut it fit and made good use of turns at the ends. Many of the thick hangers are hollow inside. With that hollow inside tube exposed I pushed epoxy up into it and on the falt underside and then clamped it place. I of course first sanded the paint off the hood where it was going to be attached with #80 grit to make sure it would hold good. I simply then used filler to shape it. BTW: I first attached a test one to and extra small sheet of hood CMC to make sure it hold good, it did. As you'll see from the pics later it still needs some sanding, but seems to look good.
IP: Logged
10:56 PM
PFF
System Bot
Sep 15th, 2005
t76racer Member
Posts: 233 From: Salt lake, Utah, Salt Lake Registered: Nov 2004
That looks great, but I was just wondering how big is too big. I mean I have a 6"x 6" hole under my extractor scoop and seems to be night and day when it comes to high speed stability, but I have seen bigger. I was thinking about going bigger but thought would it be better than what I have.
Is there a formula or general rule of thunmb for the size of the hole in people's hoods? My car has been up to 130mph and it felt very stable, but would a bigger vent hole give bigger results in stability?
IP: Logged
06:10 PM
85-GT Member
Posts: 365 From: Dover, NH, 03820 Registered: Mar 2005
Goat, I think this particular hood scoop is for keeping the radiator cool. Correct me please, if I'm wrong. I don't know what it has much for aerodynamic value other than less resistance after air goes through the radiator. It is true, however, that this particular shape couldn't help but give some downforce, but I'm pretty sure this particular shape is for creating a venturi above the scoop and "sucking" more air through the radiator.
-Shawn
[This message has been edited by 85-GT (edited 09-15-2005).]
IP: Logged
06:23 PM
Sep 16th, 2005
Francis T Member
Posts: 6620 From: spotsylvania va. usa Registered: Oct 2003
Like said when i started this thread, it was going to be a love or hate thing. Aside from the fact that I did it more for looks than anything; it is also intended to allow the air to flow more effectively through the radiator. I wanted an opening close in volume to the fan area and I also wanted a better aero flow up from the radiator too, thus the curving deep scoop. I played around with tape on my hood to get a feel for what different scoop sizes would like and this was what I liked best, granted most will thing it's too big, but as they say, it's my ride. Sad a lot of folks worry so much about what others think. A custom or modified car should come from your heart. You should love it first, if others share your vision all the better, but you have to love it most.
It still needs to get some form of shrouding between the fan and the scoop and an overflow boottle that will fit. On that topic, I looked at the one in my son's Nissions pickup and it looks just right.
Origional intention was to retain the tire up front and not cut down on what little space there is up there. When I first put it on, it was 2" more forward and the tire fit, I think it will still fit but haven't tried it yet. Worse case, I put my onboard tools up front and the tire in the back. If I have to do that I may look for a light rim for it.
I never said I didn't like it....I think it looks tight (good). Just wondering if there was a "too big" when it came to vent holes. I do agree with you on the "if you like then who cares" idea.
IP: Logged
10:24 PM
Sep 17th, 2005
t76racer Member
Posts: 233 From: Salt lake, Utah, Salt Lake Registered: Nov 2004


.jpg)


.JPG)
.JPG)
.JPG)
.JPG)