Pennock's Fiero Forum
  Technical Discussion & Questions - Archive
  How to make Chris's center consol

T H I S   I S   A N   A R C H I V E D   T O P I C
  

Email This Page to Someone! | Printable Version


How to make Chris's center consol by Chris Hodson
Started on: 08-29-2007 03:30 AM
Replies: 17
Last post by: Matthew_Fiero on 08-12-2008 02:52 PM
Chris Hodson
Member
Posts: 3099
From: Carpentersville
Registered: Aug 2006


Feedback score:    (6)
Leave feedback


Total ratings: 54
Rate this member

Report this Post08-29-2007 03:30 AM Click Here to See the Profile for Chris HodsonSend a Private Message to Chris HodsonDirect Link to This Post
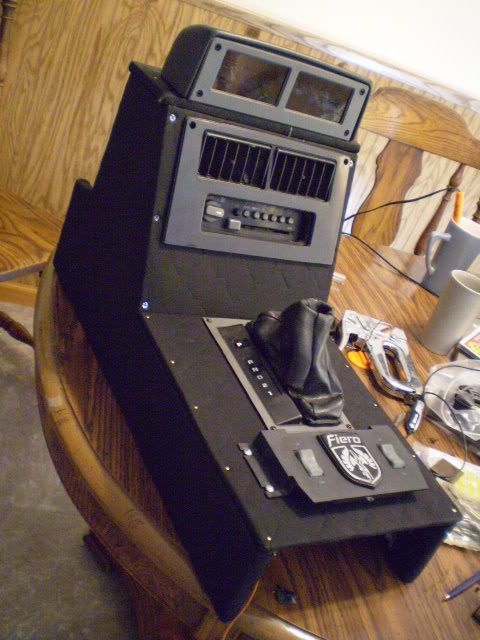
Ta-DA


For those who cant wait for pictures … lol Here’s a quick walk through of what I did. Hopefully you will end up with something close or better than what i have in the picture above. If you dont think of it as something that needs to fit perfect i think your results will exceed what you have in mind.
Apologies for my explaining skills, im not the best at it.
oh and... Take a pee break before reading this.


You need some screws, some nails, some fabric, some wood, a jigsaw, industrial staple gun and a screw driver.

“Just” remove the whole center console. “yes this is an understatement, but do it”
Using the old console, hold a piece of cardboard to the side of it and roughly outline the shape of it. It will kind of look like…A


The vinyl and plastic thing that the ash trays and windows switches sit in…. roughly take the length of that and add it to your first drawing. I set mine together like it was in the dash and outlined it like that. So now your outline kinda looks like B.
If you look at where your old console rested against the dash, you will see it is recessed a bit around the air duct. Whatever wood you use, you want it to fit in that recess. So make sure your template matches the contour of the dash, just by outlining like we did in A you will get very close to where you need to be, you can perfect it when you make the top piece.
So now you got your length, now you can tweak your template just a bit. Originally I wanted more of a slope to my console but you have to make sure the HVAC and radio and whatever else you want to put in there wont interfere with anything. On my design it looks like there is a lot of room to play with. You have to make sure whatever you incorporate clears the shift knob. Pic C is how I tweaked my template.
Once I thought I had a pretty decent design I traced 2 of these onto half inch thick particle board because I had some laying around. And test fitted, it fit nice. Then I got both of them and shoved them into the recess’s on both sides of the air duct and held them there. I noticed if your looking at them straight on they kind of curve, they are not perfectly square. Not a problem though. The goofy plastic thing that holds the radio and HVAC and stuff… I broke it in half, and c-clamped those two pieces from the template to both sides of it and it took care of the angles for me. So now that its c-clamped to the plastic box thing you can make templates for the top part of the box. I used a thinner wood for this. ¼ inch I think. To locate where your shift rod hold needs to be you can set our old bezel on the top of the box and get a pretty good idea where it should go because the dimensions of the box your probably building and the original are pretty close.
From here, once you get the top pieces made its just cutting out what you want to put in. Its all personal preference. I cut up the original bezels and took measurement off that that. You may want to do something different.


K, getting this all together…
YOU MUST PRE DRILL, otherwise its going to split your wood and wont fasten right.
You should countersink your holes to so your screw heads don’t poke out.


Im no expert on upholstering trust me, but this is how I went about doing what I did.


After I had all my holes drilled and countersunk, the box put together to make sure it all fit right. I took it all part.


This is easy. Pick out a fabric. Lay whatever piece your doing first “visible side down” onto the back on the fabric. Cut about an inch or so out around your piece. Starting on one side first, staple the fabric to the back side of the board. When that side is done go to the opposite side and stretch it as you staple to get it tight. Watch out for wrinkles or stretch lines. You want to get this fabric as even as possible, especially if your fabric is patterned. You don’t want your patter to look lopsided. For the corners just staple it like your taping a present if that makes sense, You could even stretch then staple one side then when you do the other side of the corner, stretch and staple but cut off the excess amount of fabric. If you play around with it you will develop your own thing. Main goal it to not bunch the fabric up on the corners so much because when you put your box together its going to not fit well.


Do this to all the pieces. When putting fabric over a piece that has holes cut out of it, like for the HVAC and radio etc… Cover it as once piece, like you did the sides of the console. After you do that flip it over. Imagine in each of the rectangles you cut out of the wood there is an x in the box. Cut along the lines of the X into the fabric. Then stretch and staple. Start from one side and work to the other, do not start in the middle.
Once you have all the fabric where it needs to be. Its time to put the box together. Locate the holes you predrilled and very carefully poke a hole through the fabric into the hole. If you don’t do this and try running a screw through the fabric your fabric will probably twist around the screw and rip out the staples. Oh, I used a non electric screwdriver for this. Once all the holes are poked start screwing your box pieces together. For my top piece and the angled piece I used heavy duty screws because it needs to hold the weight. Then I ran out of those and had some fancy goldish looking nails I used for the flat piece the shift arm goes through. You can use what you like. These nails where tiny enough I didn’t need to pre drill.


There’s lots of things you can do to this. You could build that template all the way from the air duct to the fire wall if you wanted to. I think this is what im going to do, and im going to incorporate a sub enclosure also. Just make templates out of cardboard before you cut wood. If you can make it out of cardboard you can probably make it out of wood.


This gives you a decent idea of what’s goin on. For people like me, who need pictures - you will have to wait a few days so I can get better material to work with.
---------------------------------------------------------------------------------------------------------------
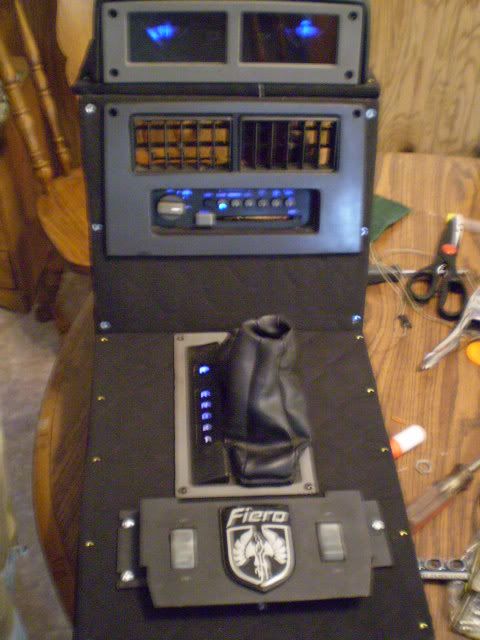


K, for the gages I really need to post pics to explain how it works. BUT i dont have them so for the volt and oil pressure whatever its called on the top of my console, To get the red color out you need to…

Take the thing apart carefully, don’t force anything. You will see a clear plastic thing with two electronic things In it your needles plug into. On the face of the plastic thing there is like a printed transparency that you can peel off. Peel this off. This is where you need to be really careful. This transparency is odd, its like 3 layers thick. Imagine it like one of those scratch off lottery tickets.

The black part you see has all the lettering in it which is nice because you cant scratch it out. Then there is a few other layers that help block out light where it doesn’t need to go and some of it gives the gage the red color. I used a knife and scraped all of that off around where the markings where. You can hold it up to the light to see what kind of progress your making. I didn’t try it but I think lacquer thinner might be able to take this stuff off a lot easier than scraping it. Don’t take my word for it, I didn’t try it on this.

The red volt and oil I think cannot be modified L but try wiping lacquer on it and see what happens, it might make it white for you, but it might take the lettering off also? ANYWAYS.. Use some super glue to glue that piece you did all the scraping on back onto the clear plastic piece and put it all together but don’t stick it in the vynil plastic holder thingy just yet. To make colors… you can either replace the filament bulb with some other diff colored filament bulb OR you could do something cool like I did and use LED’s. I unplugged the filament bulb out of its holder. You will notice a hole already in the bottom of the bulb holder, I just drilled it out a bit more so I could fit an LED inside of it. After I go the LED’s in I put it all back together. To get the lights to come on I wired it into the HVAC lights which ill explain next. If you know the positive and negative terminal on the oil volt gage circuit board you could just wire it in there but im lazy and didn’t care to figure it out.


K, HVAC control lights. Kind of like the volt oil gage BUT tricky. The lettering isn’t printed inside of the transparency like the other one it. So to remove the red color once you get it all apart and separated you need to gently wipe the back of the transparency with lacquer thinner. Just until when you hold it to the light you can see white light through it. You might wipe away some of the lettering but you can touch it up with black paint. You will have to modify the clear plastic piece if your using an LED. But for filament and LED you will have to shave out the orangish part of the clear plastic piece that the light sits in.


I just had a thought. Try just removing the orangish color on the clear part and see if its still red or not. The stuff that I said to wipe off may just be light collecting material. This wont work for the volt and oil gage but here it might. I’m at work right now so I cant say for sure but try this. If you using an LED with the HVAC, to get it to light up just use the wires that were for the filament bulb. I used these same wire to light my volt and oil gage also because I was lazy.


Again, ill post pictures later.
Hope this kind of helps you guys.


------------------

IP: Logged
PFF
System Bot
85FieroGT3.4
Member
Posts: 242
From: Lancaster, CA
Registered: May 2007


Feedback score: (1)
Leave feedback

Rate this member

Report this Post08-29-2007 06:46 AM Click Here to See the Profile for 85FieroGT3.4Send a Private Message to 85FieroGT3.4Direct Link to This Post
Very cool man. Nice, original idea.

------------------
It'll run... Getting Closer
2.8 Parts for sale soon.

IP: Logged
pontiacman63383
Member
Posts: 819
From: warrenton, mo
Registered: Jun 2007


Feedback score: (1)
Leave feedback

Rate this member

Report this Post08-30-2007 01:52 PM Click Here to See the Profile for pontiacman63383Send a Private Message to pontiacman63383Direct Link to This Post
Thanks for the info, what about the garuge cluster have you tried to make those lights blue also? and if so how did you do it?

[This message has been edited by pontiacman63383 (edited 08-30-2007).]

IP: Logged
Chris Hodson
Member
Posts: 3099
From: Carpentersville
Registered: Aug 2006


Feedback score:    (6)
Leave feedback


Total ratings: 54
Rate this member

Report this Post08-30-2007 06:48 PM Click Here to See the Profile for Chris HodsonSend a Private Message to Chris HodsonDirect Link to This Post
For those i bought one of those indiglow inserts off of the internet. i think they look better than anything i could do there. Soo today ive just been drawing ideas for new console. Im goi to redo it ALL. Looking at what i have right now, it would be easy to build it out on the right hand side and put in a glove box. Doing something like with will give me a good place to hide my amp and possibly install more buttons, "i love buttons". ive got the ideas in my head i just have to get them all on paper, when i do you guys will be the first to see.

stay tuned
IP: Logged
shawnkfl
Member
Posts: 2457
From: Largo, Florida
Registered: Oct 2004


Feedback score:    (7)
Leave feedback


Total ratings: 72
Rate this member

Report this Post08-30-2007 09:41 PM Click Here to See the Profile for shawnkflSend a Private Message to shawnkflDirect Link to This Post
i really wan tot make my A/C controls blue like that. could you elaborate a bit more on that for the dummies like me?
IP: Logged
mtownfiero
Member
Posts: 1779
From: Mansfield, Mass
Registered: Mar 2007


Feedback score:    (6)
Leave feedback

Rate this member

Report this Post08-30-2007 09:59 PM Click Here to See the Profile for mtownfieroSend a Private Message to mtownfieroDirect Link to This Post
I am still in the process of making something like this based of fieromaniacs but with wood covered in vinyl like this one. Im glad someone did it first and got such a good response from it because i wasnt sure if others would think the look matched the original interior as much as i thought it did. Thanks again.
IP: Logged
Eclipse
Member
Posts: 2040
From: Woodstock, Ontario Canada
Registered: Jun 2004


Feedback score: N/A
Leave feedback

Rate this member

Report this Post08-31-2007 11:04 AM Click Here to See the Profile for EclipseSend a Private Message to EclipseDirect Link to This Post
Did I miss something? No Radio in your car?

------------------
Jay Brintnell
Southern Ontario Fiero Association
Yellow 85 Notchback(A.K.A. GodFearN)

The progress thread: https://www.fiero.nl/forum/Forum2/HTML/077740.html

IP: Logged
crytical point
Member
Posts: 569
From: sanford FL USA
Registered: Feb 2006


Feedback score: N/A
Leave feedback

Rate this member

Report this Post08-31-2007 04:35 PM Click Here to See the Profile for crytical pointSend a Private Message to crytical pointDirect Link to This Post
hey I noticed the stock fiero power window plate so can I suggest a set of 82-92 camaro/firebird power window switches for a cleaner look. They plug right into the fiero's wiring and with a dremel you can make a perfect hole for them to pop right in. If i didn't end up doing my floating dash and stand alone center console I would have done something like that.
IP: Logged
Austrian Import
Member
Posts: 3919
From: Monterey, CA
Registered: Feb 2007


Feedback score: N/A
Leave feedback

Rate this member

Report this Post08-31-2007 08:41 PM Click Here to See the Profile for Austrian ImportSend a Private Message to Austrian ImportDirect Link to This Post
 
quote
Originally posted by crytical point:
If i didn't end up doing my floating dash and stand alone center console I would have done something like that.


Floating dash?? Pictures please... Is it like the 2007 Volvo S80 dash, that I'm drawing inspiration from? I think that would be a cool setup in a fiero.

-M
IP: Logged
Chris Hodson
Member
Posts: 3099
From: Carpentersville
Registered: Aug 2006


Feedback score:    (6)
Leave feedback


Total ratings: 54
Rate this member

Report this Post09-01-2007 05:54 AM Click Here to See the Profile for Chris HodsonSend a Private Message to Chris HodsonDirect Link to This Post
yea, whats a floating dash? -- pics please! The radio will be somewhere else, im working on a new design. Much much better. Maybe i will sell templates that can be shipped in mail.
IP: Logged
Austrian Import
Member
Posts: 3919
From: Monterey, CA
Registered: Feb 2007


Feedback score: N/A
Leave feedback

Rate this member

Report this Post09-01-2007 09:31 PM Click Here to See the Profile for Austrian ImportSend a Private Message to Austrian ImportDirect Link to This Post
 
quote
Originally posted by Chris Hodson:

yea, whats a floating dash? -- pics please! The radio will be somewhere else, im working on a new design. Much much better. Maybe i will sell templates that can be shipped in mail.


I would love pics too.

Pictures for the aforementioned "floating center console" on the 2007 Volvo S80


Different Volvo This images is larger than 102400 bytes. Click to view.
IP: Logged
PFF
System Bot
Chris Hodson
Member
Posts: 3099
From: Carpentersville
Registered: Aug 2006


Feedback score:    (6)
Leave feedback


Total ratings: 54
Rate this member

Report this Post09-03-2007 01:43 AM Click Here to See the Profile for Chris HodsonSend a Private Message to Chris HodsonDirect Link to This Post
Thats very odd and foreign to me. i don't like it lol it creeps me out. I love the technology that is there though.
IP: Logged
Chris Hodson
Member
Posts: 3099
From: Carpentersville
Registered: Aug 2006


Feedback score:    (6)
Leave feedback


Total ratings: 54
Rate this member

Report this Post09-03-2007 01:45 AM Click Here to See the Profile for Chris HodsonSend a Private Message to Chris HodsonDirect Link to This Post

Chris Hodson

3099 posts
Member since Aug 2006
oh yea, forgot to mention i picked up some wood the other day. Im still in the drawing stage right now. Ill be making my templates here shortly and start some cutting.
IP: Logged
Chris Hodson
Member
Posts: 3099
From: Carpentersville
Registered: Aug 2006


Feedback score:    (6)
Leave feedback


Total ratings: 54
Rate this member

Report this Post02-15-2008 02:20 AM Click Here to See the Profile for Chris HodsonSend a Private Message to Chris HodsonDirect Link to This Post
ok, back to this project I finally found a place around here that sells nice vinyl. it looks like something that would be in a newer car, its black, not to shiny, more like leather if anything. I also got some of those round grand am vents. I think they will update the cars interior and be very functional. after i put this thing together i dont want any hard or 90 degree edges anywhere. So ill take the sander to it all.
I still want more buttons... im not sure what for yet but i want them. I saw a bonneville with alot of cool buttons i think im going to grab.
IP: Logged
Chris Hodson
Member
Posts: 3099
From: Carpentersville
Registered: Aug 2006


Feedback score:    (6)
Leave feedback


Total ratings: 54
Rate this member

Report this Post02-18-2008 02:36 AM Click Here to See the Profile for Chris HodsonSend a Private Message to Chris HodsonDirect Link to This Post
i didnt find any buttons yesterday but i found something else.... Im going to use the vents out of a 2001 mitsubishi eclips instead. They look alot more modern over the grand am vents. Also i found some cup holders! I dont know what they are from but they will work well. Ill post pics later.
IP: Logged
Chris Hodson
Member
Posts: 3099
From: Carpentersville
Registered: Aug 2006


Feedback score:    (6)
Leave feedback


Total ratings: 54
Rate this member

Report this Post02-18-2008 05:28 AM Click Here to See the Profile for Chris HodsonSend a Private Message to Chris HodsonDirect Link to This Post

Chris Hodson

3099 posts
Member since Aug 2006
Just found something cool i think ill use.

http://cgi.ebay.com/Univers...QQrdZ1QQcmdZViewItem

IP: Logged
americasfuture2k
Member
Posts: 7131
From: Edmond, Oklahoma
Registered: Jan 2006


Feedback score: (3)
Leave feedback


Total ratings: 105
Rate this member

Report this Post08-12-2008 10:24 AM Click Here to See the Profile for americasfuture2kSend a Private Message to americasfuture2kDirect Link to This Post
 
quote
Originally posted by Chris Hodson:

Just found something cool i think ill use.

http://cgi.ebay.com/Univers...QQrdZ1QQcmdZViewItem


what is that? a speedo? its blue light, so pretty........

------------------
1987 Fiero GT built by my brother, merlot566jka, 3500 LX9 from 06 Malibu, WOT-TECH.com 1280 grind stage 3 cam, LS6 valve springs, 1227730 ECM conversion, Darrel Morse solid aluminum cradle mounts, Truleo headers modified to fit the 3500, 36# inectors, 70mm 4.3 throttle body adapted to 3500 intake, ported heads, upper and lower intakes, lightly polished, tcemotorsports.com crank trigger wheel, CenterForce dual friction clutch, Flowtech Afterburner muffler, 2.5" piping, cat deleted, EGR deleted, SinisterPerformance tuning, C6 Corvette exhaust tips. projected to be 35 MPG with a guesstimate of 250 hp to the wheels

IP: Logged
Matthew_Fiero
Member
Posts: 2909
From: Canada
Registered: Aug 2001


Feedback score: (1)
Leave feedback


Total ratings: 50
Rate this member

Report this Post08-12-2008 02:52 PM Click Here to See the Profile for Matthew_FieroSend a Private Message to Matthew_FieroDirect Link to This Post
wow I want a volvo now, lol
IP: Logged


All times are ET (US)

T H I S   I S   A N   A R C H I V E D   T O P I C
  

Contact Us | Back To Main Page

Advertizing on PFF | Fiero Parts Vendors
PFF Merchandise | Fiero Gallery
Real-Time Chat | Fiero Related Auctions on eBay


Copyright (c) 1999, C. Pennock