Pennock's Fiero Forum
  Technical Discussion & Questions - Archive
  Bushing Removal Made Easy with pics

T H I S   I S   A N   A R C H I V E D   T O P I C
  

Email This Page to Someone! | Printable Version


Bushing Removal Made Easy with pics by Dave E Bouy
Started on: 01-03-2008 08:58 PM
Replies: 17
Last post by: White Spyder on 05-24-2008 07:45 AM
Dave E Bouy
Member
Posts: 1465
From: Kettle Point Ontario Canada
Registered: Sep 2004


Feedback score:    (6)
Leave feedback

Rate this member

Report this Post01-03-2008 08:58 PM Click Here to See the Profile for Dave E BouySend a Private Message to Dave E BouyDirect Link to This Post
Here's a hndy dandy way to remove control arm bushings

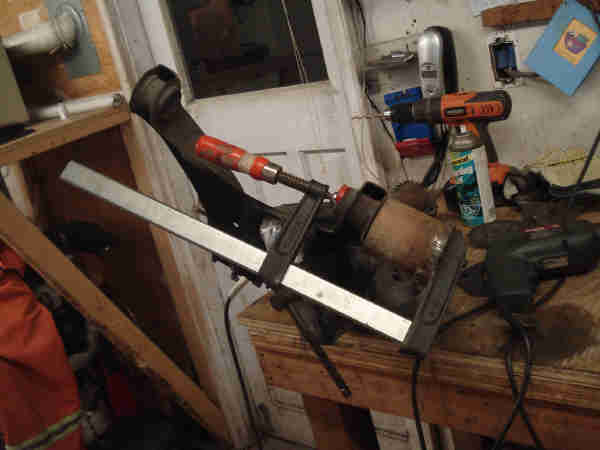
First I used a chunk of old pipe connector I had laying around.


Its 2 1/4 ID and 2 3/4 long. I then tack welded a chunk of sturdy plate to one end

I slip the open end of the pipe connector over the large end of the bushing to be removed and hook a C=clamp over the whole thing with the threaded end of the clamp at the small end of the bushing like so.


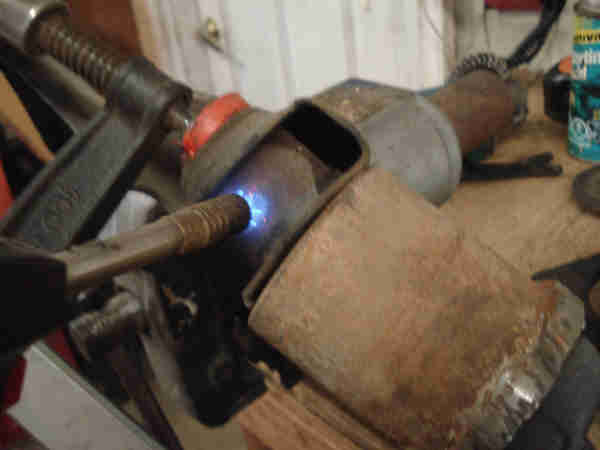
Next I start applying the heat to the outside sleeve of the bushing and as it heats up slowly start tightening the clamp a little at a time to keep pressure on the bushing. When the bushing sleeve is hot enough I just tighten the clamp all the way and the bushing easily pushes into the big pipe connector thing.


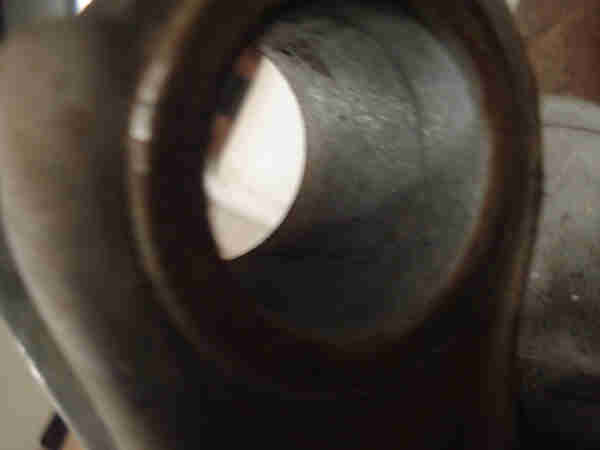
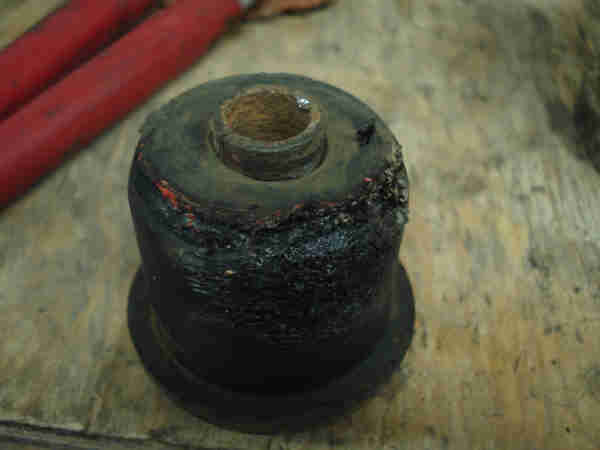
Leaving the bushing sleeve very nice and clean


The bushing itself hardly distorts at all


So there is very little smell and smoke. I have used this method to successfully remove the front cradle bushings too! Hope some of you guys find this useful too

Dave
IP: Logged
PFF
System Bot
slinger
Member
Posts: 1403
From: grand rapids MI
Registered: May 2006


Feedback score: (3)
Leave feedback

Rate this member

Report this Post01-03-2008 09:21 PM Click Here to See the Profile for slingerSend a Private Message to slingerDirect Link to This Post
i do i dont want to pay 25 bucks evey time i need one removed big thanks from me
IP: Logged
antinull.com
Member
Posts: 1631
From:
Registered: Oct 2006


Feedback score:    (11)
Leave feedback

Rate this member

Report this Post01-05-2008 11:40 AM Click Here to See the Profile for antinull.comSend a Private Message to antinull.comDirect Link to This Post
HEY thats awesome points for you!
i deff needed this info
bookmarked for when i have to remove bushings
just thinking i could probably even use a balljoint press to do the same thing!

[This message has been edited by antinull.com (edited 01-05-2008).]

IP: Logged
vortecfiero
Member
Posts: 996
From: Toronto Area, Canada
Registered: Feb 2002


Feedback score: (1)
Leave feedback


Total ratings: 57
Rate this member

Report this Post01-05-2008 12:25 PM Click Here to See the Profile for vortecfieroClick Here to visit vortecfiero's HomePageSend a Private Message to vortecfieroDirect Link to This Post
great idea !

------------------


87 Fiero GT 5sp with Vortec L35 4300 Turbocharged V6
Bully Stage 2 clutch
Syclone intake manifold and engine management with Moates adapter and chip burner
Air/water intercooler and Devil's Own progressive water/alky injection
50lb injectors, 3 bar map sensor, Walboro fuel pump and Jabasco Intercooler pump
LM1 wideband on custom manifolds and 3" stainless exhaust system
T31/T04B S4 turbo with a Super T61 in the box
S10 caliper conversion.
Murphy's Constant Matter will be damaged in direct proportion to its value
Murphy's Law of Thermodynamics Things get worse under pressure.
Arthur C. Clarke "Any significantly advanced technology is indistinguishable from magic"

IP: Logged
thismanyfieros
Member
Posts: 3468
From: Red Deer, alberta,canada
Registered: Dec 2002


Feedback score:    (15)
Leave feedback


Total ratings: 120
Rate this member

Report this Post01-05-2008 01:43 PM Click Here to See the Profile for thismanyfierosSend a Private Message to thismanyfierosDirect Link to This Post
kudos...smart idea....tim
IP: Logged
87_FieroGT
Member
Posts: 698
From: Mill Creek, WA USA
Registered: Jul 2005


Feedback score: (4)
Leave feedback

Rate this member

Report this Post01-05-2008 03:42 PM Click Here to See the Profile for 87_FieroGTSend a Private Message to 87_FieroGTDirect Link to This Post
Nice tip. + for you!

------------------

Visit my website!
Fieros West
David
2 Corinthians 5: 17
1987 Pontiac Fiero GT, 5 Speed
2006 Pontiac Grand Prix

IP: Logged
Synthesis
Member
Posts: 12207
From: Jordan, MN
Registered: Feb 2002


Feedback score:    (19)
Leave feedback


Total ratings: 294
Rate this member

Report this Post01-05-2008 11:28 PM Click Here to See the Profile for SynthesisSend a Private Message to SynthesisDirect Link to This Post
That is a great tip... Question though.. Why are you removing the Poly bushing? lol
IP: Logged
Ken_86gt
Member
Posts: 574
From: WILLIAMSBURG
Registered: Jan 2004


Feedback score: (1)
Leave feedback

Rate this member

Report this Post01-05-2008 11:39 PM Click Here to See the Profile for Ken_86gtSend a Private Message to Ken_86gtDirect Link to This Post
He didn't actually remove the poly, look again at what he removed. It appears to me that he was just using it as an example for the pictures.
IP: Logged
Synthesis
Member
Posts: 12207
From: Jordan, MN
Registered: Feb 2002


Feedback score:    (19)
Leave feedback


Total ratings: 294
Rate this member

Report this Post01-05-2008 11:44 PM Click Here to See the Profile for SynthesisSend a Private Message to SynthesisDirect Link to This Post
I see what you are saying, but look closer.. Rubber bushings don't have the flange that is shown on the bottom of that bushing in the last pic.

Also, the top "corner" of the bushings shows some red flecks, as if the burnt area has been knocked away..
IP: Logged
Fierology
Member
Posts: 1195
From: Eastern Tennessee
Registered: Dec 2006


Feedback score: (3)
Leave feedback

Rate this member

Report this Post01-06-2008 12:08 AM Click Here to See the Profile for FierologySend a Private Message to FierologyDirect Link to This Post
The red plastic face of the C-clamp looks like the red of the polys. I think that's what you see. maybe>>>?

Looks great. I did something similar w/ allthread a couple months ago. But I did it outside. My bushings started burning like a candle! I had to douse them.

------------------
"A guy know's he's in love when he loses interest in his car for a few days." -Tim Allen

IP: Logged
Dave E Bouy
Member
Posts: 1465
From: Kettle Point Ontario Canada
Registered: Sep 2004


Feedback score:    (6)
Leave feedback

Rate this member

Report this Post01-06-2008 12:00 PM Click Here to See the Profile for Dave E BouySend a Private Message to Dave E BouyDirect Link to This Post
 
quote
Originally posted by Fierology:

The red plastic face of the C-clamp looks like the red of the polys. I think that's what you see. maybe>>>?

Looks great. I did something similar w/ allthread a couple months ago. But I did it outside. My bushings started burning like a candle! I had to douse them.


yep thats the plastic face of the C-clamp and those were the old rubber bushings. If you check autozone they show the rubber bushing as having a flange

Dave
IP: Logged
PFF
System Bot
Mickey_Moose
Member
Posts: 7568
From: Edmonton, AB, Canada
Registered: May 2001


Feedback score: (3)
Leave feedback


Total ratings: 145
Rate this member

Report this Post01-06-2008 12:41 PM Click Here to See the Profile for Mickey_MooseSend a Private Message to Mickey_MooseDirect Link to This Post
When I did this, I never needed to use the clamp - the bushings popped out on thier own when the arm was heated.
IP: Logged
thismanyfieros
Member
Posts: 3468
From: Red Deer, alberta,canada
Registered: Dec 2002


Feedback score:    (15)
Leave feedback


Total ratings: 120
Rate this member

Report this Post01-06-2008 01:51 PM Click Here to See the Profile for thismanyfierosSend a Private Message to thismanyfierosDirect Link to This Post
lol sure tim sure....what color is the sky in your world....hehehe...
IP: Logged
Fieroking
Member
Posts: 2150
From: Coeur D Alene Idaho USA
Registered: Jun 2002


Feedback score:    (11)
Leave feedback


Total ratings: 78
Rate this member

Report this Post01-06-2008 06:10 PM Click Here to See the Profile for FierokingClick Here to visit Fieroking's HomePageSend a Private Message to FierokingDirect Link to This Post
I just use a propane torch to heat the metal spacer in the middle of the bushing once it is hot enough I push it out with a screw driver. Once the meat spacer is out the rubber part comes out with very little effort. I don't heat to arms at all, just the middle of the bushing.

Joe Sokol

------------------
85 SE Daily driver with a 3.4 DOHC build underway
88 Formula/GT 4.9 Allante Intake (My Baby)

IP: Logged
Mickey_Moose
Member
Posts: 7568
From: Edmonton, AB, Canada
Registered: May 2001


Feedback score: (3)
Leave feedback


Total ratings: 145
Rate this member

Report this Post01-08-2008 12:37 PM Click Here to See the Profile for Mickey_MooseSend a Private Message to Mickey_MooseDirect Link to This Post
 
quote
Originally posted by thismanyfieros:

lol sure tim sure....what color is the sky in your world....hehehe...


try it and see, I have, Givi did (he was the one to tell me), and many other people have (here is one instance - the 'search' functions brings up many): https://www.fiero.nl/forum/A...050818-2-059523.html

[This message has been edited by Mickey_Moose (edited 01-08-2008).]

IP: Logged
fieroguru
Member
Posts: 12454
From: Champaign, IL
Registered: Aug 2003


Feedback score:    (45)
Leave feedback


Total ratings: 259
Rate this member

Report this Post01-08-2008 06:19 PM Click Here to See the Profile for fieroguruSend a Private Message to fieroguruDirect Link to This Post
 
quote
Originally posted by Mickey_Moose:

When I did this, I never needed to use the clamp - the bushings popped out on thier own when the arm was heated.


Yes, this works like a charm. I just position the flame of the propane torch to the outer sleeve and let it cook. The rubber boils around the outer edge making it slippery and the compression of the bushing causes it to pop right out. The biggest issue is making sure the flaming bushing does not set the shop on fire when it pops out.

[This message has been edited by fieroguru (edited 01-08-2008).]

IP: Logged
Dave E Bouy
Member
Posts: 1465
From: Kettle Point Ontario Canada
Registered: Sep 2004


Feedback score:    (6)
Leave feedback

Rate this member

Report this Post03-08-2008 07:58 AM Click Here to See the Profile for Dave E BouySend a Private Message to Dave E BouyDirect Link to This Post
I have since refined my technique. I just drilled a 1/2 inch hole through the end plate of my handy dandy pipe connector. slip a 6 inch length of threaded 3/8 rod through both the bushing and the plate with washers and nuts at each end. Apply the heat like before and just tighten the nuts. Very easy, very clean, little smoke, little smell. No need to light them up and run like hell.

Dave
IP: Logged
White Spyder
Member
Posts: 1047
From: Gluckstadt USA
Registered: Sep 2007


Feedback score: (5)
Leave feedback

Rate this member

Report this Post05-24-2008 07:45 AM Click Here to See the Profile for White SpyderSend a Private Message to White SpyderDirect Link to This Post
I must have not been living right. I tried something similar with a 2 ton jack press and all I got wast the inner sleeve and very little rubber.
IP: Logged


All times are ET (US)

T H I S   I S   A N   A R C H I V E D   T O P I C
  

Contact Us | Back To Main Page

Advertizing on PFF | Fiero Parts Vendors
PFF Merchandise | Fiero Gallery
Real-Time Chat | Fiero Related Auctions on eBay


Copyright (c) 1999, C. Pennock