Pennock's Fiero Forum
  Technical Discussion & Questions - Archive
  Is there a way to bench test my gauges, and position the needles? Please help.

T H I S   I S   A N   A R C H I V E D   T O P I C
  

Email This Page to Someone! | Printable Version


Is there a way to bench test my gauges, and position the needles? Please help. by zmcdonal
Started on: 10-10-2010 12:39 AM
Replies: 8
Last post by: Bloozberry on 10-10-2010 07:55 PM
zmcdonal
Member
Posts: 1682
From: NW, Indiana
Registered: Oct 2005


Feedback score:    (9)
Leave feedback

Rate this member

Report this Post10-10-2010 12:39 AM Click Here to See the Profile for zmcdonalSend a Private Message to zmcdonalDirect Link to This Post
I have been working on a instrument cluster project, and I went to install the finished project tonight only to find that the oil gauge didn't seem to be working. Since it is a spare cluster, it would be nice if there were a way to bench test the gauges to make sure they work before I pull the dash apart again. Also it would be nice if there were some way to power up each gauge and be able to set the needle positions with it out of the car accurately. I attempted to position the needles tonight with it in the car and it's definitely not as easy as it seems, took a few tries to get them right. So I was very disappointed to find that the oil pressure gauge didn't work.

I am not the most knowledgeable with electrical stuff, so if you could be very specific so I know exactly what I need to have and what I need to do, and where to hook-up to on the circuit boards etc. it would be mostly appreciated, Thank you in advance.

I don't know if it makes any difference but my car is an V6 SE without the gauge pod, so the oil pressure gauge is in the tach, and I plan on using a 120 speedo in case that makes a difference.

------------------

IP: Logged
PFF
System Bot
phonedawgz
Member
Posts: 17091
From: Green Bay, WI USA
Registered: Dec 2009


Feedback score:    (23)
Leave feedback


Total ratings: 291
Rate this member

Report this Post10-10-2010 07:35 AM Click Here to See the Profile for phonedawgzClick Here to visit phonedawgz's HomePageSend a Private Message to phonedawgzDirect Link to This Post
How detailed do you need the instructions?

Power up the dash

Apply a resistance that should give an exact mid deflection reading and set the gauge to it

Here is a look up table for temp


Here is a thread on the fuel gauge
https://www.fiero.nl/forum/Forum2/HTML/092117.html

For the oil pressure gauge - use an 88 Ohm resistance to ground and set the needle to 80psi

[This message has been edited by phonedawgz (edited 10-10-2010).]

IP: Logged
Bloozberry
Member
Posts: 7760
From:
Registered: Jan 2009


Feedback score: N/A
Leave feedback


Total ratings: 311
Rate this member

Report this Post10-10-2010 09:21 AM Click Here to See the Profile for BloozberrySend a Private Message to BloozberryDirect Link to This Post
To be more specific, apply 12V to the pink/black wire that leads to the oil pressure gauge, ground the black wire and the tan wire to the negative terminal of the battery, but first place the 90 ohm resistor between the battery and the tan wire. The 90 ohm resistor should place the spindle all the way to the right.
IP: Logged
zmcdonal
Member
Posts: 1682
From: NW, Indiana
Registered: Oct 2005


Feedback score:    (9)
Leave feedback

Rate this member

Report this Post10-10-2010 12:28 PM Click Here to See the Profile for zmcdonalSend a Private Message to zmcdonalDirect Link to This Post
 
quote
Originally posted by Bloozberry:

To be more specific, apply 12V to the pink/black wire that leads to the oil pressure gauge, ground the black wire and the tan wire to the negative terminal of the battery, but first place the 90 ohm resistor between the battery and the tan wire. The 90 ohm resistor should place the spindle all the way to the right.


Awesome that's the kind of instruction I was hoping for. When you say all the way right, does that mean the needle at 80 or just peg the needle?

Any specific instructions with wire color and where to place the resistor to test and set the temp gauge? I just want to make sure that i'm doing it correctly. That would be awesome.
IP: Logged
phonedawgz
Member
Posts: 17091
From: Green Bay, WI USA
Registered: Dec 2009


Feedback score:    (23)
Leave feedback


Total ratings: 291
Rate this member

Report this Post10-10-2010 12:44 PM Click Here to See the Profile for phonedawgzClick Here to visit phonedawgz's HomePageSend a Private Message to phonedawgzDirect Link to This Post
90 Ohm = 80 psi

[This message has been edited by phonedawgz (edited 10-10-2010).]

IP: Logged
Bloozberry
Member
Posts: 7760
From:
Registered: Jan 2009


Feedback score: N/A
Leave feedback


Total ratings: 311
Rate this member

Report this Post10-10-2010 04:03 PM Click Here to See the Profile for BloozberrySend a Private Message to BloozberryDirect Link to This Post
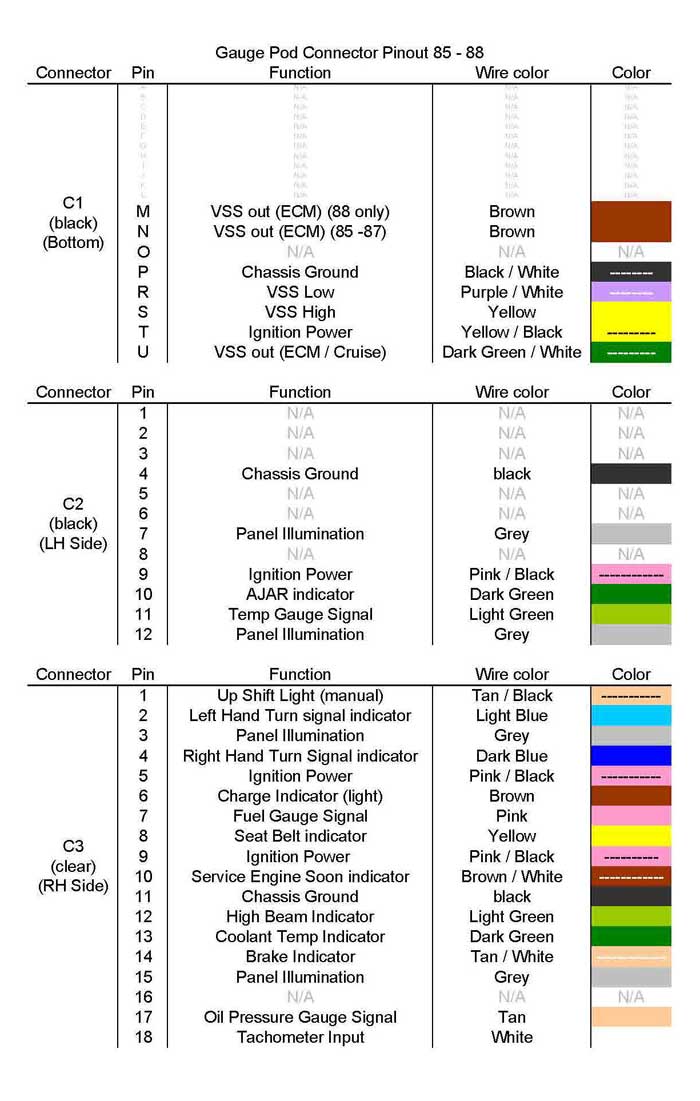
For the coolant temp gauge:

1. unplug connector C2 (the black 12 pin connector on the LH side) from the back of the instrument pod;
2. apply 12V to pin 9 (should be a pink/black wire);
3. ground pin 4 (should be a black wire) to the negative battery terminal; and
4*. ground pin 11 (should be lt green wire) placing whatever resistor you have handy between the neg battery terminal and the lt green wire;
5. look up in the table Phonedawgz first posted to see where the needle should point given the resistor value you chose and stick the needle on the gauge at the temperature that corresponds to that resistance.

*note that many cars by now have been fixed by their owners to prevent the water temp gauge from pegging to the right on bulb test. It was a fault from the factory. If your instrument panel has been modified, then the color of the wire leading to pin 11 will be dark green.
IP: Logged
zmcdonal
Member
Posts: 1682
From: NW, Indiana
Registered: Oct 2005


Feedback score:    (9)
Leave feedback

Rate this member

Report this Post10-10-2010 04:51 PM Click Here to See the Profile for zmcdonalSend a Private Message to zmcdonalDirect Link to This Post
Pluses to both of you, lots of help. It looks like I will need a 90 ohm resistor and a 145 ohm resistor to make things easy. I do not own a multimeter, any suggestion what stores would have these readily available? Do they even make 90 ohm and 145 ohm, it's been a while since my electronics class lol. Or would I need to buy a combination of resistors and wire them in a series?

Funny you should mention the temp gauge fix, that is one of the things I am addressing while the cluster is out.
IP: Logged
theogre
Member
Posts: 32520
From: USA
Registered: Mar 99


Feedback score: N/A
Leave feedback


Total ratings: 572
Rate this member

Report this Post10-10-2010 05:02 PM Click Here to See the Profile for theogreClick Here to visit theogre's HomePageSend a Private Message to theogreDirect Link to This Post
see also http://www.fieros.de/en/main.html
speedo and RPM test

------------------
Dr. Ian Malcolm: Yeah, but your scientists were so preoccupied with whether or not they could, they didn't stop to think if they should.
(Jurassic Park)


The Ogre's Fiero Cave (It's also at the top and bottom of every forum page...)

IP: Logged
Bloozberry
Member
Posts: 7760
From:
Registered: Jan 2009


Feedback score: N/A
Leave feedback


Total ratings: 311
Rate this member

Report this Post10-10-2010 07:55 PM Click Here to See the Profile for BloozberrySend a Private Message to BloozberryDirect Link to This Post
You can try Radio Shack, I believe they still sell discrete components. Look for a variable resistor in the right range... it'll be a tiny rotary dial that you turn with a jeweler's screw driver. That way you can test both circuits with the one resistor set to whatever resistance you need.

Edit: they're also called potentiometer's.

[This message has been edited by Bloozberry (edited 10-10-2010).]

IP: Logged


All times are ET (US)

T H I S   I S   A N   A R C H I V E D   T O P I C
  

Contact Us | Back To Main Page

Advertizing on PFF | Fiero Parts Vendors
PFF Merchandise | Fiero Gallery
Real-Time Chat | Fiero Related Auctions on eBay


Copyright (c) 1999, C. Pennock