I want to swap over my decklid release button but I don't know what the relay looks like. I'm not even sure where to look. In my search I found mention that it is to the right of the steering column but I also read that it was on the passenger side. I don't know if that meant "passenger side" of the steering column or right side of the console. Any help? Both cars are '87 notchie 5-speeds but one is a Duke and one a V6.
Jonathan
IP: Logged
12:16 PM
PFF
System Bot
Indiana_resto_guy Member
Posts: 7158 From: Shelbyville, IN USA Registered: Jul 2000
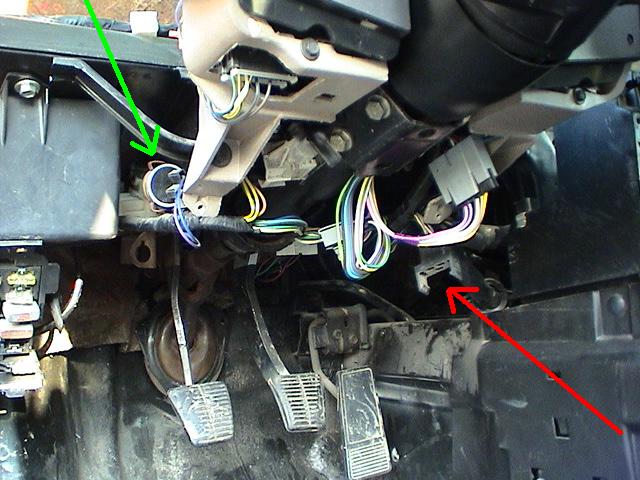
Ok, the connector at the red arrow is the one that attaches to the button in the faceplate, correct? I have read that all Fieros came from the factory with the wiring for this switch. Does that mean that all Fieros also had that connector and it is just waiting behind the faceplate or do I need the connector too?
Same question for the relay. Do I need to cut the connector out of the wiring harness to transplant into my other car or should it have it already? I know that sounds dumb but only the donor cars are here and the receiving car is 150 miles away being worked on at Rob's Fieros.
Thanks, Jonathan
IP: Logged
06:58 PM
Oct 26th, 2009
jscott1 Member
Posts: 21676 From: Houston, TX , USA Registered: Dec 2001
Ok, the connector at the red arrow is the one that attaches to the button in the faceplate, correct? I have read that all Fieros came from the factory with the wiring for this switch. Does that mean that all Fieros also had that connector and it is just waiting behind the faceplate or do I need the connector too?
Same question for the relay. Do I need to cut the connector out of the wiring harness to transplant into my other car or should it have it already?
Thanks, Jonathan
No.
The arrow is pointing to where the relay plugs in, it should be in all Fieros. The connector for the button in the faceplate should already be on the harness too, but on my 88 I could not access it without removing the dash, (it was wedged up under dash and inaccessible).
IP: Logged
12:44 PM
josef644 Member
Posts: 6939 From: Dickinson, Texas USA Registered: Nov 2006
I've got mine torn apart and that is where the switch connector is hanging. I thought it looked different but I thought it might have been the lighting or angle. My relay ( the silver cylinder by the column ) is connected by a very short connector and wire. The rest is taped up inside the wiring bundle. Do I cut the tape open and remove that whole section or do I have something different going on?
Thanks for the help, I know I have to be spoon fed. Jonathan
[This message has been edited by Boostdreamer (edited 10-26-2009).]
IP: Logged
01:01 PM
jscott1 Member
Posts: 21676 From: Houston, TX , USA Registered: Dec 2001
My relay ( the silver cylinder by the column ) is connected by a very short connector and wire. The rest is taped up inside the wiring bundle. Do I cut the tape open and remove that whole section or do I have something different going on?
Thanks for the help, I know I have to be spoon fed. Jonathan
That silver cylindrical relay is not the decklid release relay. It's rectangular like the one in the picture.
IP: Logged
03:28 PM
Indiana_resto_guy Member
Posts: 7158 From: Shelbyville, IN USA Registered: Jul 2000
The silver thing that your seeing in the emergency light flasher. It is a HD flasher which is to say it flashes more lights than the turn signal does.
Alright, I've got that straight. Stupid green arrow! LOL I found my relay now, too. Mine isn't white, it's black (and for some reason, it looks smaller) LOL!
Anyway, I think I've pulled what I need. Thanks to all for information, pictures, and patience.
Jonathan
IP: Logged
04:49 PM
qwikgta Member
Posts: 4670 From: Virginia Beach, VA Registered: Jan 2001
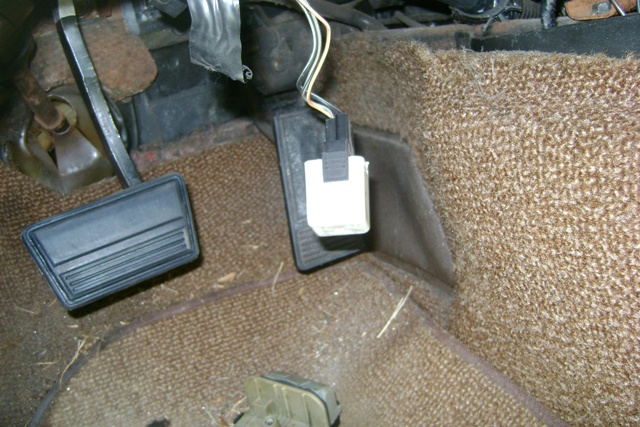
I just did this, this last weekend. Mine looked just like the one in the photo. Get the relay, install it, check that you have 12v power at the switch, at the relay when the button is pushed and finally check for 12v at the trunk when pushed. these are the only three places that it can go wrong. In my case I had a bad switch. So I used one off a newer GM car, the small square one that shows the sideview of the car with the trunk up.
When you finish it or if someone has one can you post a pic of how the latch and everything looks cuz i really need a push button on my Formula
I'll take pictures as I go and do a write-up when I'm done. I'll need someone to post the pics here for me, though. There is a good thread I found in the search that has a picture of the solinoid and the latch and how they fit together. I think I searched for "trunk release" or "decklid popper".
This is what the solenoid looks like. You can pick one up at any salvage yard without buying the entire rear latch. It's only held on with one screw (10mm head)
To install it on a non power latch, you have to open up the little window on the latch mechanism like this:
And then install it with the screw, run the one wire to it and you're done!:
IP: Logged
07:41 PM
buddycraigg Member
Posts: 13615 From: kansas city, mo Registered: Jul 2002
When you get a solenoid on a car without the trunk release do you have to run wires from front to back or are they already there and it just plugs in?
When I did mine, I had to run the wire that goes through the deck lid. The wire that runs from the front of the car is already near the fire wall. To get the wire through the deck lid, I tied a piece of fishing line to a nut then used a strong magnet on the underside of the deck lid to pull the nut through the inside of the lid. After the nut was through, I tied the fishing line to the wire and pulled it through also. Then connect the wire at the fire wall and solenoid and you are good to go!
I wanted to resurrect this thread because I am moving on to the next issue with my 88 Formula...
I pulled the switch and checked it with my multimeter and it checks out good. However, I noticed that two of the wires for the switch light were disconnected from the connector and taped together.
After removing the bottom cover, I located the lid relay connector which is empty. I found that the wires from the lid switch (yellow/black and gray/black if I remember correctly) were cut and spliced into a blue wire that is not part of the original wiring. One end tapped into the orange wire from the courtesy light fuse, and the other end leading into the center console towards the rear of the car.
I haven't removed the center console to do some further tracing because of time, but I did go back to the decklid and found that the solenoid is still connected to a black wire and that wire goes directly into the firewall via the deck and a black tube. So it looks like nothing was modified there.
I'm going to remove the center console tomorrow to try and see where the blue wire terminates or how it was connected to the black wire, but I am speculating that the person that did this was trying to bypass the relay.
Is there a link to a wiring diagram for this circuit posted somewhere? I would like to get the relay and restore the original wiring. Right now, the lid doesn't open from the inside.
Thanks!
IP: Logged
02:24 PM
phonedawgz Member
Posts: 17091 From: Green Bay, WI USA Registered: Dec 2009
thanks to this thread i finally found this relay .took it of and tested it and it worked .but the switch still would not activate the relay .so i ran a jumper from the centre contact on the socket to the black wire with the white stripe contact on the socket and now the switch does all the work and my trunk popper works for the first time in 5 years .you do not need the relay .it may make your switch last longer but it is a bigger source of trouble .thanks for the pic of the relay .


 However, I noticed that two of the wires for the switch light were disconnected from the connector and taped together.


