Pennock's Fiero Forum
  General Fiero Chat - Archive
  ~Dual Heads Up Display (HUD) by ~Mister~ (Page 1)

T H I S   I S   A N   A R C H I V E D   T O P I C
  

Email This Page to Someone! | Printable Version

This topic is 2 pages long:  1   2 
Previous Page | Next Page
~Dual Heads Up Display (HUD) by ~Mister~ by Mister
Started on: 04-01-2007 01:58 AM
Replies: 46
Last post by: Mister on 12-21-2008 11:31 PM
Mister
Member
Posts: 1975
From: Calgary, Alberta, Canada
Registered: Aug 2004


Feedback score: (2)
Leave feedback


Total ratings: 56
Rate this member

Report this Post04-01-2007 01:58 AM Click Here to See the Profile for MisterSend a Private Message to MisterDirect Link to This Post
Intro... Every project start with a good idea, and some PFF research

Search Heads up display as subject on PFF
Search HUD as subject on PFF

Credit is given where credit is due
This is not an original idea (what is?) there are a few HUD setups on Fieros out there,
On this setup I’ve combined a simple HUD idea that was made and offered for sale here by Riceburner98.

Original idea by Oliver Scholz and Riceburner98
http://www.fieros.de/en/projects/hud.html
https://www.fiero.nl/forum/A...031229-1-024240.html


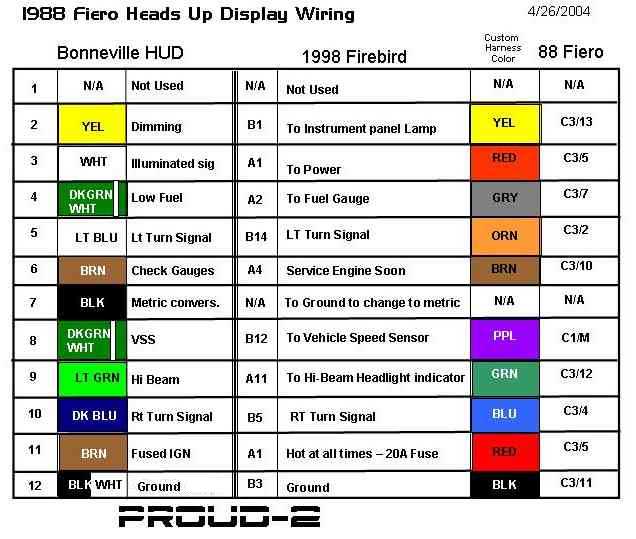
The wiring credit is given to jscott1 and other good PFF’ers that contributed


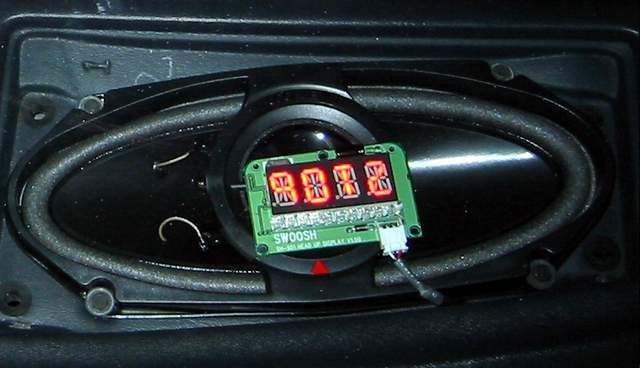
~ Though I’ve installed my setup awhile back, PaulJK have posted a similar “Swoosh” unit setup Apr 2006 Heads Up Display Install

He said...

 
quote
Originally posted by PaulJK:I wish the unit would display BOTH speedo and tach at the same time (either above and below or side-by-side)"


So… I'll pick it up from that thought…

~~~~~~~~~~~~~~~~~~~~~~~~~~~

~ Idea: A dual HUD, visually consistent with the stock speed and tach gages, Display of both important figures together, Red display to follow the Fiero’s stock display colors. Concealed Shift light.

~ Concept: I try to keep my Fiero as close as possible to the original stock look, all upgrades are made the “stealth” way, hidden or merged with the original look of the Fiero. I’ve made an effort to conceal the HUD units in the Fiero dash (it sacrifices reflection result a bit)

~Parts:
- Electrical wires, wire taping clips
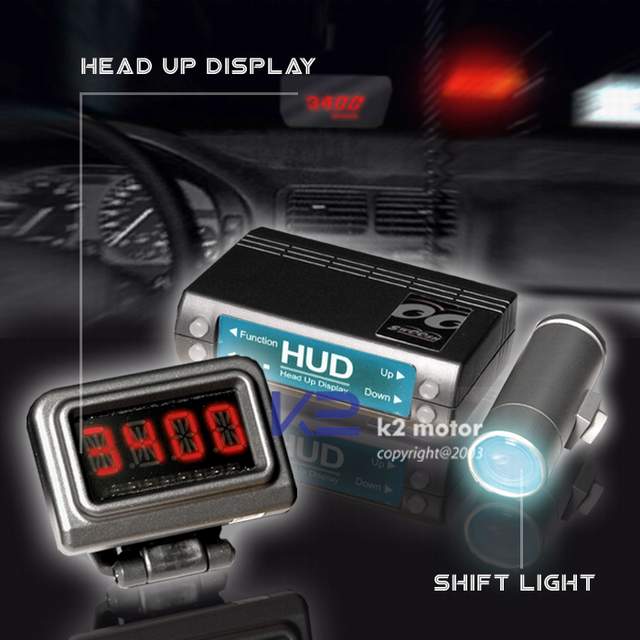
- 2 HUD units bought directly from Unshun Internationl Co. LTD. in Taiwan, Cost was $174US shipped

Item Name: HUD
Item No.: SW-HUD-2.0
Description:
Different display models to choose from (simultaneous detection of Speed and RPM) :
1. Speed + Speed (display+ running light)
2. Speed + RPM (display+ running light)
3. RPM + RPM (display+ running light)
4. RPM + Speed (display+ running light)
• Set up over speed warning
• Set up RPM-over speed warning
• Peak speed record / read / clear functions
• Peak RPM record / read / clear functions
• Over speed / RPM-over speed warning light’s flashing feature
• Over speed / RPM-over speed buzzer’s warning feature
• Screen’s brightness is adjustable ( 2 models : Day / Night )
• Remote control operated ( has copy-protection function )

In the box:


A few words on the HUD unit I got. This is a universal HUD and in my opinion is a “grade B” product, it’s not extremely accurate nor is it made for “professional” applications.
By that I mean that even with calibration done, I was not able to reach perfect accuracy on speed display and since the speed reading is very sensitive the display jitters between speed values.

You might be able to get similar units somewhere else or build one yourself if you have the time and knowledge. I just wanted it to work

~ Tools:
Wire cutters, Solder, 3rd hand tool (really helps with soldering, and holding one’s beer),Insulation tape.

~ First of all, The Wiring:
1. Using the info in the links above (and depending on model year) find the wires for
VSS, Tach, Power, Ignition power, Ground and Lights Dimmer
Use proper soldering and insulation on all wires
2. Connect tach sensor to HUD units
3. Connect speed sensor (VSS) to HUD units
4. Connect Ignition controlled (+) power and (-) ground to HUD units
5. Test units

~ Before we set the unit in place, lets clear something about regular HUDs
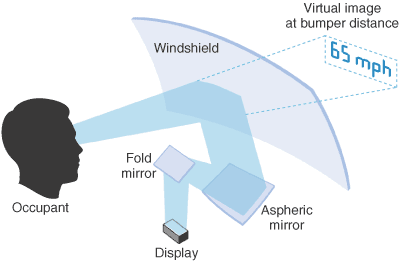
One fact I didn’t know about HUDs (total misconception). A HUD unit is not projection It’s only a reflection of the display on your windshield, this leads to the following problems:
1. Restricts the installation location for the 2 display units to achieve a good reflection spot.
2. Double image (windshield has two reflecting layers)
3. The dash and display unit themselves reflects in the daytime
4. If you use polarized sunglasses…they are designed to dramatically cut glare and light shining from straight surfaces…just like your windshield. You’ll see 50% less HUD reflection wearing polarized.

In the pics below you can see the reflection result when placing the display units in the “expected easy place” behind the gages cluster.


The display is not straight with the horizon line, too high and distracting


In regards to problem #1 the location:
Why go to all the trouble of hiding the display units in the dash you ask ???
Well, it’s the only place that provides a good location for the HUD reflection to be in line of sight. (from my point of view) while keeping the units hidden from eyes sight. Proper Installation location result would be - 2 horizon line parallel images slightly under your line of sight and to the sides.

Note 1: It could be easier to do this project with the dash apart, however you have to test the display on the windshield for final positioning, and this has to be done with the dash in place.

Note 2: In order to accommodate the tight fit of the display units in the dash, I’ve disassembled these units from their original cases and used duck-tape to protect the display units components.

~ Tach (right) display install:
1. Remove left dash speaker, this will allow access to the windshield vent.
2. Reach into the dash and remove the corner of the insulation foam from the vent left side.
3. Slide the display unit into the gap and position properly. Unit will seat in place just by the pressure of the dash. (From my experience the unit does not interfere with vent operation.
4. Run connector wires to bottom of dash
5. You’ll have to connect this unit and test the display before completely closing the dash.


~ Speed (left) display install:
This unit should sit where your left speaker is, depending on the type of speaker you have this installation will vary.
1. The unit simply sites with double sided tape on the twitter bridge.
2. Run wires accordingly to bottom of dash. (a small trim is required in the dash material next to the speaker)
3. You’ll need to modify the speaker cover to accommodate the unit depending on the unit’s location below. (for the audiophiles, I haven’t noticed any significant effect in this speaker sound output)


~ Speaker Cover HUD Window:
Create a clear plastic window in the speaker grill.
1. Cut a proper rectangular opening in the plastic grill.
2. Glue the thin clear plastic piece as a window below and on top of the gill fabric.


~ HUD Data Calibration:
A Simple yet important process explained in the units instruction, it’s intended to “teach” the HUD chip exactly what your sensors are sending in terms of decoding voltage values into numbers.
Tach is fairly accurate, however speed does not follow the Fiero speed gage perfectly.

After reaching the desired display and data calibration you can mount the control unit/s under the dash with a few zip-ties.

~ Concealed Shift light - Optional and recommended.
The HUD unit purchased has a shift light option built in. (with optional audio warning)
I’ve decided to use this function and install the 2 Shift warning Lights behind the Fiero gauges cluster.
At the preprogrammed RPM figure, these lights start flashing behind the gauges cover.

Installation of the bulbs with hot glue


SHIFT!!!
(In the pic the 'Ajar' is on)


15sec video file of the shift light, set to trigger @ 2000 RPM (for testing).

~ Final result: In my opinion, it’s a cool, useful upgrade, I love the way you can look straight up and have the road in front of you, with both displays besides of your focal point.
For day use, brightness set to 255 and is visible aside from direct sunshine conditions.
For night use, brightness set to 55 and looks great.

Results…


Suggestions and comments are always welcome, please share your own similar projects.

Good luck, and enjoy the drive

***Disclaimer: This is an amateur write-up of my ideas. Information here is provided for explanation of the general idea, I’m not a car mechanic / electrician nor will I’ll be held responsible for any damage to your car, electrical components, your garage going in a blaze or destruction of your marriage life Please use at your own risk - Thanks.***

------------------

[This message has been edited by Mister (edited 04-01-2007).]

IP: Logged
PFF
System Bot
Austrian Import
Member
Posts: 3919
From: Monterey, CA
Registered: Feb 2007


Feedback score: N/A
Leave feedback

Rate this member

Report this Post04-01-2007 02:10 AM Click Here to See the Profile for Austrian ImportSend a Private Message to Austrian ImportDirect Link to This Post
Cool, awesome!!!!

I wanted to do something like that for a looooong time. I found an old website outlining how to do it (included how to make the basic stamp from scratch), but I was stuck on some details, and I couldn't find help with it since the email links were so old they were dead.

I'd really like the rpm gauge to be analog, as fast changing info is easier to read analog. (which is another reason the project was on ice)

-M

[This message has been edited by Austrian Import (edited 04-01-2007).]

IP: Logged
Chris Hodson
Member
Posts: 3099
From: Carpentersville
Registered: Aug 2006


Feedback score:    (6)
Leave feedback


Total ratings: 54
Rate this member

Report this Post04-01-2007 02:16 AM Click Here to See the Profile for Chris HodsonSend a Private Message to Chris HodsonDirect Link to This Post
Heres my project....


------------------

IP: Logged
jscott1
Member
Posts: 21676
From: Houston, TX , USA
Registered: Dec 2001


Feedback score:    (15)
Leave feedback


Total ratings: 415
Rate this member

Report this Post04-01-2007 02:36 AM Click Here to See the Profile for jscott1Send a Private Message to jscott1Direct Link to This Post
Very cool mod, and functional too.

I like the way you lay out your objective and then measure the results at the end. Very scientific.

IP: Logged
blackrams
Member
Posts: 32428
From: Covington, TN, USA
Registered: Feb 2003


Feedback score:    (9)
Leave feedback


Total ratings: 229
Rate this member

Report this Post04-01-2007 11:24 AM Click Here to See the Profile for blackramsSend a Private Message to blackramsDirect Link to This Post
Excellent write up and cool project, + for sharing.

Your disclaimer has convinced me not to attempt this project. I can see where all the bad things will follow if I attempted this and since you won't take the blame, I guess it won't get done. Thanks for posting.

------------------
Ron
Land of the Free because of the Brave. Most gave some, some gave all. Some ran the other way.

[This message has been edited by blackrams (edited 04-01-2007).]

IP: Logged
BrewCheese
Member
Posts: 1809
From: NW Indiana
Registered: Feb 2003


Feedback score: (5)
Leave feedback

Rate this member

Report this Post04-01-2007 04:04 PM Click Here to See the Profile for BrewCheeseSend a Private Message to BrewCheeseDirect Link to This Post
Very Cool! Love the way you concelied it to keep the stock look.

Thanks for the info,
Jason
IP: Logged
Fierofreak00
Member
Posts: 4221
From: Martville, NY USA
Registered: Jun 2001


Feedback score:    (20)
Leave feedback


Total ratings: 170
Rate this member

Report this Post04-01-2007 06:06 PM Click Here to See the Profile for Fierofreak00Send a Private Message to Fierofreak00Direct Link to This Post
 
quote
Originally posted by Chris Hodson:

Heres my project....


Spill the beans!

IP: Logged
Mister
Member
Posts: 1975
From: Calgary, Alberta, Canada
Registered: Aug 2004


Feedback score: (2)
Leave feedback


Total ratings: 56
Rate this member

Report this Post04-02-2007 10:51 PM Click Here to See the Profile for MisterSend a Private Message to MisterDirect Link to This Post
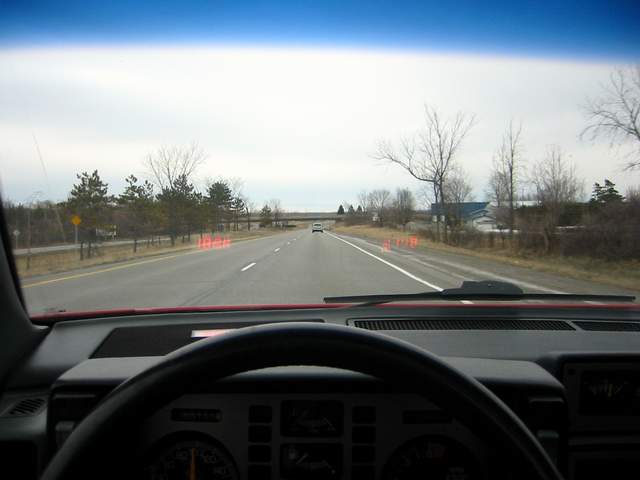
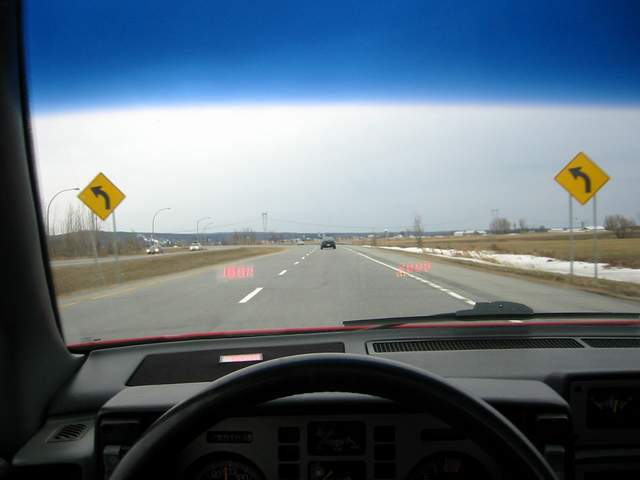
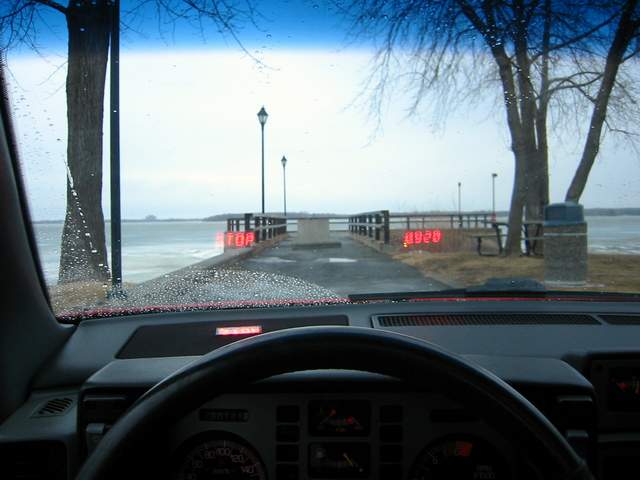
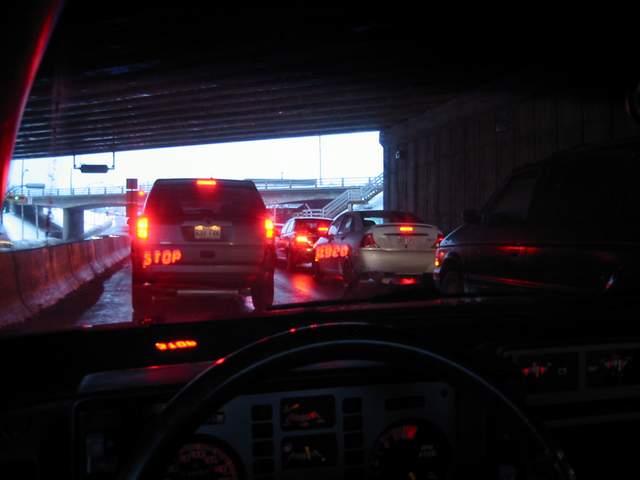
Some driver view shots...


------------------

IP: Logged
RCR
Member
Posts: 4416
From: Shelby Twp Mi
Registered: Sep 2002


Feedback score:    (7)
Leave feedback


Total ratings: 102
Rate this member

Report this Post04-03-2007 07:28 AM Click Here to See the Profile for RCRSend a Private Message to RCRDirect Link to This Post
That's a cool project and a nice write-up, but am I missing why you have "STOP"? Don't you know when you hit the brakes?

Bob
IP: Logged
THE BEAST
Member
Posts: 1177
From: PORT SAINT LUCIE,FLORIDA,USA
Registered: Dec 2000


Feedback score: N/A
Leave feedback

Rate this member

Report this Post04-03-2007 12:30 PM Click Here to See the Profile for THE BEASTSend a Private Message to THE BEASTDirect Link to This Post
 
quote
Originally posted by Mister:

Some driver view shots...


Can you tell me if the tack is limited on how high the rpm can be displayed ? I need a tack that can show up to 8200 rpm, and I like when things stay mostly stock, like yours

Thanks,
JG
IP: Logged
flames4me
Member
Posts: 915
From: Woodbury MN / Hammond WI
Registered: Jun 2005


Feedback score: (1)
Leave feedback

Rate this member

Report this Post04-03-2007 01:50 PM Click Here to See the Profile for flames4meSend a Private Message to flames4meDirect Link to This Post
 
quote
Originally posted by RCR:

That's a cool project and a nice write-up, but am I missing why you have "STOP"? Don't you know when you hit the brakes?

Bob


I had the same question. does the STOP ever go away?

------------------
1986 Silver 5 speed Fiero 3.4 DOHC
Bored .30, Fully balanced and blueprinted
13.93@101mph as it is on the street.
... ... !
350ci 400hp/tq SBC, 4 bolt main
Spec Stage 3, Nitrous Oxide, many extras.
87 GT 5-speed Getrag, power everything.

IP: Logged
PFF
System Bot
Mister
Member
Posts: 1975
From: Calgary, Alberta, Canada
Registered: Aug 2004


Feedback score: (2)
Leave feedback


Total ratings: 56
Rate this member

Report this Post04-03-2007 05:33 PM Click Here to See the Profile for MisterSend a Private Message to MisterDirect Link to This Post
 
quote
Originally posted by blackrams: Your disclaimer has convinced me not to attempt this project. I can see where all the bad things will follow if I attempted this and since you won't take the blame, I guess it won't get done.


LOL, it's not that hard, just some hardware and wires. If I was able to do it with some online reading. Anyone can.

 
quote
Originally posted by RCR: am I missing why you have "STOP"? Don't you know when you hit the brakes? Bob


Hey Bob, the "STOP" is there instead of the 0 Km/h speed.
If we've been into Mercedes S class, some of those have radar controlled cruise control, The Benz cruises on its own, keeping a safe distance…And STOPS on its own as well.

 
quote
Originally posted by THE BEAST: Can you tell me if the tack is limited on how high the rpm can be displayed ? I need a tack that can show up to 8200 rpm, and I like when things stay mostly stock, like yours Thanks, JG


To my knowledge, it will go up to 9999…(and then probably explode LOL)
As I mentioned it looks very nice, but I wouldn't trust this in professional applications.

 
quote
Originally posted by flames4me:I had the same question. does the STOP ever go away?


Yep, when you start going…

[This message has been edited by Mister (edited 04-03-2007).]

IP: Logged
Mister
Member
Posts: 1975
From: Calgary, Alberta, Canada
Registered: Aug 2004


Feedback score: (2)
Leave feedback


Total ratings: 56
Rate this member

Report this Post04-29-2007 09:18 AM Click Here to See the Profile for MisterSend a Private Message to MisterDirect Link to This Post
Hmmm, this might be an interesting addition


Thanks Cliff for posting https://www.fiero.nl/forum/Forum1/HTML/065079.html

------------------

IP: Logged
doublec4
Member
Posts: 8289
From: Oakville, Ontario, Canada
Registered: Jun 2003


Feedback score:    (20)
Leave feedback


Total ratings: 150
Rate this member

Report this Post04-29-2007 11:58 AM Click Here to See the Profile for doublec4Send a Private Message to doublec4Direct Link to This Post
This is really awesome Tal, you got some original ideas brewing... I like it!

------------------

IP: Logged
Vonov
Member
Posts: 3745
From: Nashville,TN,USA
Registered: May 2004


Feedback score: N/A
Leave feedback


Total ratings: 84
Rate this member

Report this Post04-29-2007 08:11 PM Click Here to See the Profile for VonovSend a Private Message to VonovDirect Link to This Post
Nice work. I got my very first look at a factory HUD this weekend in Jeremy's Corvette. Now I want one (HUD).
Edit: Well, yeah, I want a Vette, too, but I'm as likely to get that as I am to get a date with Natalie Portman...(it is to laugh!)

[This message has been edited by Vonov (edited 04-29-2007).]

IP: Logged
FieroRumor
Member
Posts: 35007
From: New York
Registered: Dec 2001


Feedback score: (2)
Leave feedback


Total ratings: 348
Rate this member

Report this Post04-30-2007 12:07 AM Click Here to See the Profile for FieroRumorClick Here to visit FieroRumor's HomePageSend a Private Message to FieroRumorDirect Link to This Post
Nice MOD!
IP: Logged
Vonov
Member
Posts: 3745
From: Nashville,TN,USA
Registered: May 2004


Feedback score: N/A
Leave feedback


Total ratings: 84
Rate this member

Report this Post05-02-2007 03:39 PM Click Here to See the Profile for VonovSend a Private Message to VonovDirect Link to This Post
I just snagged a 97-00 Corvette HUD for about 80 bucks on eBay...two guys were into a bidding war...I waited till they quit going back and forth, and slipped my bid in during the last few minutes of the auction. Think it went somewhat cheaper than most because of damage to the mounting tabs.
Once I receive it, I'll be referring back to this thread for connection info while I fab a mount pod for the display unit.
IP: Logged
Mister
Member
Posts: 1975
From: Calgary, Alberta, Canada
Registered: Aug 2004


Feedback score: (2)
Leave feedback


Total ratings: 56
Rate this member

Report this Post05-28-2007 07:12 PM Click Here to See the Profile for MisterSend a Private Message to MisterDirect Link to This Post
Heads up!
IP: Logged
Mister
Member
Posts: 1975
From: Calgary, Alberta, Canada
Registered: Aug 2004


Feedback score: (2)
Leave feedback


Total ratings: 56
Rate this member

Report this Post07-10-2007 01:59 PM Click Here to See the Profile for MisterSend a Private Message to MisterDirect Link to This Post
These universal HUD units are available on eBay again (in the U.S.)
Please read full install thread before buying it

http://search.stores.ebay.c...selZ29235579QQsofpZ0

------------------

[This message has been edited by Mister (edited 07-10-2007).]

IP: Logged
AP2k
Member
Posts: 2408
From:
Registered: May 2006


Feedback score: N/A
Leave feedback

Rate this member

Report this Post07-10-2007 02:33 PM Click Here to See the Profile for AP2kSend a Private Message to AP2kDirect Link to This Post
Can you post a closeup of the cases for the displays?

I've got some source for a dot-matrix controller that can display straight digital (like most all LED displays), antialiased characters, and can negate the LEDs so the numbers are unlit and the rest is lit. (should help visibility during the day)
IP: Logged
Mister
Member
Posts: 1975
From: Calgary, Alberta, Canada
Registered: Aug 2004


Feedback score: (2)
Leave feedback


Total ratings: 56
Rate this member

Report this Post07-10-2007 03:11 PM Click Here to See the Profile for MisterSend a Private Message to MisterDirect Link to This Post
 
quote
Originally posted by AP2k: Can you post a closeup of the cases for the displays?

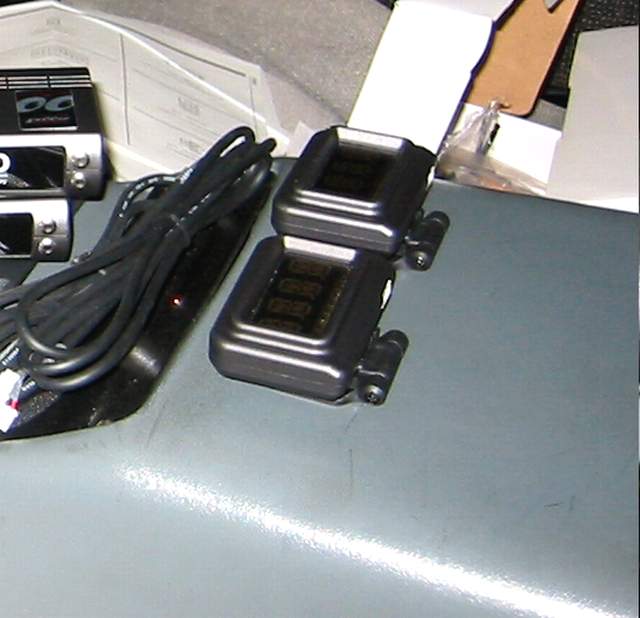
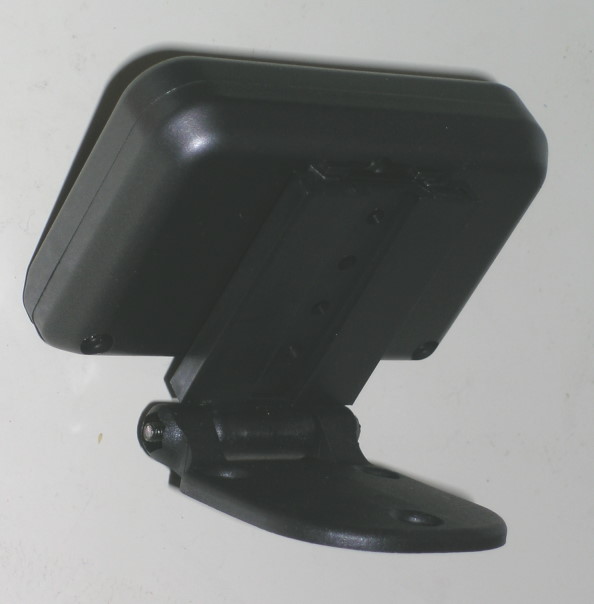
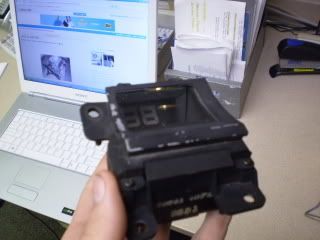
Are these pics good?

I actually didn't need the cases at all, as they won't fit my setup and the tint on the case reduced the brightness.
I just places the electronic board as is protected with some duck-tape


Pic from PaulJK's thread

[This message has been edited by Mister (edited 07-10-2007).]

IP: Logged
PFF
System Bot
AP2k
Member
Posts: 2408
From:
Registered: May 2006


Feedback score: N/A
Leave feedback

Rate this member

Report this Post07-10-2007 03:19 PM Click Here to See the Profile for AP2kSend a Private Message to AP2kDirect Link to This Post
Ok, I was wondering about how large the circuit boards are and how they were packaged. I see that the controller is external, so they cheat a bit.
IP: Logged
Mister
Member
Posts: 1975
From: Calgary, Alberta, Canada
Registered: Aug 2004


Feedback score: (2)
Leave feedback


Total ratings: 56
Rate this member

Report this Post07-10-2007 03:51 PM Click Here to See the Profile for MisterSend a Private Message to MisterDirect Link to This Post
 
quote
Originally posted by AP2k: how large the circuit boards are and how they were packaged.


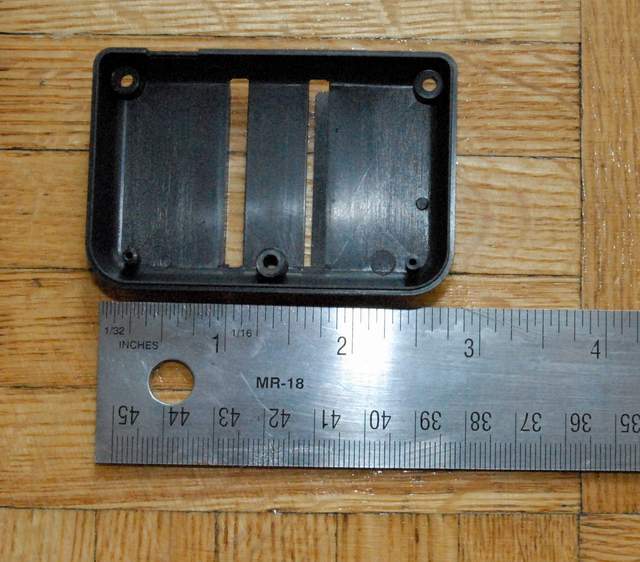
The circuit boards are in the Fiero, but here is a shot of the open case.

Its held to the plastic case by 4 screws (see pic), The measurements between screw holes centers are: X=60mm Y=35mm the two halves of the case put together are 20mm in width.


[This message has been edited by Mister (edited 07-10-2007).]

IP: Logged
mtownfiero
Member
Posts: 1779
From: Mansfield, Mass
Registered: Mar 2007


Feedback score:    (6)
Leave feedback

Rate this member

Report this Post07-10-2007 07:01 PM Click Here to See the Profile for mtownfieroSend a Private Message to mtownfieroDirect Link to This Post
I dont get what the point of it is and kinda dont get what hud really is or does.
IP: Logged
Mister
Member
Posts: 1975
From: Calgary, Alberta, Canada
Registered: Aug 2004


Feedback score: (2)
Leave feedback


Total ratings: 56
Rate this member

Report this Post07-10-2007 09:10 PM Click Here to See the Profile for MisterSend a Private Message to MisterDirect Link to This Post
 
quote
Originally posted by mtownfiero: I dont get what the point of it is and kinda dont get what hud really is or does.


http://en.wikipedia.org/wiki/Head-Up_Display

"Head-up displays are becoming increasingly available in production cars, and usually offer speedometer, tachometer, and navigation system displays. BMW, Corvette, Nissan, Lexus, Citroën and GM currently offer some form of HUD system. Motorcycle helmet HUDs are also commercially available.
Add-on HUD systems also exist, projecting the display onto a glass combiner mounted on the windshield. These systems have been marketed to police agencies for use with in-vehicle computers."
IP: Logged
PaulJK
Member
Posts: 6638
From: Los Angeles
Registered: Oct 2001


Feedback score:    (25)
Leave feedback


Total ratings: 237
Rate this member

Report this Post07-10-2007 11:07 PM Click Here to See the Profile for PaulJKSend a Private Message to PaulJKDirect Link to This Post
Nice Job and Write up ! You might consider putting a small square of window tint on your windshield where the HUD displays hits if you need to increase visibility during the day ....

[This message has been edited by PaulJK (edited 07-10-2007).]

IP: Logged
Mister
Member
Posts: 1975
From: Calgary, Alberta, Canada
Registered: Aug 2004


Feedback score: (2)
Leave feedback


Total ratings: 56
Rate this member

Report this Post07-11-2007 04:46 PM Click Here to See the Profile for MisterSend a Private Message to MisterDirect Link to This Post
 
quote
Originally posted by PaulJK: Nice Job and Write up ! You might consider putting a small square of window tint on your windshield where the HUD displays hits if you need to increase visibility during the day ....


10X Paul, they do supply the window tint, but I find it odd to have a small tinted square.
Anyway, the biggest problem in the daytime is my polarized sunglasses

There is some windshield technology by DuPont to solve the double image problem, if you have the money:

http://www.dupont.com/safet...gn/stories/1004.html

"DuPont's patented Butacite® wedged PVB interlayer technology allows HUD images to be displayed without distortion while giving windscreen manufacturers PVB with maximum handling ease for commercial production. The company is the leading worldwide supplier of wedged PVB for HUD applications."

[This message has been edited by Mister (edited 07-11-2007).]

IP: Logged
Mister
Member
Posts: 1975
From: Calgary, Alberta, Canada
Registered: Aug 2004


Feedback score: (2)
Leave feedback


Total ratings: 56
Rate this member

Report this Post08-27-2007 01:11 PM Click Here to See the Profile for MisterSend a Private Message to MisterDirect Link to This Post
Maintenance bump
IP: Logged
Mister
Member
Posts: 1975
From: Calgary, Alberta, Canada
Registered: Aug 2004


Feedback score: (2)
Leave feedback


Total ratings: 56
Rate this member

Report this Post11-15-2007 12:25 PM Click Here to See the Profile for MisterSend a Private Message to MisterDirect Link to This Post
IP: Logged
pavo_roddy
Member
Posts: 4351
From: State with a city named Gotham
Registered: Apr 2004


Feedback score: N/A
Leave feedback


Total ratings: 71
Rate this member

Report this Post01-05-2008 10:41 PM Click Here to See the Profile for pavo_roddySend a Private Message to pavo_roddyDirect Link to This Post
HI all

Nice build thread!! Adding this to favs..... Can you get the lite colour in green?

------------------
Me, I sell engines, the cars are for free, I need something to crate the engines in....
Enzo Ferrari....

Today they are called garage's, yesterday, they were stable's! Eric Jacobsen....

IP: Logged
Mister
Member
Posts: 1975
From: Calgary, Alberta, Canada
Registered: Aug 2004


Feedback score: (2)
Leave feedback


Total ratings: 56
Rate this member

Report this Post01-06-2008 02:42 AM Click Here to See the Profile for MisterSend a Private Message to MisterDirect Link to This Post
 
quote
Originally posted by pavo_roddy:Can you get the lite colour in green?


Not sure about the green display... gotta run a search.

[This message has been edited by Mister (edited 01-06-2008).]
IP: Logged
PFF
System Bot
TK
Member
Posts: 10013
From:
Registered: Aug 2002


Feedback score: (2)
Leave feedback


Total ratings: 200
Rate this member

Report this Post01-06-2008 12:56 PM Click Here to See the Profile for TKSend a Private Message to TKDirect Link to This Post
I've been playing with the Swoosh in my Fiero and that STOP and M in the display is annoying but not terrible. I finally used some black tape and covered the M, decimal and the third digit (since it's always a 0 and I don't go over 100 MPH to see if go to a 1). When I come to a stop now you see TO. I need to make up a meaning for that..... Take Off!

They work well and are plenty bright for daylight. They also have variable brightness and night dimming. I have heard green is available but I haven't seen it. There are other green HUDs out there (VFD.)

One nice feature is that you can fine tune the reading to get it dead on. Mine matches the speedo within 1 MPH from 0 to 90 (highest I've check it).

As with all HUDs, you get a ghost image (I live with it) unless you add the film to the windshield or have HUD glass.

Finally, the optical HUDs still look much better. These cheapies don't give you the sense of distance of the optical HUDs. Unfortunately that sense of distance is the focal length of the optics and they are really deep and don't fit well in the Fiero.

There are some new LED/VFD HUDs that are GPS driven. Some are even rechargeable so all you have to do is set them on the dash and off you go (once they acquire the sats). Some even output the position via BT to use with your pocket PC GPS software.

I love having a HUD so I live with the little annoyances.

[This message has been edited by TK (edited 01-06-2008).]

IP: Logged
Mister
Member
Posts: 1975
From: Calgary, Alberta, Canada
Registered: Aug 2004


Feedback score: (2)
Leave feedback


Total ratings: 56
Rate this member

Report this Post01-06-2008 05:07 PM Click Here to See the Profile for MisterSend a Private Message to MisterDirect Link to This Post
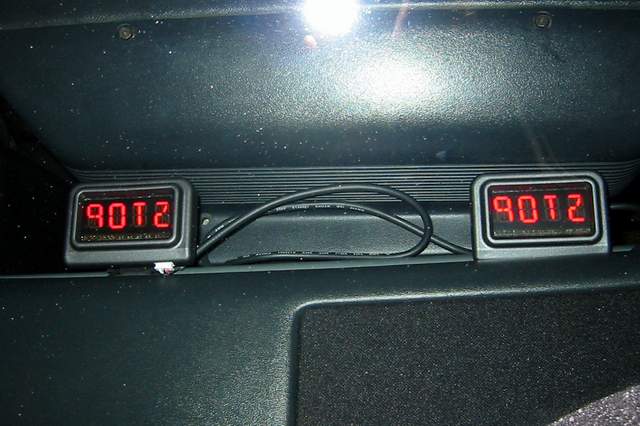
Took another shot of the HUD today


When the background is some red tail lights the display can almost disappear

 
quote
Originally posted by TK: I've been playing with the Swoosh in my Fiero


Cool another member to the HUD club please post some pics of your setup.

The "STOP" doesn't really bother me, and here we drive in Km/h so the third digit is a necessity

I gotta run a search on the new LED/VFD HUDs you've mentioned, thanks.

[This message has been edited by Mister (edited 01-06-2008).]

IP: Logged
Marvin McInnis
Member
Posts: 11599
From: ~ Kansas City, USA
Registered: Apr 2002


Feedback score: N/A
Leave feedback


Total ratings: 227
Rate this member

Report this Post01-07-2008 11:13 AM Click Here to See the Profile for Marvin McInnisClick Here to visit Marvin McInnis's HomePageSend a Private Message to Marvin McInnisDirect Link to This Post
For those who haven't studied HUD displays, there are generally three unresolved issues that prevent inexpensive HUDs from being successful:

1) Multiple images if you use the windshield as the optical "combiner" ... one reflection off of each windshield surface ... as well as low image brightness due to the poor reflectivity of plain glass.

2) Lack of collimation in the optical system, necessary to place the virtual image at (or near) infinity.

3) Inadequate image brightness during daylight and/or inadequate dimming at night.

I am currently experimenting with an inexpensive plastic fresnel lens to provide collimation, combined with a dichroic reflector tuned to the color of the display and applied to the inside surface of the windshield. If these ideas work satisfactorily, a longer-term, more elegant, and probably more expensive solution would be a single thin dichroic aspheric concave reflector applied to the windshield. Use of a dichroic reflector automatically limits you to a single-color display, but multi-color isn't really desirable in this application. You want to use a HUD to present only a limited selection of the most important and rapidly changing data, and a single color is just fine for that.

Advances in consumer display technology will certainly solve the brightness issue eventually, although at this point I still don't know whether I can get a DLP display array to fit into the Fiero dash or not.

[This message has been edited by Marvin McInnis (edited 01-07-2008).]

IP: Logged
Mister
Member
Posts: 1975
From: Calgary, Alberta, Canada
Registered: Aug 2004


Feedback score: (2)
Leave feedback


Total ratings: 56
Rate this member

Report this Post01-07-2008 12:36 PM Click Here to See the Profile for MisterSend a Private Message to MisterDirect Link to This Post
All true. what bothers me most is the fact that the image (in my case) is not at the focal point of infinity.
Thanks for the info, please keep us posted on any progress or updates.
IP: Logged
jmbishop
Member
Posts: 4484
From: Probably Texas
Registered: Jul 2006


Feedback score: N/A
Leave feedback


Total ratings: 169
Rate this member

Report this Post01-08-2008 01:02 AM Click Here to See the Profile for jmbishopSend a Private Message to jmbishopDirect Link to This Post
 
quote
Originally posted by Marvin McInnis:
Advances in consumer display technology will certainly solve the brightness issue eventually, although at this point I still don't know whether I can get a DLP display array to fit into the Fiero dash or not.


Lol, how would it not fit? Thats a amazingly good Idea.

IP: Logged
TK
Member
Posts: 10013
From:
Registered: Aug 2002


Feedback score: (2)
Leave feedback


Total ratings: 200
Rate this member

Report this Post01-08-2008 01:21 AM Click Here to See the Profile for TKSend a Private Message to TKDirect Link to This Post
The Defi VSD Basis is a nice unit too. About $150 new.

[This message has been edited by TK (edited 01-08-2008).]

IP: Logged
Marvin McInnis
Member
Posts: 11599
From: ~ Kansas City, USA
Registered: Apr 2002


Feedback score: N/A
Leave feedback


Total ratings: 227
Rate this member

Report this Post01-08-2008 01:23 AM Click Here to See the Profile for Marvin McInnisClick Here to visit Marvin McInnis's HomePageSend a Private Message to Marvin McInnisDirect Link to This Post
The cost of admission for the DLP evaluation and engineering development kit from Texas Instruments is $10,000. Additional DLP modules for experimental or prototype purposes are $2700 each.
IP: Logged
jmbishop
Member
Posts: 4484
From: Probably Texas
Registered: Jul 2006


Feedback score: N/A
Leave feedback


Total ratings: 169
Rate this member

Report this Post01-08-2008 01:49 AM Click Here to See the Profile for jmbishopSend a Private Message to jmbishopDirect Link to This Post
 
quote
Originally posted by Marvin McInnis:

The cost of admission for the DLP evaluation and engineering development kit from Texas Instruments is $10,000. Additional DLP modules for experimental or prototype purposes are $2700 each.


Which is why you either go about it another way or forget about it.
IP: Logged
pavo_roddy
Member
Posts: 4351
From: State with a city named Gotham
Registered: Apr 2004


Feedback score: N/A
Leave feedback


Total ratings: 71
Rate this member

Report this Post03-16-2008 08:53 PM Click Here to See the Profile for pavo_roddySend a Private Message to pavo_roddyDirect Link to This Post
Hi all

TTT.......

------------------
Me, I sell engines, the cars are for free, I need something to crate the engines in....
Enzo Ferrari....

Today they are called garage's, yesterday, they were stable's! Eric Jacobsen....

IP: Logged
Previous Page | Next Page

This topic is 2 pages long:  1   2 


All times are ET (US)

T H I S   I S   A N   A R C H I V E D   T O P I C
  

Contact Us | Back To Main Page

Advertizing on PFF | Fiero Parts Vendors
PFF Merchandise | Fiero Gallery
Real-Time Chat | Fiero Related Auctions on eBay


Copyright (c) 1999, C. Pennock