I figured it's time I start documenting this before I forget everything. The car that I am performing the swap on has 89k miles in the chassis, and is a perfect rust free southern car.
This is kind of a continuation of this thread, as I decided to pull the engine/suspension from my '88 GT and install it into my '85 GT.
When finished, this car will have: - 65k mile 4.9L V8 from a 1991 DeVille - Intake manifold from a 1990 Allante - Hybrid M17/MY8 Muncie 4-Speed with 70k - 90k on all components - '88 GT cradle and rear suspension with full poly bushings, new struts, and 7/8" rear swaybar - '88 rear brakes - Spec 3 clutch / LSC flywheel - Full poly bushings on stock front suspension, new shocks - 1" front swaybar - Grand Am front brakes / vented rotors - Big bore master cylinder - Mr. Mikes seats - 120 MPH speedo
Nate
[This message has been edited by NJD85GT (edited 06-02-2012).]
Now my hybrid MY8/M17 transmission. You can see how to build one of these here. This trans gives me the lowest possible first gear ratio and fourth gear ratio of all of the Fiero manual transmissions. I can get to nearly 40 MPH in 1st and am only doing 2,250 RPM at 70 MPH.
Nasty old trans out of the '85 GT, 89k miles:
Trans case split:
Taking gears apart:
Shimming:
Cleaning:
Painted!
[This message has been edited by NJD85GT (edited 05-31-2012).]
Pretty new flywheel from LSC Performace installed.
Spec Stage 3 clutch.
Pressure plate installed.
Trans bolted onto engine.
New Allante starter and the old 4.9 starter.
The clutch cover plate for the Muncie. I had to cut it to fit around the 4.9. Also, the Allante starter does not occupy the same area ad the old 2.8 starter, so there is a gap under the starter that needs to be covered.
[This message has been edited by NJD85GT (edited 05-31-2012).]
Looking really awesome! Can you take a picture of the crossover installed whenever you get to that, so I can visualize what I would have to do to it more clearly?
IP: Logged
03:01 AM
Raydar Member
Posts: 41112 From: Carrollton GA. Out in the... country. Registered: Oct 1999
Looks like you put the adapter plate on the wrong side? (I may be wrong, for MY sake I hope not) The "new hole" should have been towards the front...huh right???
Can you take a picture of the crossover installed whenever you get to that, so I can visualize what I would have to do to it more clearly?
Will do in the next couple days, it is already in the car and running, I've been slacking in my documentation, still got more catching up to do.
quote
Looks like you put the adapter plate on the wrong side? (I may be wrong, for MY sake I hope not) The "new hole" should have been towards the front...huh right???
For your sake, you are right, my hole is in the correct location, forward of the old hole. Those pictures are of the passenger strut tower, looking towards the front of the car.
I was just realizing something as I read over the details in the first post again. You are building what I have, for the most part. I have an 86 SE with the 4.9/4t60e on an 88 cradle. I had the exact same brake setup you said you are going to create, and there IS a flaw with that. They didn't work well AT ALL. I don't know if you had the grand am brakes all round like I did before the 88 cradle swap, but they were really nice. The problem is, with having stock 88 brakes in the rear now, you will loose 30% clamping pressure in the rear just because of that. The piston is much smaller in the 88 calipers, and the bigger master cylinder reduces caliper pressure with the smaller 88 caliper. You will have (like I did) front brakes that are too powerful (bad thing, they lock up QUICK), and barely working rear brakes. This front bias was dangerous, I skidded in any form of heavy stopping.
After my 88 cradle swap, my brakes were always sub-par. After I added larger 16" rims they were very poor. So recently I added Corvette rotors in the front with 88 calipers, and an 88 master cylinder. Problem solved, brakes were awesome. Recently I added a big brake booster too, and now they are nothing short of shocking.
[This message has been edited by mattwa (edited 05-31-2012).]
I was just realizing something as I read over the details in the first post again. You are building what I have, for the most part. I have an 86 SE with the 4.9/4t60e on an 88 cradle. I had the exact same brake setup you said you are going to create, and there IS a flaw with that. They didn't work well AT ALL. I don't know if you had the grand am brakes all round like I did before the 88 cradle swap, but they were really nice. The problem is, with having stock 88 brakes in the rear now, you will loose 30% clamping pressure in the rear just because of that. The piston is much smaller in the 88 calipers, and the bigger master cylinder reduces caliper pressure with the smaller 88 caliper. You will have (like I did) front brakes that are too powerful (bad thing, they lock up QUICK), and barely working rear brakes. This front bias was dangerous, I skidded in any form of heavy stopping.
After my 88 cradle swap, my brakes were always sub-par. After I added larger 16" rims they were very poor. So recently I added Corvette rotors in the front with 88 calipers, and an 88 master cylinder. Problem solved, brakes were awesome. Recently I added a big brake booster too, and now they are nothing short of shocking.
Thanks for the heads up. I will proceed as planned since I already have everything on hand, but will watch the brakes closely.
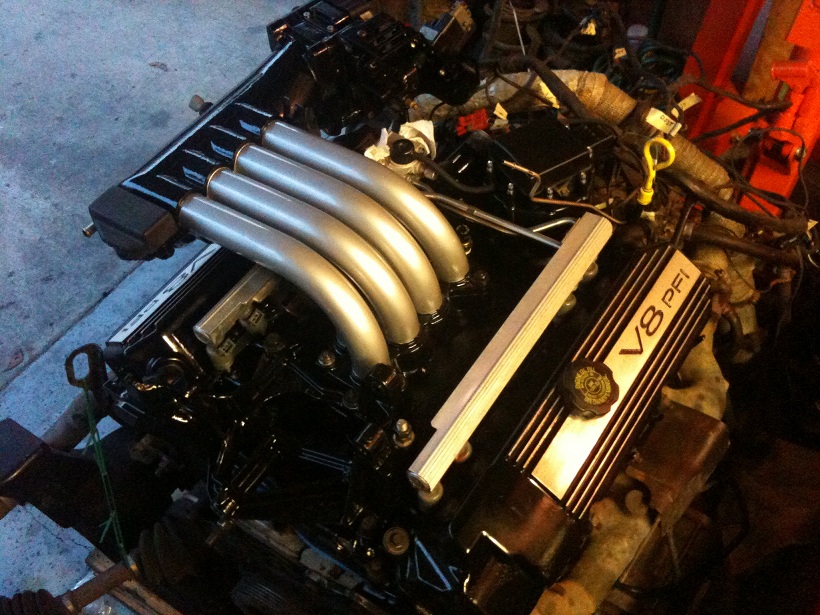
Here is the engine as it currently looks. I will be spending some time in the future cleaning up all of the vacuum hoses and some of the wiring.
I started it up for the first time a week ago. Some of the issues/fixes I've had to do since then are:
The PCM wasn't getting power for some reason. It got power in the '88 GT. So I ended up running new wires to PCM pins B1 & C16 from the battery area.
The starter solenoid wasn't getting power, so I had to run a new wire from the C500 to the solenoid.
I added a ground strap from the block to the decklid hinge, this almost completely solved my hesitation issue. I need to get a better ground strap or two though, the old one I used measured 30 ohms.
I grounded PCM pins C10 & F7 so the PCM thinks it's in drive.
My speedo was reading about 1/4 of the actual speed, while the PCM saw the correct speed. The '88 harness had a speedo circuit added to PCM pin B11 & the C203 connector. Since I now have a manual transmission, I removed that circuit and spliced wires off of PCM pins B9 & B10 to C203 connector pins G & R. After doing this, both the PCM or speedo showed 0 MPH at speed. So I reversed C203 pins G & R, and this fixed the problem. Both the PCM and speedo show the correct speed.
I added the 3-pin coolant temp sensor. Sensor pin A went to PCM pin E11, sensor pin B went to PCM pin E16, and sensor pin C went to C500 pin C2. I verified that the temp gauge worked, it shows 1/4 scale at 80 deg. C, 1/2 scale at 95-100 deg. C, and 3/4 scale at 110 deg. C. I still need to fix the pegging problem on startup by moving the C500 pin to D3 and swapping the two wires at the dash.
I fixed my TPS sensor wiring, I had two wires switched around so that it read 0.5 V at idle and 3.0 V at full throttle. Now it reads 0.5 V at idle and 4.5 V at full throttle.
[This message has been edited by NJD85GT (edited 06-02-2012).]
I took it for its first drive a few days ago, and thankfully the trans shifts like new! The clutch is a little harsh, but is getting better as it breaks in. I was having a problem where it didn't want to slow down when you take your foot off of the pedal. I re-did the idle learn procedure without much help,. it would still do it about 2/3 of the time. As I was test driving and watching my laptop / PCM data, I noticed that the closed throttle switch wasn't always closed at idle. So I took the ISC motor apart and cleaned it, it is very simple inside. After cleaning it, my idle issue was much better, it still stuck about 5% of the time. I also didn't like how slowly the RPM dropped when you pushed in the clutch. So I went to my program and modified a few of the idle parameters and DFCO. After buring a new chip with the new idle stuff, it seems to have completely fixed my idle problems, the RPM's drop quickly and stay where I want them to in neutral, the car also slows down nicely in gear. I will have to drive it more to make sure it stays like this.
Today I decided to install my 120 MPH speedo and modify my tach for the V8. It cost me $3 to modify my tach. One of the ways to modify the tach is to cut one of the traces on the circuit board, and install a new resistor. I really didn't want to cut any traces, should I decide to restore the tach to original specs for some reason, so I decided to add another resistor in parallel. After measuring the current resistance, I got 223 k ohms. Since I am going from 6 cylinders to 8 cylinders, I needed to bring that resistance to 3/4 of that, or 167.25 k ohms.
Option 1 is to cut the trace and add a 167 k ohm resistor. Option 2 is to add a resistor in parallel. Any time you add a resistor in parallel you lower the overall resistance, after a quick calculation I needed a 669 k ohm resistor to get to my target of 167.25 k ohms. I decided that I wanted to make my tach adjustable on the fly, in case I needed to re-adjust and fine-tune it later. So I went to Radio Shack and bought a 1 M ohm potentiometer. This is basically a variable resistor from zero to 1,000,000 ohms. Putting it in parallel with my existing resistor gives me a range of zero to 182 k ohms. I verified this with my digital multimeter.
After I installed it as shown below, I put the gauge cluster back in the car but with no plastic cover so I could play with the needles. I took the car out for a drive with the laptop hooked up, and stuck the needle on at 0 RPM (car off, key on). I then started it, revved to 2,500 or so, and adjusted the potentiometer until the tach showed 2,500. I then verified the whole RPM range, and adjusted until I got it perfect. I did the same with the speedo, making sure the needle was in the right spot at speed. After that re-installed the plastic cover, and then verified the gauge again. Any time I need to adjust it all I have to to is take off the decklid popper cover and turn the knob.
My old '88 GT gauges that I'm stealing the speedo out of.
120 MPH speedo.
Nasty looking odometer out of the '88 GT. I'm swapping in the one from my '85 GT so the mileage stays correct, and the thenths is whiter too.
Pulling the face off to swap the trip odometer too since this one looks very weathered.
Old trip odometer pulled off.
My '85 GT gauges. I'm keeping the '85 tach as I like the orientation much better versus the '86 and up tachs, as well as it has the oil pressure on it. I never liked the aux gauges in the later cars, they look out of place to me, like an afterthought.
Old 85 MPH speedo.
Here is my 1 M ohm potentiometer.
Two wires soldered onto the back of the tach to add the potentiometer remotely.
Potentiometer soldered onto the wires.
I had to use the '88 GT needles, but I needed to make them look like the other '85 GT needles. So I mixed up some paint to match the orange and painted them. The gauges are not backlit, so it still looks stock.
Putting everything back together.
Potentiometer wires routed out of the back.
Potentiometer mounted into the passenger side of the gauge pod.
The shaft that you turn to adjust the RPM readout/resistance. It is above the decklid popper connector.
Finished and fine-tuned gauges.
Nate
[This message has been edited by NJD85GT (edited 08-22-2012).]
About 1,000 times better! It shifts like a new trans, which I'm happy about. I'm taking it easy right now, I've gone full throttle in second and it gets up there very quickly. In 4th I'm at 2,000 RPM at 60 MPH. After playing with my idle parameters ect., it feels just like a V6 manual Fiero, but with a lot more power.
Nate
IP: Logged
01:57 AM
1MohrFiero Member
Posts: 4363 From: Paducah, Ky Registered: Apr 2003
Great thread. Very well documented. Keep going. BTW, I have your living room floor in my kitchen. My wife would freak out if I assembled an intake there!
I did the temp gauge fix this morning and took it for a test drive. The needle likes to waver by two ticks sometimes, it didn't do this when the V6 was in the car. I am hoping that better ground straps will fix the issue. We will see.
quote
Originally posted by 1MohrFiero:
Great thread. Very well documented. Keep going. BTW, I have your living room floor in my kitchen. My wife would freak out if I assembled an intake there!
Haha, yeah I am single at the moment, and didn't feel like working in the garage that day...
Can you take a picture of the crossover installed whenever you get to that, so I can visualize what I would have to do to it more clearly?
Here are some more pictures of the crossover pipe, it is kind of hard to get a good picture. Basically, I cut the middle, and added a 6-8" tube that maybe had a 45 deg. bend in it. I put each half of the cut crossover pipe onto the manifolds, and rotated the cut end up, and out just slightly, until the new piece fit, and cleared the shift cables and slave cylinder heat shield by an inch or so. I then tacked them together, pulled it off, and welded it up. I then wrapped it all in a bunch of header tape. With most of the crossover pipe being double walled and having the tape on there it stays much cooler in the engine bay, I can watch my intake manifold temps (since the intake is right above this pipe), and it is usually 10-20 deg. cooler C. than when I had the single wall pipe in the '88 GT without tape.
Nate
IP: Logged
03:44 PM
Raydar Member
Posts: 41112 From: Carrollton GA. Out in the... country. Registered: Oct 1999
Does it twitch? If so, there's probably air in the system. Drilling a pinhole in the thermostat will help.
It does sometimes. I do have a hole in the thermostat. I have been topping it off after it cools off every time, and it is just about always at the top now. Wouldn't the PCM readout be affected too? It doesn't vary like the gauge does, it is always a steady value.
Nate
IP: Logged
09:05 PM
Carver1 Member
Posts: 2843 From: Edgewood, New Mexico Registered: Nov 2000
Hmmm... A very good question. I could speculate that the PCM is buffered, in order to stop rapid fluctuations, but I really don't know.
Nice job. Very nice indeed!
So no matter what I tried I couldn't get the bubbles out of the system, that gauge moved all over the place, and with the fan on I couldn't get the coolant temp below 98 deg. C. I ended up taking the old 2.8 thermostat housing, and welding the old DeVille mount onto the bottom of it, so that I could put it on this engine and have a Fiero-style system. I'm currently running without the thermostat to try and get all bubbles out (think I finally succeeded, the gauge stays put now and the temp quickly drops below the fan shutoff speed).
I also wired up the radiator fan to the PCM pin A11 so that it controls it...there were so many errors in this harness, I have no idea where that old A11 wire went. I programmed it to turn on at 100 deg. C and shut off at 95 deg. C for now.
Nate
[This message has been edited by NJD85GT (edited 06-08-2012).]
Looking good! What are you doing with the 88 GT/notch?
Thanks! I ended up stripping the old '88 down, it had so many problems, and I needed to concentrate on this car. It lives on though! I gave it to a guy in Canada, who is re-building his rusted out Fiero onto the frame. Apparently he even had the entire chassis re-powdercoated.
Nate
[This message has been edited by NJD85GT (edited 06-08-2012).]
IP: Logged
10:52 PM
Jun 9th, 2012
BV MotorSports Member
Posts: 4821 From: Oak Hill, WV Registered: May 2001
Great looking swap and I love the custom touches. Nice work on the tach. When I did mine 10yrs ago, I could of sworn the resistor fix was really simple. I cant remember the specifics though! lol
Also, on swaps I did in the past. I liked to keep the Fiero v6 t-stat housing. I just found them easier to burp the system.
[This message has been edited by BV MotorSports (edited 06-09-2012).]
IP: Logged
12:00 AM
FieroMaster88 Member
Posts: 7680 From: Mattawan, MI Registered: Nov 2000
So I've been seriously slacking in updating this thread. Next step was to re-do the front suspension with new ball joints, rebuilt steering rack, poly bushings, Grand Am brakes, ect.
Steering rack housing cleaned up!
Getting ready to install Rodney's bushing.
Bushing installed and snap ring in place.
The rack and teeth all cleaned up.
Getting ready to put the pre-load assembly back in.
I also installed my Mr. Mikes seats today. The original seats were near perfect, but I wanted to put in Mr. Mikes. I did the light/dark grey GT style with the "Fiero GT" emblem embroidered on.
I also cleaned up the vacuum hoses and used proper hoses, as well as the wiring a bit.
A fellow forum member was kind enough to loan me his wideband O2 sensor so that I could see how I was running at WOT. Interestingly, with the Allante tune, and the BPC adjusted so that my BLM's stay around 128, I had a WOT AFR of 10.5 to 11.0. For now I wanted to get it to the low 12's, so I ended up cutting the fuel in the upper ranges of the VE table. There was a noticeable increase in power, and my current AFR's are 11.9 to 12.2. I will re-check when the weather cools a bit.
I also had to re-adjust my speedo, as it was reading 3 MPH too slow at all speeds. I took the car on a nice 60 mile drive into the mountains with my phone GPS and fine tuned the speedo, now it reads the correct 61 MPH at 2,000 RPM in 4th. It is dead on from 15 to 60 MPH, and reads about 1 MPH fast from 65-70, and 2 MPH fast from 70-80.
The hybrid trans is holding up great, I love the loooooong gears and the nice low 4th crusing gear. I've floored it a couple times in 1st and the back end goes sideways, but I can get to almost 40 MPH before having to shift into 2nd.
I swear I've seen a Cavalier Getrag with 3.42 gears. Is that something you think you could do for the Getrag? Also, did you ever measure the resistance you set your pot to so I could just try to make one that works? Can you detail me the changes you made to the programming to fix the deceleration? I have a chip burner now. What did you hook up the PWPS to? My pin F on C203 didn't cut the mustard, still reads "Not Present" on TunerPro RT data log. :/
Thanks, Lou
IP: Logged
07:39 AM
blakeinspace Member
Posts: 5923 From: Fort Worth, Texas Registered: Dec 2001


 <---- did you buy Cliff a beer?