Pennock's Fiero Forum
  Technical Discussion & Questions
  Oil Pressure Sender on an '88

Post New Topic  Post A Reply
Email This Page to Someone! | Printable Version


next newest topic | next oldest topic
Oil Pressure Sender on an '88 by br1anstorm
Started on: 07-31-2015 01:13 PM
Replies: 5 (747 views)
Last post by: Notorio on 08-01-2015 10:53 AM
br1anstorm
Member
Posts: 225
From: Scotland, UK
Registered: Apr 2008


Feedback score: N/A
Leave feedback

Rate this member

Report this Post07-31-2015 01:13 PM Click Here to See the Profile for br1anstormSend a Private Message to br1anstormEdit/Delete MessageReply w/QuoteDirect Link to This Post
I have an '88 Formula. The good news is that I have the more recent, and apparently more reliable, oil pressure sender. The bad news is that it is still mounted vertically in its original location where water can drip on to it and get inside it. So it still gets temperamental and makes the gauge on the dash misbehave.

For some time I have tried to prevent the problem by wrapping the wiring connector and the top of the sender with waterproof tape. But finally I decided to seek a more permanent and reliable solution, and to replace the sender unit.

My Fiero has aircon. So the relocation of the sender unit as suggested in a factory service bulletin - fitted direct, using an adapter, into a mounting beside the oil filter and behind the aircon compressor - was awkward and difficult because of the access problems.

I looked at - and posted an initial message into - this thread on the Forum here, about the idea of putting an "elbow" into the original fitting at the top of the tube which comes up from the mounting beside the oil filter. There's a good technical drawing in this thread which shows the tube.

So.... for anyone else who might be interested, I thought I'd do a step-by-step description of what I did.

1) Disconnect and remove battery - not only for safety but also because it's necessary for access.

2) Remove the plastic shield which forms two sides of the battery compartment - take care not to lose the little cross-head screw which fixes the lower rear corner of the shield (nearest the bulkhead); it's difficult to reach.

3) Disconnect the wiring from the oil sender unit.

4) Unscrew the sender unit from the brass block to which it is fitted, using a appropriately-sized spanner (wrench) on the metal base of the unit. Careful - the unit is easy to break. The battery has to be out of the way to give room to use a wrench there.

Now for the modification:

5) Get a 1/4" NPT 45-degree Female-to-Male Elbow Adapter fitting. I got one of these

[Note: I had originally thought of putting a 90-degree adapter, which would then have the sender unit set horizontally. But that didn't work - not enough room, the elbow pointed the wrong way when screwed tightly in , and the wiring wouldn't reach. So I got a 45-degree one.]

6) the rest is simple. Screw the adapter elbow into the original threaded hole in the brass block, then screw the (new) oil pressure sender into the elbow. With luck it will be pointing at an angle which won't foul other nearby wiring or fittings, and the original wiring will reach. Then connect it up.

7) Replace battery shield and battery, and the job is done.

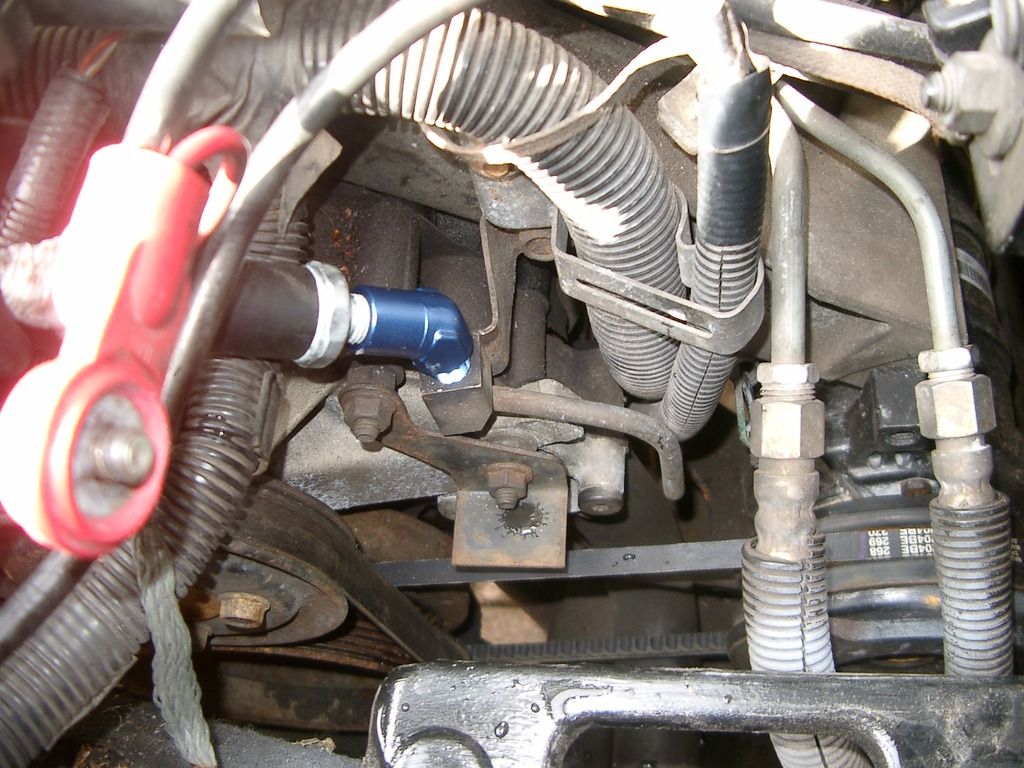
Here are pictures which show the adapter fitting in place, and the new sender unit installed.


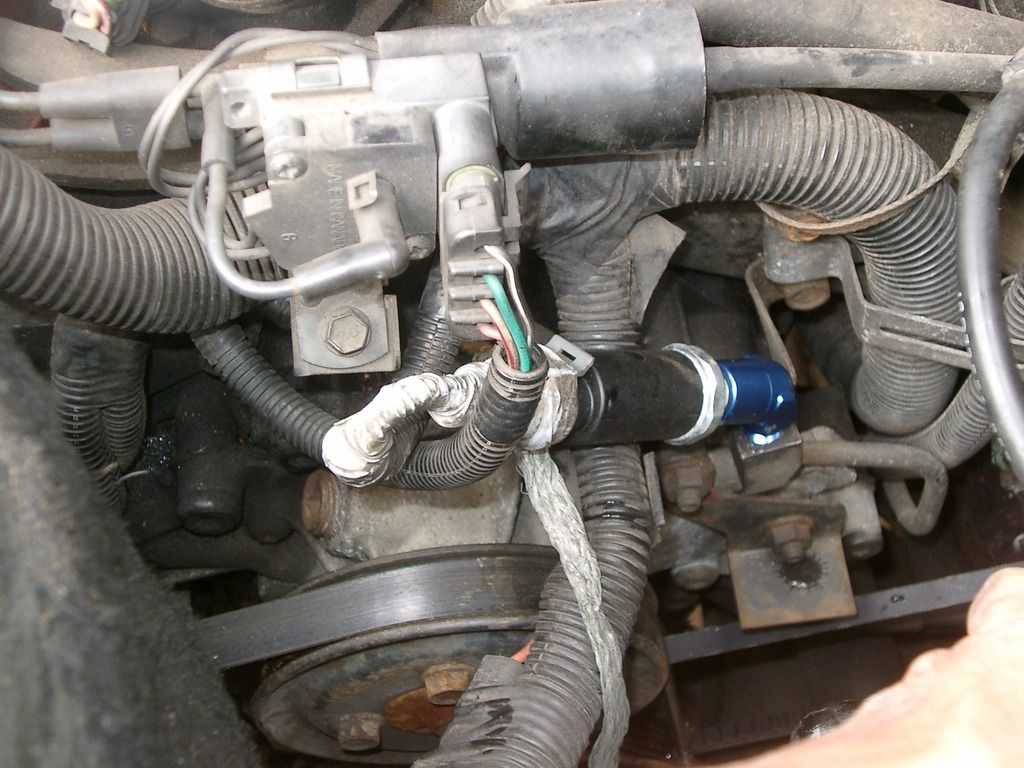
The grey waterproofing tape is still wrapped round the connector. Don't be confused by that bare-wire woven cable immediately below the sender unit - it's an extra earth strap, as recommended in another forum thread.


I hope this might be helpful to others whose oil pressure sender has suffered from being soaked with dripping water.


IP: Logged
PFF
System Bot
olejoedad
Member
Posts: 19257
From: Clarendon Twp., MI
Registered: May 2004


Feedback score: (5)
Leave feedback


Total ratings: 206
Rate this member

Report this Post07-31-2015 01:17 PM Click Here to See the Profile for olejoedadSend a Private Message to olejoedadEdit/Delete MessageReply w/QuoteDirect Link to This Post
The weatherpak connector should have a silicone bellows type seal around the part of the plug that inserts into the sender. The connectors are water tight when this seal is in place and not distorted during insertion. A dab of silicone grease (NAPA Silglyde) adds further protection.

Nice writeup, BTW.
IP: Logged
br1anstorm
Member
Posts: 225
From: Scotland, UK
Registered: Apr 2008


Feedback score: N/A
Leave feedback

Rate this member

Report this Post07-31-2015 05:49 PM Click Here to See the Profile for br1anstormSend a Private Message to br1anstormEdit/Delete MessageReply w/QuoteDirect Link to This Post
Thanks, olejoedad. You're right - up to a point - about the "bellows" seal, and about adding a dab of silicone grease.

The problem however - at least with my oil pressure sender connection - is not the weatherproofing between the two halves of the weatherpak connection - ie the plug (on the end of the wiring) and the socket (in the top of the sender unit). The bellows seal makes it weathertight where those two parts of the connector clip together.

BUT...... with the oil sender unit in its original vertical position, the wires from the loom go into the top of that plug. Water dripping from above then seeps directly downwards into the connector from the top (or back) of the plug, where the wires go into it (and this eventually corrodes the terminals). The bellows seal doesn't protect against water getting in via that route. Silicone grease may help to do so, but isn't an absolute proof against water penetrating.

That's why I have kept the grey insulating tape wrapped around the wiring and over the plug where the wires enter it - even though with the sender at a 45 degree angle it is no longer so directly exposed to water ingress.

[This message has been edited by br1anstorm (edited 07-31-2015).]

IP: Logged
olejoedad
Member
Posts: 19257
From: Clarendon Twp., MI
Registered: May 2004


Feedback score: (5)
Leave feedback


Total ratings: 206
Rate this member

Report this Post07-31-2015 08:04 PM Click Here to See the Profile for olejoedadSend a Private Message to olejoedadEdit/Delete MessageReply w/QuoteDirect Link to This Post
There are also silicone seals (or should be) surrounding the wires where they go into the plug.....
IP: Logged
br1anstorm
Member
Posts: 225
From: Scotland, UK
Registered: Apr 2008


Feedback score: N/A
Leave feedback

Rate this member

Report this Post08-01-2015 08:20 AM Click Here to See the Profile for br1anstormSend a Private Message to br1anstormEdit/Delete MessageReply w/QuoteDirect Link to This Post
Yup, that's true.

But water has a pesky way of creeping into things (capillary action). The car, and all its connectors, are now 27 years old - and like its owner (who is a lot older!) things begin to deteriorate with age.......!
IP: Logged
Notorio
Member
Posts: 2996
From: Temecula, CA
Registered: Oct 2003


Feedback score: (3)
Leave feedback

Rate this member

Report this Post08-01-2015 10:53 AM Click Here to See the Profile for NotorioSend a Private Message to NotorioEdit/Delete MessageReply w/QuoteDirect Link to This Post
That's a nice-looking fix. I wish we could get something like this for the oil filters.
IP: Logged

next newest topic | next oldest topic

All times are ET (US)

Post New Topic  Post A Reply
Hop to:

Contact Us | Back To Main Page

Advertizing on PFF | Fiero Parts Vendors
PFF Merchandise | Fiero Gallery
Real-Time Chat | Fiero Related Auctions on eBay


Copyright (c) 1999, C. Pennock