
 
     |
| Rebuilt and Installed a 3.4PR (Page 2/7) |

|
ManMadeChickens
|
MAY 01, 04:29 AM
|
|
|

|
ManMadeChickens
|
MAY 01, 04:42 AM
|
|
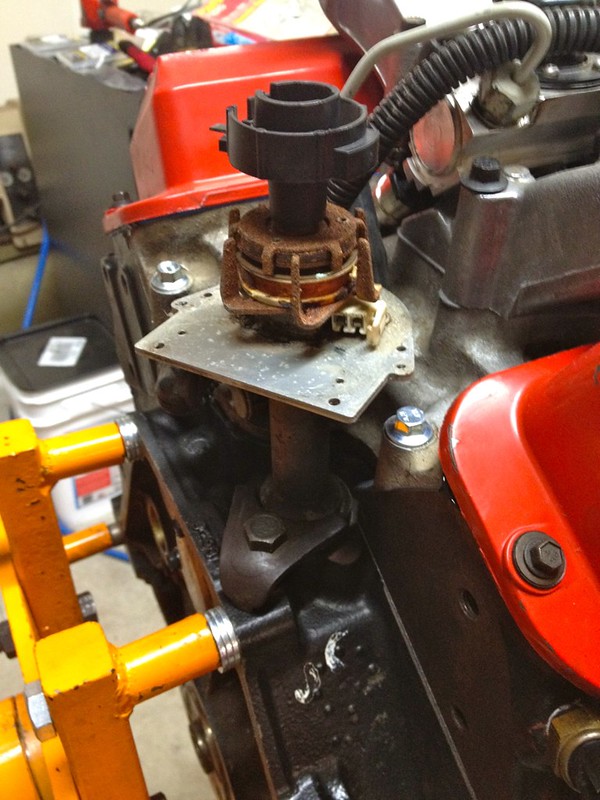
Refitted the distributor, and got the timing set as close as I can without the engine running. I was really damn close on correct timing... only problem was it was 180 degrees off. A simple pull and half rotation of the shaft later it was correct.

Drive one Fiero to rebuild another... This is my Dad's 1985 SE V6 that he's had since new. At about 170,000 miles he replaced his 2.8 with a 3.1. Now 110,000 miles on that motor and going strong. It should hit 300,00 miles next year.
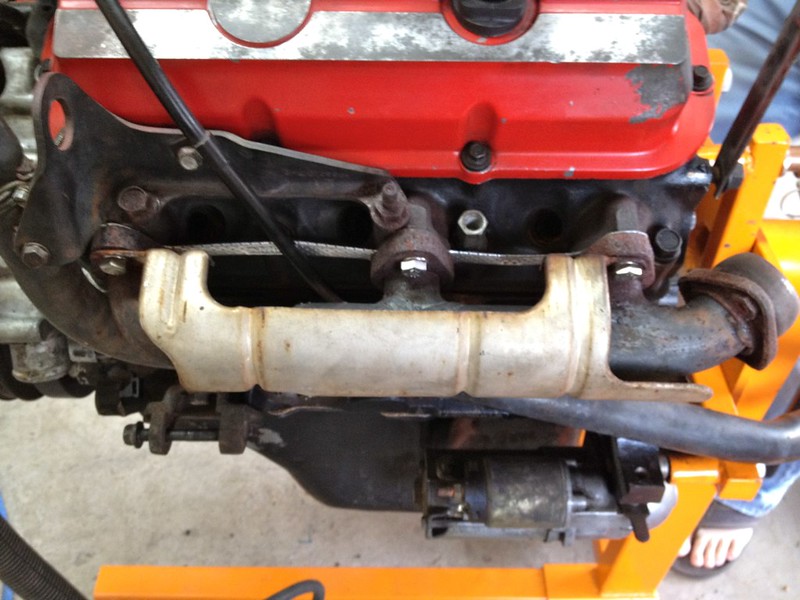
Front manifold and head shield reinstalled with new stainless steel fasteners. Dipstick, starter, lift loop, and brackets back on. I left the block shield off, as I don't like how it sandwiches between the head and manifold without a gasket on one side.
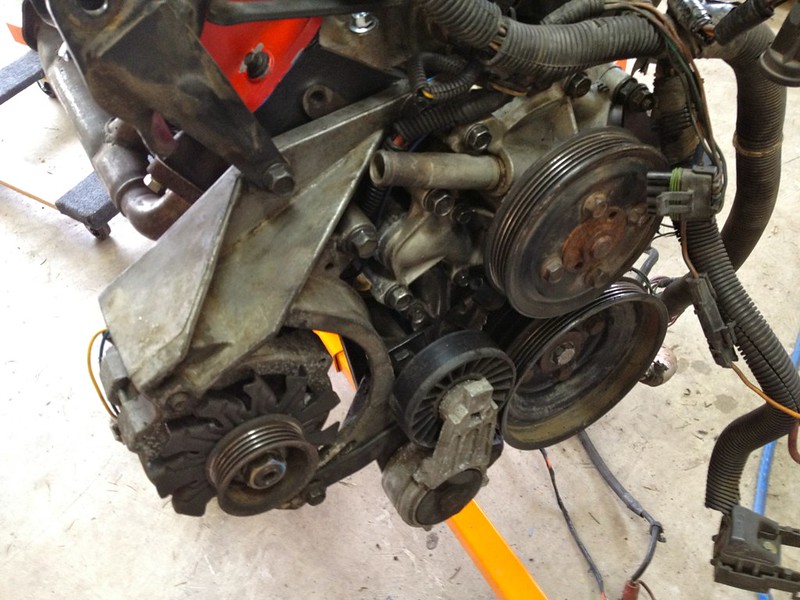
Installing front accessories back on. Shoutout to Dodgerunner for making that awesome belt tensioner kit. Makes getting a belt on and off so easy, keeps perfect tension on the belt all the time without needing adjustment. Looks like a factory part, too.
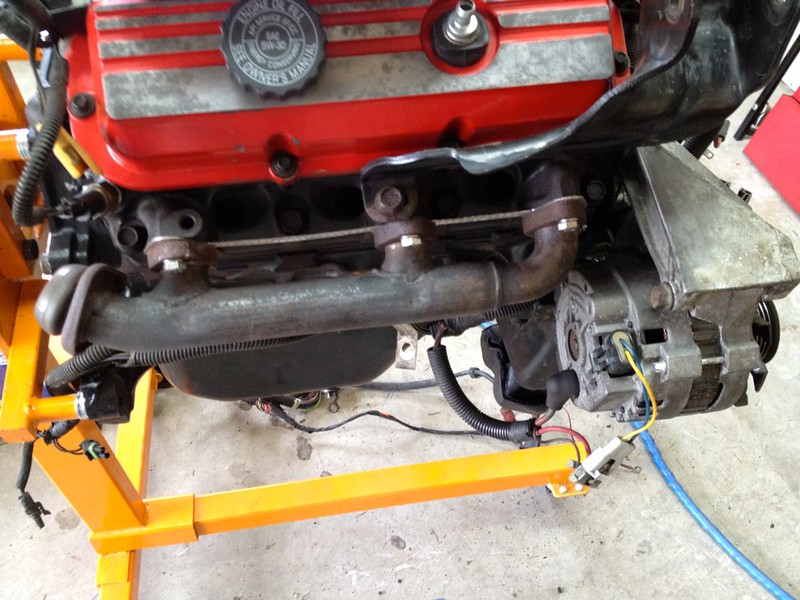
Rear manifold installed. Again, new stainless fasteners. CS-style alternator and wiring adapter visible. This is another upgrade I strongly encourage for the 1987 and earlier V6 Fiero. It gets you a smaller, lighter, more efficient alternator. Just order a 1988 Fiero V6 alternator, and get the wiring adapter. It's bolt-on and plug-n-play at that point. Lots of juice, never have a problem with voltage anymore. This alternator is 105 amp, whereas the best SI alternator that came in a Fiero was 94.[This message has been edited by ManMadeChickens (edited 09-19-2012).]
|
|

|
ManMadeChickens
|
MAY 01, 04:59 AM
|
|
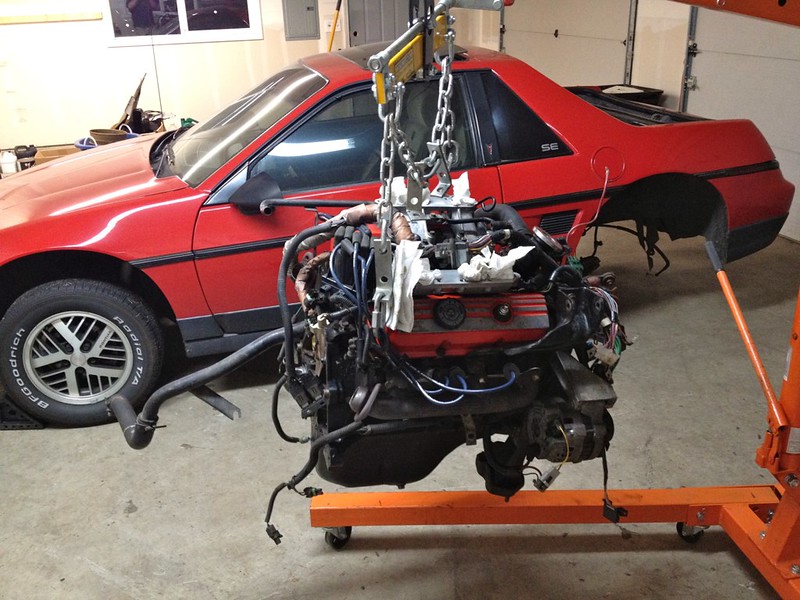
Next step: THAT goes back in THERE.
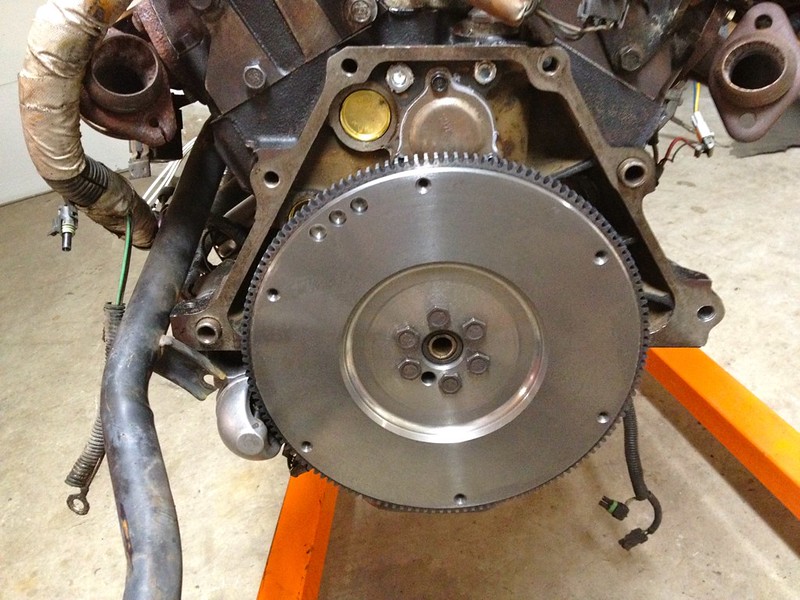
1988 Fiero V6 neutrally-balanced flywheel necessary with the internally balanced 3.4L crankshaft. Again, just order a 1988 Fiero V6 part, and it bolts right up. Does the trick. Note the old pilot bushing still stuck in the end of the crank. This would later prove to be a problem.
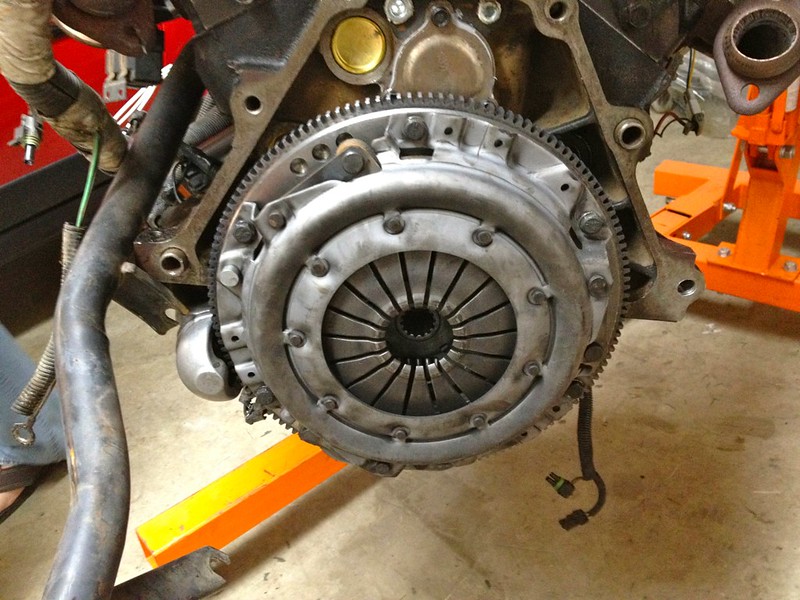
I installed this clutch assembly new only 1100 miles before the engine started knocking... so back in it goes!
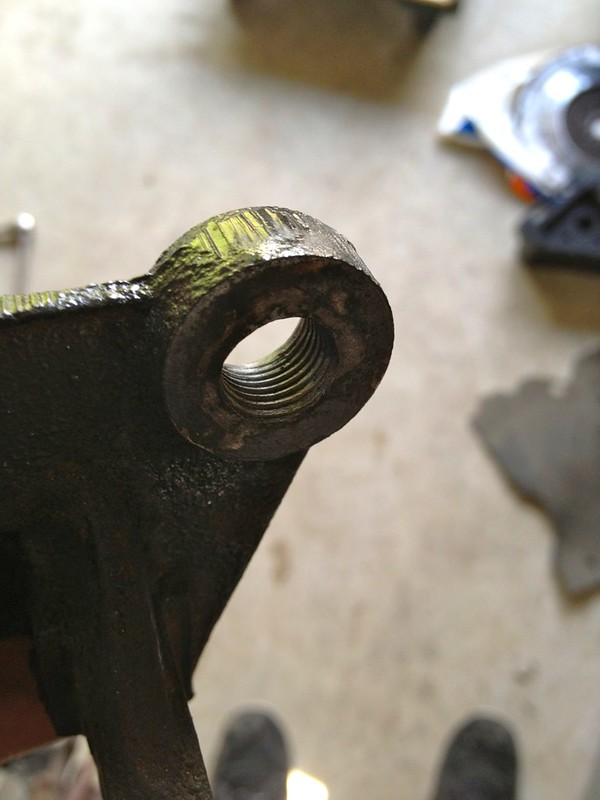
I opened up the hole and tapped some threads into the engine torque strut mount bracket, so that the A/C compressor bracket has somewhere to mount to. The stock 2.8 motor has a boss for the third bolt to share functionality as holding the bracket on, and mounting the AC compressor bracket. The new 3.4 motor has only the two bolt locations. I used a 27/64ths drill bit and M12x1.25 tap to properly thread the now bigger hole in the bracket. There's limited clearance behind the bracket, so I used a 30mm length 12x1.25 bolt which was enough to pass through both brackets and get a couple threads through on the back. You only have to do this if you have an '85, '86, or '87 Fiero with A/C. Check out the next picture to see the mounting points for this bracket.
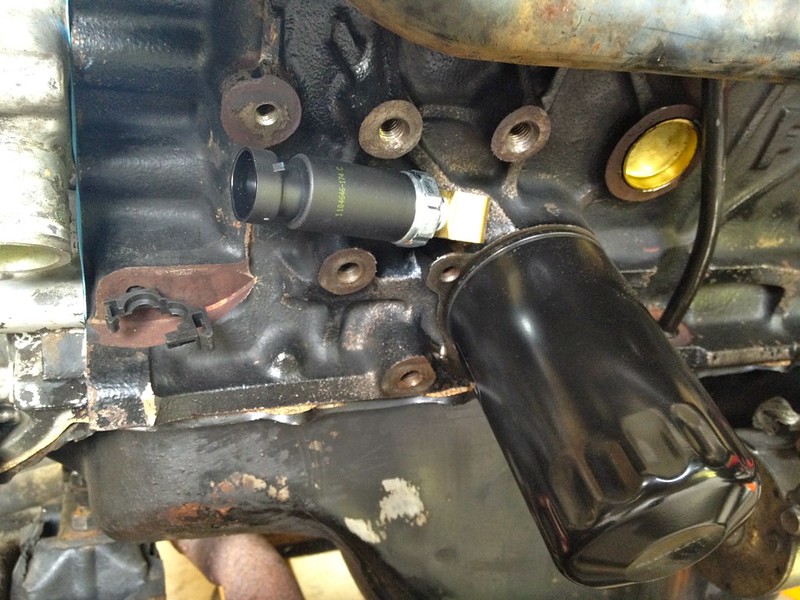
I installed an '88 Oil Pressure sender, instead of the earlier style with a tube up to a top-mount sender. This eliminates the degradation of the sensor from rain water damage, and is a cleanlier installation. I used a 45 degree angled fitting to get the sender to sit parallel to the side of the block, which allows clearance for the air conditioning compressor. This process is outlined in a 1988 Technical Service Bulletin. I bought the '88 oil pressure sender and new pigtail wiring from Autozone. I pulled the three wires back through the harness and out of the sheathing to get it down to this spot. Overall, another nice change. The two bosses between the sender and the oil filter are 2/3rds of the bosses on the 2.8. This is why you need to do something with the torque strut and A/C bracket. Also, note the larger than stock oil filter. You can get a filter for later 60 Degree V6's that is almost twice the capacity of the stock 2.8 part. Same diameter, same threads, just taller. Holds more oil, gives you longer filter life. Pair one of these with synthetic oil, and you can go 6000-7000 miles between changes and maintain an internally clean engine.[This message has been edited by ManMadeChickens (edited 03-18-2014).]
|
|

|
DefEddie
|
MAY 01, 05:13 AM
|
|
Dude your Awesome .
That's a nice build and great job.
Get it tuned though! Your leaving too much power on the table!
|
|

|
ManMadeChickens
|
MAY 01, 05:19 AM
|
|
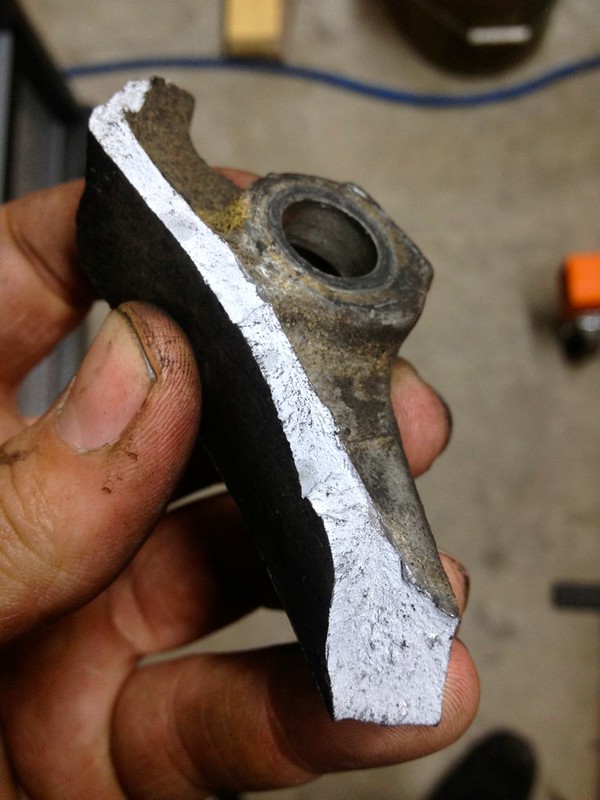
Here's a broken-off section of transmission bell housing. Cast aluminum is apparently very brittle. Damian and I were trying to install the transmission with the aforementioned unnecessary pilot bushing in the end of the crank, which apparently prevents the transmission input shaft from going all the way into the crank. We didn't realize this was why it didn't sit flush, and thought we'd try to cinch it up using the mounting bolts. We knew better, and had always heard that this is a no-no... but tried it anyway. Dumb. This stressed the case in an odd way, and cracked. Thankfully, I had a whole spare 4 speed Muncie just like the one I broke, so we swapped transaxles. Someday I'll either swap case halves on my old one, or have this welded back up so I have a spare again.
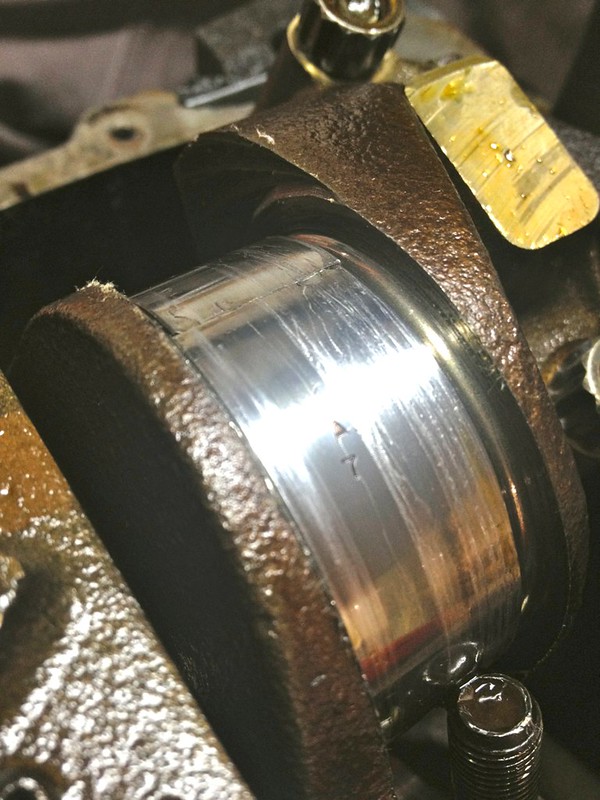
Once the trans case broke, I took a break from installing the new engine to do a Post-mortem on the 2.8. These are the #2 connecting rod bearings, with the two halves of rod bearing spun 90 degrees off normal. That's what was causing my engine noise. You can see how the bearings have grooves cut in their backs from spinning in their caps. Bad.
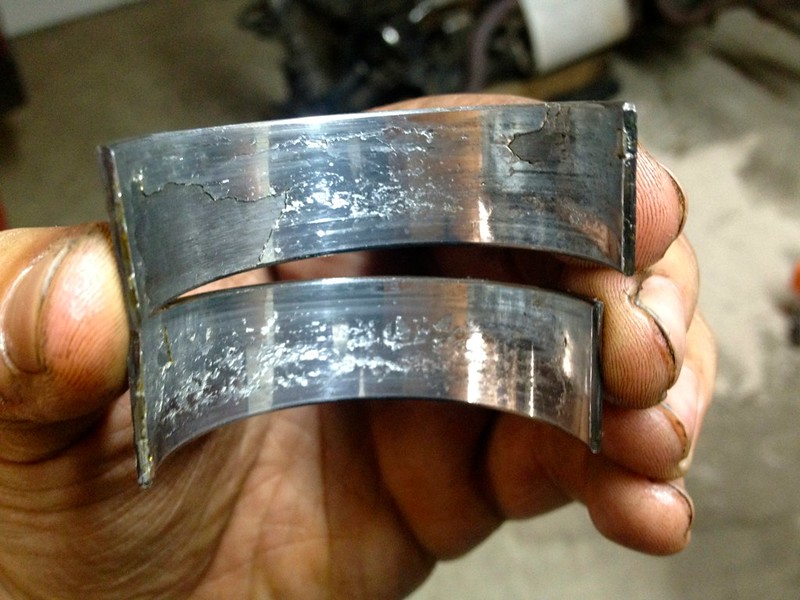
Inner surface of #2 rod bearings. WOW. These are totally mangled. Check out how the upper one is shedding layers of material, and how the bottom one is pitting. Totally crazy. This is as-pulled. The metallic flakes I was pulling out of the oil pan were the layers of that top bearing. Sad.
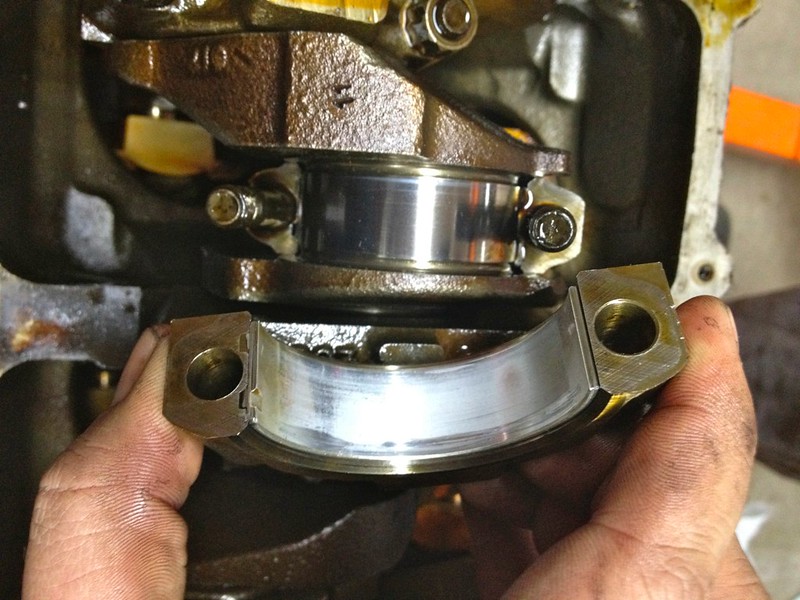
This is what a perfectly happy, normal, well-maintained rod bearing is supposed to look like. 5 of the 6 cylinder's bearings looked like this- minimal and normal wear after 150,000 miles. It's a shame one rod bearing had to go and ruin my motor.

Transmission replaced, everything set back in place. Next step, back in the car![This message has been edited by ManMadeChickens (edited 03-18-2014).]
|
|

|
ManMadeChickens
|
MAY 01, 05:24 AM
|
|
|
DefEddie - Thanks for the praise. It's running on the 2.8 computer and tune for now, just because I need the car back. My plan is eventually get it on a 7730, so I can use my Dad's chip burner and make a much better tune for it. Even with the limitations of the stock management, it's a lot peppier, with a huge gain in low and mid torque. 4th gear pulls are completely possible now!
|
|

|
ManMadeChickens
|
MAY 01, 05:33 AM
|
|
|

|
ManMadeChickens
|
MAY 01, 05:39 AM
|
|
Since then, I've already put 1200 miles on it in the two weeks I've had it back together. I broke it in on Shell Rotella, with a bottle of ZDDP additive. After 250 miles of getting the rings seated, I changed it over to Mobil 1 10W-30 with the ZDDP additive to help protect the flat tappet lifters. It's very noticeably better on the throttle than the 2.8, and has awesome torque. Mileage is about the same, perhaps 1 MPG less on average so far. Hard to tell if that's the bigger engine, or the fact that it's still pretty tight and "fresh."
Once it's fully broken in, I'm gonna take a baseline dyno, to see what it's making. Virtual Engine Dyno software says this build should be at about 195 crank. It was dead-on the stock 140HP figure for a 2.8, so it should be pretty close to that I think. We'll see if I'm making that much with the stock manifolds. After that, a 7730 is in the plan to get a bit better drivability and perhaps some more performance out of it.[This message has been edited by ManMadeChickens (edited 05-01-2012).]
|
|

|
Brucepts
|
MAY 01, 07:51 AM
|
|
Nice write-up!! Thanks!
Any chance of getting some part numbers posted up for the engine parts you used?------------------
"There is no more formidable adversary than one who perceives he has nothing to lose." - Gen. George S. Patton
http://www.flowbenchtech.com
|
|

|
ManMadeChickens
|
MAY 01, 08:33 AM
|
|
Sure, I'll do my best with the access to the receipts and such I have online. When I get back home to my parent's place, I can try to get anything remaining, as all the boxes and hard copy receipts are there.
-Melling M134 - Oil Pump, Standard-Volume, GM/Isuzu, 3.1/3.4L, V6
-Clevite MS2037P - Main Bearings, Direct Replacement, Standard Size, TM-77, GM, Isuzu, Jeep, 2.8, 3.1, 3.4L, V6, Set
-Sealed Power Z64020A - Rod Bearings, Standard Size, Bi Metal, Buick, Cadillac, Chevy, GMC, Olds, Pontiac, Isuzu, Jeep, V6, Set of 6
-Sealed Power Z1492M - Cam Bearings, Direct Replacement, B100, Buick, Cadillac, Chevy, GMC, Olds, Pontiac, Jeep, Isuzu, V6, Set of 4
-CompCams K16-233-4 - High Energy Cam and Lifter Kit
-CompCams RP1413-12 - Rocker Arm Kits; Chevy (V6 173 60°) 1.52 Magnum Rockers & High Energy Pushrods (Also Available in 1.6 Ratio)
-Accel 150619 - Fuel Injectors, 19 lbs./hr., 14.4 Ohms Impedance, 12 Volt, Ford, GM, Mazda, Mercury, Mazda, Set of 6
-WOT Tech Crank Scraper - 283400CS GM 60V6 Crank Scraper
-Sealed Power E548K - 3.4 DOHC Piston Ring Set
-Dorman 594-147 - Harmonic Balancer, Internal Balance, Nodular Iron, Natural, Buick/Chevy/GMC/Olds/Pontiac, V6, Each
-NAPA NTP 95059 - Timing Chain Damper
-NAPA NCF 88162 - 1988 Fiero Flywheel
-Duralast PS220 - 1988 Fiero Oil Pressure Switch
-Duralast 214 - 1988 Fiero Oil Pressure Switch Connector
-Rodney Dickman 3.4 V6 Swap Starter Relocation Jig Kit
As far as the Fel-Pro gaskets are concerned, I totally could have done that more efficiently. I mistakenly ordered an engine gasket set for the 3.4 Camaro motor, which has different manifolds, different oil pan and different front timing cover. For that, Get a Fiero engine Head gasket kit. Then, all you'll need is a front cover gasket set, which comes with an oil pan gasket, because of the shape of the Fiero oil pan. I bought so many unneeded gaskets, it's depressing.
As far as the pistons go, they're some no-name brand. The box at home has a bunch of industry part interchange numbers I can get for you later. The basic thing to know here is that they are 1991-1995 GM 3.4L DOHC (sometimes called Twin Dual Cam) pistons. They're an OEM design, so nothing too fancy. That's why I chose them- I thought that they're something that should be somewhat readily available. I did end up having a hard time finding anyone that could get me some.
The starter is supposedly a 1996 Pontiac Grand Prix 3.4L starter. I find them in the junkyard, so I don't have a part number for you.
The bigger oil filter is a WIX 51036 but their site has a list of many different models that are the same thing for each manufacturer.[This message has been edited by ManMadeChickens (edited 05-01-2012).]
|
|
    
  |
|


