
 
     |
| Front Exhaust Manifold Replacement (Page 3/3) |

|
sleek fiero
|
NOV 25, 12:36 PM
|
|
|
When I changed out mine I went to a local bolt and nut store and purchased a full set of grade 8 studs and nuts for about $20 Canadian. makes it super easy to remove down the road. sleek
|
|
|
|
82-T/A [At Work]
|
NOV 25, 01:19 PM
|
|
| quote | Originally posted by lateFormula:
All this talk of removing the decklid, or removing cradle bolts and lowering the cradle. Nahh. If you put the car up in the air on jackstands, this job can be done from underneath the car. But to do this you need to remove the AC compressor from the bracket if you have AC, and also remove the Y pipe. Both of these can be done from above before you raise the car up.
As for replacement hardware, here's my suggestion: Buy one of these to chase the threads in all the mounting holes in the heads before you start re-installing the manifolds. https://www.mcmaster.com/8305A59/
Then buy three of these: https://www.summitracing.com/parts/arp-761-1002. If you want to retain the factory heat shields you will need some M8 x 1.25 x 50mm studs and a package of these: https://www.mcmaster.com/93033A102/
Remember, when using stainless steel fasteners you ALWAYS need to coat the threads with anti-seize! |
|
Your URL has the period within the URL, so reposting your link: https://www.summitracing.com/parts/arp-761-1002
When I removed my forward exhaust manifold, I was able to do so without removing the decklid. It was not easy... but I basically leaned over the engine, and I had to move my hand around the front left of the engine, and the front right of the engine. I had to remove the air cleaner tube, and the battery / bracket in order to be able to get leverage in there. But none of my bolts snapped... and I was able to remove them all.
Thanks!!!
|
|
|
|
jjd2296
|
NOV 25, 02:57 PM
|
|
| quote | Originally posted by lateFormula:
All this talk of removing the decklid, or removing cradle bolts and lowering the cradle. Nahh. If you put the car up in the air on jackstands, this job can be done from underneath the car. But to do this you need to remove the AC compressor from the bracket if you have AC, and also remove the Y pipe. Both of these can be done from above before you raise the car up.
As for replacement hardware, here's my suggestion: Buy one of these to chase the threads in all the mounting holes in the heads before you start re-installing the manifolds. https://www.mcmaster.com/8305A59/
Then buy three of these: https://www.summitracing.com/parts/arp-761-1002. If you want to retain the factory heat shields you will need some M8 x 1.25 x 50mm studs and a package of these: https://www.mcmaster.com/93033A102/
Remember, when using stainless steel fasteners you ALWAYS need to coat the threads with anti-seize! |
|
That depends on the model of engine you have and if you have mods like a 3.4 block. In most cases the coolant crossover tube for 87-88 will be in your way if you try to do it from the bottom. Plus the top is much easier. I don’t know about you but I’m 6.1 220lbs. The car has to be jacked up fairly high for me to get under it comfortably. But then the reach to the manifold is That much further away! And I would prefer to do it with light shinning from above.
|
|

|
Patrick
|
NOV 25, 05:40 PM
|
|
| quote | Originally posted by 82-T/A [At Work]:
But none of my bolts snapped... and I was able to remove them all.
|
|
Count your lucky stars. Drilling out broken exhaust manifold bolts on the forward side of the engine is one helluva job! 
|
|
|
|
82-T/A [At Work]
|
NOV 25, 05:57 PM
|
|
| quote | Originally posted by Patrick:
Count your lucky stars. Drilling out broken exhaust manifold bolts on the forward side of the engine is one helluva job!
|
|
Yeah, I got lucky... the car didn't have a lot of miles when I went to remove the manifold to replace it with hogged out ones... but when I did remove them, half of them were heavily pitted and looked like they would have snapped at some point. I went really slow though...
|
|
|
|
Dukesterpro
|
NOV 27, 04:06 PM
|
|
I literally just finished mine.
I hate to break the bad news, this is not going to be a one day project. You absolutely need to take this slow and do it right.
You have to avenues of approach, I did both to see what I liked better.
Top Approach remove the decklid, tilt engine backward after disconnecting dogbone. Reach down and unbolt.
Bottom Approach remove catalytic converter, unbolt AC compressor (If equipped) (you dont have to remove it, just unbolt the bracket and lower it), tilt engine backward after disconnecting dogbone. Reach up and unbolt.
I personally like the bottom access cause it was easier to see the bolts and align the new gasket. I was so unbelievable lucky that not only did I not break any bolts, they were so loose they practically all fell out. Nor were they rusty, most likely due to the fact my car has not been recalled. Most of the time this wont be the case. You need almost 4 or 5 days of PB blasting and soaking (without running the car) to bust them loose. if even one breaks you are screwed until you can find time to get the head off. Replace all the bolts with studs (The Fiero store ones were nice to me)[This message has been edited by Dukesterpro (edited 11-27-2023).]
|
|
|
|
Patrick
|
NOV 27, 06:01 PM
|
|
| quote | Originally posted by Dukesterpro:
Top Approach remove the decklid, tilt engine backward after disconnecting dogbone. Reach down and unbolt.
|
|
The other option, which I've used, is to remove the two rear cradle bolts (and dogbone) and swing the cradle down just enough to gain the necessary access up front.
|
|
|
|
jjd2296
|
NOV 27, 07:20 PM
|
|
|
Patrick read the thread above, thats what it says and my question was where do I place the jack stands to do this? they cant go on the cradle in the middle where one would normally put them if you want to let the front of the cradle drop a few inches?? where did you place the jack stands?
|
|
|
|
Patrick
|
NOV 27, 07:46 PM
|
|
| quote | Originally posted by jjd2296:
...where do I place the jack stands to do this? they cant go on the cradle in the middle where one would normally put them if you want to let the front of the cradle drop a few inches?? where did you place the jack stands?
|
|
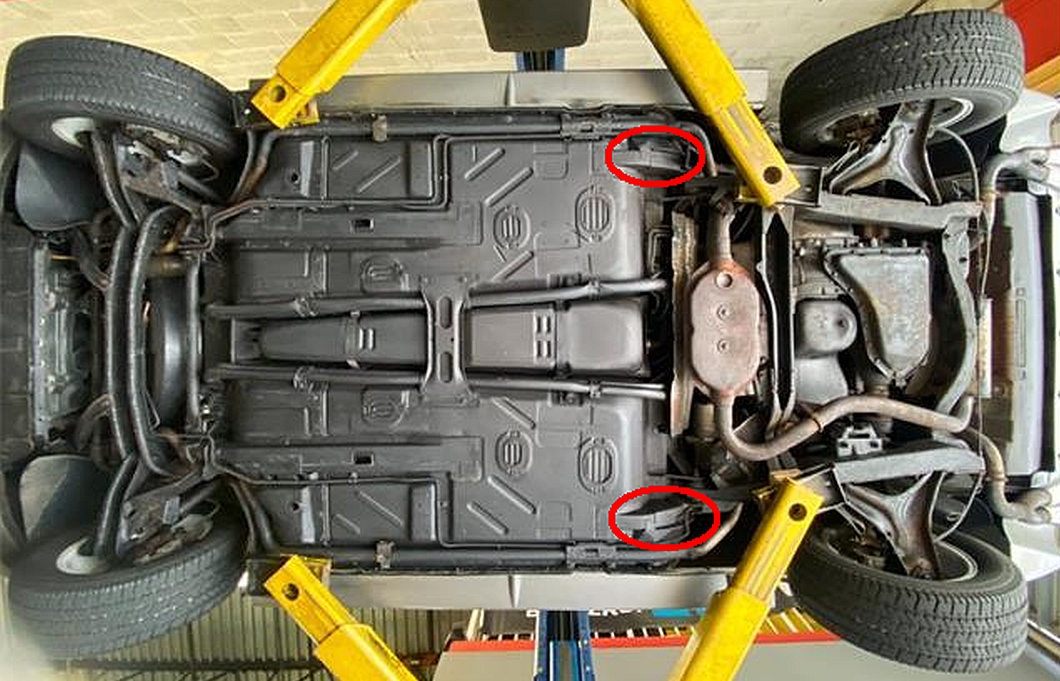
First of all, just to be clear... it's not the front of the cradle that drops. The method that I (and Dennis) described has the rear of the cradle drop.
The rear jack stands are located under the frame just in front of where the cradle pivots.
 [This message has been edited by Patrick (edited 11-27-2023).]
|
|
|
|
jjd2296
|
NOV 27, 08:33 PM
|
|
|
Thanks Patrick much appreciated and yes you are right the rear cradle bolts!!
|
|
|
|