
 
     |
| 85 GT front caliper bind (Page 1/1) |

|
hobbywrench
|
DEC 03, 12:24 PM
|
|
|
About time I looked at the following (orig owner). Go to 85 Fiero owner manual, brake section, pp 5-19 and 5-21, figure 5-25, and see a clearance call out where the calipers slide on the 2 caliper bracket "seats" ( beaks with rails). The spec is .005"-.012." Mine ran zero (that's 0.00") to .005." I had always fought the installation of the loaded calipers and this is why. Try running a feeler gauge at these 4 points on both front brakes. You may be surprised due to bad factory clearance and/or corrosion/dirt. Tedious and careful file work. I was in there still fighting a left pull on braking. Too soon to tell about this, but the calipers go together much easier and feel more "modern," more like the other cars I maintain. How weird and difficult these Fiero brakes are!
|
|
|
|
theogre
|
DEC 03, 06:54 PM
|
|
Fiero Front Brakes are very simple.
Rebuilt calipers often have issues/problems.
Your problem is this?
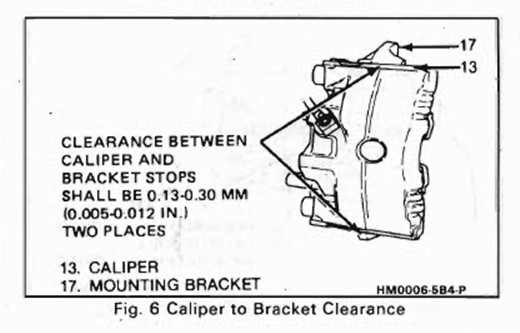
From 87 Fiero FSM
87 is only version w/ correct brake sections. (For early Fiero, GM/Helm copy/past brake data from other cars and didn't bother to check.)
If you fail to fit is likely because rebuilder built up metal back. The aluminum wears as dirt and rust on the steel grinds into it.
Need brake grease for that, inner pad area and other places.
carefully file the caliper on one end only when possible. Not the bracket.
Both edges must be square/parallel to themselves and to the slider bores or the caliper can bind as pads wear.
Slider have "bushings" to allow some errors but bad filing could wreck a caliper.
See my Cave, Brake Service
Brakes on other cars including new models often have problems need filing/grinding to work right.
Like Fiero Inner pad ends that caliper bracket hits. That problem is Not unique to Fiero or even to GM. I have to clean up pad edges for other cars even new cars and isn't just "cheap" parts either.------------------
Dr. Ian Malcolm: Yeah, but your scientists were so preoccupied with whether or not they could, they didn't stop to think if they should.
(Jurassic Park)
The Ogre's Fiero Cave
|
|
|
|
hobbywrench
|
DEC 05, 12:18 PM
|
|
|
The calipers have never been replaced. Yes , very simple. And weird...the long outer pad wears to very thin while the inner stays thick. The drawing you show is the one I refer to. After relieving the cast iron bracket seats the caliper is much easier to seat and the slider bolts home and thread much easier. Ideally the bracket would be set up and machined on a mill to maintain parallelism...few would do this. I recommend checking the gaps to improve freedom of the caliper and installation. Both front and rear brakes are difficult compared with Japanese systems.
|
|
|
|
hobbywrench
|
DEC 22, 06:49 PM
|
|
On another post I complained about left pull on braking and have pursued for years with no solution. This caliper bracket "relief" seems to have cured the pull. At the same time, however I did deglaze the right disc and dress both pads. This problem "may" have been the right front caliper hanging or dragging on brake application. That right caliper was much tighter in the bracket before filing than the left. The braking sensation was to pull on first stab, then straighten out on second. I had even monitored disc temperatures after quick stops from 60 mph-results: all 4 discs 225F.
I filed the bracket. If you try this go slow and expect to fit and refit the clean caliper in its bracket several times or more , including torque down , while using a feeler gauge strip to achieve the clearance you desire. Hate to think what a yard would charge for a bracket, if even available.
Edit: Just glanced at Guru's supplied drawing,and item 17 (bracket) is not really shown. If you do not do your own brakes this explanation is hard to follow. The brackets are cast steel.[This message has been edited by hobbywrench (edited 12-22-2020).]
|
|
|
|
pmbrunelle
|
DEC 22, 07:56 PM
|
|
| quote | Originally posted by hobbywrench:
Ideally the bracket would be set up and machined on a mill to maintain parallelism...few would do this. |
|
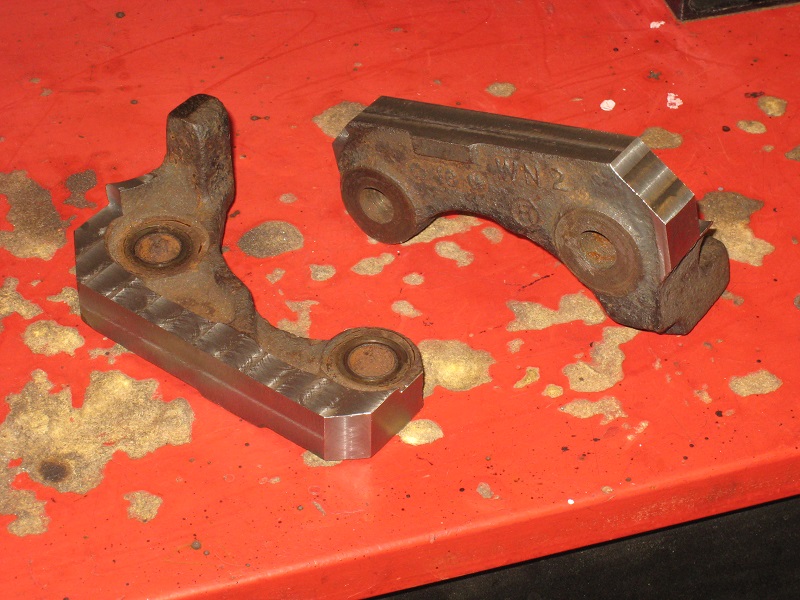
On that topic, I set up the brackets on a mill last week.
What can be done for an easy setup is to clamp the bracket in a mill vise (the machined mounting pads on one jaw), with long sockets to reach the bolt head spotfaces.
This will orient the bracket correctly for the machining you describe.
The Fiero brackets are cast iron, not steel. After machining the brackets, my hands (and the surrounding area) were all black with carbon...
|
|
|
|
hobbywrench
|
DEC 23, 11:29 AM
|
|
|
Hmm, Glad you showed the pic, but does not show the 2nd resting surface for the caliper. What are these brackets taken from? Also, if not too late ,show your setup on the mill. How did you determine depth of cuts? On mine the clearances were different on top vs bottom resting planes. What were the final clearances? Thanks [This message has been edited by hobbywrench (edited 12-23-2020).]
|
|
|
|
pmbrunelle
|
DEC 23, 12:16 PM
|
|
Those are 84-87 Fiero front brake caliper brackets.
I wasn't trying to eliminate caliper bind with stock calipers; I was taking off a lot of material (including chopping off the caliper mounting ears) to do something else for a "big" brake project.
Nevertheless, the mill setup part is applicable to the subject at hand.
This photo shows the best I could reproduce the setup after-the-fact.
Imagine that it's a Kurt vise on a milling machine table, with the caliper mounting ears still intact and pointing upwards:
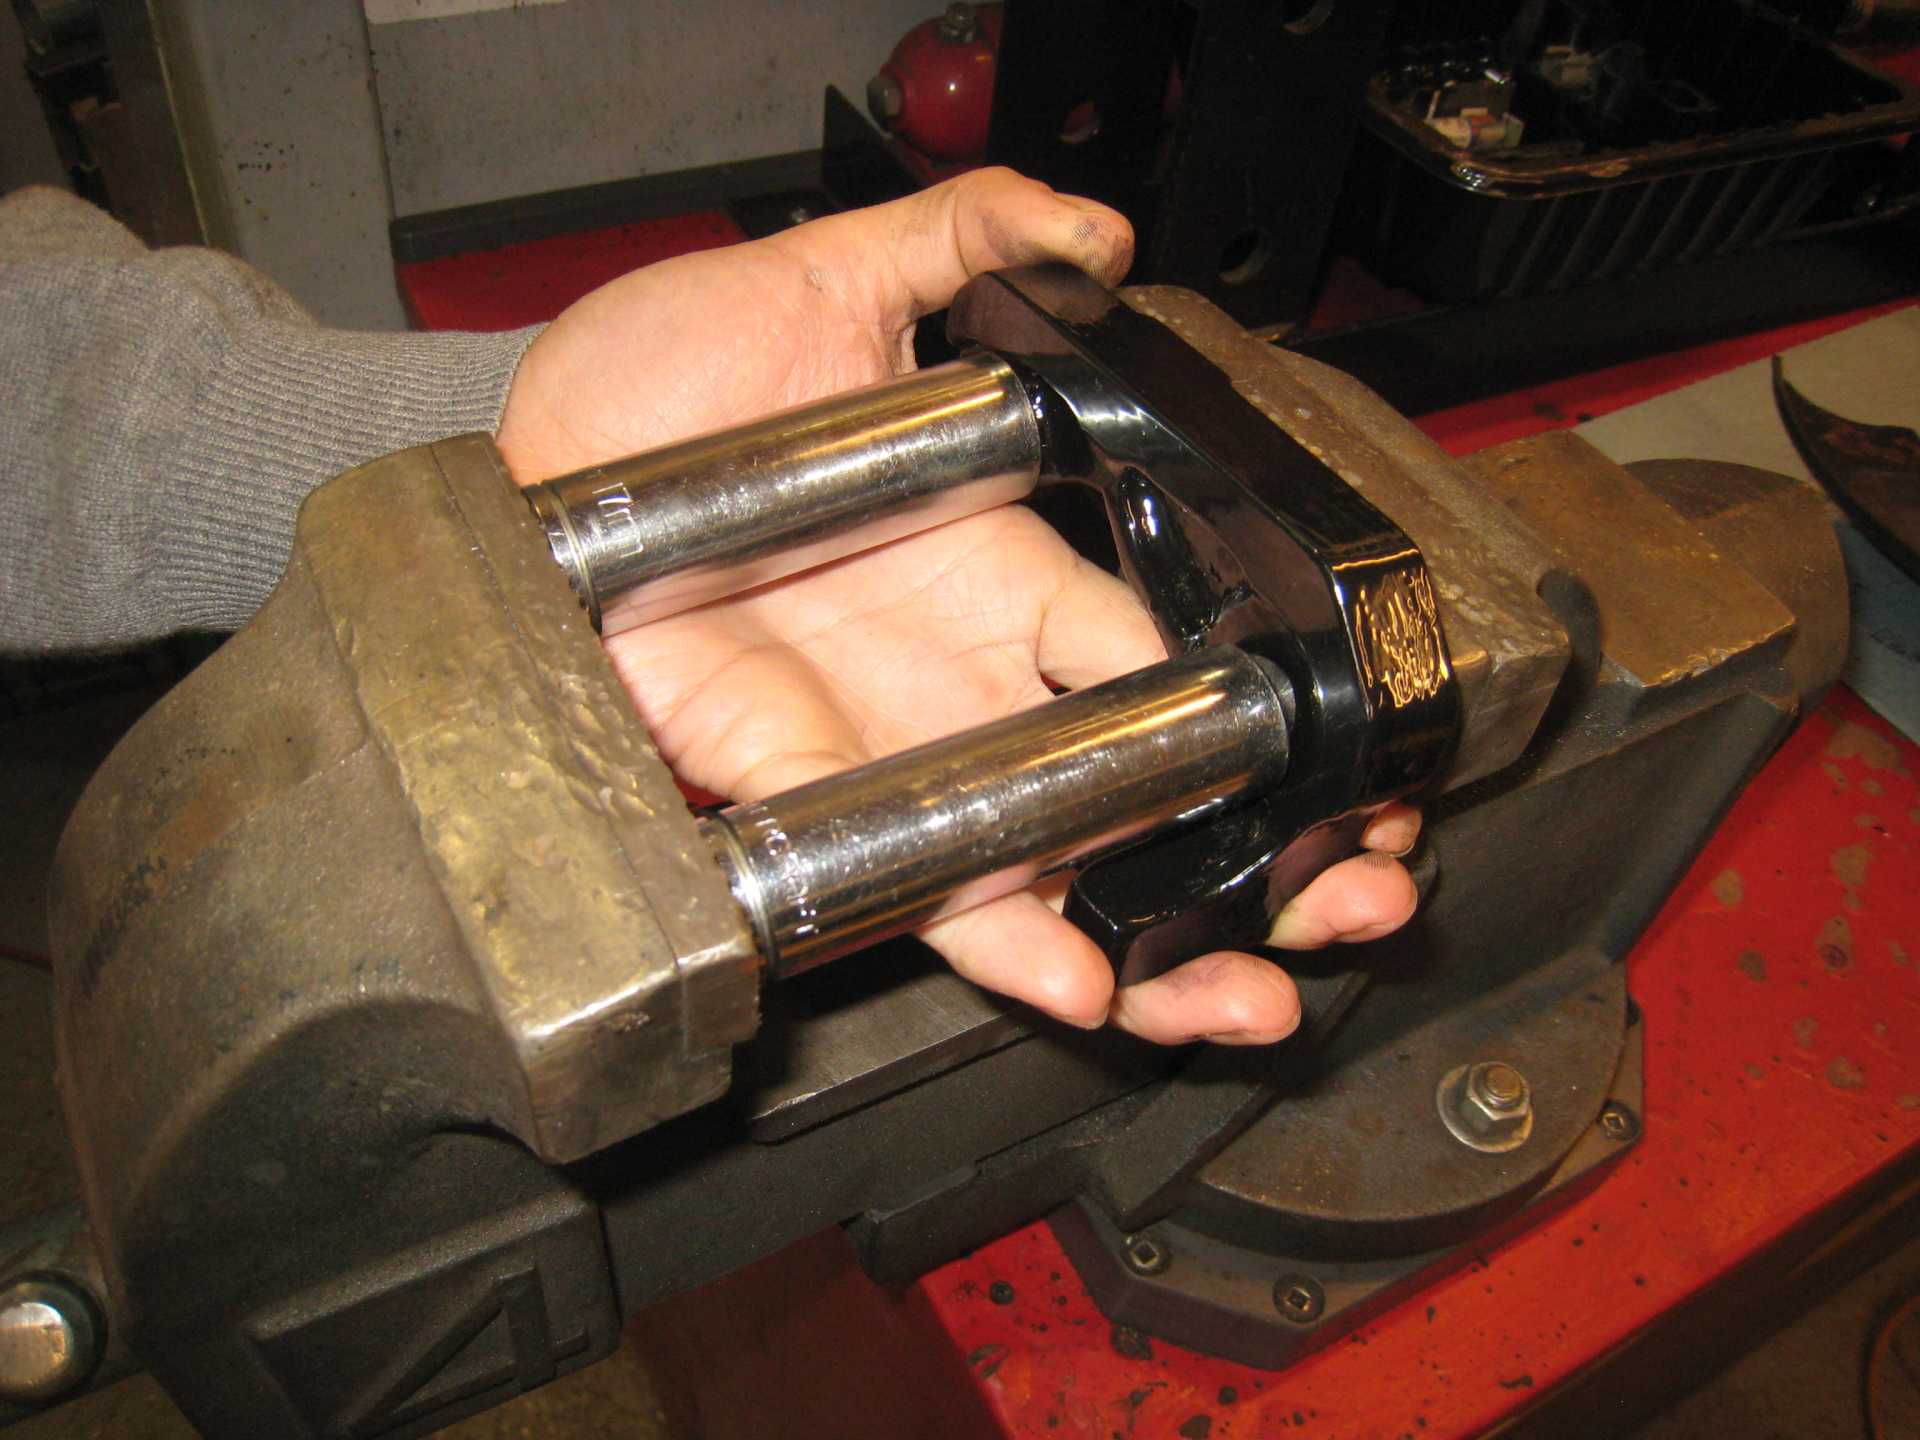
As far as how much material to cut, I guess I would suggest bringing the caliper to the milling machine, and testing the fitment after each shallow (like 0.002") cut.[This message has been edited by pmbrunelle (edited 12-23-2020).]
|
|
|
|
hobbywrench
|
DEC 24, 12:26 PM
|
|
Good and thanks. One final word to clarify my take on the problem of insufficient clearance. Proper lubrication of the caliper slider bolts is required, but if these bracket clearances are insufficient a drag or stop may be introduced into the free movement of pads onto disc. And to add to the problem corrosion is sure to develop on the "spot" where the caliper "lives" on the bracket, especially the top.
Filing is somewhat risky , especially on the top because that bracket surface is wider promoting uneven file strokes. I am lucky to have a lift which put the brackets at working height. Removing e.g., 005" to .010" of material requires some elbow . I used a bright light and marker "blue" to assess progress. Worth the effort.[This message has been edited by hobbywrench (edited 12-24-2020).]
|
|
|
|
theogre
|
DEC 24, 03:58 PM
|
|
| quote | Originally posted by hobbywrench:
Good and thanks. One final word to clarify my take on the problem of insufficient clearance. Proper lubrication of the caliper slider bolts is required, but if these bracket clearances are insufficient a drag or stop may be introduced into the free movement of pads onto disc. And to add to the problem corrosion is sure to develop on the "spot" where the caliper "lives" on the bracket, especially the top.
Filing is somewhat risky , especially on the top because that bracket surface is wider promoting uneven file strokes. I am lucky to have a lift which put the brackets at working height. Removing e.g., 005" to .010" of material requires some elbow . I used a bright light and marker "blue" to assess progress. Worth the effort. |
|
"Weird" Outer pad wear is cause by...
Sliders have problems... Not lubed or lube wrong and when that happens need new "O-rings" for 84-87 Fiero and other w/ same type. (88 Fiero need new slider boots when lubed wrong.) Slider O-ring is supored to stick some to the slider because is a Return Spring to the outer pad. Wrong lube is too slippery and ring moves too easy when you apply brakes or worse swells the ring and in either case won't move right or at all.
Wheel Bearing have too much play when turning. Bearing have some play because can't "preload" them but too much causes problems too. See my Cave, Front Bearings
Normal operation or Dragging pads make Heat, heat can expand the cal body and lack of clearance to bracket can bind the whole thing.
Rare people need to grind/file the bracket. Some many need to do that to the caliper because rebuilders messed up fixing them.
Need thin film of brake grease to lube and stop "rust" when iron and aluminum meets. AlOx Swells a lot a easy binds where this happens and far worse when meets other metals and gets "water" in the joint.
Many iron parts for brakes and suspension are Ductile Iron. Unlike "normal" Cast Iron this will bend a lot more before breaking. Is possible your bracket got hit and actually needed some minor work to fit the caliper. But many should be very careful before grinding/filing them or next time you buy new calipers, they can have too much clearance w/ the bracket.
|
|
|
|
hobbywrench
|
DEC 25, 12:07 PM
|
|
Well re front bearing clearance. Pros at alignment have remarked adjustment is a lost art. The received wisdom says set up your front wheel bearings with a dial indicator and look for the required clearance on the gauge.. Over the years this has not worked because getting an accurate reading moving the wheel in and out against the dial plunger is tedious if not impossible. What I learned is that there is a sweet spot on bearing clearance that is reached by careful attention to the hex nut /washer combination.
Tighten the nut while spinning the wheel until drag is felt. Then back off and slowly retighten. Check clearance by grasping wheel at 12/6 O' clock and listen/feel for clearance while applying rocking force at 12/6 O'clock points. The adjustment that has worked ( for me) is qualitative so no torque reading works. Rocking with all the force your steely arms can muster must reveal a clearance felt and not heard. Just this side of zero.
Now the task is insertion of the key through the nut slot and axle shaft hole. Use the largest key that will fit with some force. Won't go, right?. Slowly reduce the nut mating surface with figure "8" movement on emory paper, or (unlikely) sort through your special washer trove for thinner washers until you can access the key openings. Trim and bend one side of key up around nut hex.
Too tight and burn the bearing purple. Too loose and wheel jump. New brake disc/bearing requires repeat above.[This message has been edited by hobbywrench (edited 12-25-2020).]
|
|
|
|