
 
     |
| Another temp gauge issue thread (Page 1/3) |

|
Mccannable
|
FEB 01, 09:21 AM
|
|
I have been researching This for a few weeks and I am at the conclusion my temp gauge is not working.
88 gt in great shape.
Steps taken:
-Previous owner swapped the wires at sender and behind dash.
-Tested grounding wires at sender; temp lights illuminates but gauge does nothing.
-tested grounding wires on dash to gauge and lights. Light illuminates and gauge doesn’t move.
I’m guessing that means the gauge is bad. Is there anything else I should do Before I replace the gauge/cluster?
Also, I can’t find just the gauge.
|
|
|
|
Gall757
|
FEB 01, 11:11 AM
|
|
|
|
|
Mccannable
|
FEB 01, 11:37 AM
|
|
|
Thanks, I have been reading post for awhile now.
|
|
|
|
olejoedad
|
FEB 01, 01:13 PM
|
|
Temp and fuel gages are housed as one unit.
Forum member JGunsett repairs and restores gages.
|
|
|
|
ninedriver
|
FEB 02, 10:04 PM
|
|
|
I just went through this recently and my issue was with the temperature sending unit/switch. I removed it from the engine and it appeared someone had used pipe dope to install it which will interfere with it making contact with the block to complete the ground. Once removed, I cleaned the threads in the block and on the sensor with a pick. I also “bench” tested it in a pot of water on the stove and an ohm meter. It specked out good, I reinstalled it, and all is good. If it doesn’t check out good, Napa has them with the factory correct plug end. ------------------
Steve
|
|
|
|
ninedriver
|
FEB 02, 10:08 PM
|
|
|
BTW, I grounded / tested the wires at the sender like the write up suggests and had the same results as you, light came on but gauge did nothing. I suspected the gauge but ended up bench testing it with some resistors and it checked ok. That’s what led me back to the sending unit. Not sure why that grounding of the wire test didn’t work.
|
|
|
|
Mccannable
|
FEB 03, 09:27 AM
|
|
| quote | Originally posted by ninedriver:
BTW, I grounded / tested the wires at the sender like the write up suggests and had the same results as you, light came on but gauge did nothing. I suspected the gauge but ended up bench testing it with some resistors and it checked ok. That’s what led me back to the sending unit. Not sure why that grounding of the wire test didn’t work. |
|
That is strange.
Can you explain the bench test for the gauge. I simply grounded it behind the dash to rule out a poor connection from the sender.
|
|
|
|
theogre
|
FEB 03, 02:10 PM
|
|
gauge maybe "dead" but more likely "wires" to it have problems.
Dash "board" has "pins" where plugs go and bend or break when "glue" holding them fails. This can do nothing or short out the dash and other things on a plug.
Gauges have stamped "spring" between gauge and board and they and board get dirty etc.
Some gauges have resistor "bolted" to back and stamped nuts get dirty etc. Carefully Loosen/tighten the nuts a few times may "clean" them. DO NOT tighten like "real" nuts or you likely wreck the resistor. only need to tighten enough so just stays put.
Oil and fuel can test w/ ~ 45Ω half scale, 90Ω full scale.
But Temp gauge needs higher values. 55Ω = 260°F(127°C), 1365Ω = 100°F(38°C). Nearly Anything will tell a gauge even tries to work. (Sender is NTC Termistor ground thru threads.)
Gauges need "12v" Ground and 1 wire to resister/sender that goes to ground too.
⚠️ Warning:
Temp gauge have 4 "terminals" but only 3 to connect to car.
Connect gauge terminal or dash wrong and likely wreck dash, gauge or resistor on gauge. Don't bother w/ FSM and others because won't help "bench testing."
See http://www.fiero.nl/forum/Forum2/HTML/138175.html at bottom.
------------------
Dr. Ian Malcolm: Yeah, but your scientists were so preoccupied with whether or not they could, they didn't stop to think if they should.
(Jurassic Park)
The Ogre's Fiero Cave[This message has been edited by theogre (edited 02-03-2021).]
|
|
|
|
ninedriver
|
FEB 03, 02:31 PM
|
|
First of all, does your gauge “come to life” when you select the key to the run position? Another words , the needle is probably way left with no power, turn the key to the run position and the needle will jump to about the 100 degree line on a cold engine. If so, read on.
The gauge acts like nothing more than an ohm meter measuring resistance. The resistance is varied through the sending unit. To bench test the gauge, it has to be removed from the cluster which if you haven’t done before can be somewhat tricky. Lots of screws into plastic, tight spaces, and potential to screw things up. There’s some good write ups on the forum on how to tackle that. However, before going down that road, I would suggest inspecting and testing the sending unit first.
By inspecting, make sure the threads on the sender and in the block are clean and free from corrosion or thread compound. Use a pick to clean them out. Once that’s done, select your DVOM (volt meter) to ohms. If you don’t have one that measures ohms, buy or borrow one. Touch one lead from the DVOM to the threads of the sender and the other lead to the pin on the sender that’s away from the exposed side (alligator clips work well here). You should get an approximate ohm reading based on temperature relative to this table. If you have no reading, you may have the lead on the wrong pin, in which case switch, or a dead sender.
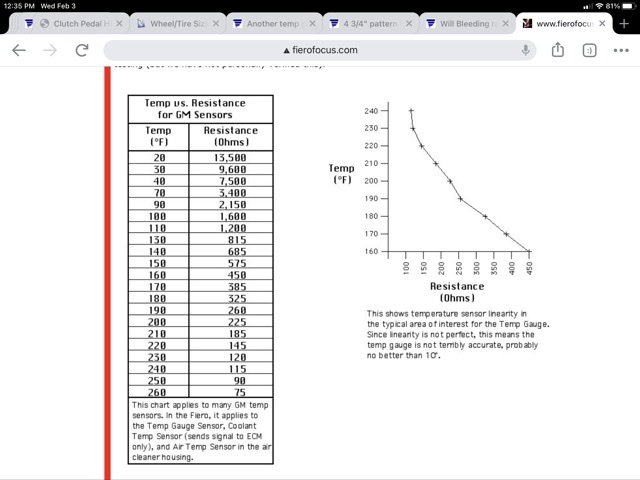
Put the sender in a pot of water on the stove and heat it up. Place a kitchen/ food thermometer in the water to monitor the temperature and reference the table to make sure the ohms, resistance, is changing accordingly. If that checks good, reinstall the sensor (DON’T USE SEALANT ), plug the wire harness back in, run the car for a few minutes and see if the gauge responds. Sealant or corrosion in the threads are usually the culprit.
If that doesn’t work, then on to the gauge. Once you carefully remove it, test as follows. A member helped me troubleshoot it using the following instructions.
“To check it you will need a 12-13V power supply and a resistor 130 to 140 ohms. Looking at the back of the gauge you have 4 posts. The top center post is ground, the left post is 12+ volts, and the right side post is the reading in ohms from the sensor on the engine block. You place the resistor (130-140 ohms) across the signal post to the ground post. Hook up + an - from the power supply and the gauge should read around the 220 to 230 degrees.”
You can buy resistor kits on Amazon/eBay in various values. Then you attach them in series and add the values together to get the resistance you want. Now you can reference the table again and the gauge should indicate the temperature based on the amount of resistance you’ve put inline. Approximately anyways, within a couple of lines.
If the needle moves but is way off, reach out to J Gunsett as he can fix that issue and possibly others.
If the sending unit checks good, the threads and leads are clean, and the gauge checks good but things still don’t work...report back and we can diagnose the wiring to make sure it’s done properly.
|
|
|
|
theogre
|
FEB 03, 03:52 PM
|
|
Above Chart Is Wrong for the Dash Temp Gauge.
Is a longer version for MAT ECT and others used by Most GM ECM/PCM.
While all are NTC Thermistor, Gauge sender is not same "guts" inside them on top of different plugs etc.
|
|
|
|