 
     |
| Side Scoop Install (Page 1/1) |

|
thejinx13
|
APR 28, 01:38 PM
|
|
Good afternoon.
I am getting ready to install the side scoop rocker panels on my 86 GT. Can anyone point me to a guide for this process? I looked around but didn't see one.
I have to pull the rear wheel and flashing off to do my belts anyway so I figure it's a good time to do it.
Thank you!
|
|
|
|
Mike in Sydney
|
APR 28, 10:36 PM
|
|
I'm stripping my '86 GT for paint and scoop installation now. The process I followed was:
1. Remove aero Rocker panel under door.
2. Remove inner fender
3. Remove round quarter panel moulding
4. Remove the 7 rivets holding the panel on.
5. Remembering the panel has a leg that extends up, gently ease the panel down and off the car.
Expect to break moulding clips. Get new ones from TFS. Also expect to be really frustrated in removing the aero rocker panels. They have to come off to remove the panel.
Email me if you have questions. I'll take some pics and send them to you.
|
|
|
|
Spoon
|
APR 29, 09:21 PM
|
|
You may find that removing the smallest body part on a Fiero requires dissecting the whole side of the car from front to back.
A decade or more ago I bought that triangle piece near the driver side view mirror. To replace it the A-Pillar panel needed to be unglued and lifted which is part of the roof. The risk was too great for my skills so the part is still sitting on the shelf.
Just remember everything you need to remove is like an overlapped jigsaw puzzle.
Spoon
------------------
"Kilgore Trout once wrote a short story which was a dialogue between two pieces of yeast. They were discussing the possible purposes of life as they ate sugar and suffocated in their own excrement. Because of their limited intelligence, they never came close to guessing that they were making champagne." - Kurt Vonnegut
|
|
|
|
Mike in Sydney
|
APR 29, 10:00 PM
|
|
The quarter panels below the side mouldings and behind the doors are not that difficult you just need to be careful. Make sure all the pop rivets are removed - seven aluminium rivets if I remember correctly - and a couple of screws. The most aggravating part of the process is removing the aero moulding under the doors. There are 7 or 8 plastic rivets under under the car that need to come out and 2 of 3 aluminium rivets under the long plastic cover plate in the door jamb that have to come out. There are also screws front and back.
Disengage the clips holding the under door aero moulding from the front fender. Look between the under door moulding and the fender moulding for an opening. You need to push down on the tab in the opening to release it. I found that using an old table knife worked pretty well. I started at the front and released it then moved to the back. Now, disengage the tab at the back in the same manner. BE CAREFUL! You do not want to break these tabs.
When reinstalling the aero moulding, secure the rivets in the door jamb first, tabs next, and then the screws. Plastic rivets are the last - at least that’s the way I did it.[This message has been edited by Mike in Sydney (edited 04-29-2021).]
|
|
|
|
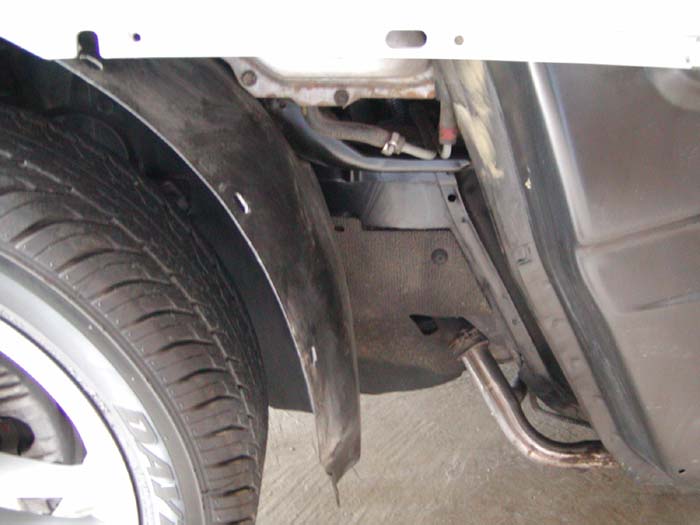
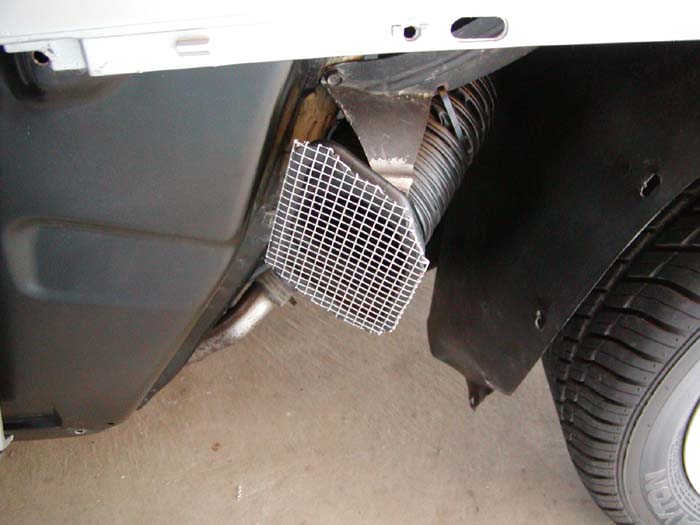
Skybax
|
APR 29, 10:41 PM
|
|
Here are some photos I took when I installed mine 20 years ago so they might help you seeing what's behind beforehand. I also added a extended air duct and attached it to the scoop inlet, and pinched wire mesh over inlet so critters couldn't crawl in.
|
|
|
|
thejinx13
|
MAY 01, 09:00 PM
|
|
Thank you all very much.
I am currently visiting Mickey Mouse with the kids, but as soon as I get home I will give this a try.
I had no clue that whole lower moulding piece had to come off, that's... unfortunate haha.
I did this same project in the late 90s but I didn't recall pulling that piece. My girlfriend at the time wrecked the car 2 weeks later so I have blanked the whole thing from my memory I guess lol.
Thanks again.
Chris
|
|
|
