
 
     |
| V6 Valve Cover Gasket Change (Page 1/2) |

|
robmox
|
MAY 26, 02:10 PM
|
|
My '88 Formula is having oiling issues, and one thing I'm doing while I tackle the problem is chase down oil leaks. I'm working from top to bottom, so the first leak I'm going after is a valve cover leak. However, that requires removal of the intake plenum and upper intake. What all would I need for this work? I already have the valve cover gaskets and intake manifold gasket. Looking on Rock Auto, the Intake Plenum Gasket looks exactly the same, and I believe that's a mistake. Also, do I need any RTV for installation of these gaskets? Lastly, a few of the gaskets are no longer made by ACDelco, so I'm looking for the best replacement. Any trusted brands?
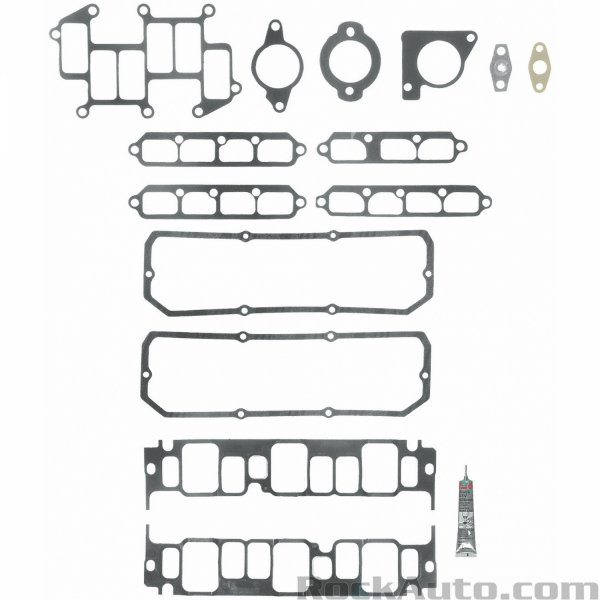
I'm considering getting this (https://www.rockauto.com/en/moreinfo.php?pk=125356&cc=1249208&pt=5424), because it looks like it should have everything I need. However, I've yet to tear into this engine, so I just want to ensure that's everything I'll need.
 [This message has been edited by robmox (edited 05-26-2022).]
|
|
|
|
A_Lonely_Potato
|
MAY 26, 04:54 PM
|
|
You don't need to pull the lower middle intake manifold, only the plenum. If you loosen the MIM bolts you can nudge it slightly to the side, allowing you to get the valve covers off. I just did it a couple weeks ago, and I had to remove the bracket the oil dipstick guide tube is secured to(for removing firewall side cover). On the trunk side, the dogbone mount had to be removed.
EDIT: my bad, i was calling the middle intake manifold the lower[This message has been edited by A_Lonely_Potato (edited 05-26-2022).]
|
|
|
|
robmox
|
MAY 26, 05:04 PM
|
|
| quote | Originally posted by A_Lonely_Potato:
You don't need to pull the lower intake manifold, only the plenum. If you loosen the LIM bolts you can nudge it slightly to the side, allowing you to get the valve covers off. I just did it a couple weeks ago, and I had to remove the bracket the oil dipstick guide tube is secured to(for removing firewall side cover). On the trunk side, the dogbone mount had to be removed. |
|
Sounds good. I went ahead and bought the gasket set above just in case. Should be able to do this next week.
|
|
|
|
fierofool
|
MAY 26, 08:28 PM
|
|
|
That is the correct gasket set. It includes some extra stuff that's used on the 3.1 and 3.4. The valve cover gaskets included are cork for the 3.1 and 3.4. As you already know, the Fiero uses silicone valve cover gaskets. I don't recall that I had to do anything to the lower intake manifold to get the valve covers off. Just the upper and middle intake manifolds.
|
|
|
|
pmbrunelle
|
MAY 26, 08:57 PM
|
|
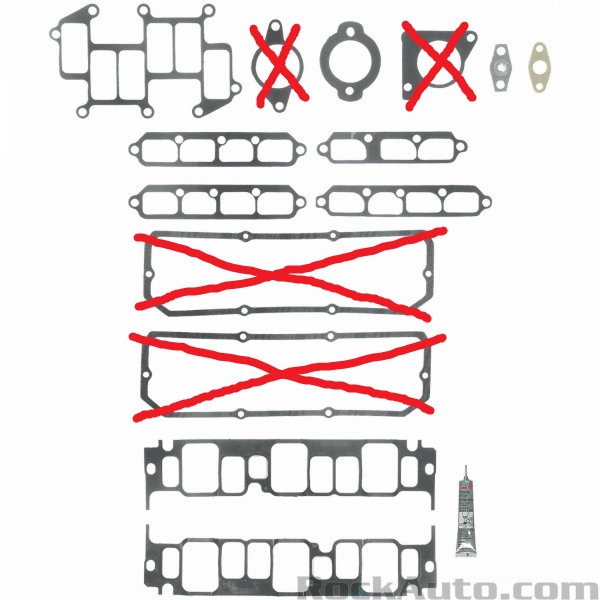
For information, the following gaskets from the kit are not used in the Fiero V6:
RTV is only needed when you're messing with the lower intake.
The intake manifolding on the Fiero V6 is made up of three parts:
Upper (plenum)
Middle
Lower
|
|
|
|
Dennis LaGrua
|
MAY 26, 09:39 PM
|
|
|
I've read that some Fiero owners have changed the rocker cover gaskets without removing anything else but the covers.. I've been told by another owner that you can remove all the rocker cover bolts using a 1/4" socket set with 10mm socket, a U joint and an extension bar. I have never tried this but I have heard this more than once. True or false? ------------------
" THE BLACK PARALYZER" -87GT 3800SC Series III engine, custom ZZP /Frozen Boost Intercooler setup, 3.4" Pulley, Northstar TB, LS1 MAF, 3" Spintech/Hedman Exhaust, P-log Manifold, Autolite 104's, MSD wires, Custom CAI, 4T65eHD w. custom axles, Champion Radiator, S10 Brake Booster, HP Tuners VCM Suite.
"THE COLUSSUS"
87GT - ALL OUT 3.4L Turbocharged engine, Garrett Hybrid Turbo, MSD ign., modified TH125H
" ON THE LOOSE WITHOUT THE JUICE "
|
|
|
|
Patrick
|
MAY 26, 09:40 PM
|
|
| quote | Originally posted by robmox:
...the first leak I'm going after is a valve cover leak. However, that requires removal of the intake plenum and upper intake.
|
|
I refer to the intake assembly as upper, middle, and lower... but as you've been informed, there's no need to remove the middle intake plenum.
It's true, 2.8 valve covers CAN be removed without removing the middle intake plenum!
| quote | Originally posted by Patrick:
I'm here now to tell you all that it can be done! And here's the proof...

The red arrow indicates where the bolt is that's a bit of a challenge to remove (one on each side), but really, with a bit of ingenuity it was actually pretty easy. 
|
|
[This message has been edited by Patrick (edited 05-26-2022).]
|
|
|
|
A_Lonely_Potato
|
MAY 26, 09:49 PM
|
|
|
Im a bit of a masochist(as i believe most people who work on cars are), so for the bolt patrick has highlighted, I just used the box end of a 5/16" wrench. slow as molasses, but it got it done
|
|
|
|
Patrick
|
MAY 26, 10:00 PM
|
|
| quote | Originally posted by A_Lonely_Potato:
Im a bit of a masochist (as i believe most people who work on cars are), so for the bolt patrick has highlighted, I just used the box end of a 5/16" wrench. slow as molasses, but it got it done
|
|
I used a 1/4" drive socket on there, but if I remember correctly... after loosening it with a flat wrench of some sort, I used a large Philips screw driver at quite an angle to turn the socket... as I couldn't get a 1/4" extension in the socket, and I couldn't find my 1/4" universal. 
|
|
|
|
A_Lonely_Potato
|
MAY 27, 01:39 AM
|
|
| quote | Originally posted by Patrick:
I used a 1/4" drive socket on there, but if I remember correctly... after loosening it with a flat wrench of some sort, I used a large Philips screw driver at quite an angle to turn the socket... as I couldn't get a 1/4" extension in the socket, and I couldn't find my 1/4" universal. |
|
oooohh thats smart! i didnt think about using a screwdriver on a socket, that probably woulda worked WAY faster than what i did.
|
|
|
|