
 
     |
| Hose sizes under battery tray vapor lines (Page 1/1) |

|
WonderBoy
|
AUG 26, 02:59 PM
|
|
It's fuel line replacement time!
Thank you theogre and Patrick for this:
Hidden Fuel and Coolant Leaks...
Going to be replacing my vapor/vacuum lines under the nasty rusted out battery acid eaten battery tray with a set that arrived from Inline-tube:
1987 Pontiac Fiero 5/16", 1/4" Fuel Vapor Lines 2pc, Stainless
I'm looking to also replace the rubber hoses/clamps that go from those lines to that expansion tank up above rear passenger side wheel well I remember seeing under there years ago. Since this is my lone daily driver, I can't take apart then go to autozone and get replacements. Does anyone know the size (inside outside diameter) and type/rating of those hoses? Want to have all the parts on hand before I begin so I'm not stranded.
Thanks------------------
Curtis
1987 Pontiac Fiero GT:
<Drives like a Go-Kart, handles like a roller coaster>
|
|

|
theogre
|
AUG 26, 04:03 PM
|
|
The Return and "Vent" lines are 5/16" OD for metal, ID for hoses.
Those lines are "non-pressure" and J10R7 or R9 will work in most places.
if some places actually look and require "Barrier" hose, those won't meet that. See https://www.underhoodservic...l-hose-installation/
Feed line to engine is 3/8" OD/ID for metal/hose outside of tank. Even if is dukes w/ low pressure think needs R9 high pressure hose to be safe.
Note: If you replace "O-ring" at F-filter etc... need Viton NOT black rings. black rings will leak and likely fast.
Do not over torque the fitting. "wrenching down" does nothing but make more problems.
If the joint leaks no amount of force will help. O-rings are bad and/or have damage the sealing areas.
HF and others have "bundles" of Viton rings but not sure if include ones use by GM. Dorman have then but way over price for 4, 2 each of common size.
If metal to the aux tank rots. just replace w/ rubber and make sure can't move and hit pulleys, sharp edges,etc. Make sure bottom of aux tank goes to fuel tank. not the other way around.
If you over fill the main tank, most any that make more nozzle shut offs after first shut off, extra often is force to the aux tank and self empty after you drive enough.------------------
Dr. Ian Malcolm: Yeah, but your scientists were so preoccupied with whether or not they could, they didn't stop to think if they should.
(Jurassic Park)
The Ogre's Fiero Cave
|
|
|
|
Will
|
AUG 26, 04:49 PM
|
|
| quote | Originally posted by WonderBoy:
It's fuel line replacement time!
Thank you theogre and Patrick for this:
Hidden Fuel and Coolant Leaks...
Going to be replacing my vapor/vacuum lines under the nasty rusted out battery acid eaten battery tray with a set that arrived from Inline-tube:
1987 Pontiac Fiero 5/16", 1/4" Fuel Vapor Lines 2pc, Stainless
I'm looking to also replace the rubber hoses/clamps that go from those lines to that expansion tank up above rear passenger side wheel well I remember seeing under there years ago. Since this is my lone daily driver, I can't take apart then go to autozone and get replacements. Does anyone know the size (inside outside diameter) and type/rating of those hoses? Want to have all the parts on hand before I begin so I'm not stranded.
Thanks
|
|
I didn't know Inline Tube made those! 
Mine weren't bad, so I bead blasted them and painted them with clear POR-15.
Stainless is SOOOOOO much nicer though...
Err... Wait... the description says "Fuel tank to charcoal canister"... I'm not sure that's the lines to the expansion volume outboard of the battery.
Also: The vent line that goes from the expansion can to the charcoal canister connects to the *TOP* of the expansion can. I don't think you can R&R that hose without removing the quarter panel and taking loose at least the bottom edge of the rear clip.
|
|

|
theogre
|
AUG 26, 05:33 PM
|
|
Sorry... Forget EVAP tube from aux tank to EVAP can... (Above post is 2 return/vents from gas tank are 5/16". 1 to aux tank, 1 for engine return.)
That's 1/4" ID hose. Should have J10R7 hose on both ends.
Also "non standard" and thus not in stock at many parts stores.
This can get hard but rarely goes bad. Hard hose is only a problem in states test the fuel tank etc looking for flume leaks during emissions testing.[This message has been edited by theogre (edited 08-26-2022).]
|
|
|
|
WonderBoy
|
AUG 26, 06:37 PM
|
|
| quote | Originally posted by Will:
I didn't know Inline Tube made those!
Mine weren't bad, so I bead blasted them and painted them with clear POR-15.
Stainless is SOOOOOO much nicer though...
Err... Wait... the description says "Fuel tank to charcoal canister"... I'm not sure that's the lines to the expansion volume outboard of the battery.
|
|
They do look like direct replacements for the expansion tank Will post a picture tonight of what I got. Too much stuff in the way.
This is a multi-day project that I have to plan. Would like to also drop the tank later to clean up the sender and put in new strainer and possible pump. I have also the braided stainless steel inlet and return lines from TFS with o-rings, so hope that's all good. New fuel filter on the way.
Thanks for the replies.
Will post updates.
|
|
|
|
WonderBoy
|
AUG 30, 10:19 PM
|
|
These are the lines from Inline Tube that I have. They look like the ones I'm looking for, yes?
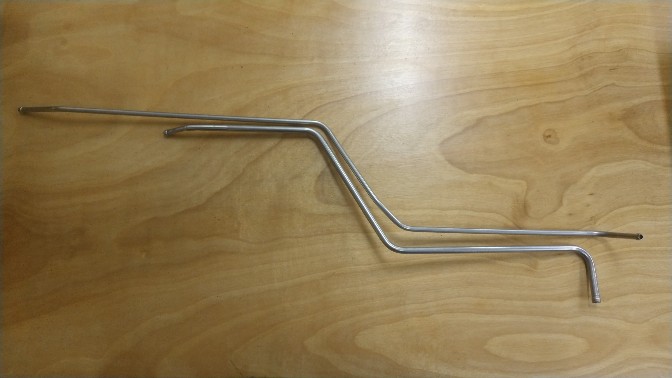
Sorry, haven't removed battery yet, nor the passenger wheel/wheel well. And Will is probably right, might not be able to fully access the expansion tank without removing the rear clip from how I saw it mounted when I had the rear clip removed a couple years ago. So I may just have to leave those old hoses in place.[This message has been edited by WonderBoy (edited 08-30-2022).]
|
|
|
|
theogre
|
AUG 31, 06:25 PM
|
|
Sometimes you have to bend or straiten lines from Inline Tube etc.
Is so they can ship the product w/o major headaches for them and you. Look @ Fiero Brake Line Kit there or maybe TFS to see sections where needs straiten.
If true, you may need tube bender tool(s) to handle whatever size tube.
Example: I think the little tube to EVAP can needs 90° bending when goes along firewall to the EVAP can on the strut tower. That's If V6 EVAP can is in same spot as 87 and other Fiero 4cyl.
Ask Inline Tube for directions if printed doc(s) not clear or not included.
|
|
|
|
theogre
|
SEP 16, 02:17 PM
|
|
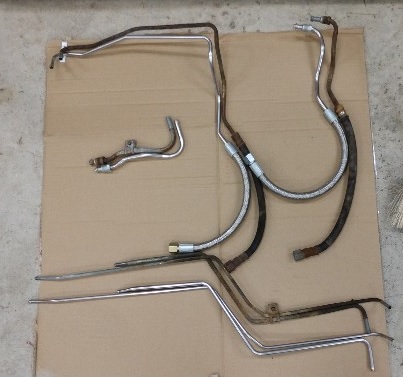
Update:
Since WonderBoy can't bother.
I was doing other work on gas tank and need pulling tank plug...
Above Line Kit is only "2/3" of EVAP tubing and likely used as shown. (Unlike Brake set you need straightening out some places.)
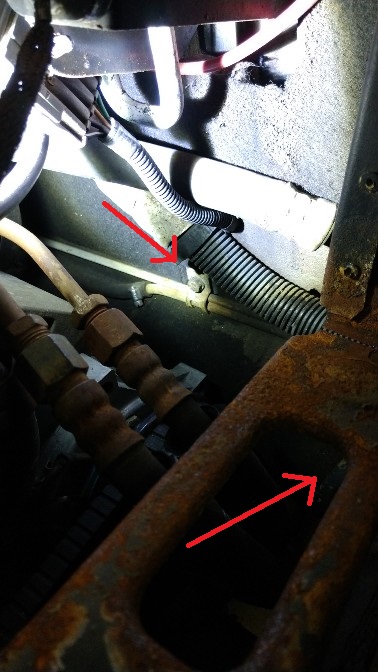
They are 2 that go under battery tray to the aux tank but only ½ of small tube.
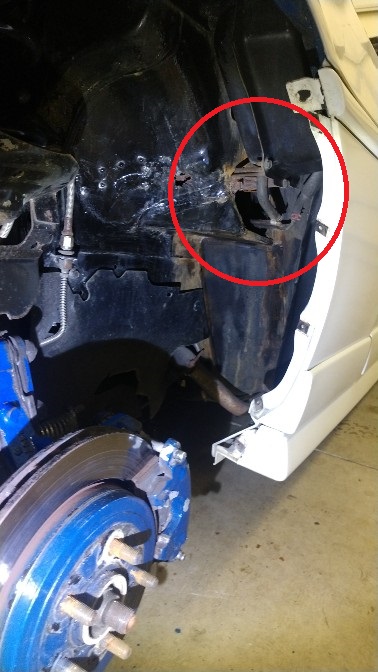
Small tube have "rubber" hose joint about in the middle of firewall to reach the EVAP can itself.
The joint is often is hard to see w/o looking for it because can be "hidden" by AC hoses and other things.
|
|
|
|
WonderBoy
|
SEP 24, 11:13 PM
|
|
Mr Ogre, I currently relocated to another state with all my tools in storage 600miles away. My posts here help me to organize my time to keep track how long it will be off the road while I plan various maintenance tasks on my precious. Again, my Fiero is my daily driver and can't have it off the road. Not to mention out of the many many tools my Uncle has in his garage, small metric and 3/8' drive is in extremely short supply. But I got my task done. There may have been some confusion as to my original post. I was mostly looking to replace the 2 metal lines under the battery tray with the hope of also replacing the rubber hoses to that expansion tank. The lines going to the charcoal canister along the truck compartment and fresh air supply filter housing on the front firewall are in top notch shape with their original factory coating. And the original rubber hoses to the expansion tank are not leaving a black streak on my skin since not exposed to the sun UV rays, so they haven't deteriorated at all, so those seem good.
The lines from In Line Tube were perfect. Didn't have to bend them at all. Just a small ruff metal burr at one end needed filed. I installed their SS Brake Lines in 2009 and the SS automatic transmission cooler lines 5 months ago.
- Remove Battery
- Chalk front wheels
- Jack up rear of car and place jack stands with additional backup support blocks
- Remove Rear passenger wheel
- Remove Rear passenger wheel plastic splash guard
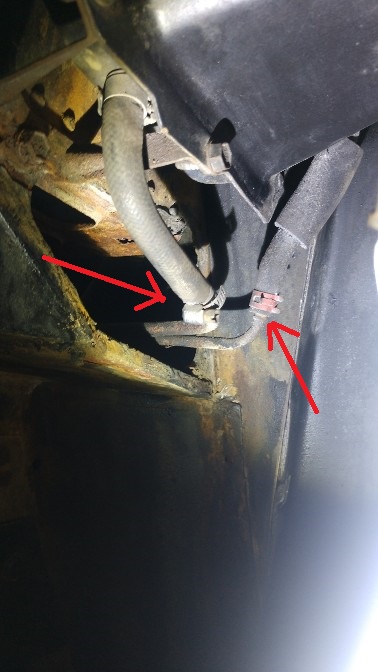
- Loosen the 2 clamps on the hoses near the expansion tank
- Carefully using a small flat-head screw driver with 1"+ long shaft, insert it along the metal tube and rubber hose. Work it around to loosen it. Should be able to twist it free after some work. Do it to both lines at the expansion tank.
- Remove the 2 10mm bolts holding the clamps for the tubes. One is under the battery tray across from the feed/return fuel lines going to the fuel rail. The other is visible on the front firewall.
- Remove the heat shield on the firewall to access the other ends of those lines. These may be a little more difficult to remove. Just take it slow with the small screwdriver and don't tug to much or you may damage a weld on metal tube going to the sending unit on top of the gas tank.
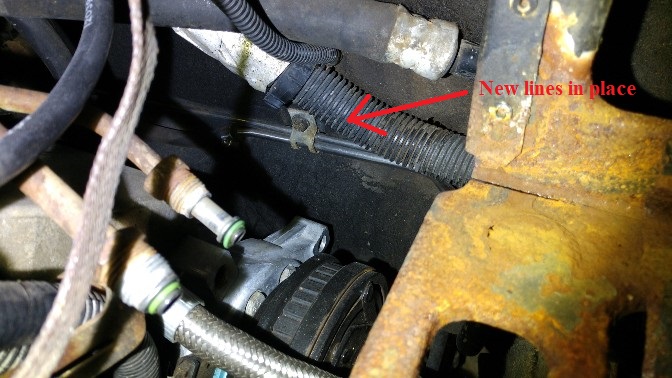
- Removing and slipping in the new tubes can be like Tetris, but I found (if memory serves me right) by going in between the 2 AC manifold lines behind the AC compressor was a nice direct route with out bending the tubes.
- Recommend using new hose clamps (you can pick up variety packs at any auto parts shop) slip them over the rubber hoses and wiggle the new tubes into the hoses till you 'feel' them seat where the old ones did. Then tighten the hose clamps about 1/8" away from the end of the rubber. Do both ends.
- Now reinstall the 2 line clamps and their 10mm bolts. I wire wheeled mine. Wish I had my POR15 cans on me

- Reinstall the plastic splash guard
- Reinstall the Wheel
- Reinstall the battery
I did this because I could smell gas for some reason. Not sure if from my car or what but after seeing the condition of those 2 lines and the battery tray, along with reading theorge's post, I didn't want my baby to turn into a Fire-oh.
Also did replaced the fuel lines (SS from TFS) and filter (Bosch) as well. I've got the SS lines to the Fuel Rail but didn't want to remove the intake without a new gasket. And besides, I plan on getting the injectors re-flowed/cleaned later. So will do that when that project kicks off. Would really like a fuel filter holder if anyone has one kicking around. Mine is really crumbling.
Took me 8hrs to do all the lines. Mostly because of (1) the slow process of removing the old lines from their rubber hoses that have never been touched since she was rolled off the assembly line in 1987. (2) Because my car 'ate' my uncles only 9/10mm open box wrench. 'Ate' meaning I dropped it when my knuckle hit something and fell who knows where while tightening the 10mm bolt/clamp under the battery tray. Searched for hours The forth time I've done something like that. But they all eventually turn up when doing other maintenance. The forth time I've done something like that. But they all eventually turn up when doing other maintenance.
The battery acid leak was so bad that not only am I going through my 2nd battery tray (1st one was replaced in 1999) but the clutch for the AC Compressor was a 1/3 rusted/eaten away. Compressor was replaced 4 months ago and I've got a replacement battery tray from TFS in storage. Need to have some welding done/added on a section of that passenger wheel well by someone local before new tray can be put in.
Now, on to the next maintenance project!
|
|

|
theogre
|
SEP 24, 11:47 PM
|
|
|
Thanks for final update. Far too many get answers and never post results.
|
|
|
|