
 
     |
| Mouse Proofing the Ignition Coil/Alternator Cooling Fan and Rear Trunk Compartment (Page 1/1) |

|
Romsk
|
DEC 05, 04:57 PM
|
|
Here is a step by step procedure to keep mice from getting into your Ignition Coil/Alternator Cooling Fan and out of your Rear Trunk.
Tools:
Safety Goggles, OSHA for Automotive
Sound Reduction Headphones, 30dB attenuation minimum, OSHA for Automotive
Nitrile Gloves
Face Mask, N95 or better (do not inhale dust or gasses from mouse residue)
Large Room Exhaust Fan
#2 Phillips Screwdriver, 8 inches Long
1/8 Inch Flat Blade Screwdriver, 4 inches Long
Reversible Ratchet, 3/8 Drive, 8 inches Long
10mm 6 Point Deep Socket, 3/8 Drive
Extension, 3/8 Drive, 6 inches Long
Tin Snips
Large/Long Pipe Cleaner
Workshop Compressed Air, not canned air
6 Foot 12V Cheater wire with Ground wire, with Alligator Clips on each end.
Material:
A roughly 12x12 Inch piece of 1/4 Inch 24AWG, Galvanized Steel Mesh, cut into 3 smaller pieces:
One 5x5 inch
Two 3x3 inch
Dispose of any scraps
Two 2 inch Hose Clamps, screw to tighten type
Procedure:
Prep: Wear Safety Goggles and Face Mask at all times. Disconnect the negative side of the Battery. Do not breath the air around mouse residue (it can contain health risks), vent all blown air to outside using Room Exhaust Fan and do not breath in any blown air - stay away from air paths from blown and exhaust air.
1. Carefully remove the Rear Trunk Light Assembly. One side will pry outwards, the other side slips sideways a little then pops out. Carefully pry on one side, if it does not come out easily, try prying out the other side. Whatever side you pry out, do it just enough so you can slide the other side sideways to pop out the light assembly. If you break the assembly (easy to do especially in cold weather or due to age), there are ways to repair it but that is an involved process.
2. Pry off the five plastic Trunk Carpet Retainers. If you have a tool that is like a wide V pry handle, pass it between the backside of the carpet and the body frame. If not, slip you hand behind the carpet, wedge the retainer and wiggle it out with your other hand. Pry off retainers and set aside. These may break in cold weather or due to age. If so, you can use #10 Self Tapping Sheet Metal Screws, #10 Galvanized Washers, and large Nylon Washers to keep the metal washers from touching/staining the carpet.
3. Remove the Carpet, sliding the Light Assembly out through its hole. Set carpet aside.
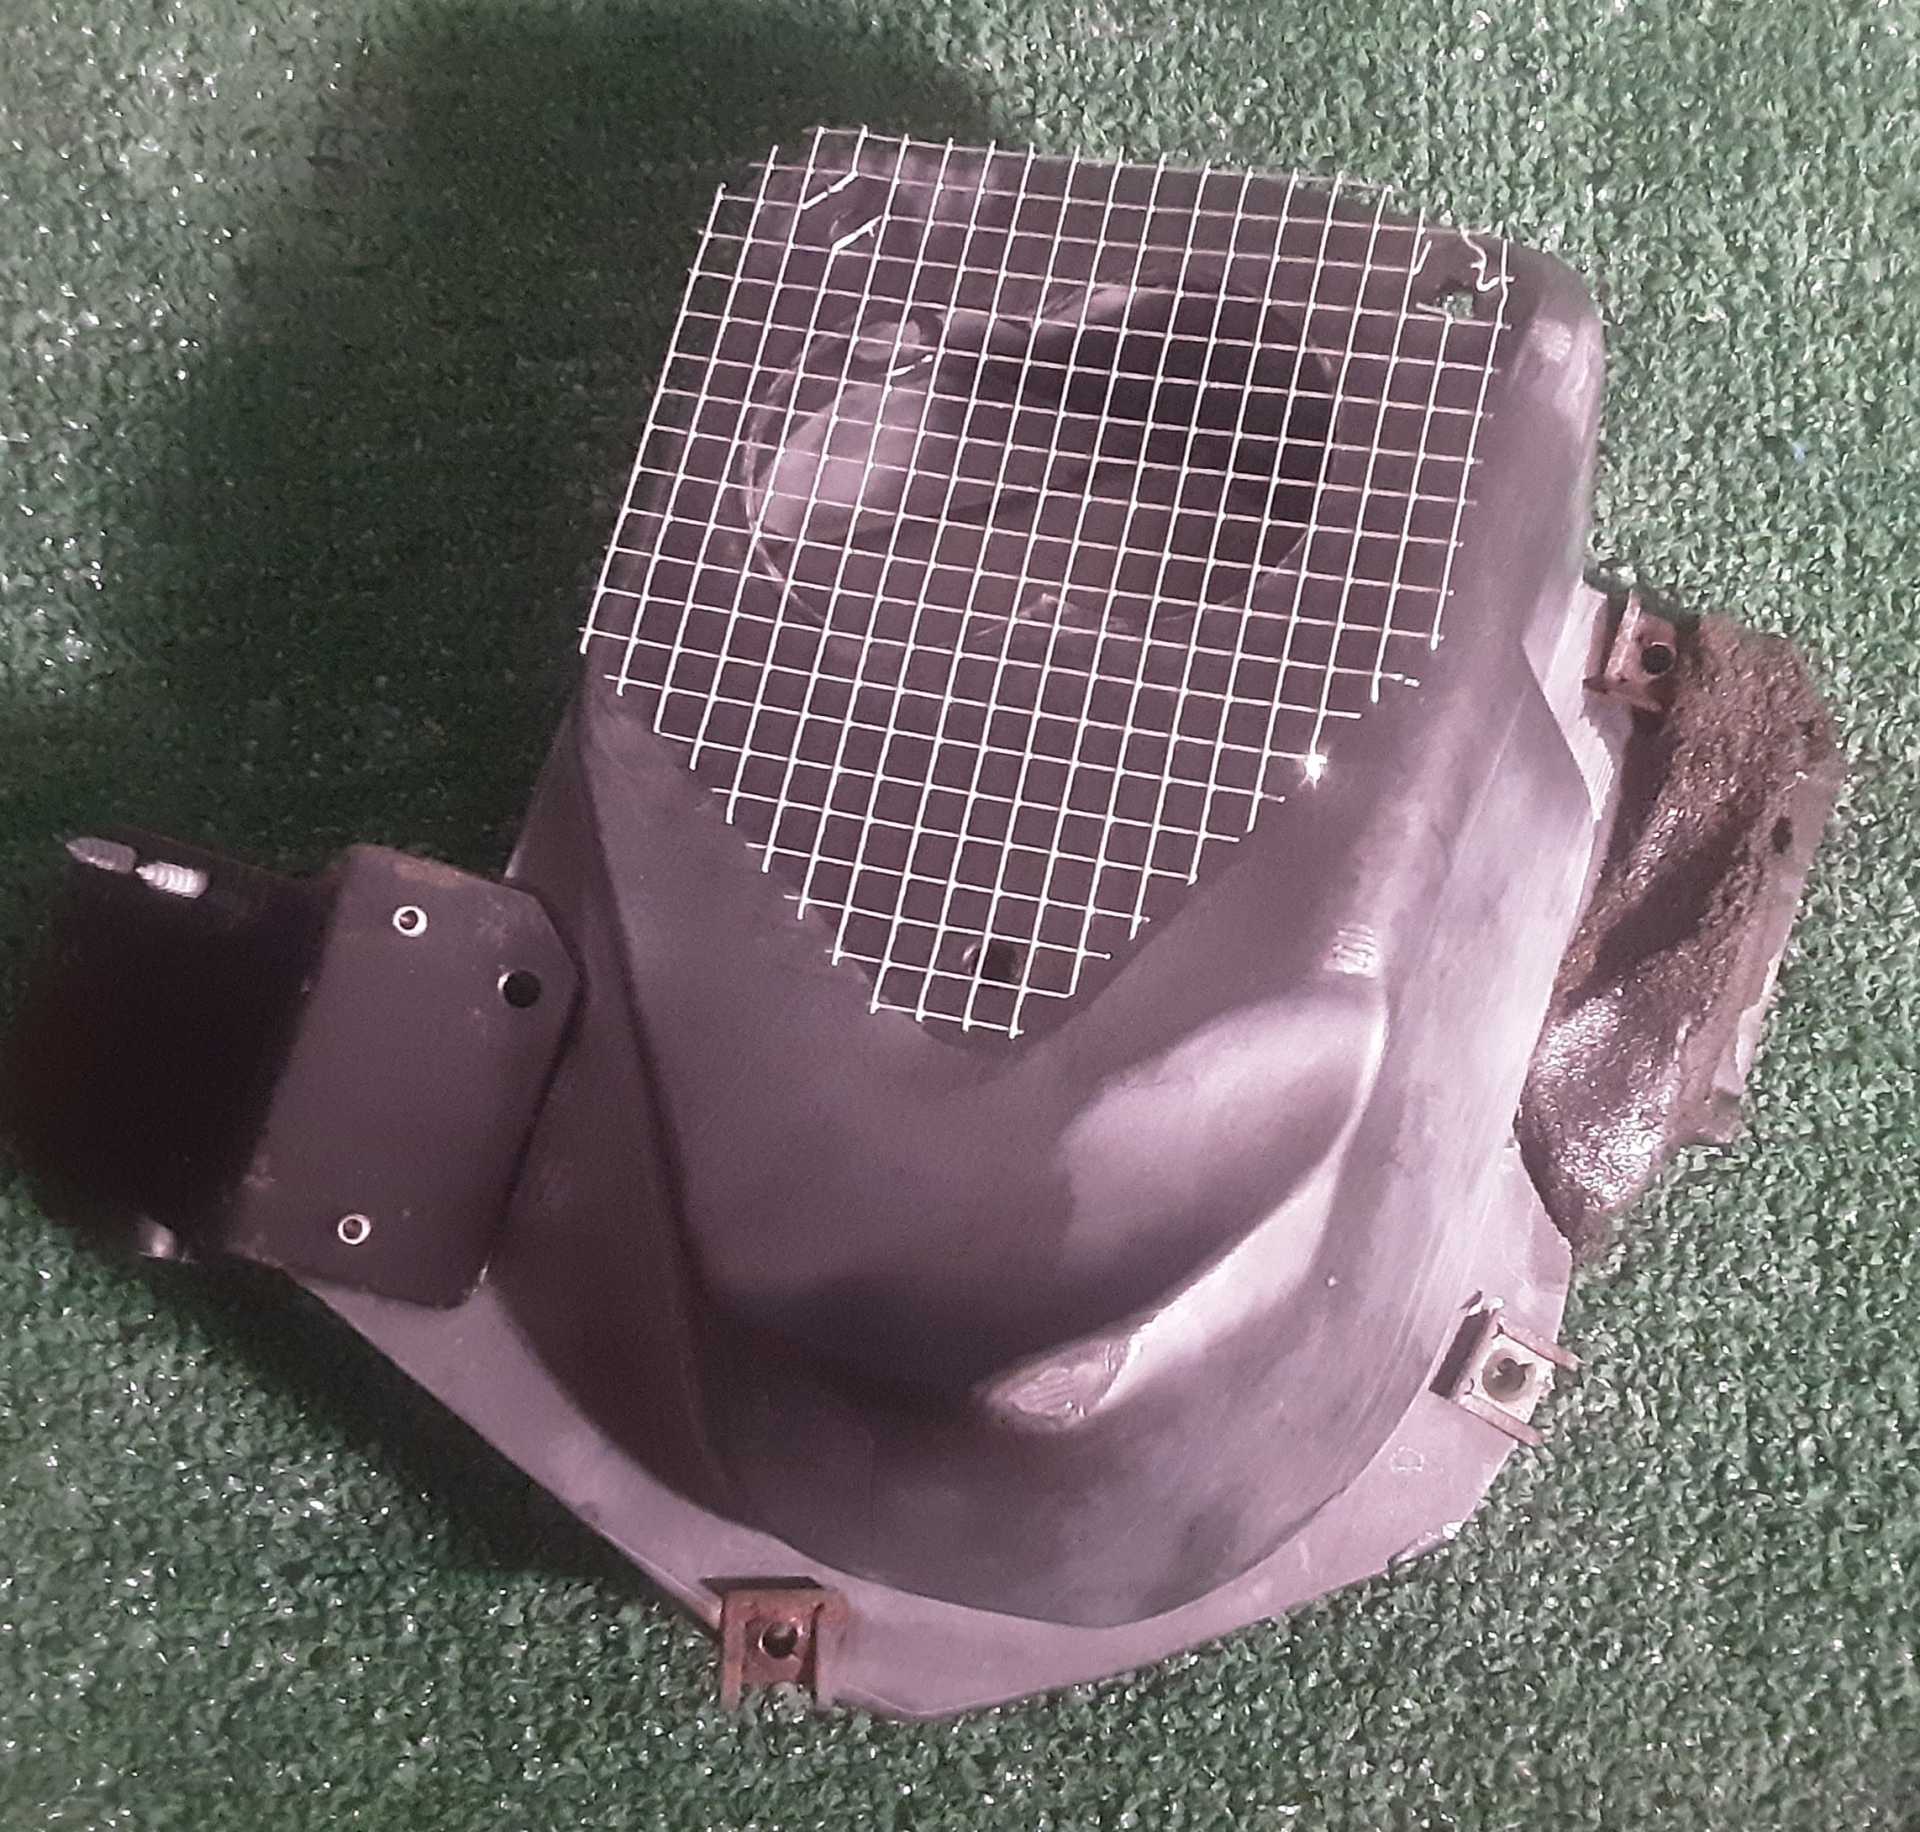
4. As you face the engine, the Fan is located on the right side of the Rear Trunk. Remove the five #2 Phillips Screws on the Fan Housing as shown in the following photo, and set aside.

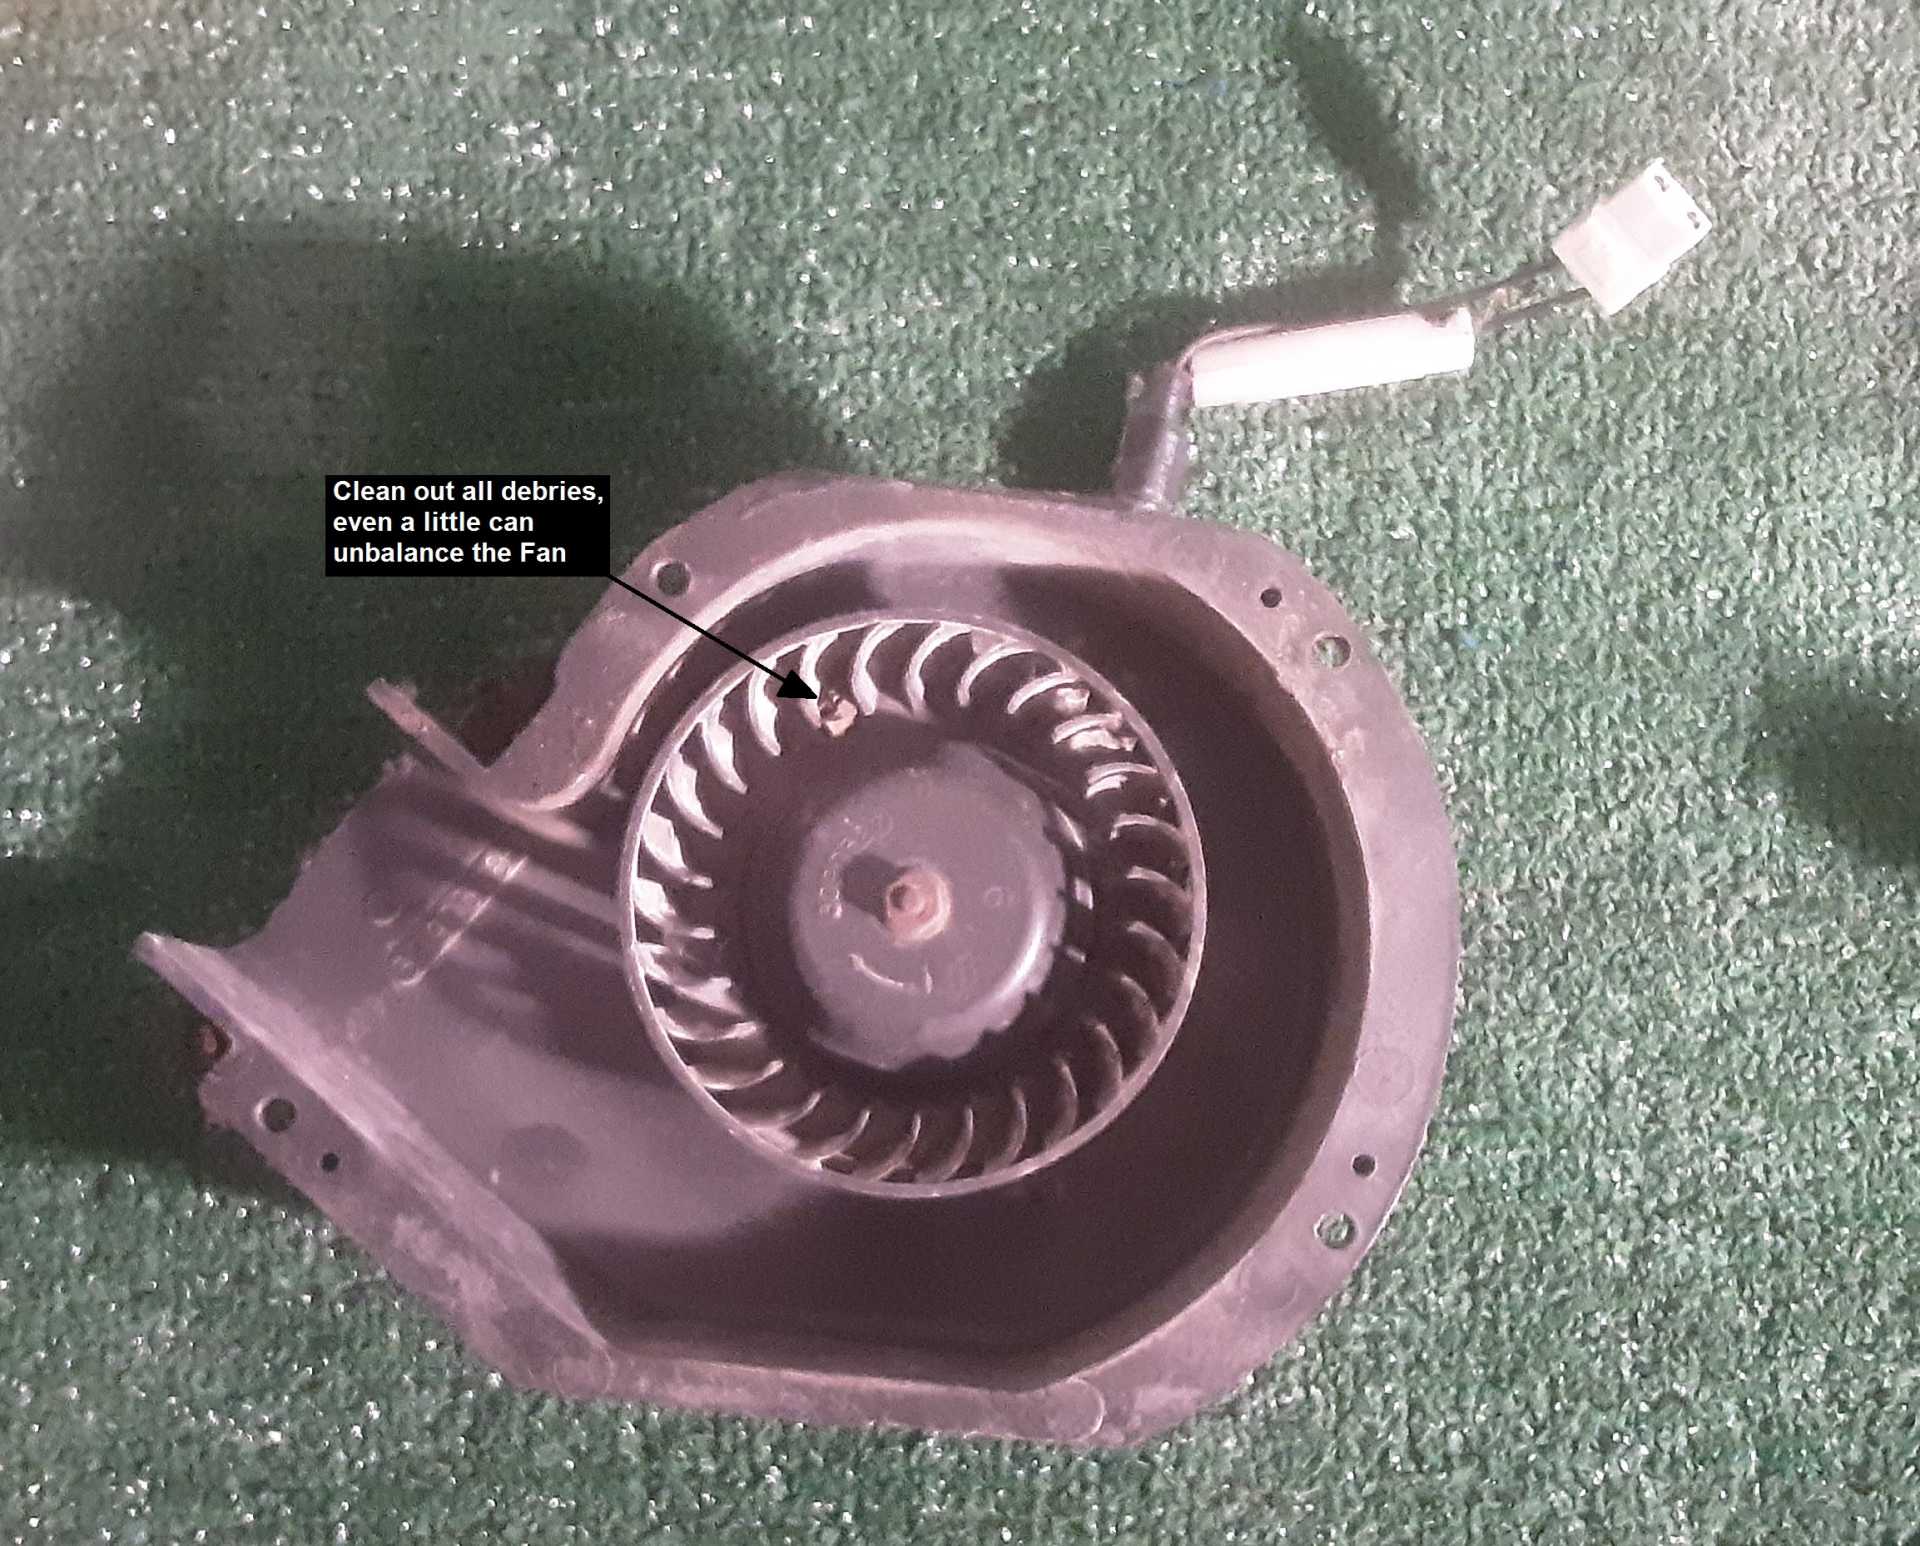
5. Pry off the Fan Housing, the Gaskets may be sticky, especially around the Fan Outlet.
6. Carefully disconnect the Fan Housing from the Harness. You may need to use the Flat Blade Screwdriver to pry and release the Catch (sometimes the Latch on the Connector can be pressed by hand). The Catch and/or Latch may break in cold weather or due to age. If so, use a Zip Tie to hold the connector back together when re-assembling.
7. Wear Sound Reducing Headphones and be sure Face Mask and Safety Goggles are on. Clean out the Fan Housing. Check the Fuse (if one is in-line with the Fan wires), replace if blown. Wear eye protection and keep fingers and clothing from coming near the Fan and apply 12V 5 Amps (using a "cheater wire and ground") to the Fan Connector contacts to be sure the Fan is working and not burnt out. If the Fan does not spin at a high speed, the Fan Motor must be replaced. Set Fan Housing aside.
8. Remove the 3 nuts on the Plenum as shown in the following photo using the 10mm 6 Point Deep Socket, 6 inch Extension, and Ratchet. Set the nuts aside.

9. Pry off the Plenum (the gaskets may be sticky) and disconnect the Relay Harness from the Relay by pressing the Release Latch on the Connector while wiggling the Connector off. If the gasket on Body Frame (that is around the 3 studs for the 3 nuts that were removed) comes off, clean it off and if not broken put it back in place on the Body Frame. If you need a new gasket (or if it is missing), A 1/16 inch thick rubber sheet (from any well stocked hardware store) can be cut to form a new gasket. Clean off the gasket and clean out the Plenum. Set aside.
10. Be sure Sound Reducing Headphones, Face Mask, and Safety Goggles are on. Turn on Room Exhaust Fan to remove blown air from the area and directly to the outside. Do not breathe any air in these paths - blow air AWAY from you at all times. Clean out the Air Manifold (what the Fan blows into) by blowing compressed air so any debris comes out the metal Ignition Coil Cooling Tube and the Alternator Cooling Tube. You may need to chase the Air Manifold and Tubes with Large/Long Pipe Cleaners. Blow any debris that may collect on the Coil and/or Alternator.
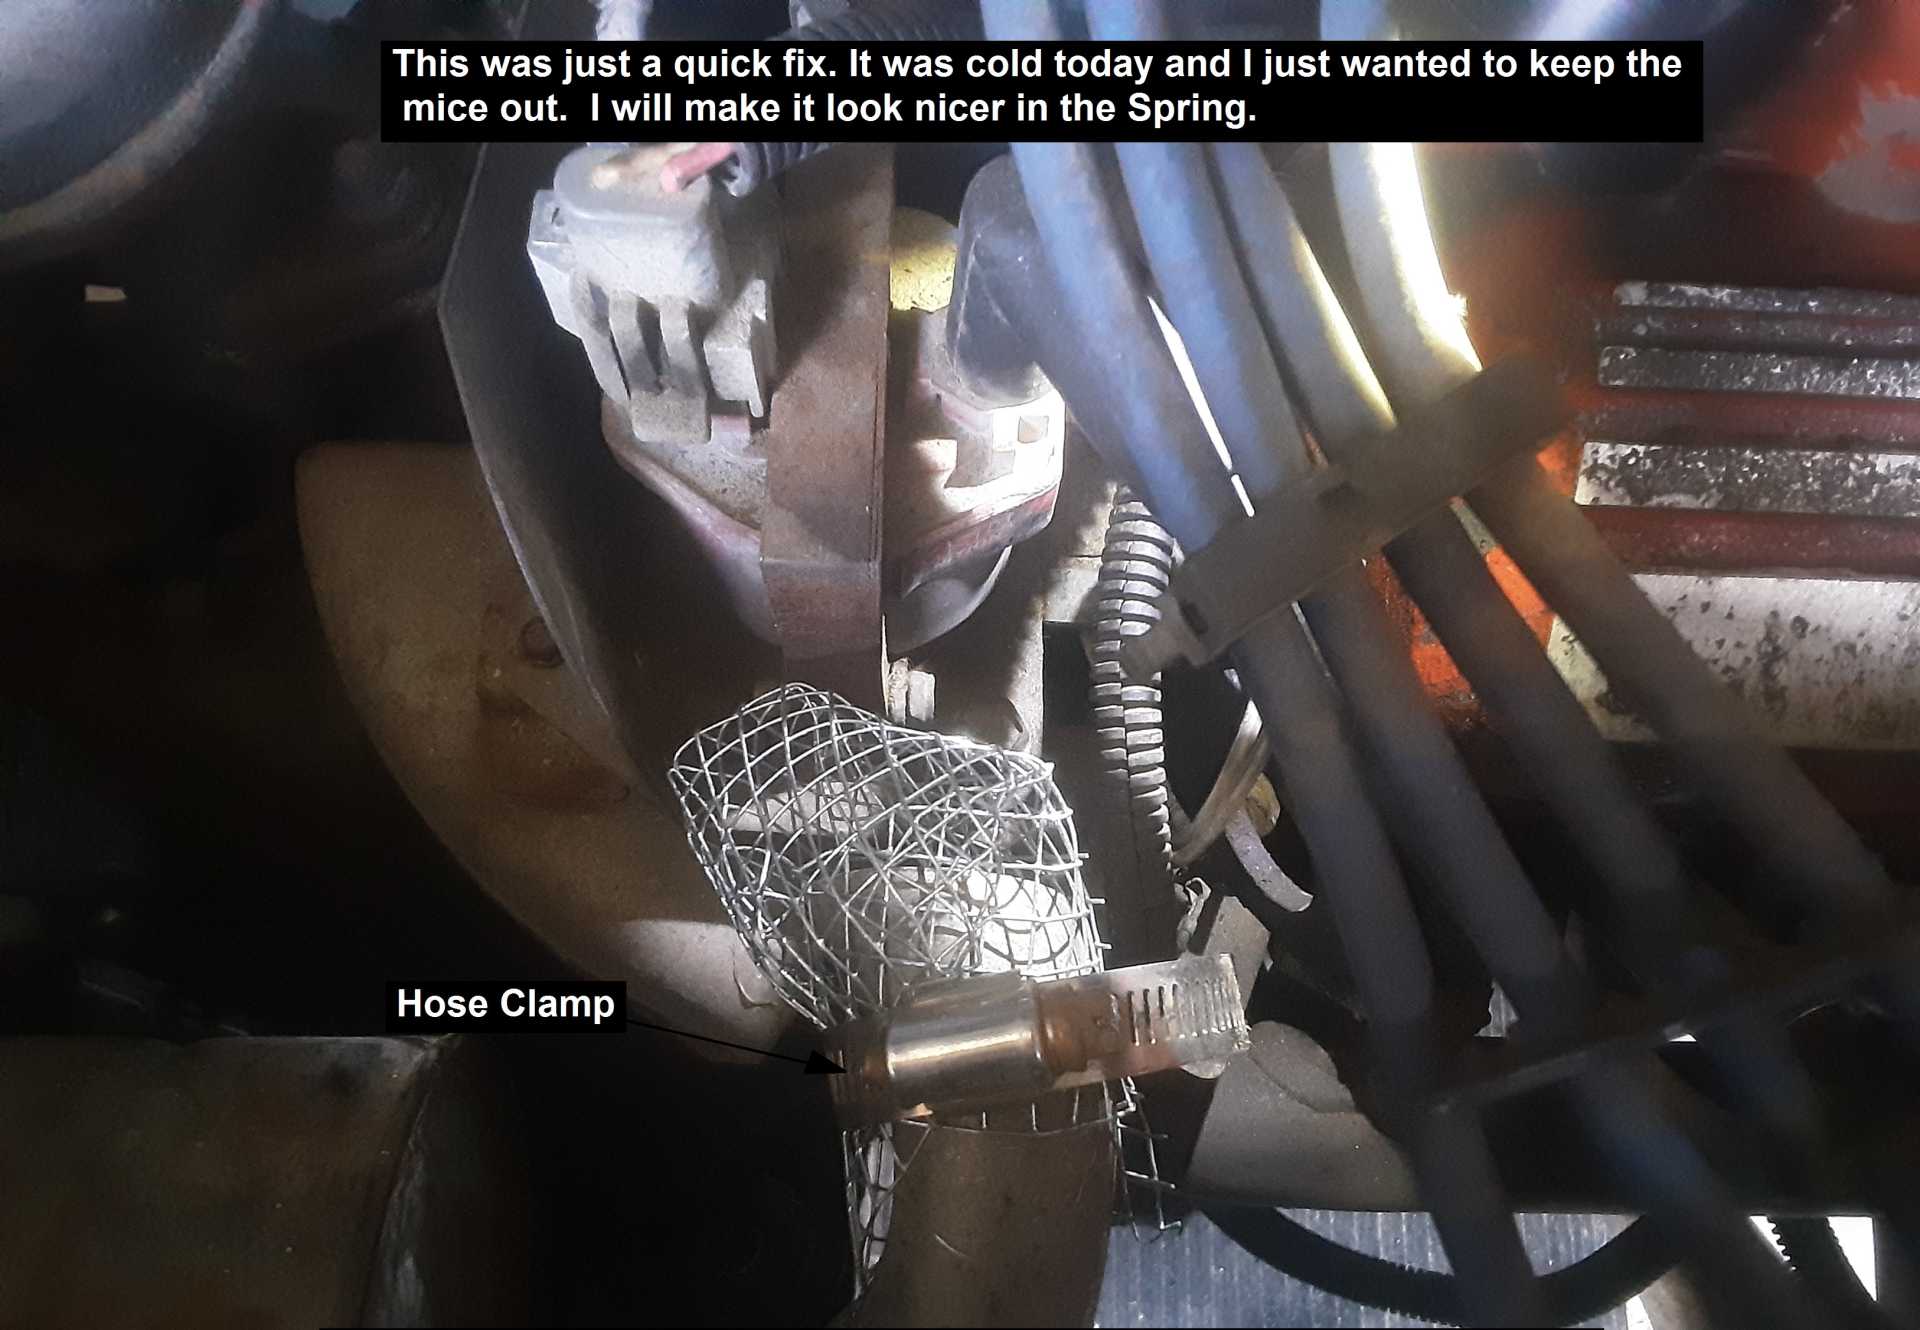
11. Form one of the 3x3 inch Mesh pieces over each Cooling Tube and hold in place with a Hose Clamp tightened firmly to keep the Mesh in place. Insure the Mesh does not contact the Ignition Coil, Alternator, or any wiring.
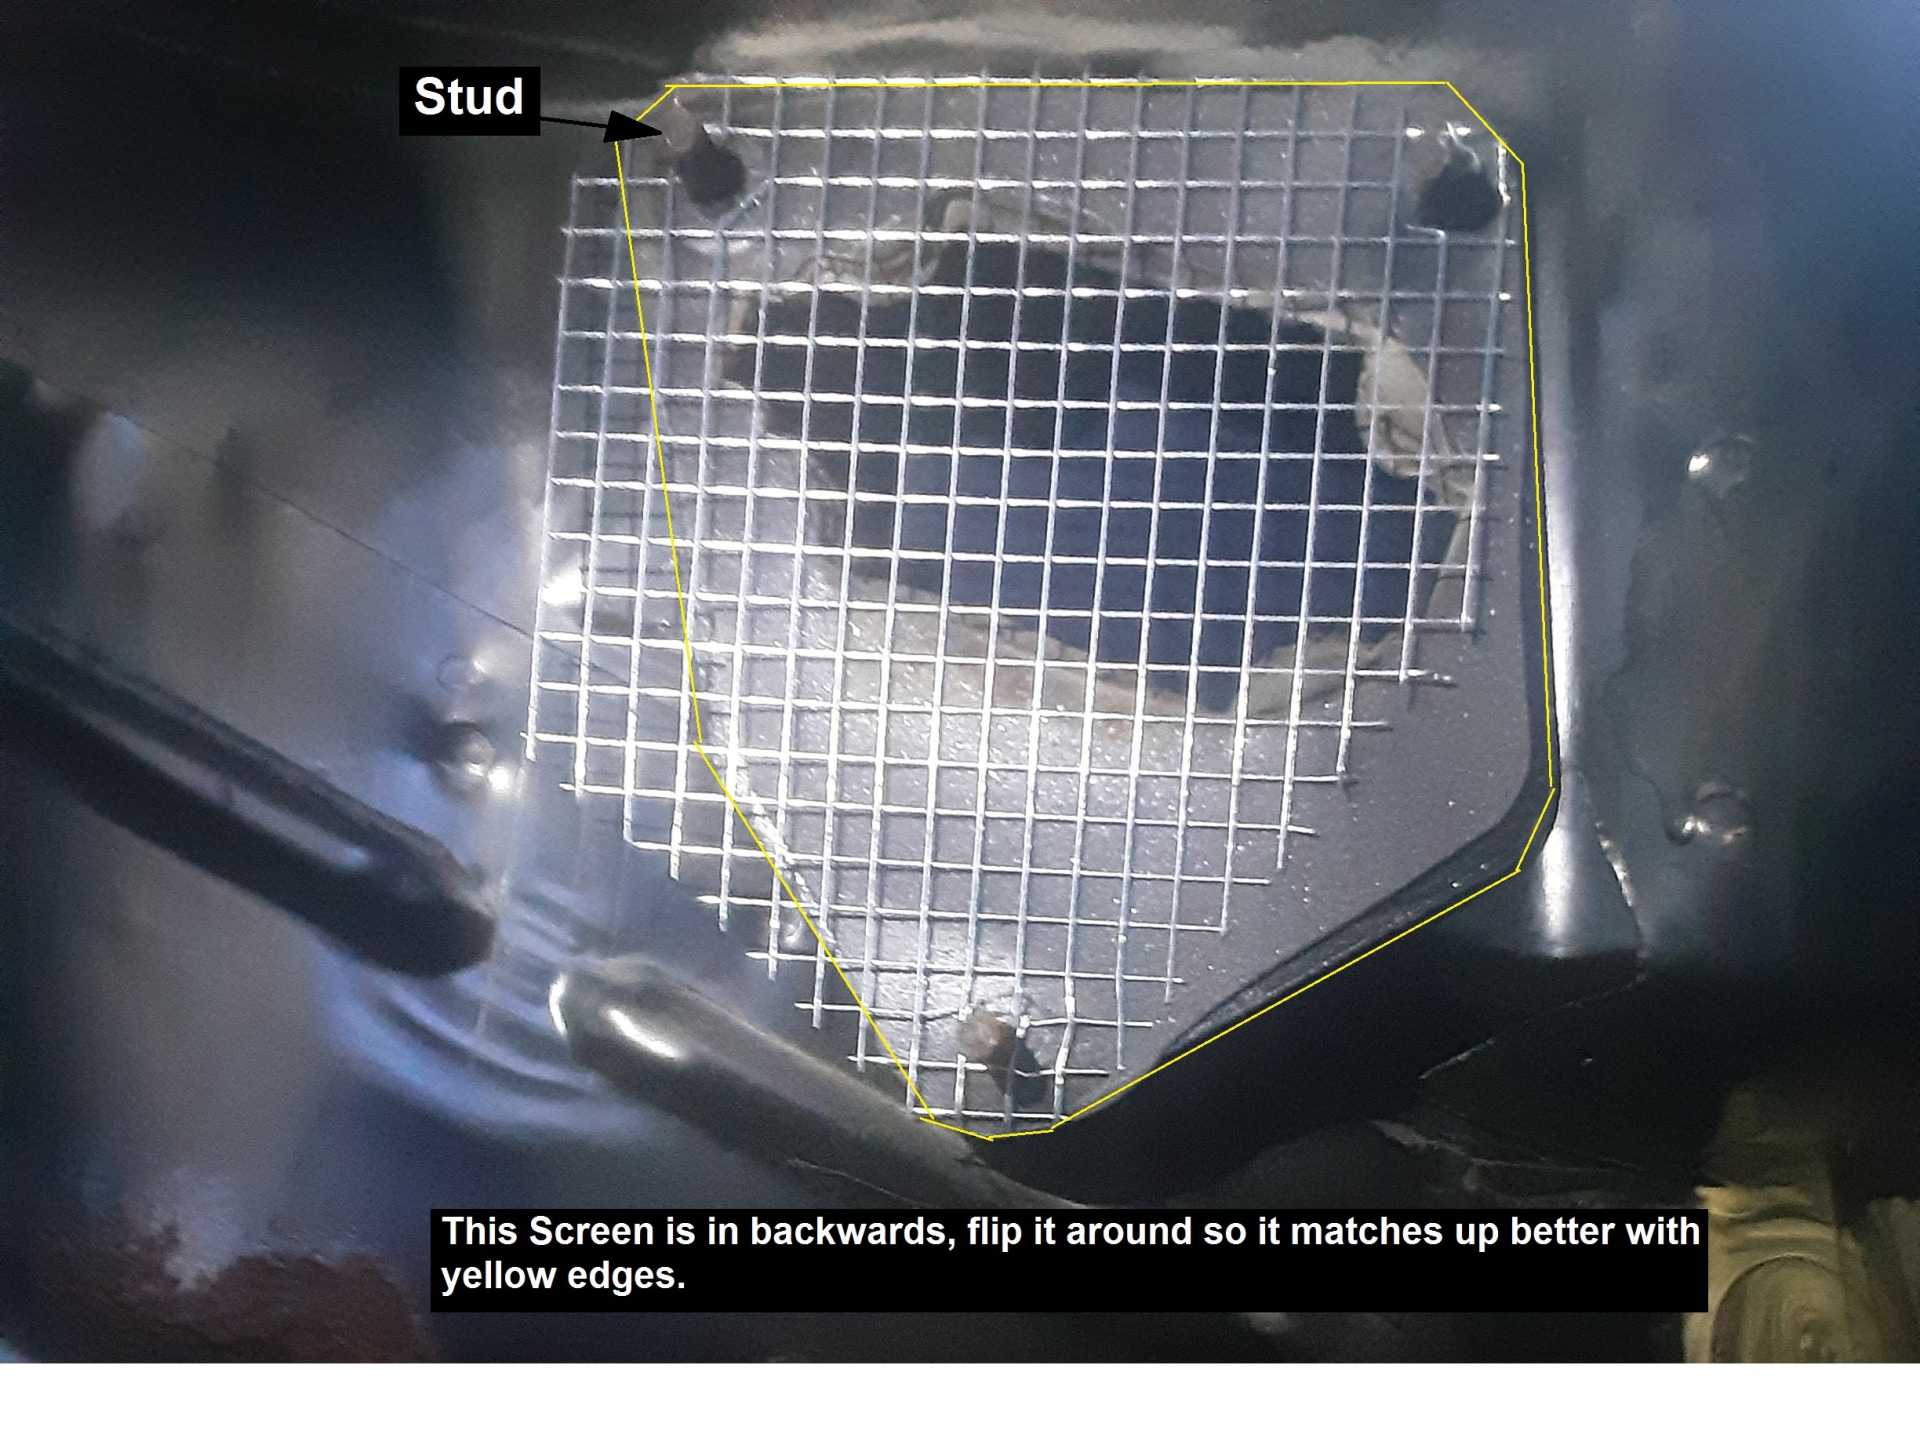
12. Cut and trim the 5x5 inch piece of 1/4 Mesh to fit as shown in the following photo. You will have to widen the Mesh for the studs (use the holes as guide) as you can see in the photo.
13. Place the Mesh over the studs similar to that shown in the next photo. Note. In the photo I put the Mesh on backwards (it didn't align it as it should be). I flipped it into proper position but I didn't take another photo.
14. Reconnect the Plenum to the body with the three 10mm nuts and tighten to a firm but not too strong tightness - you don't want to break the Plenum plastic.
15. Reconnect the Harness Connector to the Relay.
16. Reconnect the Fan Housing Connector to the Harness.
17. Reconnect the Fan Housing using the five Phillips Screws.
18. Pass the Light Assembly through its hole in the Carpet and reinstall the Carpet using the five Retainers.
19. Carefully slide in and then snap the Light Assembly in place.
20. The Fan should come on whenever the Engine Cooling Fan (located at the front of the car) comes on at around an Engine Coolant temperature of 180 degrees F. Both Fans and circuits should be checked to make they both come on when the Fan Switch (located on the Engine) closes (which should be when the Engine Coolant is around 180 degrees F).
------------------
Paul Romsky[This message has been edited by Romsk (edited 12-06-2022).]
|
|
|
|
Rhodesia1977
|
DEC 20, 09:43 AM
|
|
|
|
|