
 
     |
| Love of a Mode Door Actuator (Climate Control Solutions) (Page 1/2) |

|
Jeffdylanproctor
|
JUL 13, 10:46 PM
|
|
Sometimes you do a thing knowing that a certain number of people will hate it, but you just don't care so you do it anyways.
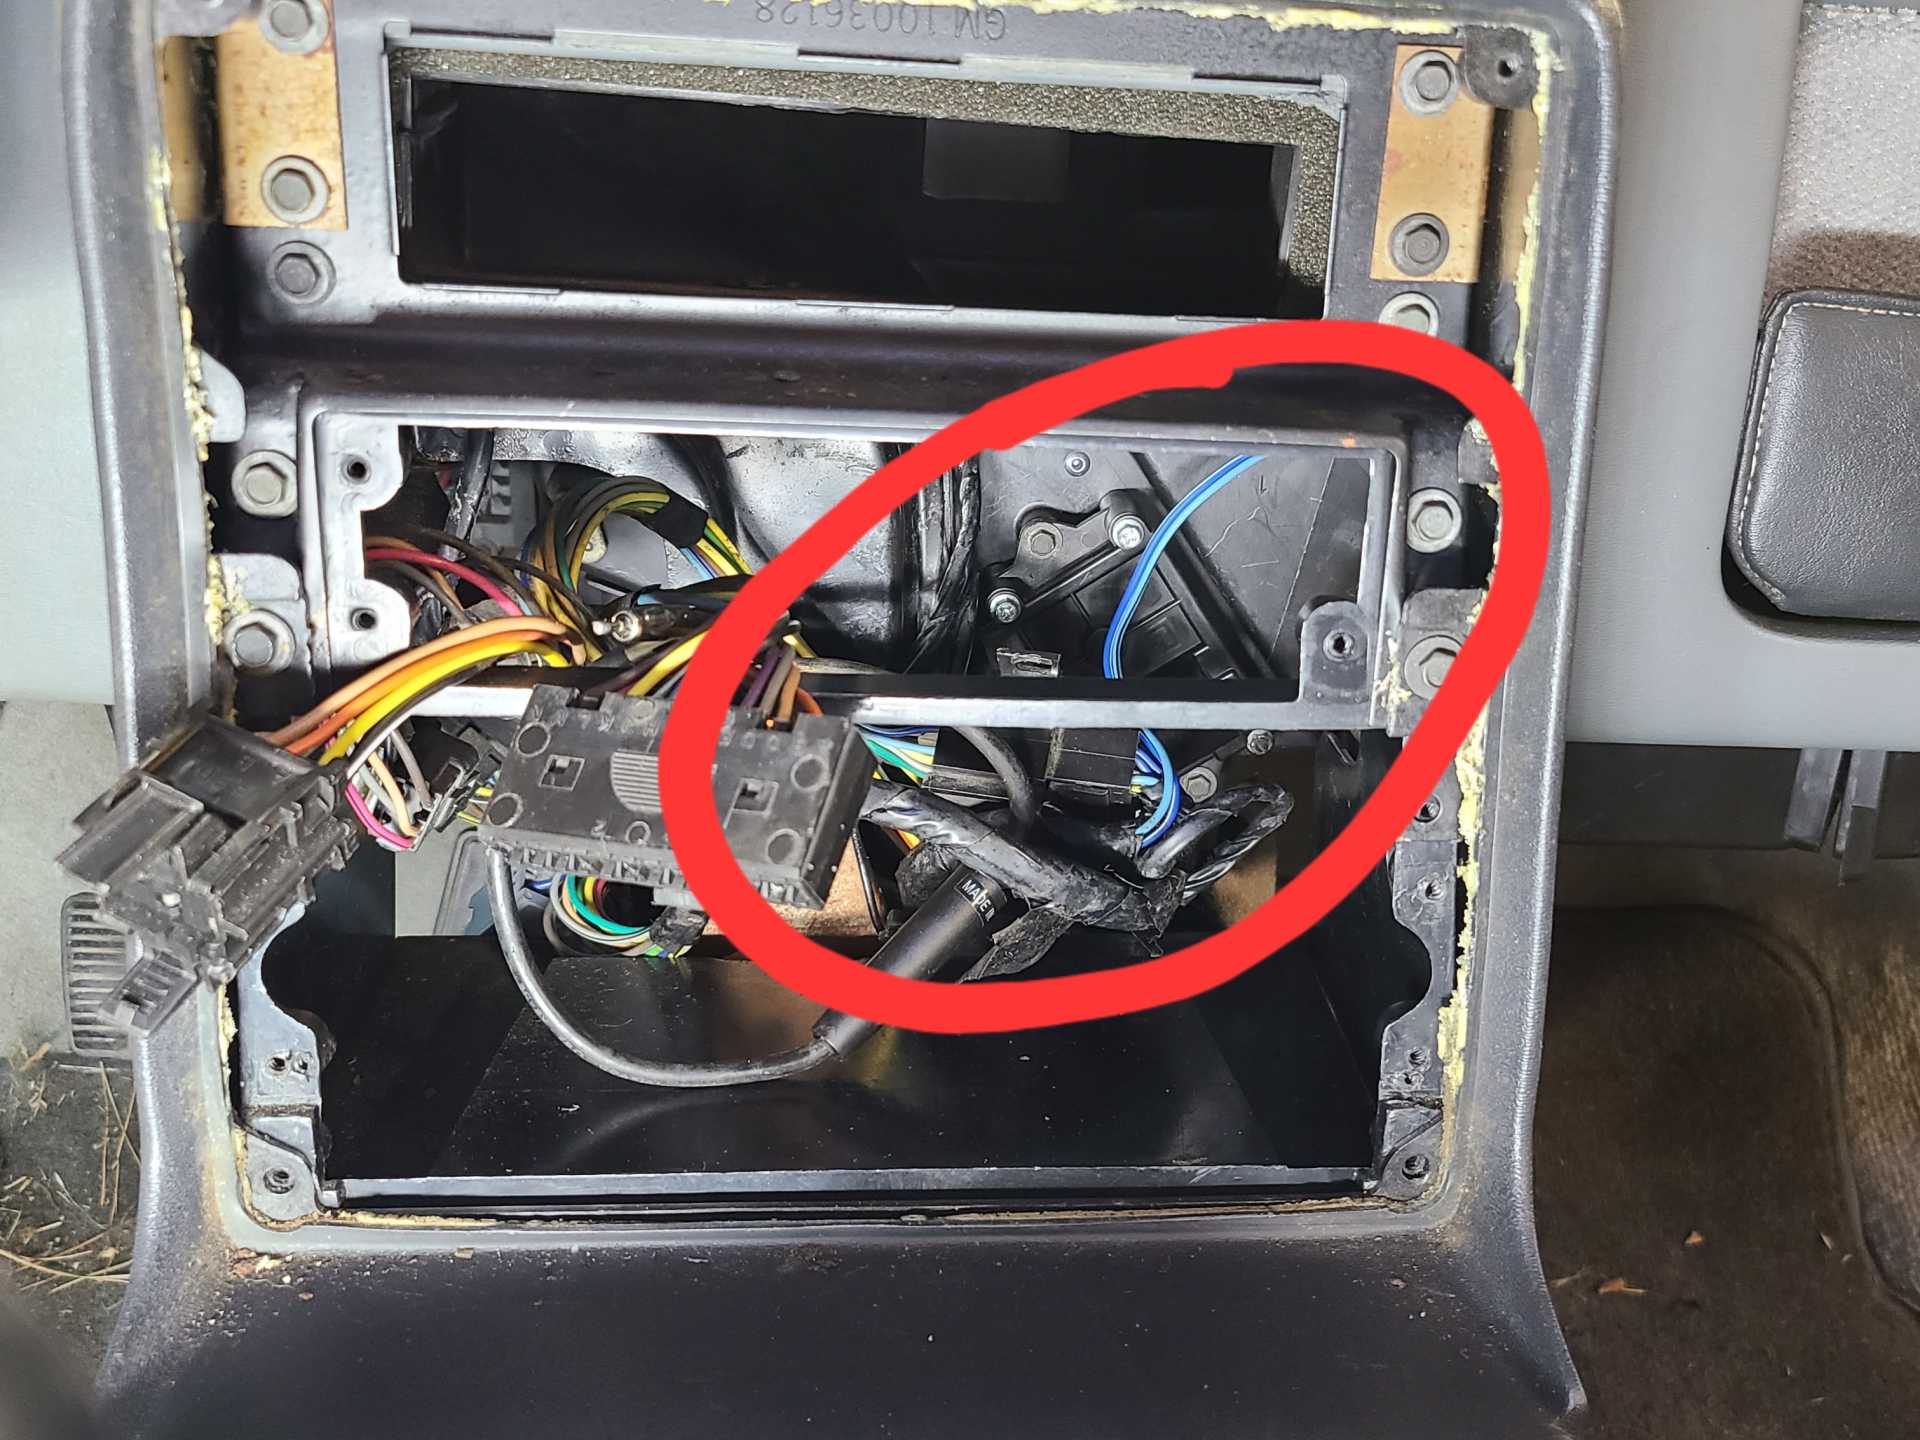
I'm sure it is no rare occurence that we Fiero owners have problems with the climate control, specifically the Mode Door Actuator (Part Number 3052051) which controls what vents blow air. Those of you who know, well you know, and perhaps this may be of use to others who face this wonderful battle in the future.
Yes: the faulty Mode Door Actuator. Anyone who has worked on these unhappy wretches knows that while they are not the most innaccessible thing, being just behind the climate control panel and radio, that their real evil is acheived by the clip which holds the actuator's arm to the two levers inside the duct work. It is a small perdition working on these things, a little foretaste of eternal despair.
Well after a pleasant afternoon in the abode of the ductwork, I made the executive decision that if that clip was so horrible to extract, then I was going to redesign the whole contraption so it wasn't necessary. I wasn't sure at first what I planned on doing, but I knew I would sort it out. Either mine was uniquely insufferable, or this clip is so terrible that I can't imagine any mortal getting it back in there without having power over the duct work from another angle.
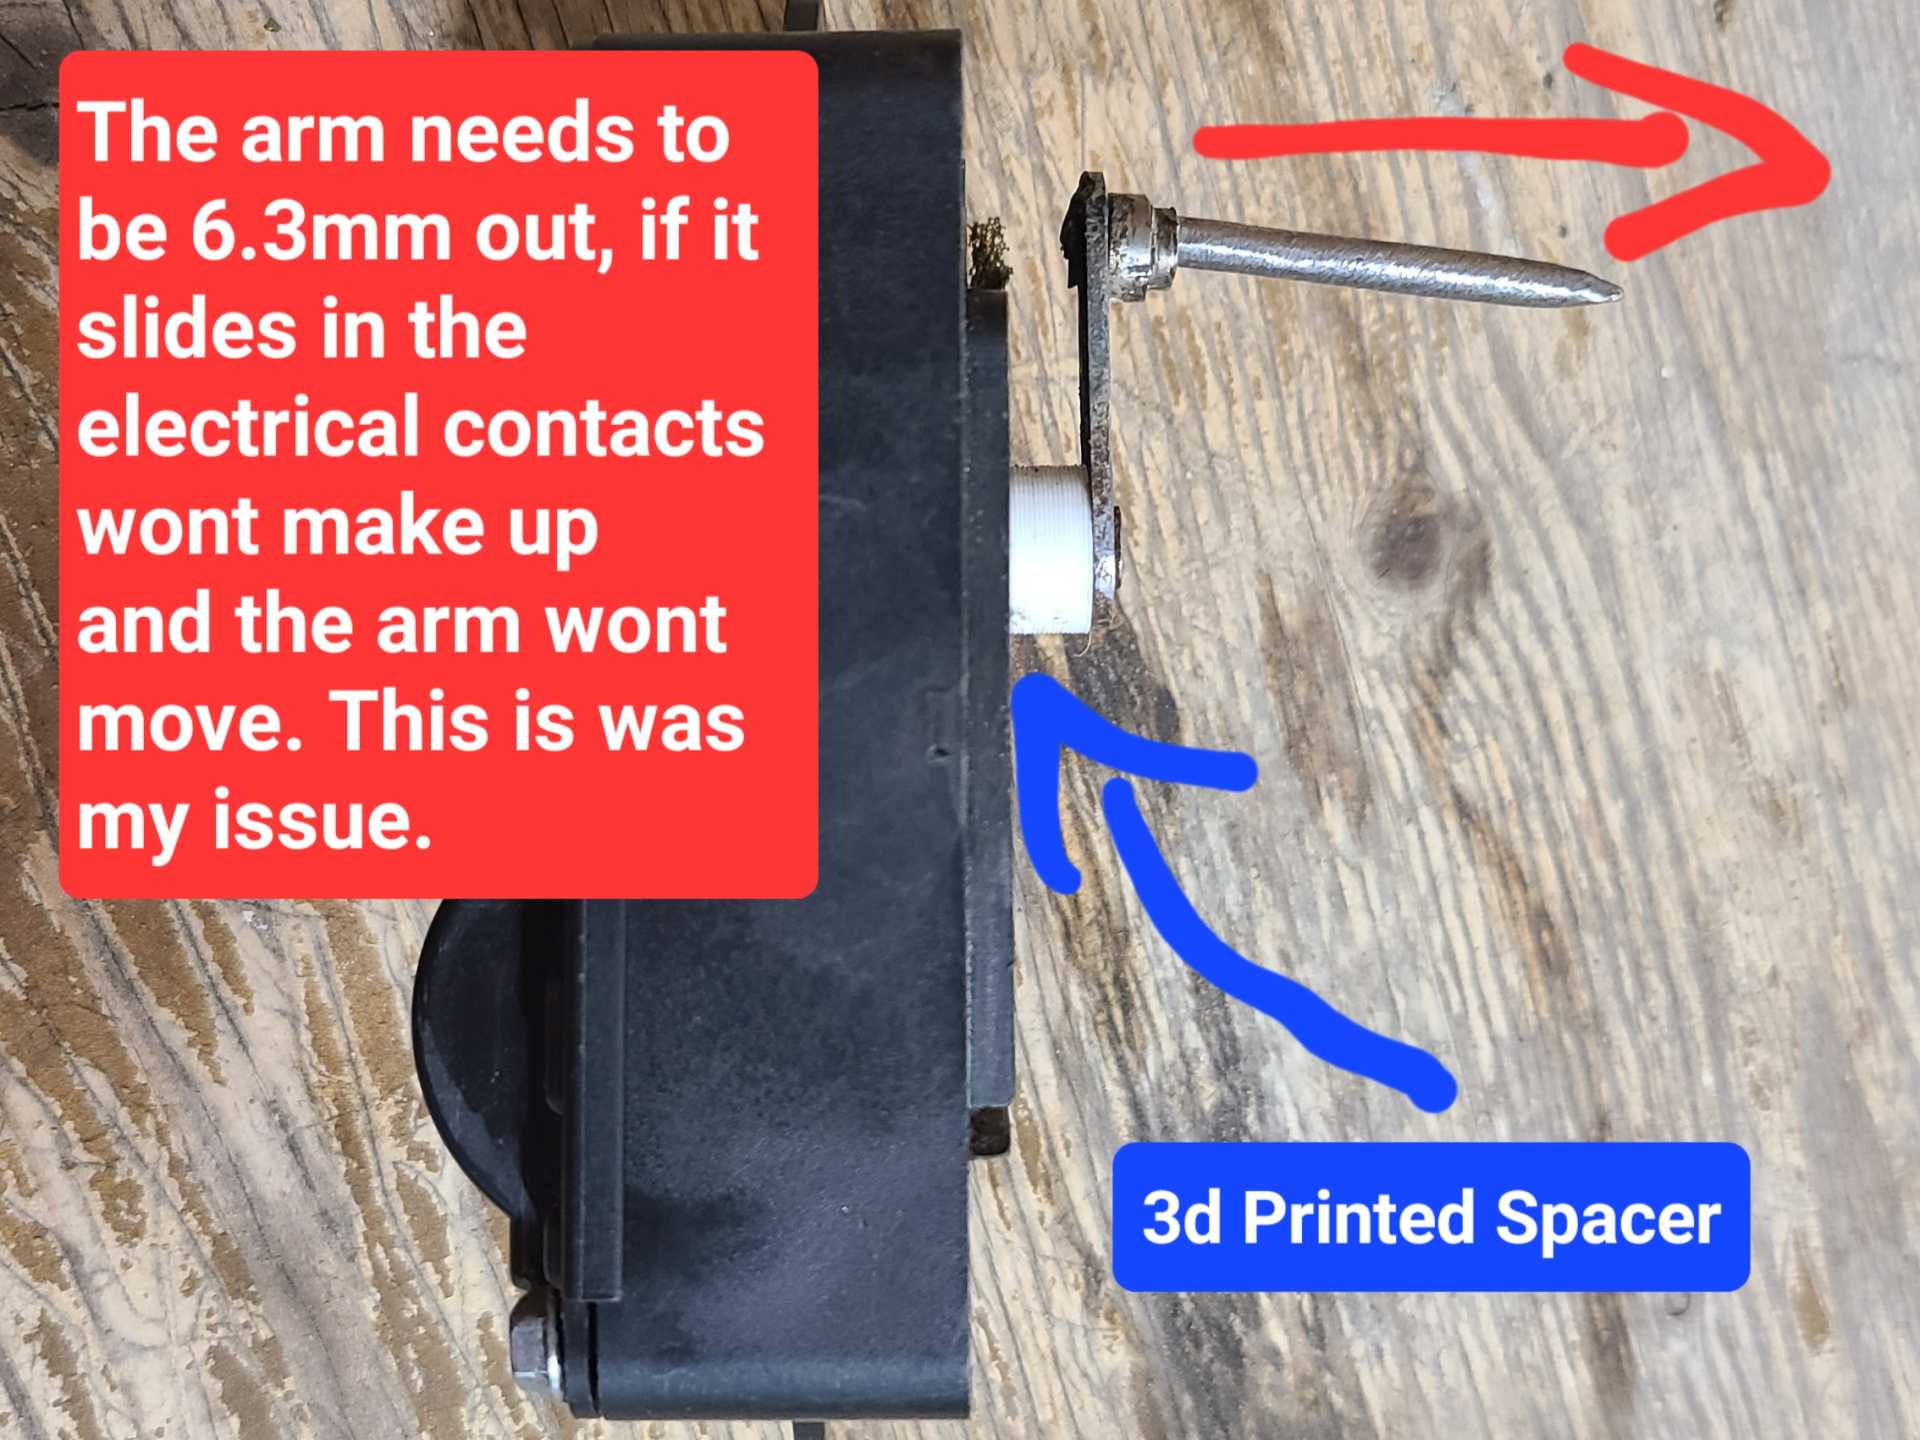
So why did I remove the Mode Door Actuator to start with? My 86 GT was stuck on defrost. The problem? The arm in the actuator was shifted out of place and the electrical contacts on the wheel were not making up, and it needs these contacts in order to know what position the arm is in, and without the wheel making electrical contact, it just remains frozen. How did I fix it? I 3d Printed a 6.3mm tall spacer that snapped behind the arm and now it works fine. But this post is more about the miserable installation process than the actuator rebuild.
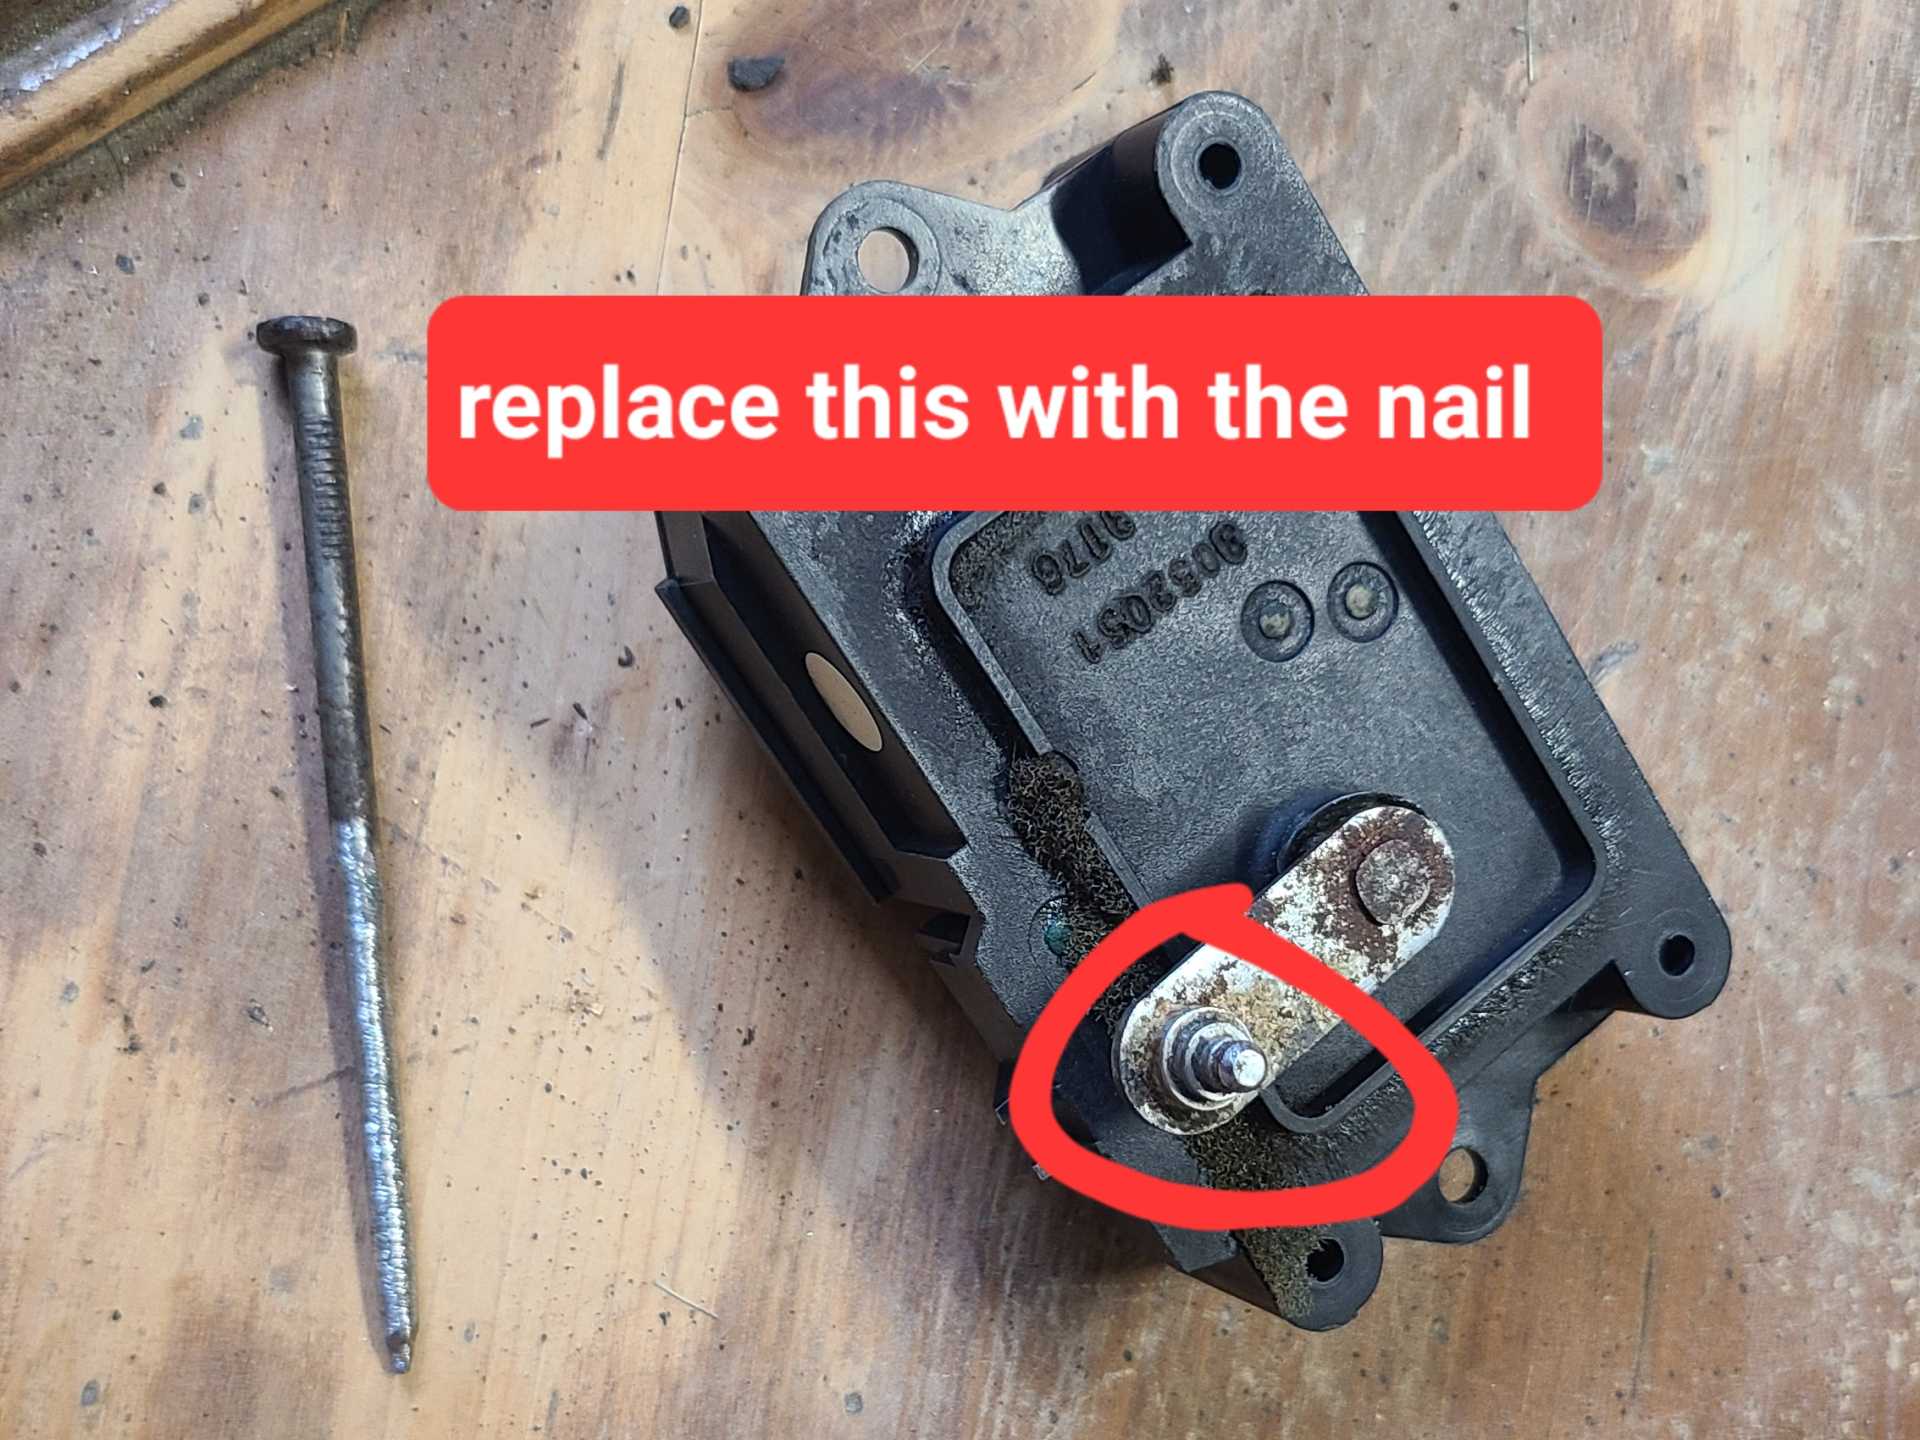
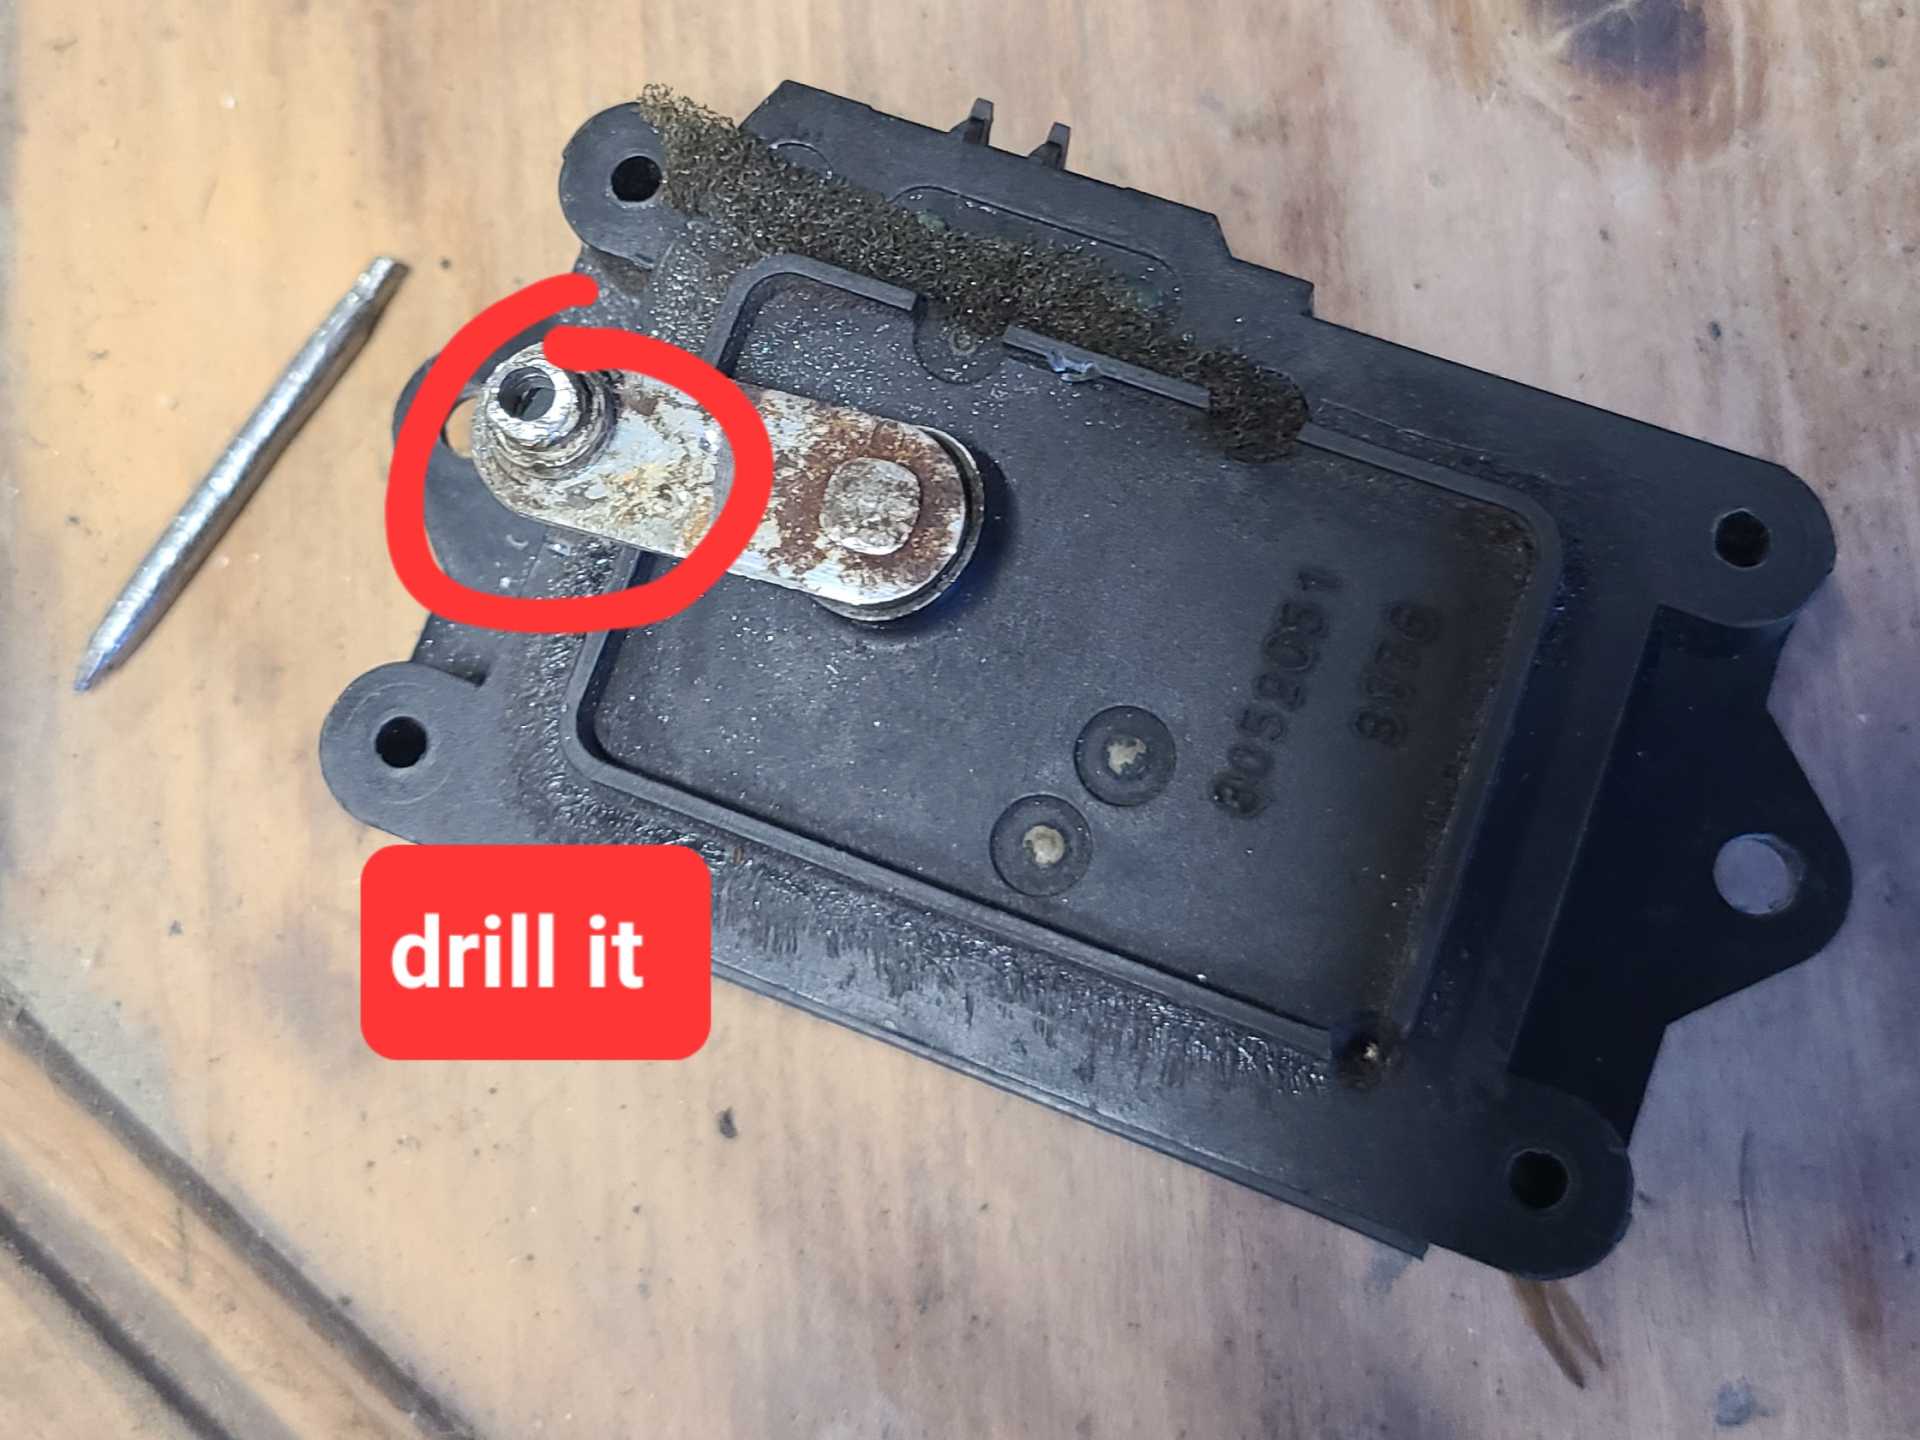
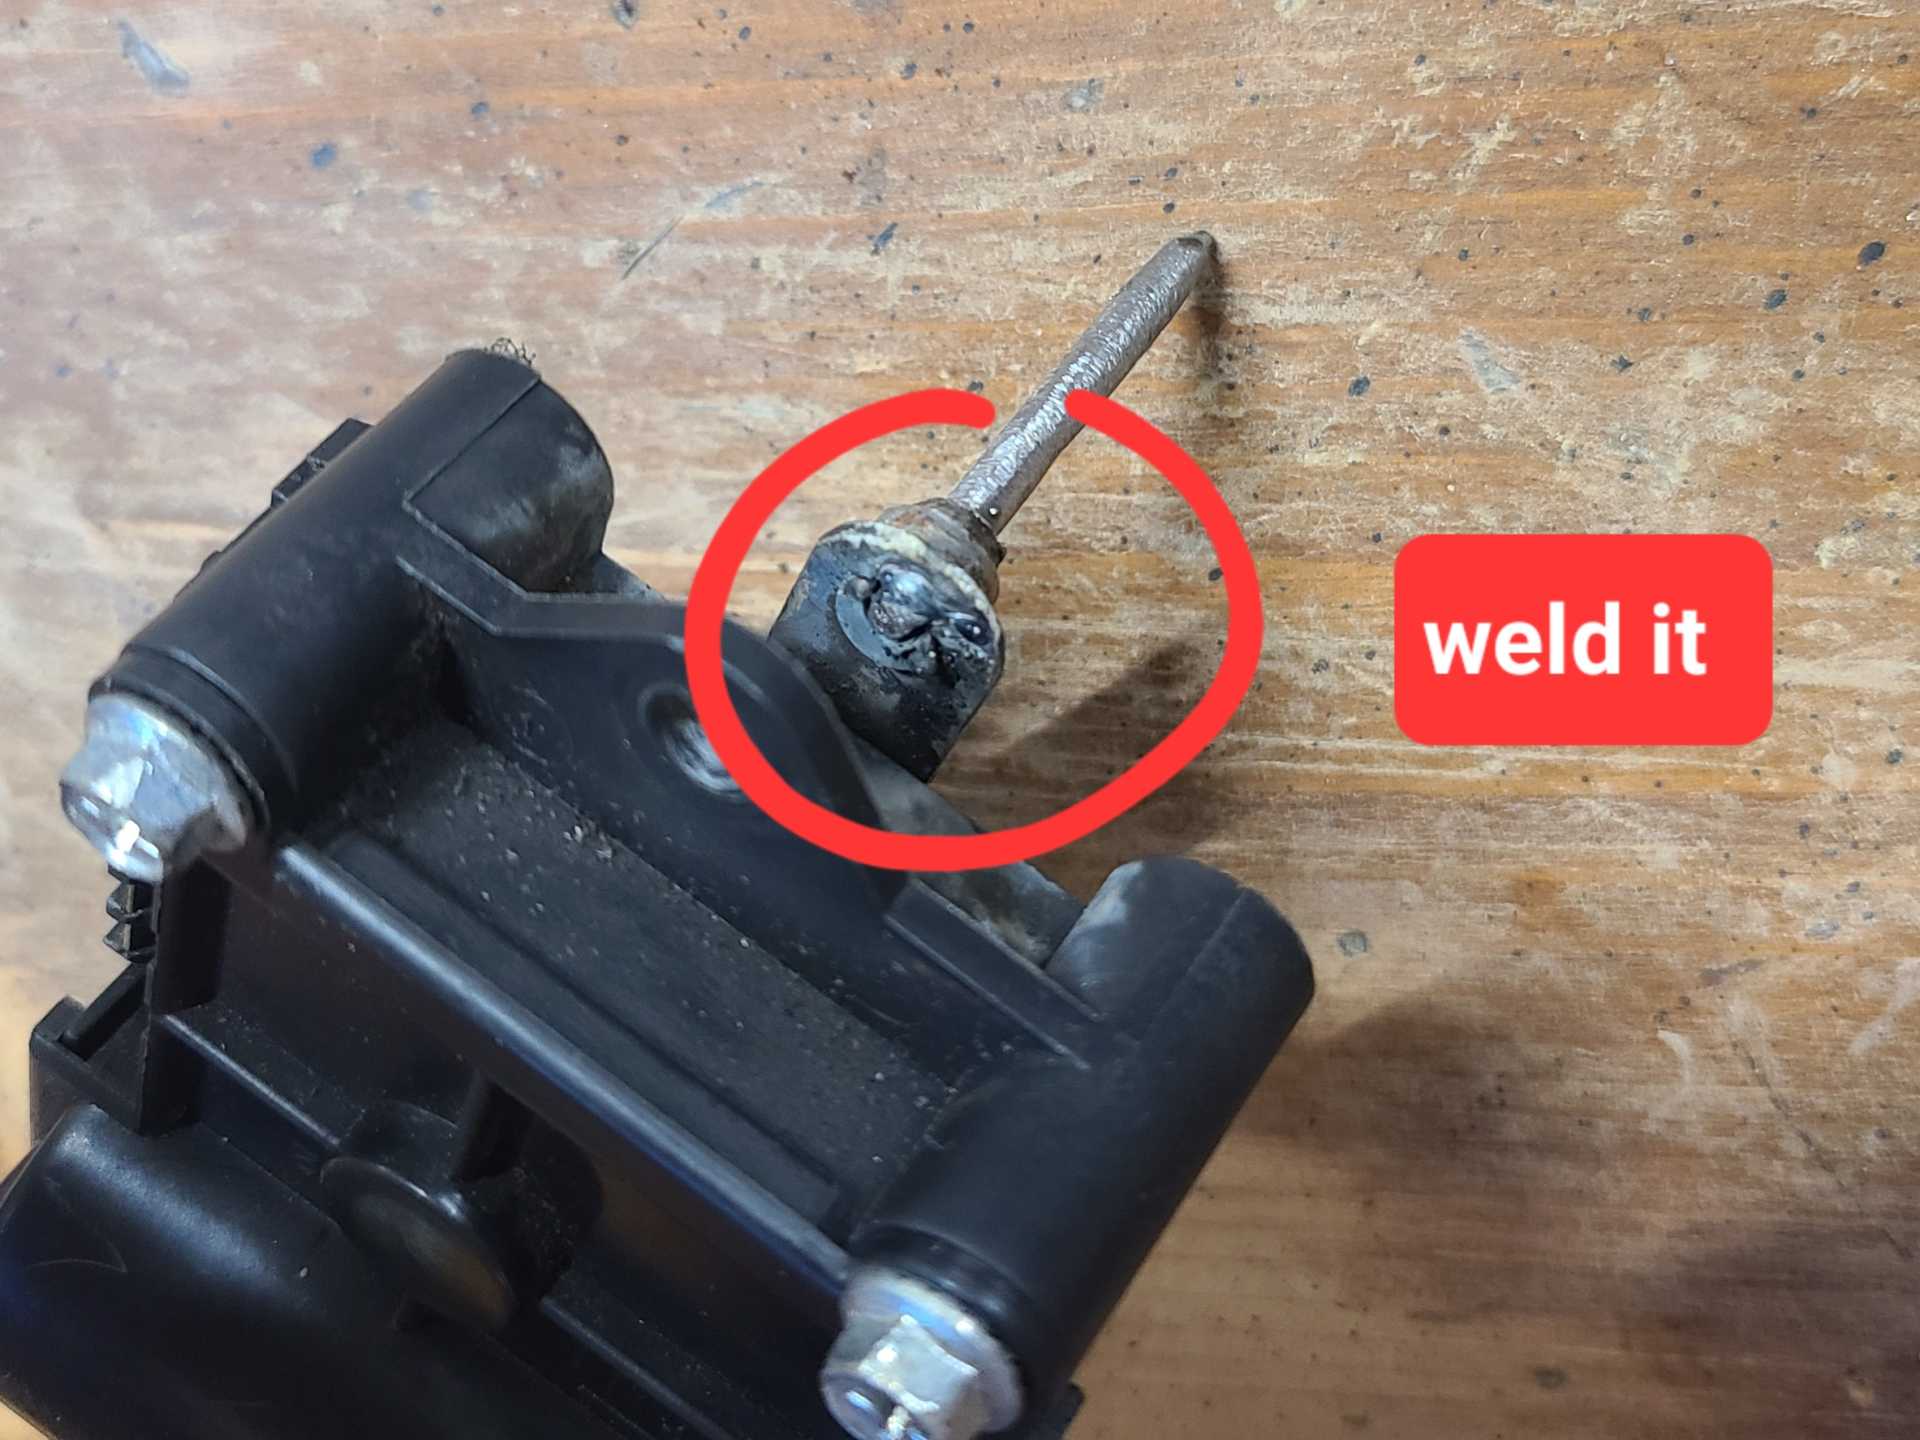
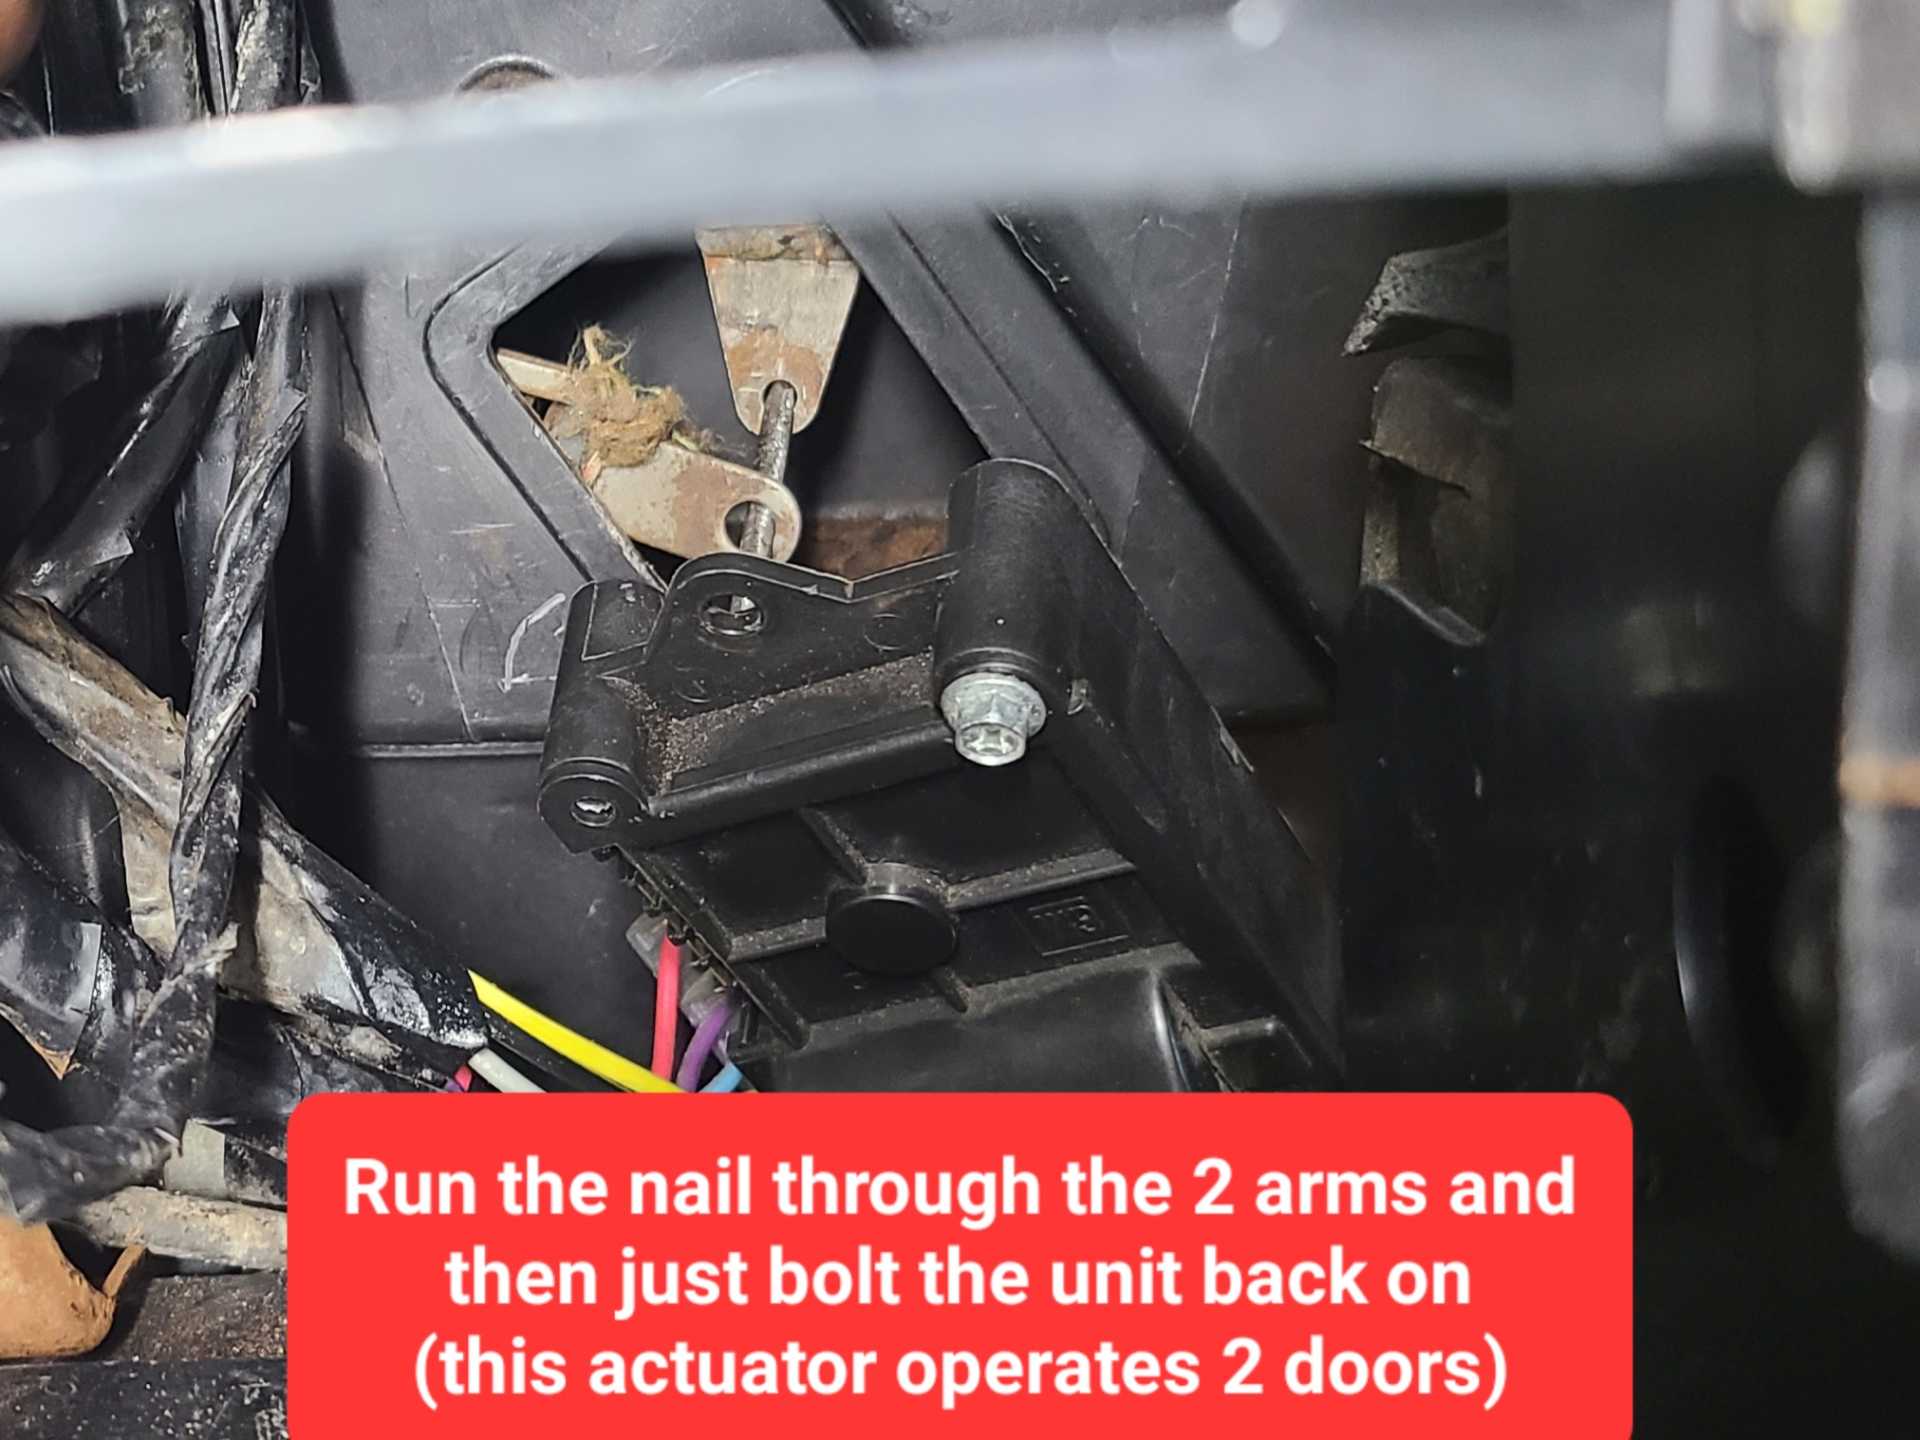
When it came to reinstall the actuator, I decided to drill out the original arm which received the clip, and weld in a nail that was so preposterously long that once installed there was no chance that the door levers would ever come loose.
It was easy and it works.
GM can deal it with as can anyone who disapproves of this. You can now pop this thing in and out supremely fast (just make sure the screws don't fall into the bottomless chasm below it). Sure it makes a little noise, but I'm fairly certain it would have done that anyways based on the material of the levers. Check out the pictures and see for yourself.
  [This message has been edited by Jeffdylanproctor (edited 07-13-2023).]
|
|
|
|
Jeffdylanproctor
|
JUL 13, 10:50 PM
|
|
This is the clip. I wish I would have remembered to take a picture of the insides of the actuator, so that the electrical contacts make sense to the post, but anyways. These things can be repaired.
I advice anyone to do whatever they can so they never have to mess with these clips again. 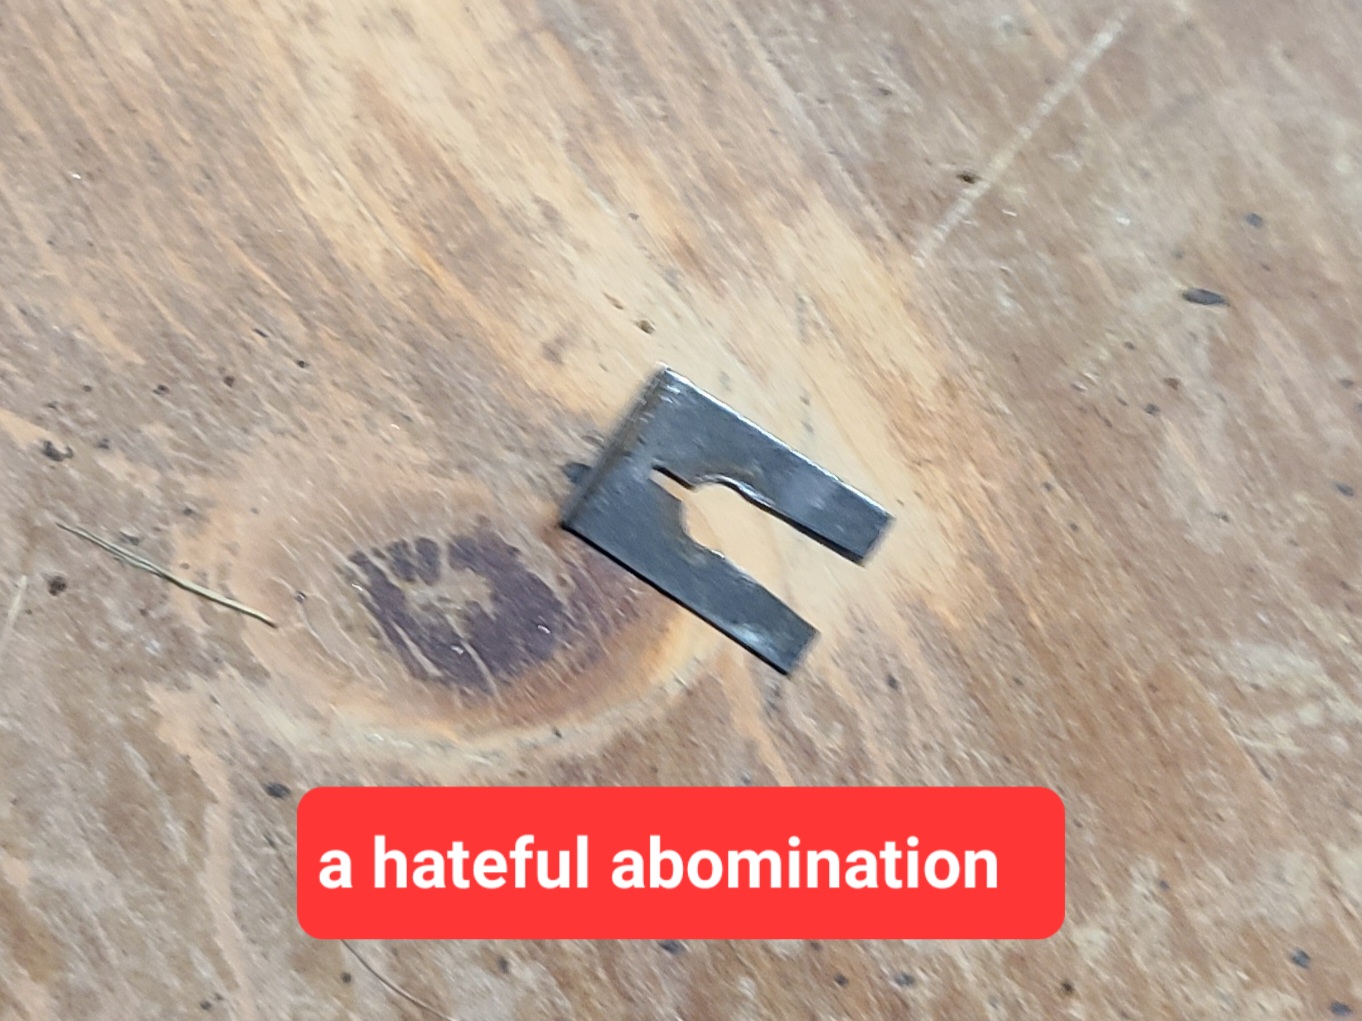 [This message has been edited by Jeffdylanproctor (edited 07-13-2023).]
|
|
|
|
Vintage-Nut
|
JUL 14, 08:24 AM
|
|
A Picture is Worth a Thousand Words
Thank-you for the awesome write-up and photos Jeffdylanproctor!
However, you said "This post is more about the miserable installation process than the actuator rebuild"
Do you plan to include the actuator rebuild on this thread or another post?
Thanks again for your time! 
|
|
|
|
Jeffdylanproctor
|
JUL 14, 09:40 AM
|
|
I should have taken more photoes of the actuator while I had it disassembled, but since it is now very easy to take in and out, I could probably pull it back out and do a write up, though most of what I did is actually explained above.
Essentially, my Mode Door Actuator was frozen and would not change vents from defrost. There was a mouse nest in there (hence I knew I needed a easier way to reinstall this thing, as I had to put it back together and take it apart several times cleaning out the system)
Here is the short version of how I rebuilt the actuator:
1) Drilled out the four plastic corners so I could open it (common screws can replace these plastic rivets, or whatever they are, I don't know their real name)
2) Examined and unjammed the stuck pieces.
3) Cleaned Lubricated everything.
4) Put it back together but used a 6.3mm tall 3d printed a spacer to snap around the arm after it goes through the housing, this keeps it pulled out as far as it can go, so the electircal contacts can make up.
The arm had over time worked itself loose and slid into a positon where it was neither making electircal contact nor even free and able to move. The spacer fixed that problem. I can imagine many of these quite working because the electrical contacts behind the arm's gear aren't making up, it only has be pushed in a very small amount to fail. That arm needs to be very tight or else it stops operating.[This message has been edited by Jeffdylanproctor (edited 07-14-2023).]
|
|

|
theogre
|
JUL 14, 04:40 PM
|
|
GM likely installed the clip while making the "box" before Box sections jointed.
Yes large problem for anyone else trying to fix/replace the motors after that...
This "Fix?" Nice idea, bad execution.
The clip keeps the door "rods" in place next to Actuator arm while the motor runs.
W/o that, the "rods" can move inward/forward and cause binding and other problems on the longer pivot.
Did you notice the "rods" have 2 sizes of holes that match the Pivot areas? The "rods" will not align right w/o the clip holding them.
"Best" way is using wire(s) to hold the "rods" so can't fall down and various medical Hemostat/forceps for dealing w/ the clip.
Many different types and size of forceps so can't tell you exactly what to use. Plus some are made way better to hold w/o you watching after clamping the handles.
Many seen "standard" forceps that sim to "needle nose" pliers but there are Many other formats. (Many Hundreds of types of all sizes.)
Example: web search ssi 50-0215 (is a Real Med tool and less common to see outside of that.)

Has a T head w/ teeth only @ end
this and related often go on Eflay
Or can mod other types to grab at ends better etc.
I had spares w/ Clips and remove the clip using good "standard" forceps w/o a problem. The clip will rotate on the pivot to get better target to grab. I have the Example only much later and may not fit but is one of hundreds of types.
⚠️ "Cheap" forceps often have the "ratchet" part that won't hold... IE like touch a bit and easily let go or worse just slip off easy w/o you doing anything. You don't want iffy ones for this job.
Side Note: Even "standard" Forceps have different versions besides straight vs curved... Example: Ones w/ some teeth but a Gap near the hinge is for dealing w/ IV tubes. Gap clamps them to stop flow w/o damaging the tube.------------------
Dr. Ian Malcolm: Yeah, but your scientists were so preoccupied with whether or not they could, they didn't stop to think if they should.
(Jurassic Park)
The Ogre's Fiero Cave
|
|
|
|
Jeffdylanproctor
|
JUL 20, 11:56 PM
|
|
|
Yeah so far they have worked perfectly fine and I am not worried about it.
|
|
|
|
donuteater306
|
JUL 23, 11:52 AM
|
|
|
Can those motors be disassembled for cleaning and lubrication?
|
|
|
|
Jeffdylanproctor
|
JUL 23, 06:58 PM
|
|
Yes they can! All you need is a drill and then some standard screws to replace where you drill out the plastic rivets.
They very much need lubricantion, or at least mine did.
|
|
|
|
Duck 1
|
JUL 27, 04:29 PM
|
|
|
Very good write up and photos. I am right in the middle of this process and only those who have done this know how intimidating this is. After removing the actuator motor I took it apart and cleaned , regreased and reassembled the motor .When I started to put it back into the blower housing I saw a spring hanging down inside the housing. The spring is about 3.5 " long and made of very small diameter spring wire. One end appears to be attached to the top flapper and the other end was just hanging there. When i removed it , one end had a loop on it and the other end appeared to be rusted off. Does anyone know where or how the rusted off end was suppose to be attached ? A diagram would also help?
|
|
|
|
Jeffdylanproctor
|
JUL 27, 11:53 PM
|
|
The levers/arms that work the door have springs on them (it's actually these that keep the arms tight on my nail design)
Are these the levers/springs what you are referring to? There are two that hang down in the hole for the actuator.
|
|
|
|