 
     |
| Engine/trans mount sequence (Page 1/2) |

|
gregr75
|
OCT 21, 01:11 PM
|
|
Hi guys
Another saturday, another question!
Months ago i replaced the cradle at which time i mounted the engine and trans with a new engine mount on passenger side and new front and rear trans mounts on driver side.. all 3 mounts from fiero store. im re-using the poly dogbone up top.
Im now trying to reconnect the dogbone at the engine side, but it is too "short", i would have to pull back on the engine with much more force than the recommended 200-250 newtons per service manual to get a line up. i tried tilting the car nose high on jackstands and it barely helped. im wondering if i should not have tightened the cradle mounts first and if i should do the dogbone first? is there a sequence.
87 gt 2.8 v6 5 speed
|
|
|
|
theogre
|
OCT 21, 02:30 PM
|
|
When have correct engine & trans mounts, you should see they align "automatically" to frame or in this case cradle.
Cradle will do same w/ car frame when installed.
Most vehicles will do same with little or no help from installer. When the mount parts have slots on them or part bolted to is only to allow Tolerance Stacking across many parts.
For "dog bone" to trunk wall...
Release all loads by parked on level surface + putting trans in Neutral then dog bone should fit w/o effort w/ engine end bolt goes into the slot on bracket. You Should Not need to Force it to fit because the Bone & Mounts are "preloaded" & hate this & break fast. Plus can preload on the cradle affecting wheel alignment.
Many times people install Aftermarket "trick"/"performance" parts & measure wrong for many reasons & later won't fit.------------------
Dr. Ian Malcolm: Yeah, but your scientists were so preoccupied with whether or not they could, they didn't stop to think if they should.
(Jurassic Park)
The Ogre's Fiero Cave
|
|
|
|
olejoedad
|
OCT 21, 03:26 PM
|
|
A good rule of thumb is to install all of the mounts and dogbone without tightening any of them, just go finger tight or get the nuts on or on he bolts started.
After everything is attached, do the final tightening.
|
|
|
|
gregr75
|
OCT 24, 12:29 PM
|
|
So i backed out all the nuts until theyre almost running off the studs on all mounts. i even disconnected the mini "shock absorber" cradle mount at front seen on some cars. still cant get the dogbone to go. i should say, the dogbone lines up nicely inside the bracket, (left to right alignment is good) its still too "short" by 1/2 inch or so.
I read something about jacking up the engine a tad with a piece of wood under the oil pan to relieve the weight on the mounts. This might help but seems like it would crush the oil pan, no?
|
|
|
|
olejoedad
|
OCT 24, 04:39 PM
|
|
Use a block of wood that spans the width of the oil pan, or use a ratchet strap to pull the engine toward the trunk.
You can hook the strap to the beam behind the carpet on the front wall of the trunk, or even the trunk latch hoop.
|
|

|
IMSA GT
|
OCT 24, 07:15 PM
|
|
Use Joe's recommendation above.
Here is the factory manual information:
 [This message has been edited by IMSA GT (edited 10-24-2023).]
|
|
|
|
gregr75
|
OCT 24, 08:23 PM
|
|
Success! Jacking engine up by oil pan simultaneosuly moved it up and rearward. Was able to get dogbone bolt in.
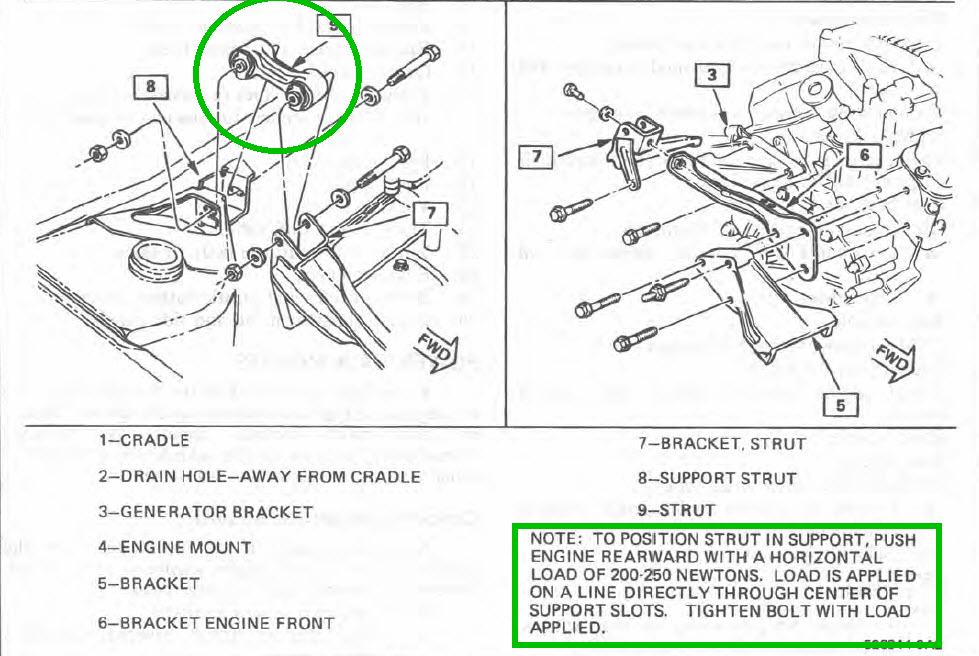
Theres one more thing, before i torque everything, the service manual recommends the "finger" A on each trans mount is in the middle of the "hook" B as shown in pic. theres an ominous note on the other page saying failure to do this could result in drive train component failure. what?
i dont even see how this is adjustable, the hook and the finger are all one piece on each mount so i cant see how they would move relative to eachother?? What am i missing?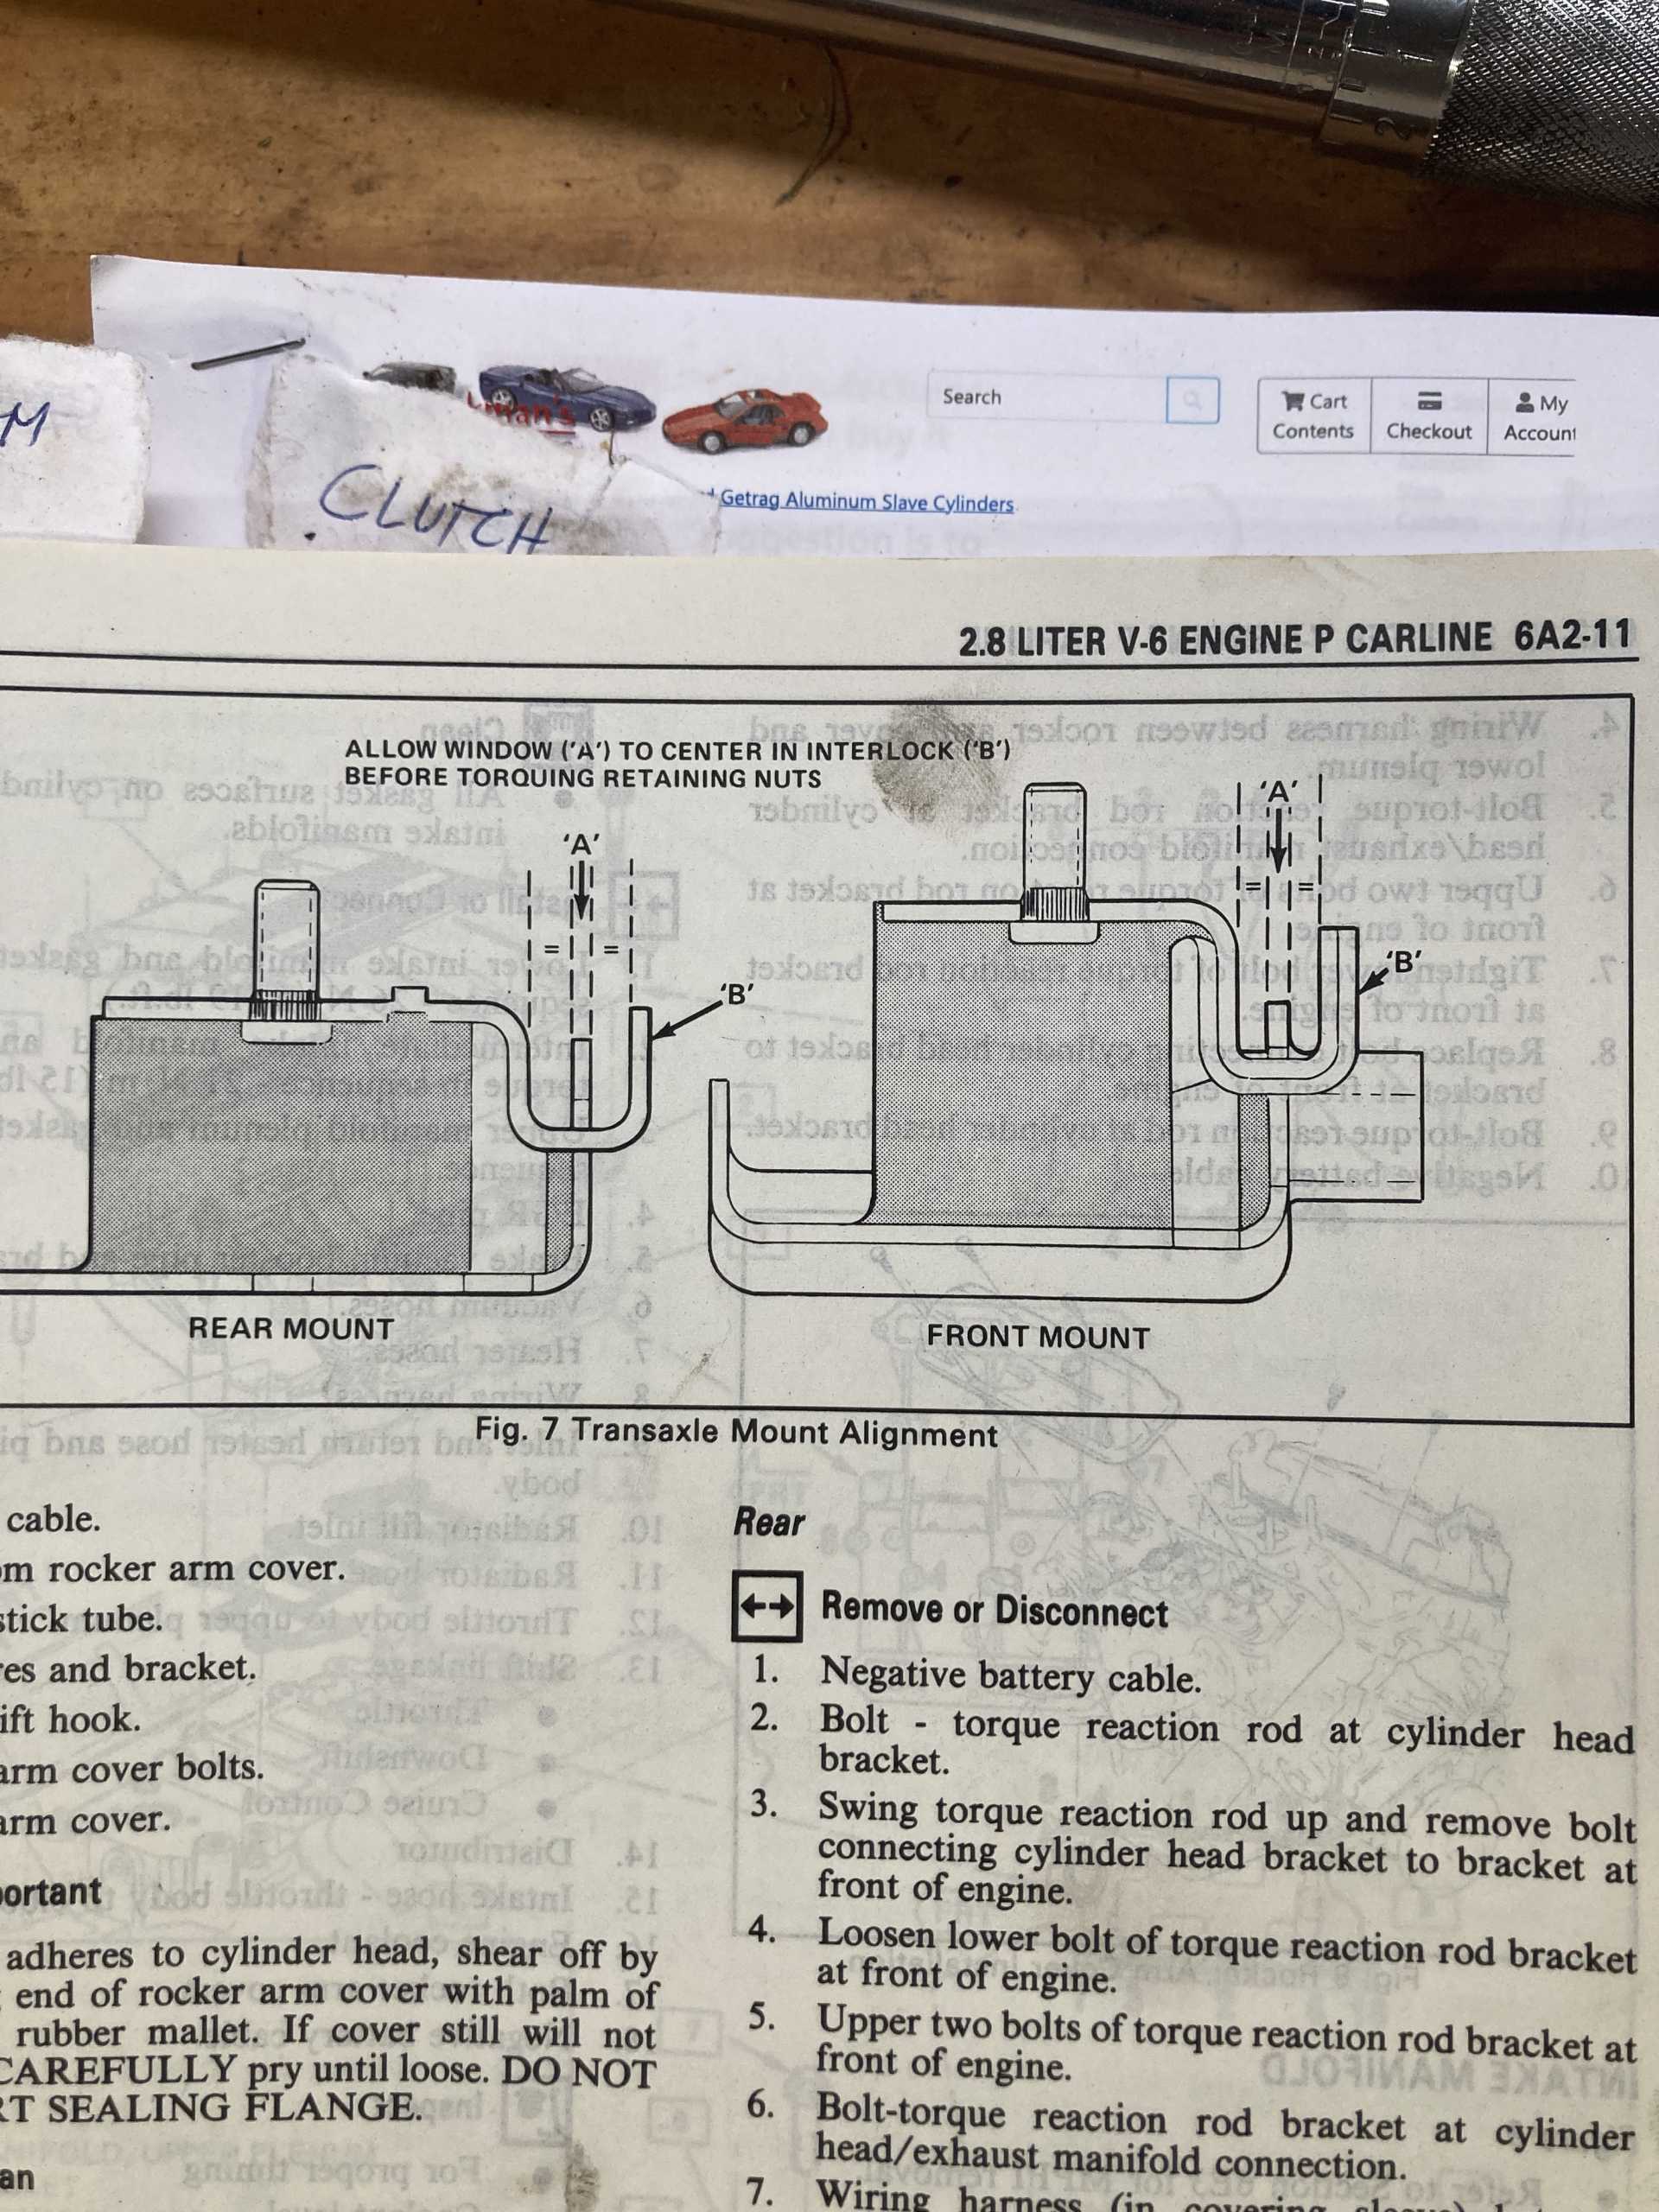
|
|
|
|
cvxjet
|
OCT 24, 09:34 PM
|
|
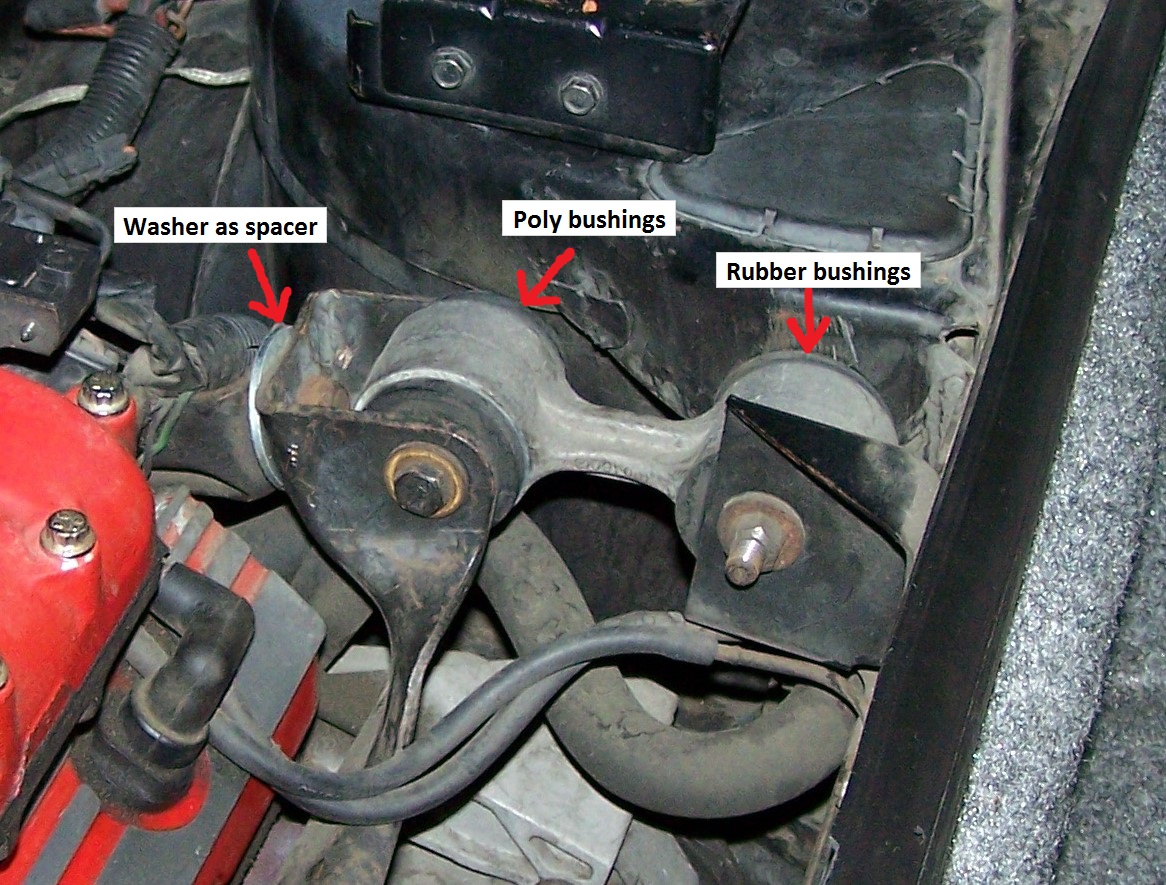
One thing you can try is what I did to my dog-bone mount- I installed a thick washer as a spacer to get it closer to neutral;
|
|
|
|
theogre
|
OCT 25, 10:49 AM
|
|
| quote | Originally posted by gregr75:
Success! Jacking engine up by oil pan simultaneosuly moved it up and rearward. Was able to get dogbone bolt in.
Theres one more thing, before i torque everything, the service manual recommends the "finger" A on each trans mount is in the middle of the "hook" B as shown in pic. theres an ominous note on the other page saying failure to do this could result in drive train component failure. what?
i dont even see how this is adjustable, the hook and the finger are all one piece on each mount so i cant see how they would move relative to eachother?? What am i missing? | | CLICK FOR FULL SIZE |
|
|
The "ears" are to prevent rubber section tearing out when you hit the gas etc.
Ears should not be loaded otherwise.
Mean rubber either pulled out all the time or twisted/pulled as bolts won't fit the slots/holes to mount them.
Basically a mount should look nearly identical as it did before installing. If ears are not "centered" w/ engine @ rest then can/will hit when you drive making noise or worse problems.
While FSM book say jack or other force the dogbone to fit... FSM have many errors for many reasons & above image w/ forcing to fit leaves bad taste to many people.
Even if "does work" w/ OE Rubber "bushings" bones.... Rubber can deform is several ways that allow this w/o wrecking other mounts/bushings.
Polly in this application barely moves & act like solid part to keep others in preload condition & often shorten their lives.
|
|
|
|
gregr75
|
OCT 25, 01:32 PM
|
|
|
OK I get it, the purpose of the finger being centered after install is an indicator to make sure the top of the mount isnt drifting relative to the bottom of the mount. in otherwords, the mount isnt being side loaded. side load would mean the axles are being pushed or pulled into the wheels, which could cause premature failure.
|
|
|
