
 
     |
| ~Dual Heads Up Display (HUD) by ~Mister~ (Page 1/5) |

|
Mister
|
APR 01, 01:58 AM
|
|
Intro... Every project start with a good idea, and some PFF research
Search Heads up display as subject on PFF
Search HUD as subject on PFF
Credit is given where credit is due 
This is not an original idea (what is?) there are a few HUD setups on Fieros out there,
On this setup I’ve combined a simple HUD idea that was made and offered for sale here by Riceburner98.
Original idea by Oliver Scholz and Riceburner98
http://www.fieros.de/en/projects/hud.html
http://www.fiero.nl/forum/A...031229-1-024240.html

The wiring credit is given to jscott1 and other good PFF’ers that contributed

~ Though I’ve installed my setup awhile back, PaulJK have posted a similar “Swoosh” unit setup Apr 2006 Heads Up Display Install
He said...
| quote | | Originally posted by PaulJK:I wish the unit would display BOTH speedo and tach at the same time (either above and below or side-by-side)" |
|
So… I'll pick it up from that thought…
~~~~~~~~~~~~~~~~~~~~~~~~~~~
~ Idea: A dual HUD, visually consistent with the stock speed and tach gages, Display of both important figures together, Red display to follow the Fiero’s stock display colors. Concealed Shift light.
~ Concept: I try to keep my Fiero as close as possible to the original stock look, all upgrades are made the “stealth” way, hidden or merged with the original look of the Fiero. I’ve made an effort to conceal the HUD units in the Fiero dash (it sacrifices reflection result a bit)
~Parts:
- Electrical wires, wire taping clips
- 2 HUD units bought directly from Unshun Internationl Co. LTD. in Taiwan, Cost was $174US shipped
Item Name: HUD
Item No.: SW-HUD-2.0
Description:
Different display models to choose from (simultaneous detection of Speed and RPM) :
1. Speed + Speed (display+ running light)
2. Speed + RPM (display+ running light)
3. RPM + RPM (display+ running light)
4. RPM + Speed (display+ running light)
• Set up over speed warning
• Set up RPM-over speed warning
• Peak speed record / read / clear functions
• Peak RPM record / read / clear functions
• Over speed / RPM-over speed warning light’s flashing feature
• Over speed / RPM-over speed buzzer’s warning feature
• Screen’s brightness is adjustable ( 2 models : Day / Night )
• Remote control operated ( has copy-protection function )
In the box:


A few words on the HUD unit I got. This is a universal HUD and in my opinion is a “grade B” product, it’s not extremely accurate nor is it made for “professional” applications.
By that I mean that even with calibration done, I was not able to reach perfect accuracy on speed display and since the speed reading is very sensitive the display jitters between speed values.
You might be able to get similar units somewhere else or build one yourself if you have the time and knowledge. I just wanted it to work
~ Tools:
Wire cutters, Solder, 3rd hand tool (really helps with soldering, and holding one’s beer),Insulation tape.
~ First of all, The Wiring:
1. Using the info in the links above (and depending on model year) find the wires for
VSS, Tach, Power, Ignition power, Ground and Lights Dimmer
Use proper soldering and insulation on all wires
2. Connect tach sensor to HUD units
3. Connect speed sensor (VSS) to HUD units
4. Connect Ignition controlled (+) power and (-) ground to HUD units
5. Test units
~ Before we set the unit in place, lets clear something about regular HUDs
One fact I didn’t know about HUDs (total misconception). A HUD unit is not projection It’s only a reflection of the display on your windshield, this leads to the following problems:
1. Restricts the installation location for the 2 display units to achieve a good reflection spot.
2. Double image (windshield has two reflecting layers)
3. The dash and display unit themselves reflects in the daytime
4. If you use polarized sunglasses…they are designed to dramatically cut glare and light shining from straight surfaces…just like your windshield. You’ll see 50% less HUD reflection wearing polarized.
In the pics below you can see the reflection result when placing the display units in the “expected easy place” behind the gages cluster.

The display is not straight with the horizon line, too high and distracting

In regards to problem #1 the location:
Why go to all the trouble of hiding the display units in the dash you ask ???
Well, it’s the only place that provides a good location for the HUD reflection to be in line of sight. (from my point of view) while keeping the units hidden from eyes sight. Proper Installation location result would be - 2 horizon line parallel images slightly under your line of sight and to the sides.
Note 1: It could be easier to do this project with the dash apart, however you have to test the display on the windshield for final positioning, and this has to be done with the dash in place.
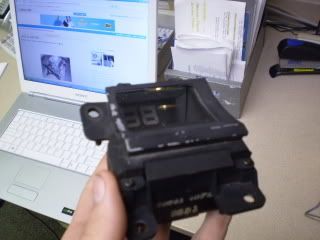
Note 2: In order to accommodate the tight fit of the display units in the dash, I’ve disassembled these units from their original cases and used duck-tape to protect the display units components.
~ Tach (right) display install:
1. Remove left dash speaker, this will allow access to the windshield vent.
2. Reach into the dash and remove the corner of the insulation foam from the vent left side.
3. Slide the display unit into the gap and position properly. Unit will seat in place just by the pressure of the dash. (From my experience the unit does not interfere with vent operation.
4. Run connector wires to bottom of dash
5. You’ll have to connect this unit and test the display before completely closing the dash.

~ Speed (left) display install:
This unit should sit where your left speaker is, depending on the type of speaker you have this installation will vary.
1. The unit simply sites with double sided tape on the twitter bridge.
2. Run wires accordingly to bottom of dash. (a small trim is required in the dash material next to the speaker)
3. You’ll need to modify the speaker cover to accommodate the unit depending on the unit’s location below. (for the audiophiles, I haven’t noticed any significant effect in this speaker sound output)

~ Speaker Cover HUD Window:
Create a clear plastic window in the speaker grill.
1. Cut a proper rectangular opening in the plastic grill.
2. Glue the thin clear plastic piece as a window below and on top of the gill fabric.


~ HUD Data Calibration:
A Simple yet important process explained in the units instruction, it’s intended to “teach” the HUD chip exactly what your sensors are sending in terms of decoding voltage values into numbers.
Tach is fairly accurate, however speed does not follow the Fiero speed gage perfectly.
After reaching the desired display and data calibration you can mount the control unit/s under the dash with a few zip-ties.
~ Concealed Shift light - Optional and recommended.
The HUD unit purchased has a shift light option built in. (with optional audio warning)
I’ve decided to use this function and install the 2 Shift warning Lights behind the Fiero gauges cluster.
At the preprogrammed RPM figure, these lights start flashing behind the gauges cover.
Installation of the bulbs with hot glue

SHIFT!!!
(In the pic the 'Ajar' is on)

15sec video file of the shift light, set to trigger @ 2000 RPM (for testing).
~ Final result: In my opinion, it’s a cool, useful upgrade, I love the way you can look straight up and have the road in front of you, with both displays besides of your focal point.
For day use, brightness set to 255 and is visible aside from direct sunshine conditions.
For night use, brightness set to 55 and looks great.
Results…


Suggestions and comments are always welcome, please share your own similar projects.
Good luck, and enjoy the drive 
***Disclaimer: This is an amateur write-up of my ideas. Information here is provided for explanation of the general idea, I’m not a car mechanic / electrician nor will I’ll be held responsible for any damage to your car, electrical components, your garage going in a blaze or destruction of your marriage life Please use at your own risk - Thanks.***
------------------
 [This message has been edited by Mister (edited 04-01-2007).]
|
|

|
Austrian Import
|
APR 01, 02:10 AM
|
|
Cool, awesome!!!!
I wanted to do something like that for a looooong time. I found an old website outlining how to do it (included how to make the basic stamp from scratch), but I was stuck on some details, and I couldn't find help with it since the email links were so old they were dead.
I'd really like the rpm gauge to be analog, as fast changing info is easier to read analog. (which is another reason the project was on ice)
-M[This message has been edited by Austrian Import (edited 04-01-2007).]
|
|

|
Chris Hodson
|
APR 01, 02:16 AM
|
|
Heres my project....
 ------------------

|
|
|
|
jscott1
|
APR 01, 02:36 AM
|
|
Very cool mod, and functional too.
I like the way you lay out your objective and then measure the results at the end. Very scientific.
|
|

|
blackrams
|
APR 01, 11:24 AM
|
|
Excellent write up and cool project, + for sharing.
Your disclaimer has convinced me not to attempt this project. I can see where all the bad things will follow if I attempted this and since you won't take the blame, I guess it won't get done.  Thanks for posting. Thanks for posting.
------------------
Ron 
Land of the Free because of the Brave. Most gave some, some gave all. Some ran the other way.[This message has been edited by blackrams (edited 04-01-2007).]
|
|
|
|
BrewCheese
|
APR 01, 04:04 PM
|
|
Very Cool! Love the way you concelied it to keep the stock look.
Thanks for the info,
Jason
|
|

|
Fierofreak00
|
APR 01, 06:06 PM
|
|
| quote | Originally posted by Chris Hodson:
Heres my project....
|
|
Spill the beans!
|
|
|
|
Mister
|
APR 02, 10:51 PM
|
|
|
|
|
RCR
|
APR 03, 07:28 AM
|
|
That's a cool project and a nice write-up, but am I missing why you have "STOP"? Don't you know when you hit the brakes? 
Bob
|
|
|
|
THE BEAST
|
APR 03, 12:30 PM
|
|
| quote | Originally posted by Mister:
Some driver view shots...

|
|
Can you tell me if the tack is limited on how high the rpm can be displayed ? I need a tack that can show up to 8200 rpm, and I like when things stay mostly stock, like yours
Thanks,
JG
|
|
|
|

