
 
     |
| school me old schoolers, on motor brush replacement (Page 1/1) |

|
maryjane
|
JAN 31, 11:58 AM
|
|
It's been a minute or 2 since I made/formed a set of brushes for an electric motor. Older Montgomery Wards PowerKraft rotary sander/polisher.
Not this exact model, but very close.
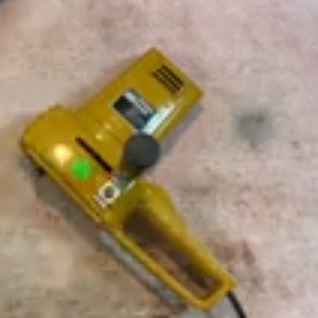
I used it last summer and it worked ok for several hours but sparked a good bit from the brush area, then would Start, stop, then finally stopped altogether. The brushes are just worn down to almost nothing. The way the brush holder is made, when the brushes wear down, the conductor (wire) hits the end of the slot in the top of the brush holder and there is no more spring tension pushing the brush up against the commutator.
Been unable to find exact replacement brushes and not knowing what the correct length is supposed to be, had to buy locally, two brushes 1/4x/1/4" x 3/4" long which is correct width-height but way too long
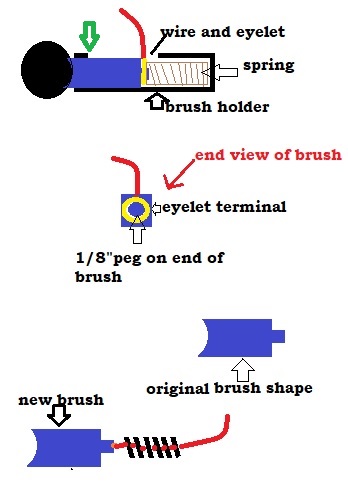
The original set up is kind of funky. Instead of the brush having a conductor factory made on to the end of it, enclosed by a spring, it's just a rectangle, with an 1/8' round peg on one end that an eyelet terminal fits over, and the spring also goes over the end of the peg, which holds the wire eyelet up tight on to the brush.
The new brush I had to get tho, has the usual brush, conductor and spring all in one. Looks like this:
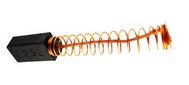
There's just not enough room in there to make a splice connection plus, with thespring too long, even after I cut the brush down to a guestimate of how long it should be, the spring would still be too long to all fit in the holder.
My intention is to cut the conductor completely off the end of the new brushes, scrap the spring and use the original eyelet over the little peg on the end of the new brush and use the original springs.
Here's basically what the original design is. When the brush wears down, the wire ends up against the end of the slot where the green arrow is.
So, my questions.
1. I'm having to guess on the correct brush length but I hope that as long as I make both brushes equal length, the spring tension on each will be equal. Does it make much difference how hard the spring pushes the brush against the commutator?
2. Since I have to shorten the brushes on the commutator end in order to retain the round peg on the spring end, do I need to form a radius on the other end of the brush or leave it squared off and let it seat itself against the commutator thru wear?
3. The commutator is dirty and the grooves are filled with gunk. What do I use to polish the commutator?
Yes, I know, I can buy a new rotary sander dirt cheap nowadays but I'm old and I just wanna keep this one, even tho I rarely use it since I have belt and random orbit sander already.
(besides, I already have $16 in the 2 new brushes and there's no return on electrical parts at my local hardware store.)[This message has been edited by maryjane (edited 01-31-2024).]
|
|
|
|
82-T/A [At Work]
|
JAN 31, 03:31 PM
|
|
| quote | Originally posted by maryjane:
So, my questions.
1. I'm having to guess on the correct brush length but I hope that as long as I make both brushes equal length, the spring tension on each will be equal. Does it make much difference how hard the spring pushes the brush against the commutator?
2. Since I have to shorten the brushes on the commutator end in order to retain the round peg on the spring end, do I need to form a radius on the other end of the brush or leave it squared off and let it seat itself against the commutator thru wear?
3. The commutator is dirty and the grooves are filled with gunk. What do I use to polish the commutator?
Yes, I know, I can buy a new rotary sander dirt cheap nowadays but I'm old and I just wanna keep this one, even tho I rarely use it since I have belt and random orbit sander already.
(besides, I already have $16 in the 2 new brushes and there's no return on electrical parts at my local hardware store.) |
|
I'm definitely not an expert... but here's my story. My uncle loaned me his power drill years ago. It was a totally original power drill from back in the day (whatever day that was), and it was chrome, and old as **** . it worked fine. But somehow between the time I last used it and returned it, it stopped working. It was just coincidence that the brushes failed (as yours have) literally at that same time with my last use. I literally borrowed it for a weekend, and didn't think to check it before I returned it since it literally worked when I returned it.
My uncle gave me an earful about being respectful and returning things in a broken state. He then ordered some new brushes and gave me the tool back and told me to fix it. So I did. So this was my experience in a basically similar situation.
From what I could tell:
1 - It didn't appear to me that brush length made any difference, so long as it fit and it didn't cause the spring to bind in such a way that it can no longer maintain tension on the "brush." I think the only concern here (about them possibly not being of equal length), is if in 30 years, you find yourself in this same situation and need to replace one of the brushes sooner than the other one.
2 - On the one I'd replaced... the brushes had formed a slight curvature... and of course I replaced them with the new squared off ones. It made no difference from what I could tell... except I'd say that it went from not working to working... haha. But just as you expected... my guess too is that these brushes eventually just seat themselves.
3 - I used baking soda, water, and a toothbrush to clean out all the gunk... and then used a hair drier to dry everything really well (not a heat gun, just a normal hair drier).
|
|
|
|
theogre
|
JAN 31, 05:35 PM
|
|
1. brush length doesn't matter until wears out & spring hit. For things rarely used, new brushes could last for years even when not OE spec.
2. "break in" only matter on motors that get a big load. Just run new brushes before does any real work.
If sanded "round" by you, often is done "wrong" & bushes do same to seat & just "wear" faster most of break in time.
3. cleaning depends just what is wrong. Many time you lightly sand the armature then many sure you remove all copper/bronze out of gaps between armature sections.
If damage & dirty, likely need a lathe of some type & more tools to remove more copper. There are Limits how the armature are turned small before before brushes wear way fast or bushes are now "too fat" & covers too much or even short the hole thing.
Do Not let oil/grease on the armature & brushes or lube will quickly burn & motor will Hate you.
Related to 2: Once brushes have broke in... you often can't turn them or switch side because of wear pattern to fit etc. If done, is "back to square 1" & bushes will "break in" to new setup = will wear fast & spark way more.
|
|
|
|
maryjane
|
JAN 31, 05:38 PM
|
|
well, I don't think I'll be using a sander at age 103.
But, I did get it done, but more on the sander later.
(I was, going to do the toothbrush and toothpaste thing but the new modern toothpaste isn't abrasive enough and I've evidently used the last of my Ipana.. )[This message has been edited by maryjane (edited 01-31-2024).]
|
|
|
|
IMSA GT
|
JAN 31, 07:12 PM
|
|
| quote | Originally posted by maryjane:
...... and I've evidently used the last of my Ipana.
|
|
There's 3 partially used tubes on Ebay for $30 
|
|
|
|
maryjane
|
JAN 31, 08:23 PM
|
|
| quote | Originally posted by theogre:
1. brush length doesn't matter until wears out & spring hit. For things rarely used, new brushes could last for years even when not OE spec.
2. "break in" only matter on motors that get a big load. Just run new brushes before does any real work.
If sanded "round" by you, often is done "wrong" & bushes do same to seat & just "wear" faster most of break in time.
3. cleaning depends just what is wrong. Many time you lightly sand the armature then many sure you remove all copper/bronze out of gaps between armature sections.
If damage & dirty, likely need a lathe of some type & more tools to remove more copper. There are Limits how the armature are turned small before before brushes wear way fast or bushes are now "too fat" & covers too much or even short the hole thing.
Do Not let oil/grease on the armature & brushes or lube will quickly burn & motor will Hate you.
Related to 2: Once brushes have broke in... you often can't turn them or switch side because of wear pattern to fit etc. If done, is "back to square 1" & bushes will "break in" to new setup = will wear fast & spark way more. |
|
Thank you...always a knowledge base you are!!
|
|

|
theogre
|
FEB 01, 11:07 AM
|
|
Even most Dremel & small motors have same "rules."
Example: If you take the Dremel brushes out for any reason & don't have ways to remember brush locations & orientation... The brushed will "redo" the break in & if short of live before will be far less or nothing left & when spring(s) or buried wire hit the armature is trashed.
You may not intentionally remove the brushes... But some real Dremel & related tool products have clip in brush "covers" that can fall/break off, others have screw in covers that get loose & fall off. Assume you find all old parts... have 50/50 chance reinstalling the brush right. So watch the motor if you can for more sparks then normal & if does flip the brush & try again.
Also Wired Brushes like you have the wire often goes much deeper then location tip to keep spring load centered on them. So last 1/8 or more may not be "safe" to use.
Side note: While Dremel makes brushes easy to change, most times they die is for Bearing(s) & other parts.
Like "nose" bearing(s) may fail faster because many use mainly cut off disks & grinders that puts a lot of side loading. Worse on "cheaper" models w a single noise bearing.
B&D made a "dremel" tool w/ level to lock the shaft way better then any Real Dremel but cheap nose bearing fails for cutting/grinding.
|
|
|
|
ray b
|
FEB 01, 09:18 PM
|
|
wet or dry sand or emmory paper 400 grit for the comm
needle to clear the slots of junk
long as it fits file or grind to fit the brushes allow movements
spring just moves the brush to contact the comm
blow or vac dust out and clean bearings
|
|
|
|