
 
     |
| Gen. 1 to Gen. 2 Headlight Swap (Page 1/3) |

|
Cliff Pennock
|
MAR 12, 06:38 PM
|
|
Not so long ago my left headlight failed to pop up. The headlight motor had been rebuild a few years before (or that is what the garage claimed they did) and at first I was planning to rebuild it again, but this time do it myself. I contacted Rodney Dickman to ask what was needed for the rebuild and he said he happened to get a complete headlight set from an 88 and that it would be better to swap my "Generation 1" headlight motors out for the "Generation 2" headlight motors. He kindly donated the kit under the condition I would do a write up. So here it is. 
I made this into a VBook, so to view the VBook, click here or click the "Print VBook" link at the top of the thread.
Introduction
The Fiero uses two different headlight motor systems. One is used in all 84 to 86 Fieros, the other is used in all 87 and 88 Fieros, hence they are usually referred to as the "Generation 1" and "Generation 2" headlight system. The Generation 1 motors have many, many disadvantages. They are noisy and slow and break down often. A lot of people choose to rebuild them when they fail - which is fine if you want to keep your Fiero stock or if you can't find the parts for the Generation 2 headlight system. Otherwise I would suggest doing this swap since it's an easy one and one you will not regret.
What you need
A lot of people wonder what is needed for this swap. Most importantly, you need the headlight actuators (motors) of course. Make sure they are complete with the crank arm and the link assembly:
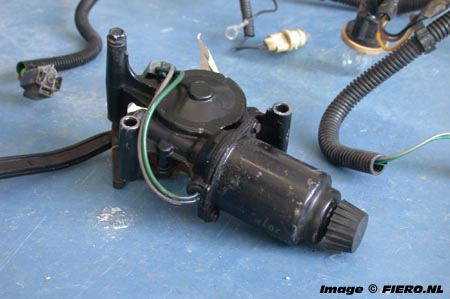
Generation 2 Headlight Actuators
If you are removing them from the donor car yourself (or if you have someone remove them for you), make sure they are marked "LEFT" and "RIGHT" since there is a difference. Also, you might want to take the three bolts holding the motor in place since they are about half an inch shorter than the bolts from the Gen. 1 motor.
The Generation 2 system uses a motor control module which is not present in the Generation 1 system:
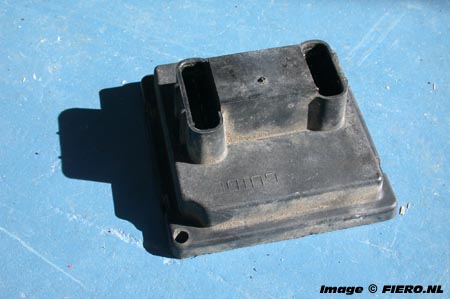
Generation 2 Headlights Motor Control Module
On the 87-88 Fiero, the module is located under the driver's side fender. This really is a strange location for the module since there are far better locations for this module:
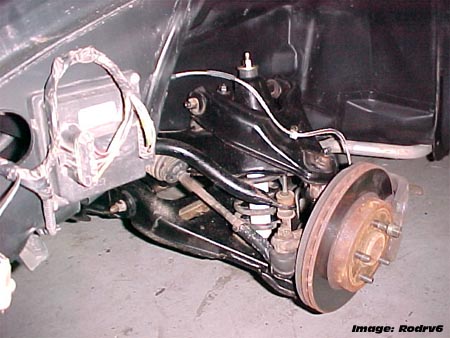
Original location of the Motor Control Module
Finally, you will need the entire Forward Lamp Harnass, obviously since it's different from the Generation 1 harnass:
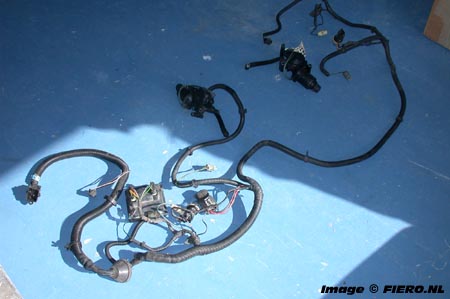
Generation 2 Forward Lamp Harnass
Preperation
Before doing anything else, either disconnect the battery or disconnect the forward lamp harnass (see "The Harnass"). You are working on moving parts and the Fiero's electrical system here and to prevent injuries, you need to make sure the system is not powered!
There's absolutely no reason why you don't want to remove the hood. It makes working on the headlights so much easier and re-aligning the hood is a piece of cake. First, open the hood and remove the headlight doors. The headlight doors are attached to the hood with two bolts:
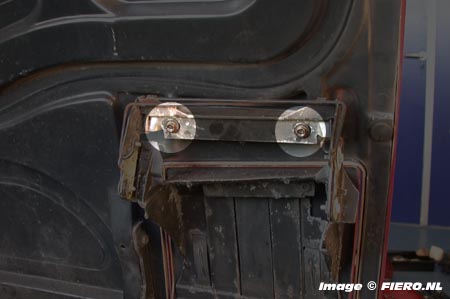
Headlight Cover
Remove the bolts and remove the headlight door through the top of the hood. When both headlight doors have been removed, it's time to remove the hood support. Unbolt the two upper support bolts:
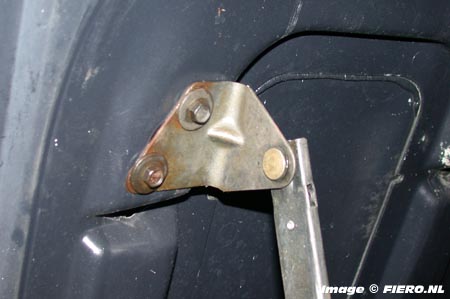
Upper Hood Support Bolts
With the upper support bolts removed, lower the hood support and close the hood. If you now look under the hood through the holes, you can see the two hinges that hold the hood in place. Remove the two bolts on both hinges:
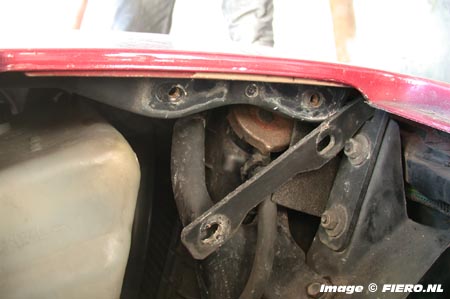
Hood Hinge
Now you can remove the hood completely.
Continued in next message...
|
|

|
Cliff Pennock
|
MAR 12, 07:12 PM
|
|
The Headlight AssembliesThe next step is to remove te headlight assemblies (buckets). The headlight assemblies are attached to the frame with 4 studs, two at the top and two at the bottom. You do not need to completely remove the nuts from the bottom studs. Loosening them a bit is sufficient since you can slide the assembly out. To reach the bottom nuts you first need to detach the link assembly from the headlight assembly: 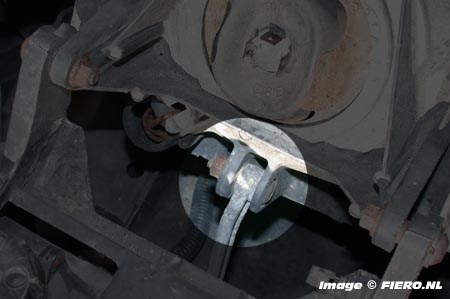
Detach link assemblyOnce that bolt is removed you can lift the headlight, giving you enough room to loosen the bottom two nuts: 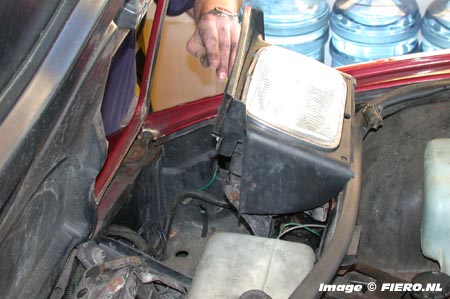
Lift the headlight to get to the bottom studsLooking at the assembly from the front, the two nuts to loosen are positioned here: 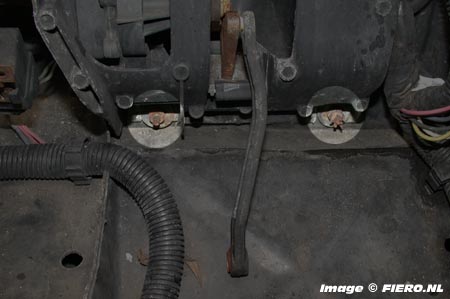
Bottom two studs of headlight assemblyLike I said, there's absolutely no need to remove these two nuts, just loosen them a bit. You do need to remove the top two nuts. Before you remove the top two nuts, you might want to mark their position since that will save you some time realigning the headlights once you put them back in again. After you have removed the top two and loosened the bottom two nuts, remove the entire headlight assembly by tilting them forward at the top, then pulling them up. Of course, do not forget to disconnect the harnass first. Now that the headlights are out of the car, remove the actuator relais on both of them. They are no longer needed. If you look at the headlights from the side, you will see the headlight motor is held in place by three bolts. You will need to remove these three bolts to remove the headlight motor: 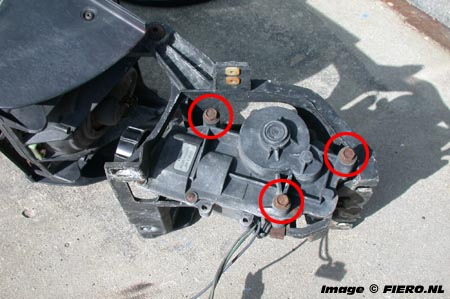
Three bolts hold the headlight motor in placeThe Gen. 2 headlight motors will drop in without any modifications. But as mentioned earlier, the three bolts use to hold the Gen. 2 motors in place are about half an inch shorter. If you were unable to save the bolts from the Gen. 2 headlight assembly, you will need to shorten the bolts (with a Dremel or something) once you have bolted the Gen. 2 motors in place, otherwise the motor will not be able to make a full turn without the crank arm getting stuck on the bolts (there's in fact only one bolt that's too long. You will be able to see easily which one it is once the motor is bolted in place). Do not attach the link assembly to the headlight assembly just yet (so the headlight can still freely move up and down). Once the new motor is in place, put the headlight assemblies aside. It's now time to concentrate on the harnass. Continued in next message...
|
|

|
Cliff Pennock
|
MAR 12, 07:54 PM
|
|
The HarnassNow it's time to remove the original harnass. First you will need to unplug it from the bulkhead - it's the bottom connector near the brake booster: 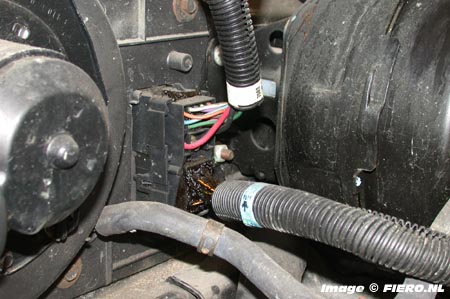
Front Harnass Main ConnectorYou can't simply pull out the connector. The entire connector is bolted to the bulkhead with a single bolt. This bolt also holds the connector in place. So in order to disconnect it, you will need to unbolt it first: 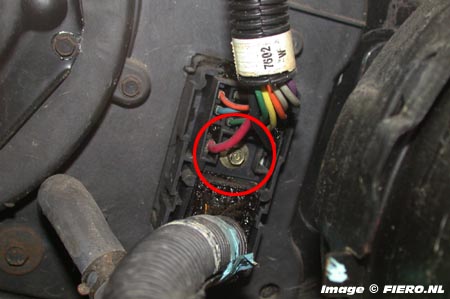
Remove the boltOnce the bolt is loose, you can unplug the entire connector from the bulkhead and remove the front harnass' connector by sliding it out: 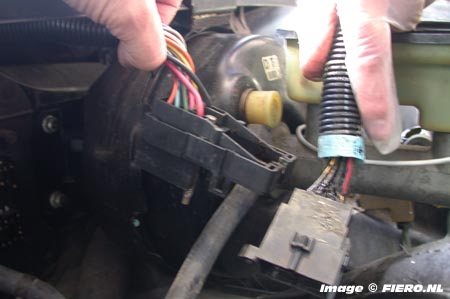
Slide the connector out to remove itNow remove the side turn signal lights and remove the bulbs from the housings. The harnass is also connected to the horns which can only be reached from the bottom of the car. Just look under your car just in front of the wheels and you will see the horns. Disconnect them both. Follow the harnass around and disconnect every plug (master cylinder, side turn-signals, horns, headlight motor, headlights, front turn signals, radiator). Also disconnect the plastic retainers holding the harnass to the frame. Now completely remove the old harnass. This is another moment you will be glad you removed the hood. 
Take note how the old harnass is routed while removing it. You will need to route the new harnass as closely as possible. But before we can route the new harnass, we must find a spot for the motor control module. The original location is under the driver's side fender, but to make things a lot easier I would suggest another location. The best location I have found is under the left headlight assembly, just behind the left turn signal. You have more than enough room there and you don't have to do some creative routing to make the harnass fit. Put the module just behind the turn signal and drill two holes through the screwholes to hold the module in place: 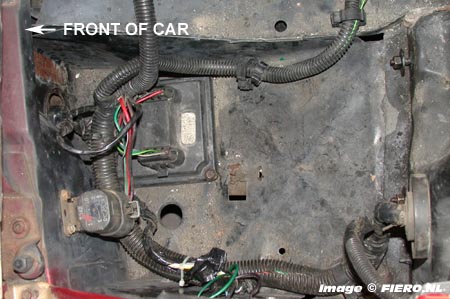
Placing the Headlight ModuleSome people are concerned about it getting wet in that location. The module itself is pretty much waterproof so as long as the plugs are in good condition, water shouldn't be a problem. If you want to be absolutely sure water can't get into the plugs, use some dielectric grease on the plugs and reseat them. Continued in next message... (tomorrow, first I need some sleep)
|
|

|
theogre
|
MAR 12, 08:07 PM
|
|
|
Thanks Cliff... This even answers some of my questions about it. To all... Don't post anything yet. Let Cliff finish first. Cliff, delete this post or move it to the end when you finish up.
|
|

|
Fastback 86
|
MAR 13, 01:44 AM
|
|
|
Just a thought - When I did mine, I tried putting the module where you did, in the driver's headlight bucket. I had a problem with the wires interferring with and getting caught on the headlight when it went up and down, so I ended up putting it under the fender like Pontiac did. If you can find away around that problem, more power to you!
|
|

|
Cliff Pennock
|
MAR 13, 03:01 AM
|
|
| quote | | Originally posted by theogre: To all... Don't post anything yet. Let Cliff finish first. |
|
Actually, that's the nice thing about the new VBook system - it doesn't matter if people ask questions/offer suggestions since it won't show up in the VBook.  So post away. So post away. 
|
|

|
TennT
|
MAR 13, 05:27 AM
|
|
Man, I love the VBook feature.
Now if someone will do a complete Getrag rebuild........... 
Nice feature, Cliff.
|
|

|
xlowes
|
MAR 13, 06:47 AM
|
|
|
Did my swap over a month ago and put the module under the driver side headlight bucket with no problem. Works great with no interference.
|
|

|
techman2
|
MAR 13, 09:34 AM
|
|
|
What is the best place to get the parts needed for the conversion? How many V-books are there?
|
|

|
OH10fiero
|
MAR 13, 12:50 PM
|
|
|
Did the same swap many years ago on my 86GT, one of the best upgrades I ever did to that car.
|
|
    
  |
|


