Tech-Tip - Pick up Coil Replacement...
by Jim Hallman and Paul Vargyas
It appears that high temperatures that build up near the distributor can cause the pick up coil on the Fiero V-6 engine to literally burn up. This may be caused by the EGR valve tube going into the intake plenum being located so closely to the distributor. In some cases, the pick up coil has shorted out in 20,000 to 30,000 miles. It would be recommended to replace the pick up coil at 30,000 mile intervals, as preventive maintenance, when you change your distributor cap, rotor, and sparkplugs. Keep in mind that if the pick up coil shorts out, your V-6 Fiero will stall out and will be difficult, if not impossible, to re-start - leaving you stranded.
The pick up coil is located at the base of the distributor and plugs into the ignition module. The pick up coil's purpose is to sense or "pick up" the pulses of the distributor and tell the ignition module when to fire the spark plugs. The most critical part of the replacement of the pick up coil is to make certain you properly mark the orientation of the distributor to the engine block and the rotor to the distributor base. When you successfully make these markings, you will not need to check your timing when this job is finished. Keeping this in mind, here we go: You will need to purchase a replacement pickup coil and a rubber o-ring gasket that will replace the o-ring located where the distributor shaft enters the engine before you start this project.
The GM part numbers are:
1987972 - ignition module hold down screws - (2) cost is $.75/ea.
10475880 - distributor shaft rubber "O" ring - (1) cost is $.75/ea.
10495089 - pick up coil - (1) cost is $12.85/ea.
Unplug the ignition coil wiring - which is the spark plug wire leading from the coil to the center of the distributor. Also, remove the two wire connectors that plug into the ignition coil itself. Now, remove the ignition coil by removing the two 13mm mounting screws.
Unscrew the two mounting screws on the distributor cap using a Phillips screwdriver or 7/32" nut driver and move the distributor cap away from the distributor - you do not have to remove the spark plug wires from the distributor cap if you do not want to - there will be enough room to work.
Disconnect the two plug connectors from the ignition module located at the base of the distributor. Remove the ignition module from the base of the distributor by loosening the two 7/32" mounting screws. Be sure that these mounting screws are not corroded because they provide the ground for the ignition module. Replace if necessary. Now, unplug the pick up coil connector from the back of the ignition module.
Using a 15mm socket, remove the bracket at the base of the distributor that holds the distributor to the engine block.
Where the distributor enters the engine, place a fine mark with paint (quick drying) or an etching device to orient the distributor base to the engine block so your engine timing remains the same when you re-install the distributor.
Now you need to make a mark to orient the distributor rotor. Place a mark to orient the protruding prong of the rotor to a fixed point on or near the engine. Again, doing this assures the engine timing will be the same now as when you replace the distributor when you are done.
Remove the distributor by pulling straight up on the distributor - there could be some resistance depending on how well the O-ring gasket is seated. Take notice that the rotor turns as you are pulling up on the distributor. Mark a third orientation mark where the protruding rotor prong stops turning as it is released from the internal gear in the engine. You will use this reference point to position the protruding rotor prong as you are replacing the distributor into the engine. Move the distributor base around the throttle body coolant lines to remove the entire distributor from the engine. Patience is a virtue!
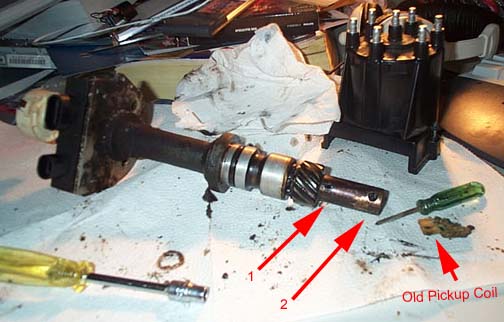
With the distributor removed from your Fiero, place it on a work bench and examine the orientation of its parts so your re-assemble it correctly.
Notice near the bottom gear on the distributor shaft is a roll pin (Approx. 3/16" dia, 1/2" long) which holds the distributor gear to the distributor shaft.
Place the gear end of the distributor on a solid metal surface, like the heal of a bench vise -not in the vice itself because you do not want to damage the distributor gear or shaft. Using a hammer and the 3/16" die punch, remove the roll pin from the shaft of the distributor. Remove the distributor gear from the gear shaft - note the orientation of the lock tab washer as you remove the distributor gear.
Slide the distributor shaft out of the distributor base. Clean and polish the shaft to create a clean, burr-free, polished surface using steel wool or mild sandpaper. Lubricate the shaft with motor oil. Set aside.
Remove the rubber O-ring gasket near the bottom of the distributor base and replace it with a new one to prevent oil leaks. Lubricate the O-ring with motor oil to correctly seat the gasket.
Now it is time to remove the pick up coil from the distributor base. Remove the pick up coil retaining clip from the top of the distributor - be very careful not to pry up on the retaining clip as this will damage the distributor base. It is best to cut off this retaining clip to prevent damage. Note the orientation of these parts as they are removed from the base. Note how the pick up coil is positioned on the base. There are alignment pins on the bottom side of the pick up coil to orient it to the distributor base. Be sure to follow the directions that came with pick up coil to ensure proper replacement.
Replace the pick up coil on the distributor base along with the spacer and retaining clip. Make sure the pick up coil alignment pins are properly positioned on the distributor base.
Replace the oiled distributor shaft into the distributor base.
Replace the lock tab washer and the distributor gear on to the distributor shaft. Reinstall the roll pin using the 3/16" die punch.
You are now ready to replace the distributor back into the engine block. Place the protruding prong of the rotor at the orientation mark where the rotor stopped turning as you removed the distributor. Push down on the distributor making sure you are engaging the gears on the distributor shaft with the gears in the engine. Continue pushing down until the O-ring is properly seated in the engine block. Verify that the protruding rotor prong is oriented with the first orientation mark you made. If they do not match up, remove the distributor from the engine block and try again until they do line up in order for the timing to be properly set.
Now that you have the rotor correctly oriented, the base of the distributor needs to be re-oriented to the engine block. Make sure your alignment marks are oriented properly and replace the distributor base hold down bracket and screw - be careful not to move the base off of the orientation mark.
Now, remove the old coating of di-electric grease from the bottom of the ignition module. Re-mount the ignition module onto the distributor base after applying a new coating of di-electric grease onto the bottom of the module.
Connect the pick up coil to the ignition module after applying di-electric grease onto the bottom of the pick up coil connector.
Replace the distributor cap onto the distributor.
Replace the ignition coil.
Re-connect the wiring to the ignition module.
Re-connect the wiring to the ignition coil.
Start your Fiero to make sure all the proper connections have been made and your timing remained accurate. If all is done correctly, your pick up coil should last another 30,000 miles, if not more.
Keep an eye on the pick up coil and check it when you check your spark plugs or distributor cap or rotor. Add the pick up coil to your list of routine check and replacement procedures. If you do not, you could surely be stranded sometime in the middle of nowhere. It would be advisable to keep an extra pick up coil in your Fiero at all times. If you do, you can always find a local garage to pull the distributor for you - at least you know you have the part in stock!
[This message has been edited by Adrift (edited 01-31-2002).]