Here is some helpful hints when dealing with the rack. When using Rodney's bushing, place four (4) screws in the bushing instead of using has two cheap rivets. The two rivets will break when you use the car hard. Like sprit driving or autocrossing. The rack rebuild and suspension modification is easy as compared to my current race engine rebuilt. Tom, I still offer you to come and see my '88GT complete suspension mods while it is half way apart to help you in your front end rebuild. It will be easy for you to do your work if you come and see mine. I have already given you advice, it will be easier if you see it first hand. Solo2
Here is some helpful hints when dealing with the rack. When using Rodney's bushing, place four (4) screws in the bushing instead of using has two cheap rivets. The two rivets will break when you use the car hard. Like sprit driving or autocrossing. The rack rebuild and suspension modification is easy as compared to my current race engine rebuilt. Tom, I still offer you to come and see my '88GT complete suspension mods while it is half way apart to help you in your front end rebuild. It will be easy for you to do your work if you come and see mine. I have already given you advice, it will be easier if you see it first hand. Solo2
IP: Logged
10:23 PM
Dec 29th, 2003
Tom Slick Member
Posts: 4342 From: Alvarado, TX Registered: May 2003
tell me when and where. email me when your available to do this.
maybe you could show me how to get my a-arms back to working condition.
thanks, toms...
quote
Originally posted by Solo2:
Tom, I still offer you to come and see my '88GT complete suspension mods while it is half way apart to help you in your front end rebuild. It will be easy for you to do your work if you come and see mine. I have already given you advice, it will be easier if you see it first hand. Solo2
IP: Logged
12:13 AM
eunospeed Member
Posts: 342 From: Lexington, KY Registered: Sep 2002
You know, I think Solo is right, it wouldn't hurt to put 3 or 4 set screws in the bushing just to be on the safe side. I have been taking my Miata's to the track for years now and I want to get the Fiero out next, last thing you want is a steering problem doing 100mph into a turn!
ok, here is the situation on my driver side inner tie-rod. i've got a photo of it, it's highlighted in the yellow box. if you can tell the the rack shaft and the back of the ITR sit flush and doesn't look like it can be unscrewed. i hate to reuse this ITR but i don't have a clue on how to get it off.
Hey Tom, haven't been much help to you. Been out of town and just returned Sun eve. You have my Email , can't help you with the 1988 upper control arm shaft since I have not had to replace one yet. But, I see Solo is giving you some help...you are in good hands with him he has helped me in the past with suspension troubles !! Good luck on the build !!
IP: Logged
07:48 AM
PK Member
Posts: 1249 From: Oxford, England Registered: Sep 2001
It can be unscrewed. The flat section of the inner tie-rod is where the thread has been staked (flattened) against the rack to lock it in position. Just hold the rack by placing a spanner on the flats (the bit just above the 'D' of 'DEC' in your pic). Then unscrew the inner tie-rod by placing a spanner on the flats at the top of your pic (the flat above the yellow box in your pic.. When fitting a new inner tie-rod don't forget to stake the new rod once in position.
Good luck
Cheers PK
[This message has been edited by PK (edited 12-30-2003).]
IP: Logged
10:06 AM
Tom Slick Member
Posts: 4342 From: Alvarado, TX Registered: May 2003
PK, thanks for the info but i need you to define two terms to me. What does "spanner" and "stake" mean?
thanks, toms...
quote
Originally posted by PK:
Tom Slick.
It can be unscrewed. The flat section of the inner tie-rod is where the thread has been staked (flattened) against the rack to lock it in position. Just hold the rack by placing a spanner on the flats (the bit just above the 'D' of 'DEC' in your pic). Then unscrew the inner tie-rod by placing a spanner on the flats at the top of your pic (the flat above the yellow box in your pic.. When fitting a new inner tie-rod don't forget to stake the new rod once in position.
Good luck
Cheers PK
IP: Logged
10:20 AM
PFF
System Bot
PK Member
Posts: 1249 From: Oxford, England Registered: Sep 2001
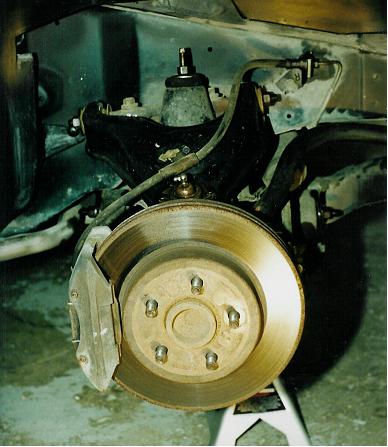
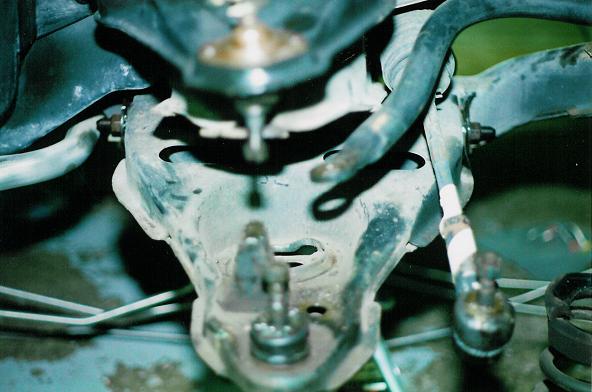
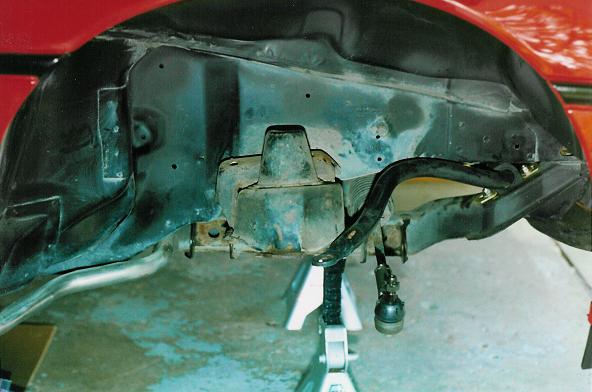
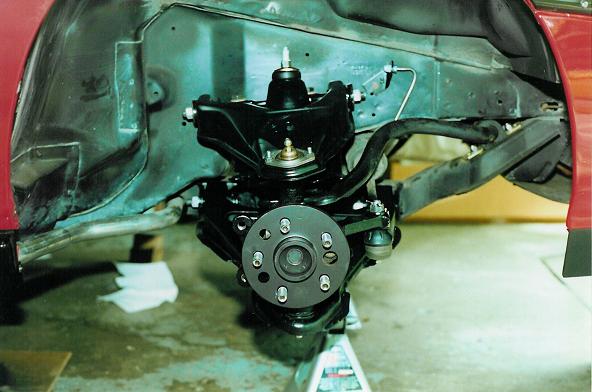
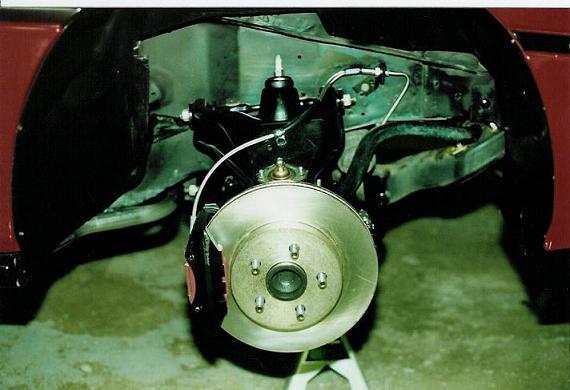
I completely rebuilt the suspension on my Formula and have some pics to share.
Before:
During:
Halfway there:
Reassembly:
Finished:
I also have similar pics of rear suspension rebuild. In my rebuild I did the following: 1) Replaced upper & lower balljoints and tie rod ends. 2) Refinished control arms & knuckles (powdercoated). 3) All bushings replaced with Prothane polyurethane. 4) New AC Delco bearing/hubs front & rear. 5) New AC Delco rotors (nickel plated to prevent rust on top hat and fins). 6) New AC Delco gas charged shocks & struts. 7) Brake calipers rebuilt by Master Power brakes (they also powdercoated the calipers) with all new Delco hardware (roll pins, springs, seals, sliders). 8) All brake hard lines replaced with stainless steel repos by Inline tube. 9) Brake flex lines replaced with braided stainless lines by Russell. These lines ARE DOT approved, unlike the Earl's lines that are commonly available. 10) All hardware replaced with GM catalog parts. Only piece of hardware that was not available were the paddle nuts for the upper control arms in the front. 11) brake dust shields nickel plated to prevent rust.
It took about three months and $3500 to do this rebuild.
[This message has been edited by lateFormula (edited 12-31-2003).]
IP: Logged
09:28 PM
Jan 1st, 2004
Tom Slick Member
Posts: 4342 From: Alvarado, TX Registered: May 2003
very nice!!! did you replace the inner tie rods? did you replace the rack bushing?
3 months to complete. whoa... i didn't want to take that long, i had two weeks of the xmas and my plan was to get mine done by then but it looks like that won't happen.
toms...
IP: Logged
02:14 PM
lateFormula Member
Posts: 1048 From: Detroit Rock City Registered: Jul 2002
Nope to the inner tie rods and rack bushings. I had it in the plan to replace the rack if needed. But the rack was very solid with no play.
Yeah it took me three months, but a lot of that time was waiting on parts from the powdercoater, the nickel plater, getting my calipers back (the caliper rebuild had the fastest turnaround of all the parts sent out for work). To completely tear down the front and rear suspension took a couple weeks of working on it daily after work. The rebuild took a bit longer due to care in reassebly, torquing all fasteners properly, and the brake system reassembly. Installing the new brake hard lines was the most difficult task I have ever undertaken on this car.
IP: Logged
04:26 PM
Jan 2nd, 2004
Tom Slick Member
Posts: 4342 From: Alvarado, TX Registered: May 2003
today, i just got back from the machine shop not good. they did not want to press the control arm shaft through those sleeves afraid that it would expand the sleeve out of tolerence to accept the bushings. they said that they could knock out the sleeves but they would be no good after that and new sleeves would need to be installed. where do i get new sleeves? what do i do now? do i look for replacement a-arms that still have the control arm shaft or let them push that shaft through and hope the bushings will still have a tight fit? anybody got any suggestions.
thanks, toms...
IP: Logged
04:36 PM
lateFormula Member
Posts: 1048 From: Detroit Rock City Registered: Jul 2002
Are you talking about the upper control arms for the front???
Did the machine shop remove the old bushings? Or was the mounting shaft an issue, so they left the old bushings in?
If the old bushings are still in the CA, here's how to get them out (it's not hard to do). Take a drill and a small drill bit (1/4 inch or smaller) and start drilling holes through the bushing parallel to the CA mounting shaft. Drill several holes all the way around the bushing, make the holes side by side. Once you have drilled the holes, you should be able to then use the drill bit like a cutter and cut the bushing from hole to hole (kinda like using a drywall cutter in a Dremel tool). Now you have cut a circular portion out of the bushing, you can easily pull the bushing out in two pieces. The inner portion can be pulled out using needle nose pliers. The outer portion can be pryed out with a thin flat blade screwdriver.
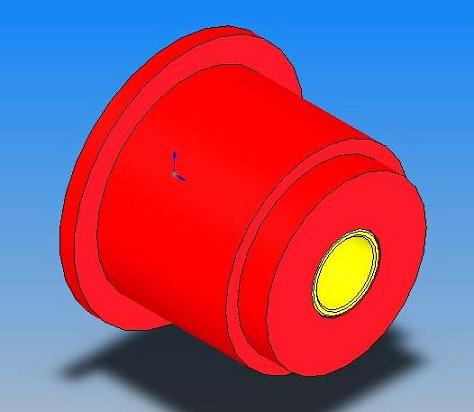
I didn't read the entire thread here, but if you are installing new poly bushings here's a valuable tip. The outer bushing sleeve will be left in the CA with this method of removal. That outer bushing sleeve is tapered on the inboard side (the inner edge is rolled inward. That rolled edge makes that end of the sleeve a smaller ID than the rest of the sleeve. Installing a new poly bushing through this smaller ID is nearly impossible. I would recommend that you cut down the small end of the bushing so that it will pass through the tapered end of the sleeve. This can be done on a lathe. Place the new bushing against the outer edge of the sleeve (on the outside of the sleeve) to measure the width of the cut. Use a caliper to measure the ID of the small end of the sleeve and that is the OD the the cut-down portion of the new bushing. When you are done the bushings will look like this:
slightly different view:
Then to install the bushings, coat the outer diameter of the bushings with a thin layer of the supplied grease (teflon based grease for Poly bushings). Then the bushings can easily be pressed in, with the mounting rod of the control arm still in place. As long as the bushing sleeves are in the CA, the mounting shaft is "captured". But even with the mounting rod in place, you can remove the old bushings and install new ones.
IP: Logged
08:19 PM
Tom Slick Member
Posts: 4342 From: Alvarado, TX Registered: May 2003
very nice rendering. the problem is that i cut out the old control arm shaft cause i have new ones. i remove the old bushings by burning them out. it left the bushing shell which is impeding the new shaft from being installed. looks like i need to press out the sleeve (won't that damage it) and install the new shaft and the bushing with a new sleeve.
thanks, toms...
IP: Logged
08:57 PM
lateFormula Member
Posts: 1048 From: Detroit Rock City Registered: Jul 2002
Well if the center shaft is out, then you could use an angle grinder to cut/grind down the inner lip of the bushing sleeves. Before you go at this, check to make sure that the collar on the new center shaft will pass through the bushing sleeve(s). The OD of the collar should be smaller than the ID of the bushing sleeve.
OR you could take the new center shafts and turn down the collar on a lathe. This would still require modification of the bushings (for ease of installation).
If you decide to grind/cut down the bushing sleeves, I'd tell you to take off as little as possible, until you have a consistent ID in the sleeve. With this option you won't have to cut down the new bushings. If you do this, I'd recommend that you clean/degrease the control arms when you're done and paint the bare metal (the areas that you ground down) with an indestrucible finish like POR-15.
IP: Logged
10:20 PM
PFF
System Bot
lateFormula Member
Posts: 1048 From: Detroit Rock City Registered: Jul 2002
I just went and took a close look at the original photos from my rebuild - they're larger than they appear up above. Considering your current situation with the upper control arms, my advice to you would be to contact one of the many salvage yards that deal in Fieros, and buy a pair of good condition upper control arms complete. When you get them use the method I described above to drill out the old bushings, get the new bushings turned down on a lathe, and rebuild the control arms without removing the center shaft. This will result in the least amount of modification, which will in turn keep the front suspension geometry as close to original as can be. If you remove the bushing sleeves from your current arms, you'll have to find bushings that have the outer sleeve. I don't know of any company that offers such replacements that will fit this application.
[This message has been edited by lateFormula (edited 01-02-2004).]
IP: Logged
10:37 PM
eunospeed Member
Posts: 342 From: Lexington, KY Registered: Sep 2002
Tom, Sorry I promised pics and didn't deliver.... my darn ISP has gone hay-wire and I'm still having trouble. But, I do agree with the fact that you should buy some used upper CA's and be done with it. Its not worth taking a chance and it will most likely be cheaper in the long run.
I'll see what I can do about the pics.
John
IP: Logged
11:48 PM
Jan 3rd, 2004
eunospeed Member
Posts: 342 From: Lexington, KY Registered: Sep 2002
i see that the fierostore has rubber bushing with the steel sleeves. maybe i could get those and install them. i know it defeats the purpose of having poly but at least it's cheaper than getting a whole new set of a-arms. plus, i don't have a clue where to get a set of '88 a-arms around here. i'm sure all the fiero people around here have already taken the good stuff. that's if there any salvage yards that have any fieros.
this going to be a very expensive learning curve. like the old saying "if it ain't broke don't fix it".
toms...
IP: Logged
01:12 AM
lateFormula Member
Posts: 1048 From: Detroit Rock City Registered: Jul 2002
Hey Late, where did you get your lower CA bolts, nuts and washers?
Local Pontiac dealer...
A dealer can look up parts for specific application in their computer parts catalog, but considering that the Fiero is almost completely "discontinued", you can still locate the hardware. Any large dealership that does big business in their repair dept will have a special catalog for common parts, like hardware, lock cylinders, lug nuts, light bulbs, etc. To look up parts in this catalog you need to know exactly what you want. You need to know the exact size, pitch, bolt description, hardness (for metric 8.8, 10.9, 12.9). This catalog lists the hardware by part description, but does not have any application info - what car lines it was used on. It takes a little while to find harware this way, but it will get you the right part.
Or if you have a large fastener house in the area (I have two good ones here in the Detroit area), you can find exact replacements made by Auveco. But if you go this route be prepared to spend a fair amount of time searching through the Auveco catalog. Their product catalog is huge! The other downside is that the fastener houses here make you buy items in box lots, you can't buy them one or two at a time.
Tom, at the top of this website check under Fiero parts vendors, you should be able to find several used parts places for Fieros. I have always used "Kick Hill Fiero" (http://www.kickhill.com/fiero.html), they have always been able to get me any part I need at very good prices.
[This message has been edited by lateFormula (edited 01-03-2004).]
IP: Logged
10:33 AM
Tom Slick Member
Posts: 4342 From: Alvarado, TX Registered: May 2003
I LOVE MY DREMEL. After looking at the pics that eunospeed sent me i noticed that flat spot was torn up. so i took my dremel with a cut off wheel and proceeded to cut away at that flat spot. i was able to finally get that driver side inner tie rod off. i put the new one on as tight as i could get it. how do torque that thing with a torque wrench and what should it be torqued to?
i tried to press(big C clamp) out the bushing sleeve in my a-arm and noticed that the a-arm was bending. now the a-arm is bent. looks like i'm in need of some a-arms. where can i get some?
thanks, toms...
IP: Logged
03:03 PM
lateFormula Member
Posts: 1048 From: Detroit Rock City Registered: Jul 2002
how do torque that thing with a torque wrench and what should it be torqued to?
I don't know the torque spec, but knowing what it is that you need to torque, use a crowfoot wrench (socket) on your torque wrench.
quote
i tried to press(big C clamp) out the bushing sleeve in my a-arm and noticed that the a-arm was bending. now the a-arm is bent. looks like i'm in need of some a-arms. where can i get some?
thanks, toms...
Read my previous reply immediately above your last post
IP: Logged
05:21 PM
Tom Slick Member
Posts: 4342 From: Alvarado, TX Registered: May 2003
today i took out the spare tire tub to get to the rack. i was going to take the rack out in order to install screws in my new rack bushing. i did notice that when i unbolted the rack there is a lot of moment at the end where the bushing is. this got me to thinking that maybe i could have enough room to install the screws without completely taking out the rack.
what kind of screws did anybody used? did you drill and tap or used self tapping screws?
i took off the bracket that holds the coolant tubes to the bottom of the frame but i broke of the bolt. is there anyway to remove this easily? i guess i could drill it out and retap the hole. but i'll have to wait until my tap and die set is delivered to me (about a week).
toms...
IP: Logged
03:26 PM
Jan 6th, 2004
jscott1 Member
Posts: 21676 From: Houston, TX , USA Registered: Dec 2001
If you have a right angle attachment to your drill you would be able to install the screws/rivets in the rack bushing without removing the rack or going in through the trunk.
But whatever you do don't skimp on the bolts/rivets. Before I got the right angle drive for my drill I only had about one and a half rivets and it failed while I was driving. Suddenly I could not turn left all the way. Luckily I made it home safely.
------------------ If you find my advice useful, then please give me a positive rating, thanks... 1988 GT (Firebird Interior),1988 Coupe (Daily Driver), 1985 SE (Project Car), 1985 Coupe (parts car), Firebird Interior Installation Website
IP: Logged
11:40 PM
PFF
System Bot
Jan 7th, 2004
Tigger Member
Posts: 4368 From: Flint, MI USA Registered: Sep 2000
The other downside is that the fastener houses here make you buy items in box lots, you can't buy them one or two at a time.
The Pontiac dealer is the expensive route but not bad if you just need one or two bolts. I got a sticker shock asking for four stab bar mounting bolts and four control arm bolts nuts and washers and I would've waited a few days. If I remember right they wanted about $10 bucks a bolt.
Look into Mid-States bolt and screw. I walked in with the specs I needed and walked out with all of the hardware for under $20 and you don't have to buy in box lots.
IP: Logged
06:55 AM
eunospeed Member
Posts: 342 From: Lexington, KY Registered: Sep 2002
today i took out the spare tire tub to get to the rack. i was going to take the rack out in order to install screws in my new rack bushing. i did notice that when i unbolted the rack there is a lot of moment at the end where the bushing is. this got me to thinking that maybe i could have enough room to install the screws without completely taking out the rack.
what kind of screws did anybody used? did you drill and tap or used self tapping screws?
i took off the bracket that holds the coolant tubes to the bottom of the frame but i broke of the bolt. is there anyway to remove this easily? i guess i could drill it out and retap the hole. but i'll have to wait until my tap and die set is delivered to me (about a week).
toms...
Tom,
I'm not sure how easy it is to install the set screws with the rack in the car but you should be able to get an idea. If not just pull the rack like I did and do it on the bench. I will try and send you a pic of what I ended up doing. Bascially, 2 set screws 180 degrees apart.
As far as getting the broken bolt out goes, I would start with a small bit slowly working up to a larger one being carful not to get the bit into the threads. Once you have a pretty good hole in the bolt you should be able to use a punch to knock off the end and then use vice grips to turn the remainder of the bolt out of the hole. DO NOT BREAK THE TIP OF THE DRILL BIT OFF IN THE BOLT! If you do you will be screwed.
Good luck, John
IP: Logged
12:39 PM
Jan 8th, 2004
Tom Slick Member
Posts: 4342 From: Alvarado, TX Registered: May 2003
just got my service manual today, so hopefully i won't be asking what's the name of this part and asking stupid questions. but here's one question: on the driver's side inner tie-rod there is a plastic ring (wait let me get the official term, shock damper ring). i forgot to put it back on when i installed the new itr, well for one reason i could get it back on the itr. so my question is do i need it?
also, got new rubber bushing for my UCA, there going to have to press out the old sleeves install the new control shafts and these new rubber bushings. when the rubbers wears out in a couple years i will put the polys ones on. i will have poly everwhere else on the front except the upper a-arms.
thanks, toms...
IP: Logged
07:00 PM
Jan 9th, 2004
Tom Slick Member
Posts: 4342 From: Alvarado, TX Registered: May 2003
Something has got me puzzled. i took my a-arms, bushings and new shafts to get assembled. since i had to use rubber bushing cause of all the things that have happen. i was wondering if i get another set of a-arms to put polys on what do i do about the washers. on my original a-arms there is one washer that is on the inside of the a-arm and one at each end. everybody says to keep the washers intact, so that you won't mess up your aligment too bad. now if i get another set of a-arms what washers do i used. i may not know how the washers were set up on that car originally. do i try and match what i had on my car and not the other car. does this make any sense.
toms...
IP: Logged
05:58 PM
Jan 19th, 2004
Tom Slick Member
Posts: 4342 From: Alvarado, TX Registered: May 2003
Ok, i've started putting my front suspension back together. i did a no-no by not labeling things as i took them off. i need to know if there are any washer on the lower control arm pivot bolts. i have washers on the floor by the passenger side but none on the driver side. so i'm trying to figure out if these washers went on the LCA or somewhere else.
thanks, toms...
IP: Logged
09:47 AM
Jan 26th, 2004
Tom Slick Member
Posts: 4342 From: Alvarado, TX Registered: May 2003
while i'm waiting for parts for the front. i've started to look at the rear. i bought a trailing arm poly bushing kit (ptp-7-305, summit). my question is, i thought the trailing arm was part that is connect to knuckle to the front part of the cradle. i can see at most 8 bushing being installed here two at each of the four mounting points. but my kit came with about 20 bushings. where do these other bushings go? i've included a pic of the bushings.
thanks, toms...
IP: Logged
10:28 AM
Feb 5th, 2004
Tom Slick Member
Posts: 4342 From: Alvarado, TX Registered: May 2003
another problem: i couldn't get the caliper mounted. the outside brake pad is not allowing the caliper to move inward (about 1/8 inch) enough so the mounting points are not behind the knuckle. can the pad be too thick or did i forget something again? did i install the knuckle on the correct side?
toms...
IP: Logged
09:26 AM
Formula88 Member
Posts: 53788 From: Raleigh NC Registered: Jan 2001
The 88 has a 3-link rear suspension. 1 trailing link, 1 lateral link, and 1 toe-link. It looks like you have bushings for the trailing link and lateral link.
8 large bushings for 2 trailing links 8 small bushings for 2 lateral links I'm not sure what the 4 long bushings are for. I'd have to look at the suspension to figure it out.
IP: Logged
10:01 AM
Raydar Member
Posts: 40845 From: Carrollton GA. Out in the... country. Registered: Oct 1999
another problem: i couldn't get the caliper mounted. the outside brake pad is not allowing the caliper to move inward (about 1/8 inch) enough so the mounting points are not behind the knuckle. can the pad be too thick or did i forget something again? did i install the knuckle on the correct side?
toms...
Sounds like the sliders (the round fittings that the bolts pass through) need to be pushed toward the rear of the caliper. They should move freely in the caliper, as far as the rubber boots will let them. If you haven't removed, cleaned, and re-lubed them, it would be a very good idea. ONLY use silicone lube that is designed for brake systems. Otherwise the heat from the brakes will cook the lube.
It's just about impossible to install the knuckle on the wrong side. The upper and lower balljoints have different size stems, and the tie rods wouldn't have lined up, either.
------------------ Raydar 88 3.4 coupe. Coming soon... 88 Formula, presently under the knife.
[This message has been edited by Raydar (edited 02-05-2004).]