|
|
|

|
Generation I head light motor disassembly by buddycraigg
| Started on | : 01-08-2004 01:28 AM |
| Replies | : 87 |
| Last post by | : Jake_2m4 on 10-14-2004 10:00 AM |
|
|
|
|
Jan 8th, 2004
|
buddycraigg
Member Posts: 13615
From: kansas city, mo
Registered: Jul 2002
|
Generation I head light motor disassembly
**Thanks to Jazzman, sanderson, and Rodvr6 for technical corrections to my original posts**
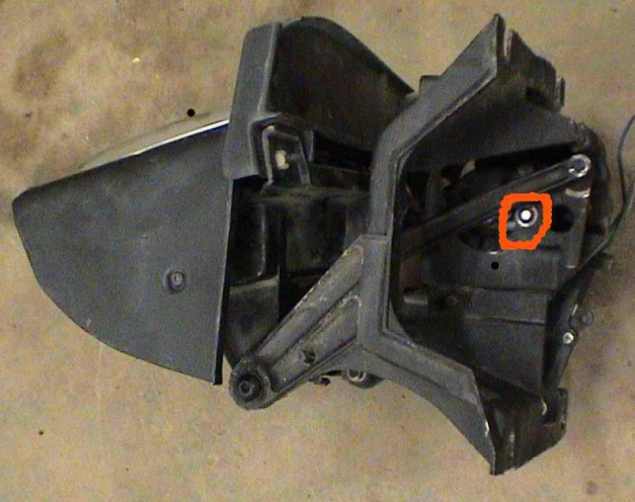
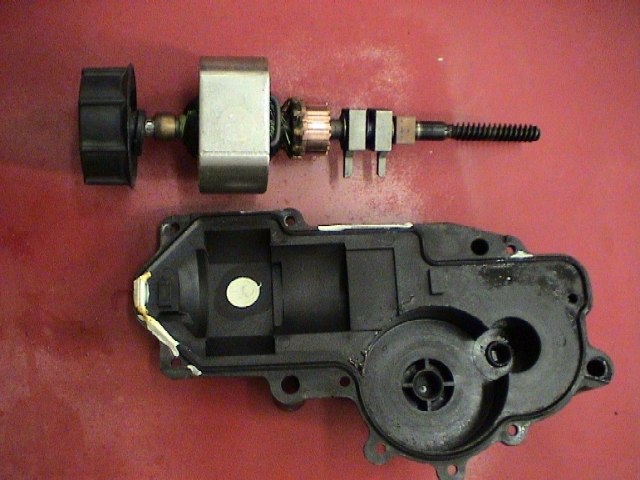
Over the last two days below 5* Fahrenheit I�ve finally joined the proud group that have had problems with their headlights. As I removed the headlight assembly, I noticed that I only had 3 nuts holding it in, although there should be 4. I removed the three bolts that hold the motor to the assembly. And the nut on the little arm. The arm didn�t want to come off the shaft so I removed the clip circled in red.
The clip shot off going about mach 2 in a northwest direction. So if any one in Montana finds it, PM me and I�ll give you my address to mail it back.
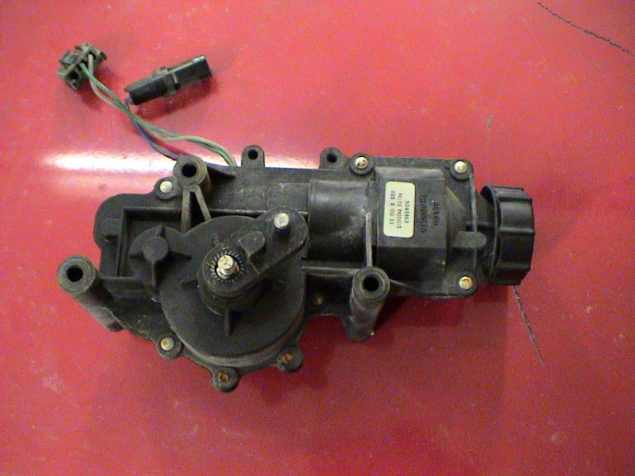
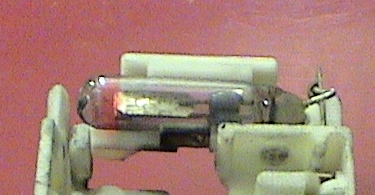
The motor�s out now.
Laying on the deck lid like a beached whale.
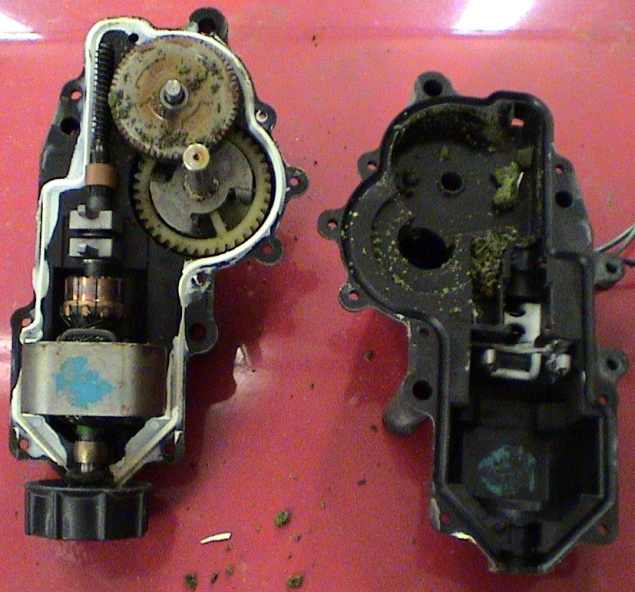
I�ve never had very good luck trying to drill out metal rivets in plastic so I went straight for the dremil and a small grinding tip.
As I was grinding the rivets, the metal dust was sticking to the case around the magnet.
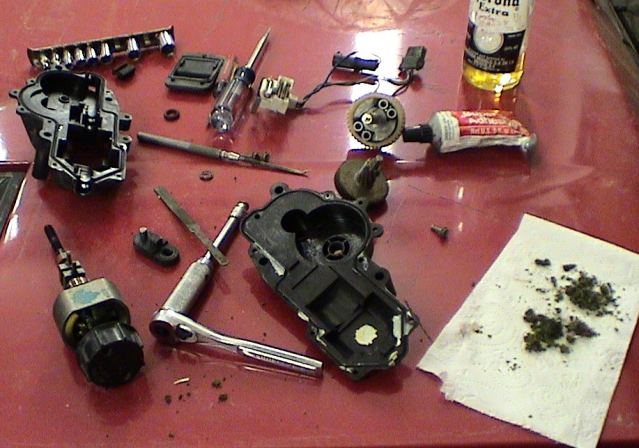
So after a good blow job... with compressed air I opened it up.
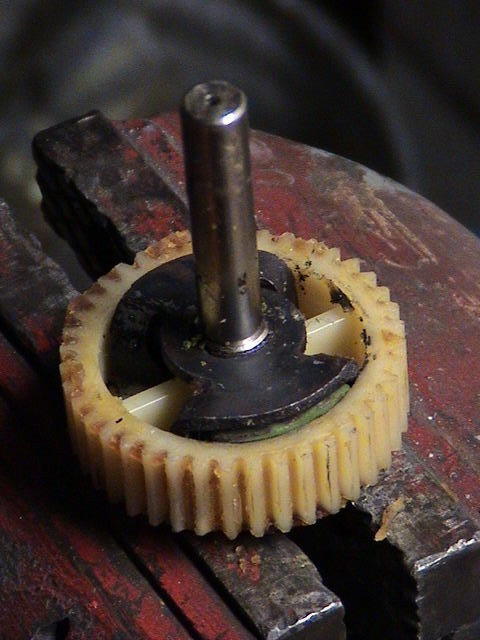
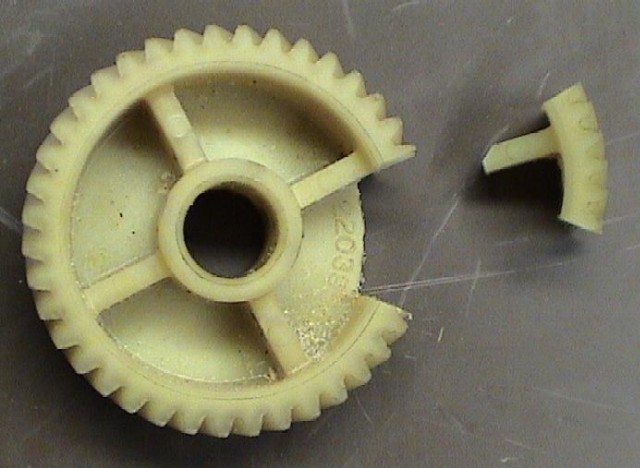
This green sand is what use to be the plastic pieces that get chewed up over time.
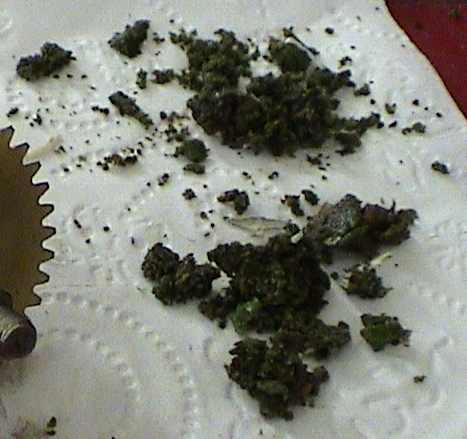
That sand use to be two pieces or semi pliable plastic that filled in the void
between the ears on the metal armature and the plastic gear

[This message has been edited by buddycraigg (edited 02-11-2004).]
IP: Logged


|
01:28 AM
|
|
|
PFF
System Bot
|
|
|
|
buddycraigg
Member Posts: 13615
From: kansas city, mo
Registered: Jul 2002
|
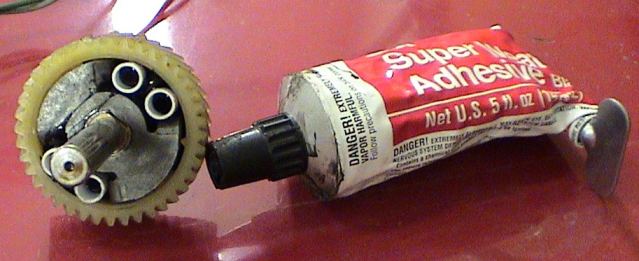
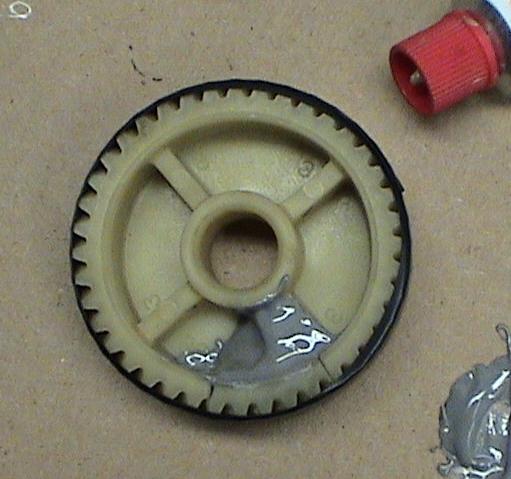
In my first attempt I didn't' know that the metal shaft could be pressed through the plastic gear and the metal plate with the ears on it. it was after 9 so the hardware store was closed. So I had to find something to put in the space between the plastic gear and the outside of the ears. I don't know how long this will last but I used part of a ballpoint pen and some glue. 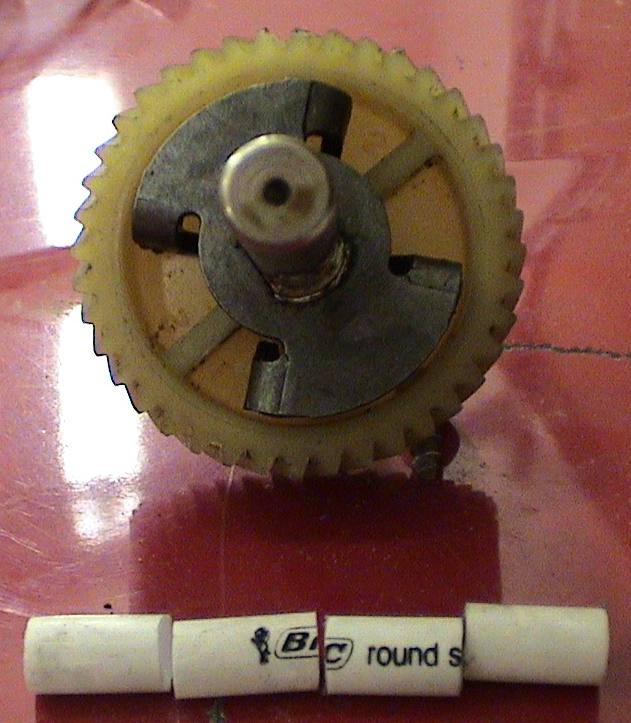
Although it�s a fairly snug fit. I decided to glue the pen pieces in place.
The reason was if they were to come out of position they could possibly interfere with the metal gear with all the little teeth. I�ll tell ya�all if it ever fails so you�ll know not to do my hair brained idea.
 [This message has been edited by buddycraigg (edited 02-10-2004).]
IP: Logged
|
|
01:29 AM
|
|
buddycraigg
Member Posts: 13615
From: kansas city, mo
Registered: Jul 2002
|
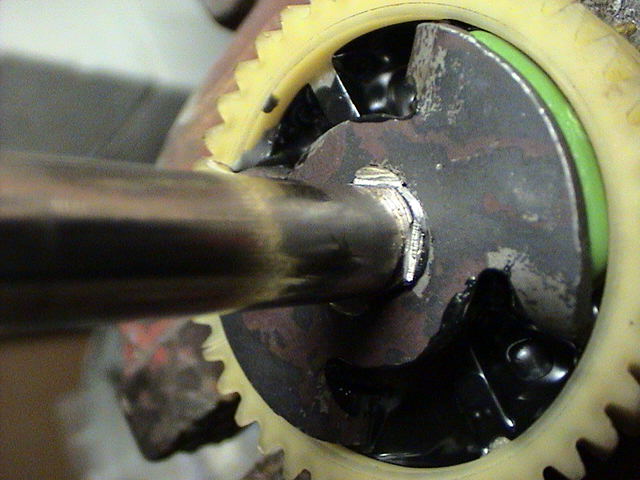
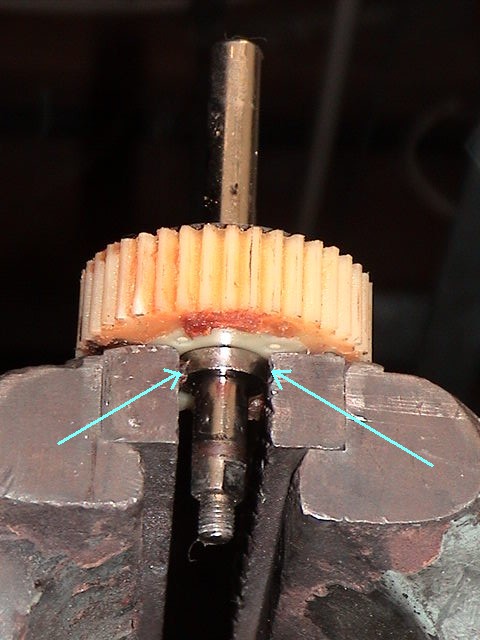
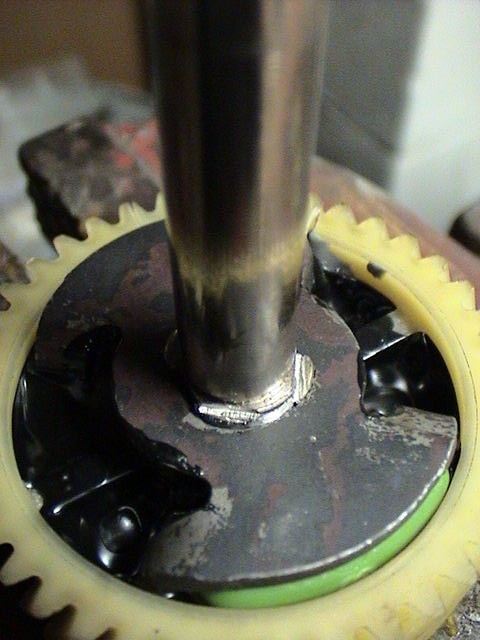
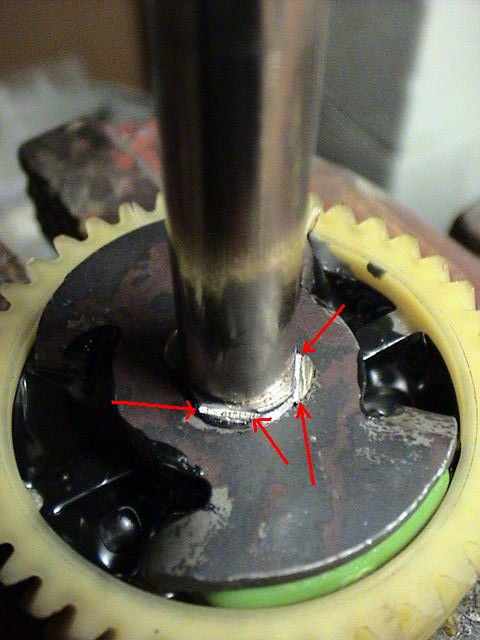
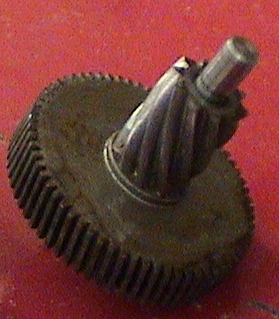
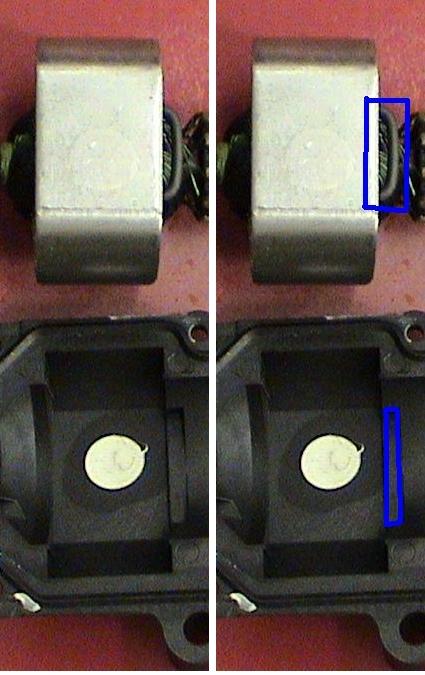
I now know that it can be pressed out and reassembled. (thanks to Rodrv6 and Jazzman) Some people have made tools to do this, I was able to get away with using my vice and a couple of sockets. First put it in the vice
be sure that you have the jaws spread far enough for this metal shoulder (pointed in blue) to clear as you press the shaft though the gear.
Now everything�s in pieces so get to cleaning.
Put the shaft in the vise again.
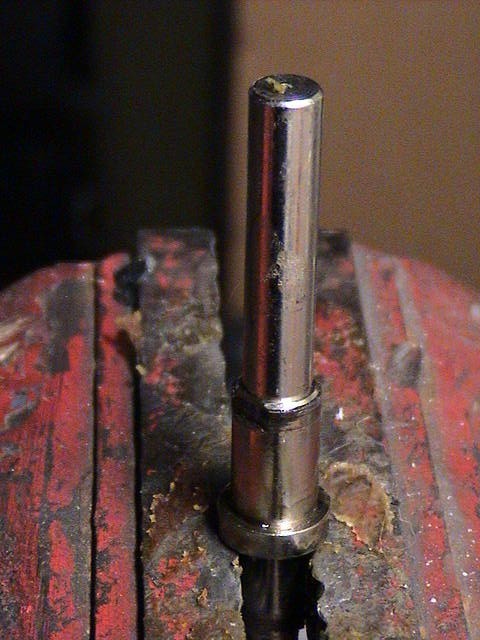
and press the plastic gear on the shaft.
The resistance you feel it from a ridge (pointed in blue) that was created when the metal ear plate was first installed on the shaft.

install a set of useable green bumpers or rodneys rubber pieces, or what ever you want to come up with.
[This message has been edited by buddycraigg (edited 02-10-2004).]
IP: Logged
|
|
01:30 AM
|
|
buddycraigg
Member Posts: 13615
From: kansas city, mo
Registered: Jul 2002
|
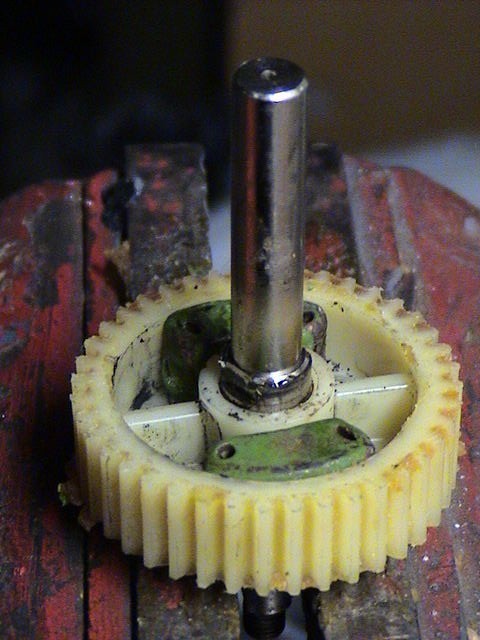
Remember the green bumpers are suppose to go between the ears on the metal plate. 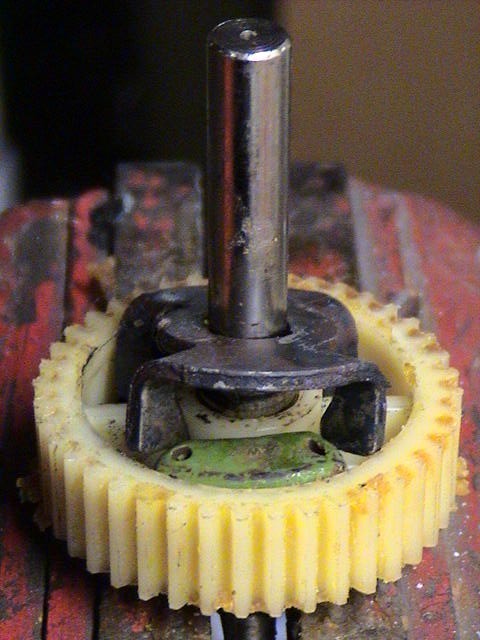
you may need to rotate the plastic gear and the metal plate as an assembly to get the oblong hole to line up with the shoulder on the shaft.
Now press the metal plate back on.
I don�t know that it is necessary, but I use a chisel and steak the shoulder so the metal plate can�t come back off
[This message has been edited by buddycraigg (edited 02-10-2004).]
IP: Logged
|
|
01:31 AM
|
|
buddycraigg
Member Posts: 13615
From: kansas city, mo
Registered: Jul 2002
|
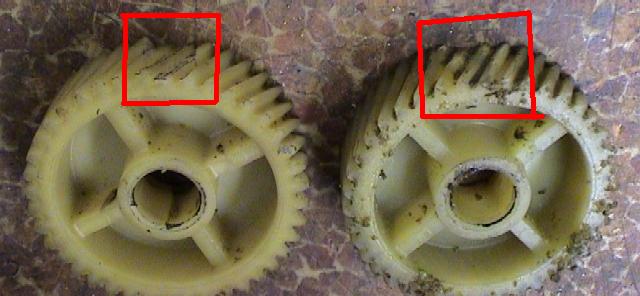
Notice the wear at the 12 O�clock position on the gear. When I put them back together I will have it 90* around so it can wear out a different spot. But at least it will take another 20 years. 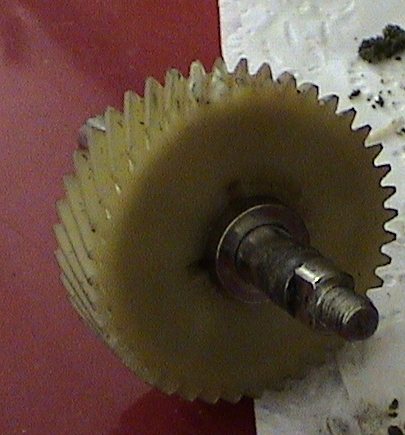
but if it�s too bad, and I�m really bored I take a different approach
this is what happens when you have too much time on your hands.
can you guess what i'm doing now???
let's see how well this works.
i'm going to mark the motor with a date, and see how long it holds up.
[This message has been edited by buddycraigg (edited 02-10-2004).]
IP: Logged
|
|
01:32 AM
|
|
buddycraigg
Member Posts: 13615
From: kansas city, mo
Registered: Jul 2002
|
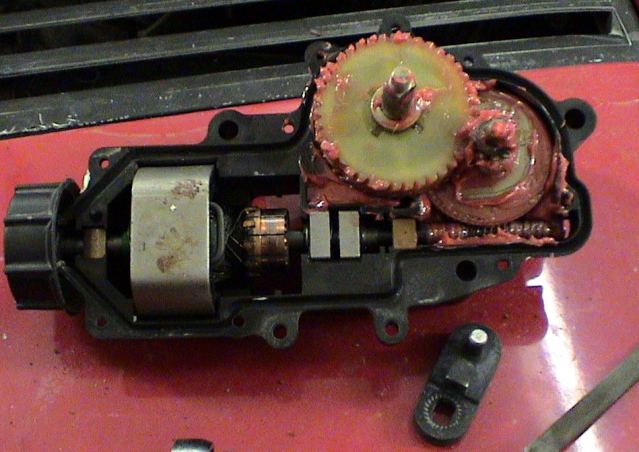
Cleaning the hard grease and plastic sand out of all of the grooves in this gear was every bit as much fun as you would hope it to be. First I tried a brush with metal bristles. NOPE.
Then compressed air, NOPE.
Then I tried the solvent tank at work, NOPE.
Finally did it one tooth at a time with a thin screw driver. And it seems to be the only thing that works.
 [This message has been edited by buddycraigg (edited 02-10-2004).]
IP: Logged
|
|
01:33 AM
|
|
buddycraigg
Member Posts: 13615
From: kansas city, mo
Registered: Jul 2002
|
Here is the limit switch that I needed to clean the contacts on. I could have removed these pieces from the side of the motor without taking it apart. But what the heck� might as well do it all at once, right? 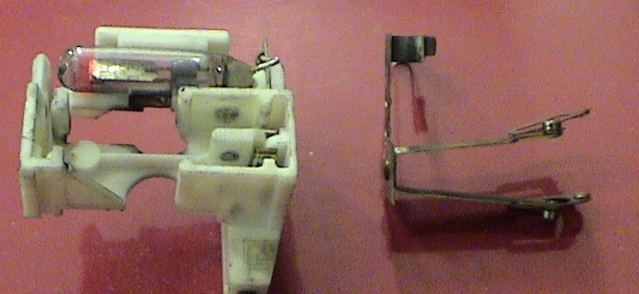
How come I�ve never heard anyone mention this circuit breaker before?
Is it in all years?
[This message has been edited by buddycraigg (edited 02-10-2004).]
IP: Logged
|
|
01:33 AM
|
|
buddycraigg
Member Posts: 13615
From: kansas city, mo
Registered: Jul 2002
|
Time to go back together� ummm, was anyone taking notes during disassembly?
 [This message has been edited by buddycraigg (edited 02-10-2004).]
IP: Logged
|
|
01:34 AM
|
|
buddycraigg
Member Posts: 13615
From: kansas city, mo
Registered: Jul 2002
|
If you get the magnet housing in 180� backwards, the headlight motor will work backwards. Here�s how to make sure you don�t do that. See in the blue square. The large loop, it fits in the large open area. 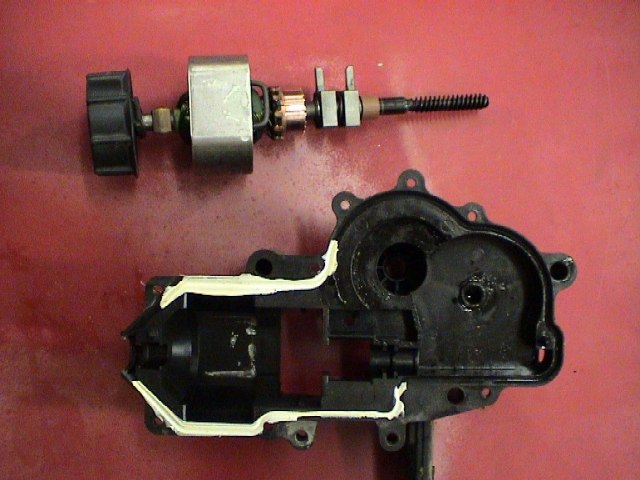 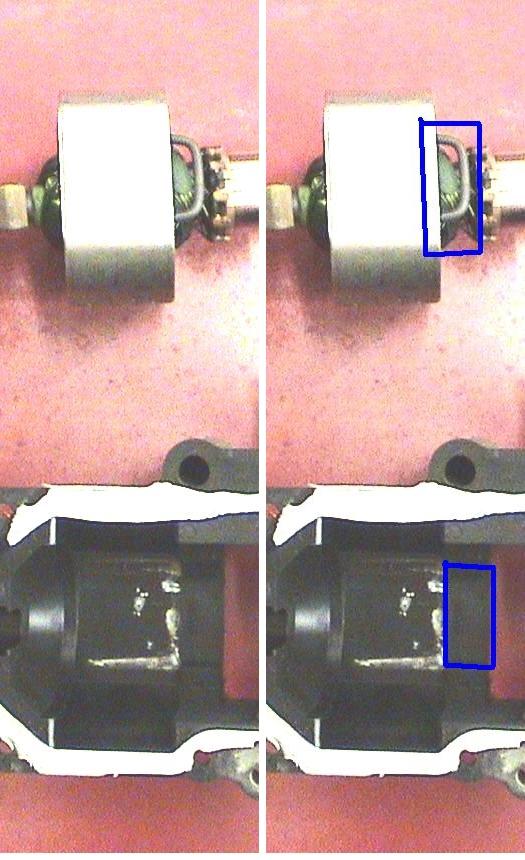 and on the other side the loop is smaller and fits in to a smaller open area
Here it is all goobered up with the same grease that I use for my poly bushings.
I didn�t want to use just plain ol� wheel bearing grease.
Hope this works�
[This message has been edited by buddycraigg (edited 02-11-2004).]
IP: Logged
|
|
01:35 AM
|
|
buddycraigg
Member Posts: 13615
From: kansas city, mo
Registered: Jul 2002
|
long shaft for left motor "Long for Left"

[This message has been edited by buddycraigg (edited 02-11-2004).]
IP: Logged
|
|
01:35 AM
|
|
buddycraigg
Member Posts: 13615
From: kansas city, mo
Registered: Jul 2002
|
sanderson assembly note...____
add pic
____ [This message has been edited by buddycraigg (edited 02-11-2004).]
IP: Logged
|
|
01:36 AM
|
|
|
PFF
System Bot
|
|
buddycraigg
Member Posts: 13615
From: kansas city, mo
Registered: Jul 2002
|
, [This message has been edited by buddycraigg (edited 02-10-2004).]
IP: Logged
|
|
01:37 AM
|
|
buddycraigg
Member Posts: 13615
From: kansas city, mo
Registered: Jul 2002
|
, [This message has been edited by buddycraigg (edited 02-10-2004).]
IP: Logged
|
|
01:39 AM
|
|
buddycraigg
Member Posts: 13615
From: kansas city, mo
Registered: Jul 2002
|
, [This message has been edited by buddycraigg (edited 02-10-2004).]
IP: Logged
|
|
01:44 AM
|
|
jeffndebrus
Member Posts: 2772
From: Jacksonville, Fl- usa
Registered: Aug 2001
|
Beautiful pics---could you use steel ball bearings in place of the cut pen parts? I had my window mechanisms repaired in my crown vic recently and the guy replaced the ground away nylon bearings with steel ball bearings and they sure do work better.
Great pics--worth a thousand words as always,.
IP: Logged
|
|
02:48 AM
|
|
sanderson
Member Posts: 2203
From: corpus christi, texas, usa
Registered: Sep 2001
|
One thing that bit me when I rebuilt this style of motor. There is a rubber bushing around the shaft under the knob. When the case is reassembled you have to make sure that this bushing gets positioned into a groove on the case halves. It's possible to knock it out of place sliding the cases back together so that it is entirely out of the case. The motor will run but when it gets to the end of travel this mispositioned bushing will prevent the limit switch from properly shutting off the motor. It just sits there and cycles on and off on the thermal overload.
IP: Logged
|
|
07:08 PM
|
|
1MohrFiero
Member Posts: 4363
From: Paducah, Ky
Registered: Apr 2003
|
Hey Buddy, great write up and pics but you didn't mention the secret ingredient in picture #13. Looks like about 3/4 of a slightly chilled Corona to me! ------------------
_3.jpg)
Dwayne Mohr
84 SC Red
87 GT 5sp Silver
(Member under various names since 2001)
IP: Logged
|
|
07:19 PM
|
|
Francis T
Member Posts: 6620
From: spotsylvania va. usa
Registered: Oct 2003
|
I'm about to order a rebuild kit for mine but have question, did you rebuild it because the end-of-cycle switch didn't work (like the light comes up or goes down but the motor never stops) or becuase of another problem. Right now, I've got toggle on that bad unit as temp fix. And, will the kit fix my problem?
IP: Logged
|
|
07:22 PM
|
|
buddycraigg
Member Posts: 13615
From: kansas city, mo
Registered: Jul 2002
|
| | | quote | Originally posted by jeffndebrus:
I had my window mechanisms repaired in my crown vic recently and the guy replaced the ground away nylon bearings with steel ball bearings and they sure do work better.
Great pics--worth a thousand words as always,. |
|
I don�t know about the ball bearings.
As I mentioned in the post about gluing the pieces in place, they could interfere with the metal gear with the fine teeth. But since they are a ball there wouldn�t be a flat side for it to catch on if they did roll out of place and bump against it. The reason he could do it in the window motor on your ford without hesitating (I�ve done it myself with nuts) is the cup and the hub share the same axis. There wouldn�t be anything for them to interfere with. But it�s a good idea and would probably work with our head light motors too and thanks for the pic complament
IP: Logged
|
|
08:03 PM
|
|
buddycraigg
Member Posts: 13615
From: kansas city, mo
Registered: Jul 2002
|
. [This message has been edited by buddycraigg (edited 02-11-2004).]
IP: Logged
|
|
08:11 PM
|
|
buddycraigg
Member Posts: 13615
From: kansas city, mo
Registered: Jul 2002
|
| | | quote | | Originally posted by 1MohrFiero: Hey Buddy, great write up and pics but you didn't mention the secret ingredient in picture #13. |
|
Shhhh,
That�s an ancient chinese secret
IP: Logged
|
|
08:16 PM
|
|
|
PFF
System Bot
|
|
|
|
buddycraigg
Member Posts: 13615
From: kansas city, mo
Registered: Jul 2002
|
| | | quote | | Originally posted by Francis T: I'm about to order a rebuild kit for mine but have question, did you rebuild it because the end-of-cycle switch didn't work (like the light comes up or goes down but the motor never stops) or becuase of another problem. Right now, I've got toggle on that bad unit as temp fix. And, will the kit fix my problem? |
|
does it do it in both directions? you may have other problems. i would suggest you check oliver's site. http://www.fieros.de/en/articles/headlight.html[This message has been edited by buddycraigg (edited 01-08-2004).]
IP: Logged
|
|
08:19 PM
|
|
|
Jan 9th, 2004
|
rodmcneill
Member Posts: 1616
From: Indiana USA
Registered: Oct 2000
|
Very nice write up and pics.I think I remember someone mentioning that you could use sections of a glue stick as the bushings.
IP: Logged
|
|
12:28 AM
|
|
buddycraigg
Member Posts: 13615
From: kansas city, mo
Registered: Jul 2002
|
glue sticks??? that would probably be close to how hard they are from the factory.
intersting... pumping the whole plastic gear full of hot glue would be a really easy fix. [This message has been edited by buddycraigg (edited 01-09-2004).]
IP: Logged
|
|
12:31 AM
|
|
Jncomutt
Member Posts: 8902
From: Charlotte, NC
Registered: Apr 2001
|
what was the point of that bushing in the first place? I don't really see from the pics what the point of it was. How come they didn't just make that metal piece have longer ears so it sits on the plastic 'stops'???
IP: Logged
|
|
01:16 AM
|
|
buddycraigg
Member Posts: 13615
From: kansas city, mo
Registered: Jul 2002
|
I have to guess that it was to absorb a sudden shock.
What that�s going to save or keep from breaking I have no idea.
Just like in jeffndebrus�s window motors they seem to cause problems rather than avoiding them
IP: Logged
|
|
01:12 PM
|
|
sanderson
Member Posts: 2203
From: corpus christi, texas, usa
Registered: Sep 2001
|
| | | quote | | Originally posted by Jncomutt: what was the point of that bushing in the first place? I don't really see from the pics what the point of it was. How come they didn't just make that metal piece have longer ears so it sits on the plastic 'stops'??? |
|
IP: Logged
|
|
03:32 PM
|
|
sanderson
Member Posts: 2203
From: corpus christi, texas, usa
Registered: Sep 2001
|
| | | quote | | Originally posted by Jncomutt: what was the point of that bushing in the first place? I don't really see from the pics what the point of it was. How come they didn't just make that metal piece have longer ears so it sits on the plastic 'stops'??? |
|
I'm guessing it is mainly a water seal.
IP: Logged
|
|
03:33 PM
|
|
|
Jan 10th, 2004
|
JazzMan
Member Posts: 18612
From:
Registered: Mar 2003
|
Total ratings: 653
User Banned
|
|
The bushing's main, and pretty much only, purpose is to absorb the shockload as the headlight mechanism hits the up and down stops. Absorbing the shockload protects the plastic gear from being overstressed, as is apparent when the bushings fail and cause the gear to become damaged. Here's a pic of how new bushings look and fit, and you can see how they act between the metal driven linkage and the plastic webs inside the gear: A piece of hard rubber or urethane, cut to shape, would probably restore the shock absorbing feature and protect the gear. JazzMan [This message has been edited by JazzMan (edited 01-10-2004).]
IP: Logged
|
|
01:36 AM
|
|
jeffndebrus
Member Posts: 2772
From: Jacksonville, Fl- usa
Registered: Aug 2001
|
I was just looking at Rodney Dickman's site. He uses (and sells) vitan rubber bushings as a high quality replacement. Plus he uses brass gears to replace the nylon ones. Looks like a very nice rebuild kit.
IP: Logged
|
|
02:24 AM
|
|
buddycraigg
Member Posts: 13615
From: kansas city, mo
Registered: Jul 2002
|
so the entire green thing is exposed rather than half of it under the ear of the metal part of the armature bar?
IP: Logged
|
|
02:34 AM
|
|
|
PFF
System Bot
|
|
fierohoho
Member Posts: 3494
From: Corner of No and Where
Registered: Apr 2001
|
How about just filling the voids in the gear with silicon sealer or butyl calk? ------------------

Where will the road take you today?
IP: Logged
|
|
02:55 AM
|
|
buddycraigg
Member Posts: 13615
From: kansas city, mo
Registered: Jul 2002
|
| | | quote | | Originally posted by fierohoho: How about just filling the voids in the gear with silicon sealer or butyl calk? |
|
i already suggested that.
now we just have to wait for someone to try it.
IP: Logged
|
|
04:39 AM
|
|
sanderson
Member Posts: 2203
From: corpus christi, texas, usa
Registered: Sep 2001
|
| | | quote | | Originally posted by jeffndebrus: I was just looking at Rodney Dickman's site. He uses (and sells) vitan rubber bushings as a high quality replacement. Plus he uses brass gears to replace the nylon ones. Looks like a very nice rebuild kit. |
|
His strandard rebuild kit still uses a nylon gear. He switched to Viton because the green OEM bumpers are no longer made.
IP: Logged
|
|
08:57 AM
|
|
Rodney
Member Posts: 4715
From: Caledonia, WI USA
Registered: Feb 2000
|
My 84-86 gears are now brass. The bumpers absord a lot of energy at full open and full close. The stock green polyurathane bumpers were marginal in long term useage. When I was getting low on them I looked at many options for replacements. The best easiest replacement I found was Viton O-ring cord. It is the toughest O-ring material available and my best guess says it should last longer than the OEM greem bumpers. Anything less will probably fail quickly. ------------------
PLEASE NOTE MY NEW ADDRESS Rodney Dickman's Fiero accessories
www.rodneydickman.com
New address and phone number after June 20,2003: Rodney Dickman's Fiero acc's
7604 Treeview Drive
Caledonia, WI 53108
(262) 835-9575
IP: Logged
|
|
11:16 AM
|
|
JazzMan
Member Posts: 18612
From:
Registered: Mar 2003
|
Total ratings: 653
User Banned
|
|
| | | quote | | Originally posted by buddycraigg: so the entire green thing is exposed rather than half of it under the ear of the metal part of the armature bar? |
|
JazzMan
Edit: I figured out what you were asking, and my description was incorrect. It's been too long since I was inside an early motor, but that's no excuse. The green bushing is completely enclosed by the metal driven linkage, which is what you were asking. JazzMan [This message has been edited by JazzMan (edited 01-10-2004).]
IP: Logged
|
|
05:07 PM
|
|
buddycraigg
Member Posts: 13615
From: kansas city, mo
Registered: Jul 2002
|
i'm at a friends house right now, I'll make a drawing to show what i was wondering about tomorrow. but i think my question was answered.
IP: Logged
|
|
09:48 PM
|
|
|
Jan 11th, 2004
|
sanderson
Member Posts: 2203
From: corpus christi, texas, usa
Registered: Sep 2001
|
| | | quote | | Originally posted by Rodney: My 84-86 gears are now brass. The bumpers absord a lot of energy at full open and full close. The stock green polyurathane bumpers were marginal in long term useage. When I was getting low on them I looked at many options for replacements. The best easiest replacement I found was Viton O-ring cord. It is the toughest O-ring material available and my best guess says it should last longer than the OEM greem bumpers. Anything less will probably fail quickly. |
|
After I corrected the problem with the misplaced bushing under the knob, Rodney's Viton bumpers seemed to work well. In my opinion there is a optimal squishiness for these bumpers. Too hard and the gear will get torn up. Too soft and the limit switches won't work right
IP: Logged
|
|
12:19 AM
|
|
Rodrv6
Member Posts: 1910
From: Ball Ground, Ga.
Registered: Nov 1999
|
| | | quote | | Originally posted by buddycraigg:
Since the welder is at the shop I couldn�t remove the metal armature from the plastic gear and be able to put it back together tonight so I went with this idea. I�ll tell ya�all if it ever fails so you�ll know not to do my hair brained idea. |
|
Actually, the plastic gear will press off of the shaft. None of the metal parts need to be seperated. ------------------
Rod Schneider, Woodstock, Ga.
White 88 GT 
IP: Logged
|
|
12:46 AM
|
|
buddycraigg
Member Posts: 13615
From: kansas city, mo
Registered: Jul 2002
|
| | | quote | | Originally posted by Rodrv6: Actually, the plastic gear will press off of the shaft. None of the metal parts need to be seperated.
|
|
I�ll bet you $50.00 that the ID of the plastic gear is at least 0.150� smaller that the ridge on the back side of the metal armature. If you were to try to press it off, the plastic gear would break. are you game?
IP: Logged
|
|
02:25 AM
|
|


