I've been told of several materials to use in the tedious process of fiberglass mold construction...
ok, in terms that i understand... What would be the best thing to use to form a shape, etc to use a a fiberglass mold... I'm going to be making a few things for my fiero.
But i need to know what is the simplest material to use to create a successful mold... I've been told about some type of foam that several body shops use, but im not sure where exactly to get my hands on this 'foam'
I've atempted using ridgid insulation material used in commercial construction (bought at lowes) but it didn't last long when polyester resin was applied to it... so that was weeks of time down the drain... do i need epoxy resin or diffrent foam ?
HELP PLEASE i wanna get moving on a few ideas that are stuck in my head before they deteriorate like that foam i've tried...
What have you used when making a mold that was successful... were you pleased with the outcome...?
Aus, Fie-ro, Madcurl, Stevo, archie...? any help?
Also... Madcurl, this ones for you... That mysterious black compound used on your latest... where might i find that spectacular puddy?
~Tim Bonner
IP: Logged
03:04 PM
PFF
System Bot
Orville Member
Posts: 263 From: Bakersfield, Ca USA Registered: Dec 2000
I'm supposing that you're asking about materials to use to make the plug (male mold). I've done a bit of this and what worked well for me is an insulating material called polyisocyanurate (sp?) foam. It has a small, firm, easily shaped cell structure that is impervious to just about any solvents, including that used in polyester resin. It comes in different sizes, but I like to use the batts that are 1 1/2" by 4 x 8 feet, which I fasten in place with hot melt glue. After I get close to the shape I want, I finish with setting drywall seam plaster. This plaster is much easier to spread and sand than plaster of paris (casting plaster). The final step is to spray the mold with a catalysed, polyester based sanding primer.
Also,www.fiberlay.com is a site with good info about all aspects of fiberglassing.
Orville
IP: Logged
04:17 PM
hatchetrider84 Member
Posts: 222 From: Orangevale, CA, USA Registered: Jun 2005
depends on what you are trying to mold. i made a side scoop and used a 4x4 for my mold. all i did to get it to release was sand it with 2000 grit sand paper. paint it to seal the wood. and use a mold release wax so it wouldnt stick. i used bondo instead of top coat for the final sandable layer. it worked great ill have pics later. im going to be making an inverted hood scoop and im gonna be using mdf for my mold. wood is easy to work with and if you seal it the resin wont stick. use lots and lots of mold release wax nothing worse that finishing a product than having it break taking it off the mold.
urothane foam [looks like a sponge] open cells will not melt styrofoam [looks like little balls] closed cell WILL MELT some have had luck sealing styrofoam with house paint and/or heavy wax
I find urothane foam eazyer to work, shapes and sands better other things used formica, clay, card board, waxed paper , wood , plaster
and good old fiber glass molds if you want to make many parts
------------------ Question wonder and be wierd are you kind?
IP: Logged
08:36 PM
Tom Piantanida Member
Posts: 527 From: Palo Alto, CA, USA Registered: Oct 2004
Here's a technique that I've used successfully to make fender flare plugs for my racecars: Glue construction foam to the fender of the car, and work it into shape with"cheese graters," sand paper, etc, until it's about the right shape. Then cover it in wallboard mud- that's right, wallboard mud. You can work that into shape and you can reshape it by wetting it. Tried spackling compound once - don't use it, it sets up hard and you can't rework it. Then comes the critical step. When the mud is completely dry, shoot it with several coats of shellac to seal it. Then you can take a fiberglass mold for the plug without the resin dissolving the foam. Make sure you wax the plug with mold-release wax, just like you will wax the mold when you use it. I've also coated the plug with PVA - polyvinyl alcohol as a release agent. It keeps the fiberglass from sticking to the plug, and it's water soluble even after its cured. Good luck.
I'm supposing that you're asking about materials to use to make the plug (male mold). I've done a bit of this and what worked well for me is an insulating material called polyisocyanurate (sp?) foam. It has a small, firm, easily shaped cell structure that is impervious to just about any solvents, including that used in polyester resin. It comes in different sizes, but I like to use the batts that are 1 1/2" by 4 x 8 feet, which I fasten in place with hot melt glue. After I get close to the shape I want, I finish with setting drywall seam plaster. This plaster is much easier to spread and sand than plaster of paris (casting plaster). The final step is to spray the mold with a catalysed, polyester based sanding primer.
Also,www.fiberlay.com is a site with good info about all aspects of fiberglassing.
Orville
your post is the only one i saw tioll now. I went ahead and tried that foam... its got like a tin foil on one side... i'm making a custom center console for a budy of mine, and i think hes gonna be very plesae with the shape ive come up with... i've got the rough shape in foam and its covered in a layer of plaster so far... i gotta put a few more coates etc... but we'll see how it turns out. I'll keep ya posted.
~Tim
IP: Logged
11:27 AM
Orville Member
Posts: 263 From: Bakersfield, Ca USA Registered: Dec 2000
Compressed air helps to blow off the foil backing. and if you fasten it in place with holt melt glue, be careful to keep it away from the outer edge - it really doesn't sand well.
BTW, are you making the male mold to get a female mold or are you going to use it directly for the finished part? Many people bypass the female mold process but ,it seems to me, after gettting a good plug, it's easier to make the finished part inside a smooth female mold than it is to smooth the rough outer surface of the fiberglass. Plus, once you have the female mold you can use it to make more fininished parts with smooth surfaces.
Please keep us informed - like to know what happens and have your opinion.
Well, im making a center console (not sure if i mentioned that yet or not...) i masking taped all the foam together and im working on covering it well with plaster then proceeding from there... I've got about 3- 8th inch thick (roughly) layers of plaster on already... smoothing it over well with a concrete finishing trowel... haven't gotten to the sanding yet... hmm, hot glue... I'll have to try that on the next mold... im making a male plug, and pulling a female from it... from there I'll try to come off with a product...
But overall everythings going well so far. Thanx again for all the advice so far... I'll keep everyone posted as often as i can.
~Tim
IP: Logged
07:13 PM
Francis T Member
Posts: 6620 From: spotsylvania va. usa Registered: Oct 2003
Depending on the shape I have used verything from bondo, fibreglass, foam, plaster, wood, metal, chicken wire (for basic shapes to work with) to clay and spray on filler. It is really only limited by your imagination when it comes to making plugs to mould off. Just make sure they are like glass when you are done. A glass like plug gives you a perfect mould.
I've done a bit of this and what worked well for me is an insulating material called polyisocyanurate (sp?) foam. It has a small, firm, easily shaped cell structure that is impervious to just about any solvents, including that used in polyester resin. It comes in different sizes, but I like to use the batts that are 1 1/2" by 4 x 8 feet, which I fasten in place with hot melt glue. After I get close to the shape I want, I finish with setting drywall seam plaster.
Are you able to "hot-wire" shape this kind of foam? Or is it primarily just sanding it to shape?
IP: Logged
11:21 AM
PFF
System Bot
Nov 10th, 2005
Orville Member
Posts: 263 From: Bakersfield, Ca USA Registered: Dec 2000
I hadn't thought of cutting the foam with a hot wire and I don't know how well a hot wire would cut it; sounds like a good idea, though. A serrated edge bread knife or a razor knife work, and also it cuts readily with a saber saw. I sand with 36 grit if I want to remove a lot and with 80 grit in preparation for the setting drywall plaster top coat.
I personally tend to use the green floral foam - you can cut it with a cold wire or shape it by crushing it with your hands.. its extremely easy to work with - but its also pourous, so its necessary to seal it before making a mold or castin - I usually seal it with silicon
IP: Logged
01:49 PM
opm2000 Member
Posts: 1347 From: Versailles, Ky USA Heart of the Bluegrass Registered: Dec 2000
PLEASE ... NEVER HOT-WIRE FOAMS OTHER THAN POLYSTYRENE (e.g. Styrofoam)!!! Urethane and, to a lesser extent, PVC foams emit deadly cyanide gas when heated to hot-wire temperatures. Styrofoam can safely and easily be cut with a hot wire.
quote
Originally posted by Orville:
... what worked well for me is an insulating material called polyisocyanurate (sp?) foam.
Orville
The "...cyan..." part of the chemical name indicates that it will emit cyanides when heated. It should not be hot-wire cut.
[This message has been edited by Marvin McInnis (edited 12-23-2005).]
IP: Logged
06:57 PM
fiero88v8 Member
Posts: 59 From: Nfld., Canada Registered: Mar 2005
You can use the pink or blue styrofoam. It is very easially shaped with simple tools and sanding. BUT dont use polyester resin!!! you MUST use epoxy resin. The epoxy is a bit more expensive but it has no harsh smell and it dont eat away the styrofoam molds. I know this for certain because I have personally made many molds myself.
well, heres what I've got so far... 2 quick pictures... just for everyone to get a better idea of the console... im tring to almost replicate a picture i've gotten... an exact replica... I'll be adding a few touches of my own...
1st heres the 2 pictures ive taken of my 1/3 finished mold...
I'll see if i can post the picture im going off of...
~Tim
[This message has been edited by 88GTFormula (edited 11-12-2005).]
That picture... any idea whose fiero it is...? can any of you 'search engine' geniuses fine anymore pictures of the interior and or exterior of this spacific fiero...? i found it a few months ago, but for some reason i cant seem to dig it up again... any and all help will be appriciated...
you can use the ridgid foam insulation from home depot. once you have the shape you want paint it with latex paint or even spray with a can of killz primer. works just fine. i have just finished some mods using this method and works great
Those of you who have experience with making multiple parts from one mold... what do you use for a mold release? I'd like something commonly available.
I was thinking some paste wax (buff on a few layers), and either vaseline or silicone oil spray... Thoughts?
IP: Logged
10:55 PM
Nov 29th, 2005
ryan.hess Member
Posts: 20784 From: Orlando, FL Registered: Dec 2002
There is a company right in your neighborhood that has everything you need at most excellent prices. go to uscomposites.com
BTW, just buy some Partall Mold Wax, the smallest tub will do. buff out five layers for the first layup. Spray on two mist coats of PVA after the wax has set up. Then do your first layup. For insurance, wash your mold with warm soapy water and put on one more coat of wax for each of your next 5 layups. After that, you can just go with fresh coats of PVA for several layups at a time. Spray your PVA with either a small detail gun set at the finest mist and held a few feet back from the mold.....or get one of those touch up paint sprayers that uses a propane pressure charge.
David Breeze
IP: Logged
02:47 PM
ryan.hess Member
Posts: 20784 From: Orlando, FL Registered: Dec 2002
i used vaseline a few times. worked a few times but it ruined one of my molds... I dont know if its because i didnt have it on thick enough or what but i dont recommend it. I wont use it again due to all the time it cost me just that once...
Good question though... i was gonna get there eventually myself... lol
Keep the info on the release agents coming... what work and what doesnt ?
Sheetrock/Drywall mud works great for making the male plug.
I have a lot of the products I have mentioned in my thread made, I just dont know if its worth my time, effort, and money to make molds for public production. Who knows, maybe I will and then we'll have t-top headliners, new side scoops and a new front clip on the market *shrug*
Good luck with your projects
------------------
IP: Logged
07:07 PM
Nov 30th, 2005
355Fiero Member
Posts: 548 From: Victoria, BC Canada Registered: Dec 2004
For using molds multiple times or even a few times to get quality parts from, I recommend doing what David Breeze (OPM2000) has said. I have made many molds of parts I am doing on my project car and I tried other methods at the beginning like car wax etc. and there were always parts of the mold that stuck to the final part. I stil got the parts out but there was more cleanup work to do and sometimes the molds could not be repaired fully.
The molding wax is a heavier or thicker wax from what I can tell and it works very well indeed. Several coats of that and a PVA release agaent on the mold and you should have no problems at all. I don't spray my PVA release agent on, I just get a soft cloth and wipe a couple layers on over the waxed surface.
You should be able to get both those products at your local auto parts store in small cans usually. Try NAPA or whatever other auto store you guys have down there. There is usually always a small body repair section in these stores. Going to an autobody supply shop also works but they are not as plentiful.
Don't try to cheap out on the release side though as it will come back to haunt you at some point when you don't want it to.
Also, when you are finished shaping your plug, really make sure you seal the drywall compund well otherwise it soaks up the resin very nicely and really holds on to the mold you are making when trying to separate them. Learned the hard way on that one too.....
Cheers Don
IP: Logged
01:28 PM
ryan.hess Member
Posts: 20784 From: Orlando, FL Registered: Dec 2002
anyone have any tips for dealing with that nasty fiberglass mat? (not the woven cloth) It falls apart and clumps together.... it's just terrible. With the cloth, I can just use a paintbrush for resin application, but for this it seems I need something else.
I was thinking of using a disposeable paint roller or something... ideas?
Been there done that buddy... I used a tapping motion 'gets out the bubbles' and it doesnt drag the mat along like a dragging motion would. I tried the dragging motion and it messes up everything (in my case anyway) I stuck with the 'tapping' of the brush and i was pleased...
That or spend some money and get an air compressor nd some guns and spray the layers on in mils... I have yet to try that though... "saving up for the equipment..."
Hope that helps alittle though as far as the brush method goes...
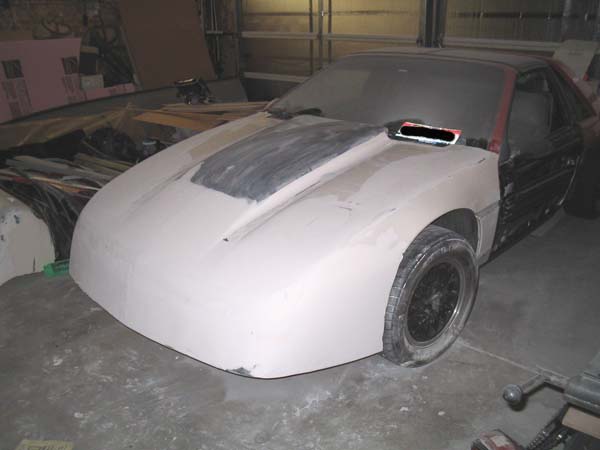
Nebiros88 as far as your concerned. you've got alot of time in that picture posted above... I thought the center console im working on is seeming to take some time... just for curiousity, what kinda time did it take you 2 cover the front end of a fiero in that spakle / mud. looks like it works well if you've got the time to mess with it... I mess with my molds etc. whenever i got a fre hour or 2... probally what everyone else does...
nice work. keep it up... dont let a few opinions discourage you as far as public intrest goes... that picture tells me you've got a ton of talent. my words of encouragement are simple... ' dont hold back '
IP: Logged
12:17 PM
opm2000 Member
Posts: 1347 From: Versailles, Ky USA Heart of the Bluegrass Registered: Dec 2000
I'll assume your using either vinylester or polyester resins, and not epoxy.
If that's the case, for a large item like a front clip, mix up your catylized resin in large batches, somewhere around one quart at a time. For the first layer, pour some resin directly onto the mold or buck, and brush it out quickly using a 3" brush. Have your mat already cut to size and edges torn. Quickly place enough mat to cover your wetted out area, and tach it down with your fingers, so it doesn't slide off. Then quickly pour out the rest of your resin onto the mat. Useeither a short hair roller about 4" wide, or a 3" brush to bed down the first layer. Each has it's advantages & shortcomings. The roller will spread it quicker, but can leave dry areas. The brush takes longer, but can stipple wetness into a dry area. A lot depends on the contours yor working with.
On successive layers, which tend to be of thicker mat, you can use a hair roller and a grooved roller more to your advantage. There are many styles of grooved rollers, but try to use them to spread resin, bed mat, and release bubbles.
For smaller items you will most likely stick with a big & litle brush. BTW, use the chip brush type. Some folks like to cut the bristles down, but I use them full length.
IP: Logged
12:23 PM
ryan.hess Member
Posts: 20784 From: Orlando, FL Registered: Dec 2002
Been there done that buddy... I used a tapping motion 'gets out the bubbles' and it doesnt drag the mat along like a dragging motion would. I tried the dragging motion and it messes up everything (in my case anyway) I stuck with the 'tapping' of the brush and i was pleased...
That or spend some money and get an air compressor nd some guns and spray the layers on in mils... I have yet to try that though... "saving up for the equipment..."
Hope that helps alittle though as far as the brush method goes...
I figured it out!! You can get these 3" mini paint rollers with really thin matts on them. Normally paint rollers have this 1/2" thick layer of plush fabric on them, but these barely have 1/8". It was $2 at lowes, and it by FAR made laying matt the EASIEST thing I have ever done. There were no globs, it was perfectly smooth! I even worked all the bubbles out! YES!!!!
and new "roller covers" are only like $3 for a pack of 2, so you don't have to worry about cleaning it. It might even work better if you removed the fabric, but it works great now.
Thanks for the kind words. It may appear that there is a lot of time in my front end.... actually there might be 10 hours at most... The mud goes on like bondo... you just slop it on there and then take a puddy knife or such to rough in the general shape... once that sets up, just block sand (I use a 1' flexible body sanding block) and that�s it.
One tip... if you are going to use a lot to build it up, do it in thin layers 1/4" thick or so... this will help prevent cracking... If you try globing on 1" thick of the mud the outside will harden, the inside will stay soft, and you will get huge cracks in it.
I actually have very little time for my projects. If I'm not in class (Auto tech at Idaho State Univ.) then I am working to afford to get by. I'm lucky if I have time to work on my car on Sunday (the only day I have when I'm not working or at school)
The front end will need several hundred hours put into it before it would be up to par to take a mold from it. I just can�t decide if it is worth the money to take a mold of it as a blank (like it is now) so that I could offer a "customize it yourself" to the public or if I just want to finish it how I want it for my car before I take the mold.
I highly doubt there are enough people out there that would spend the money for a front end that they would have to customize for themselves.
Good luck with everything, don't give up, you have some good ideas.