Nice work! I'm looking forward to seeing it on the road and making power.
Do you mind if I ask what all was done to the heads and what the cost was?
Don't mind at all.
work was done by Tims Engines www.timsengines.com (Denham Springs, LA) Stage 1 port work - Max port intake and Exhaust , Blend work around valves and runner, surfaced heads, 3 angle valve job, SS valves, guides, seals, valve locks, * valve springs and removed 2 broken exhaust bolts, with Tax $805.07
*NOTE: these are the springs we used with the Crane PowerMax Camshaft, Hydraulic Flat Tappet, Advertised Duration 272/ 284, Lift .454/ .480 � CRN-253941
Crane Cams valve Springs 99848-12. $64.99 at Summit Valve Springs, Single, 1.255 in. Outside Diameter, 432 lbs./in. Rate, 1.153 in. Coil Bind Height Installed Height (in) 1.700 Seat Pressure at Installed Height (lbs) 114 Open Height (in) 1.200 Open Pressure (lbs) 340
Edited: because I had put down the wrong information for the heads..
[This message has been edited by Zoom88 (edited 05-24-2006).]
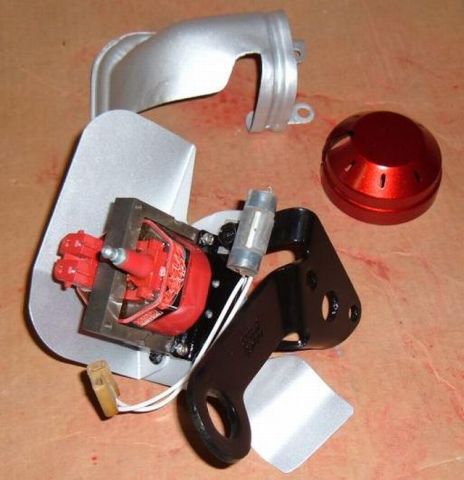
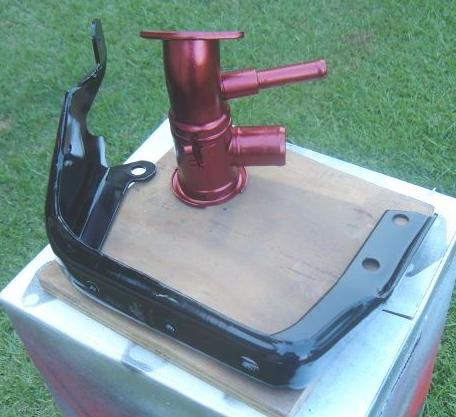
Ok I got some small bits and pieces I worked on Mon. ( seems the little details take the longest ) I wanted to remove the TB coolant lines entirely so I took the thermostat housing and ground off the TB inlet and outlets. I then welded the holes up, grinded the welds and painted for a cleaner look instead of looping hose from one to the other.
All finished nice and pretty !!
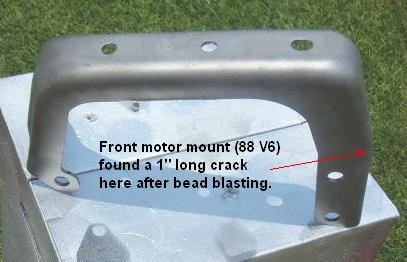
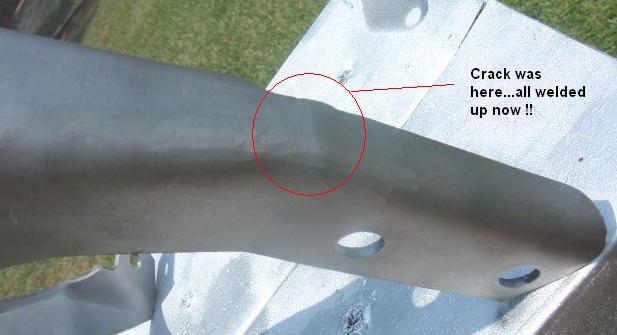
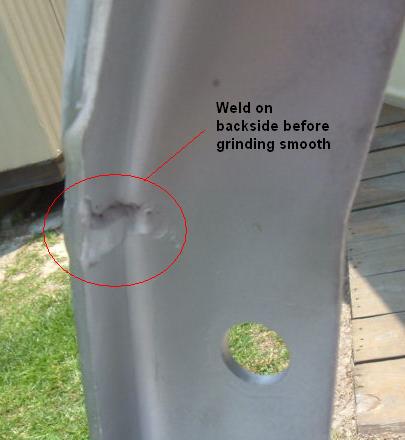
Here are some pics of the motor mount bracket (88 V6) After bead blasting it I found a crack in it that I hadn't noticed.
Closer pics of where the crack was and the area welded, with the poly motor mount I am installing I don't think it would have been long before the mount broke completly if I hadn't got lucky and noticed it !!
Not much I know..... Hey I'm slow I admit it !!!
[This message has been edited by Zoom88 (edited 06-07-2006).]
She's looking really good, Zoom. Man it was a hot day to be working on it, though. I gave in about 1100 on my project.
Thanks, yes its hot !! Even hotter today 96 here in Walker. I work outside a lot though and I had the big ole shop fan following me around !! Hows your project going anyway ?
[This message has been edited by Zoom88 (edited 06-11-2006).]
IP: Logged
02:43 PM
Jun 13th, 2006
1MohrFiero Member
Posts: 4363 From: Paducah, Ky Registered: Apr 2003
I have two fully loaded and repainted rear control arms ready to go in under some new coil overs built the Fierohoho way. The hold up is with the replacement bushings. The old bolts were too big for the sleeve and I wanted to replace them anyway. Trouble was getting grade 10.9 metric bolts. Finally found them in the John Deer store...but they only had three. They get resupplied next week...doh!. So I am on hold until the one bolt comes in. Once I get done it is off to the alignment shop.
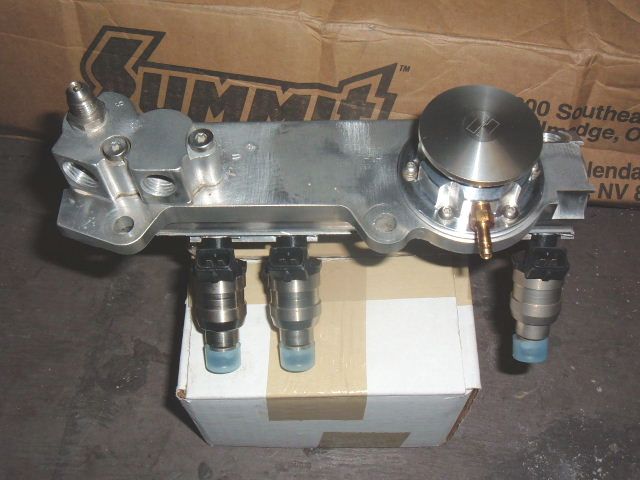
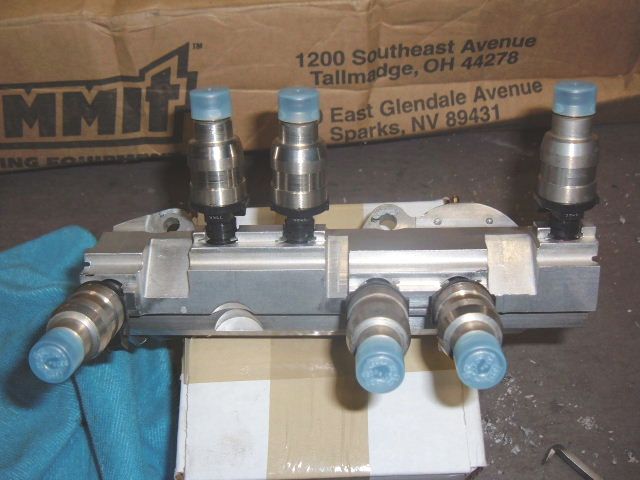
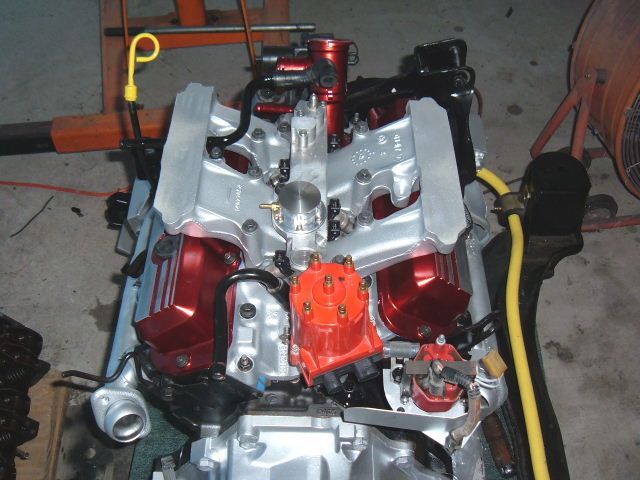
Did a little more work on the car this weekend. Got the lower intake on and the distributer in...Advance auto parts is suppose to have me some Felpro rubber gaskets in for the valve covers Sun. so I will be able to go ahead and install those. the middle intake and the fuel rail.
Also, put the injectors into the fuel rail. Thanks to those on the forum who helped me fiqure out how they installed !!! Here is the thread in case anyone else has the same questions. https://www.fiero.nl/forum/Forum2/HTML/074339.html
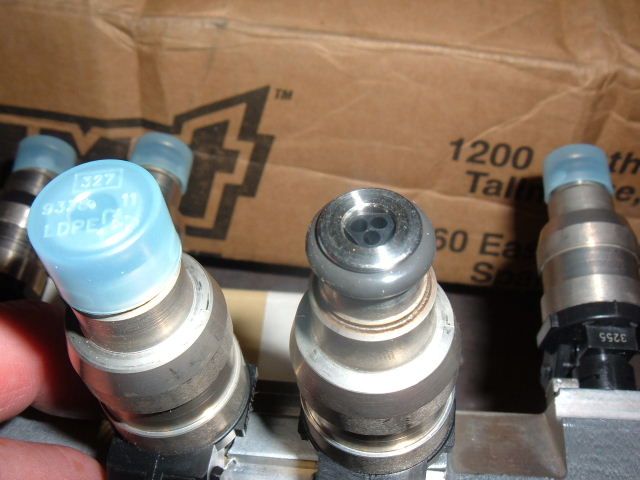
Accel 19 # injectors
Close up view of the nozzle
[This message has been edited by Zoom88 (edited 06-18-2006).]
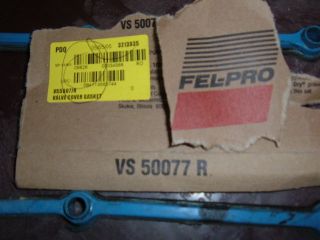
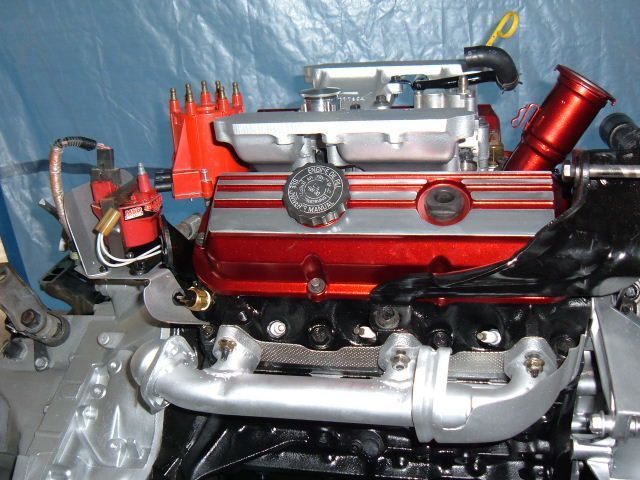
Just about ready to install back in the car. Got the valve cover gaskets in I was waiting for. I like the Felpro Rubber ones like the one in the pic below (the one pictured is used) I included the part # for future reference.
I will wait to put the plenum on after I install the motor back in the car. I think it will be easier to work with the harness and vacuum hoses with it off.
IP: Logged
06:10 PM
bcbuckeyejack Member
Posts: 84 From: Morristown, Tn. (Hamblen Co.) Registered: Nov 2003
Hey Zoom, Very nice project you got going on there. ?? How did you go about adjusting the valve lash? I wanted to get mine close & put the final tweek on them with motor running,but found out valve covers are not removeable after middle intake is in place. I dropped my motor back out and did it w/ starter spinning to pump up lifters.
Again very nice job, love the color.
IP: Logged
07:26 PM
Kaomkteek Member
Posts: 165 From: cedar falls, IA Registered: Nov 2004
Wow. Beautiful build man, very nice details.......very nice welding and painting job too
Quick question I've always wondered -- with a 3.4 swap, do you use the same vacuum lines as the 2.8 stock??? As in, if I give up on the engine I'm working on right now, can I use these nice SS vac lines I bought or will I have to sell 'em off?
Thanks that's all I have for questions....and again, very nice looking and hopefully to be running engine
Matt
IP: Logged
07:43 PM
bcbuckeyejack Member
Posts: 84 From: Morristown, Tn. (Hamblen Co.) Registered: Nov 2003
Hey Zoom, Very nice project you got going on there. ?? How did you go about adjusting the valve lash? I wanted to get mine close & put the final tweek on them with motor running,but found out valve covers are not removeable after middle intake is in place. I dropped my motor back out and did it w/ starter spinning to pump up lifters.
Again very nice job, love the color.
Thank you, I have a procedure for valve lash I like that is pretty much fool proof. Someone else wrote it, I am not sure who (found it on the net). I am at work right now but will post it for you later this evening.
Wow. Beautiful build man, very nice details.......very nice welding and painting job too
Quick question I've always wondered -- with a 3.4 swap, do you use the same vacuum lines as the 2.8 stock??? As in, if I give up on the engine I'm working on right now, can I use these nice SS vac lines I bought or will I have to sell 'em off?
Thanks that's all I have for questions....and again, very nice looking and hopefully to be running engine
Matt
Thanks for the compliments, as bcbuckeyejack said as long as you are using the stock intake setup then you use the same vacuum line setup as the 2.8.
[This message has been edited by Zoom88 (edited 06-19-2006).]
As promised here is the procedure I use, as I mentioned above it was written by someone else and I do not take any credit. I pasted it exactly as it was written.
An alternative way for Adjusting Valve lash for Pontiac 2.8L V6.
Looking at the TORSIONAL DAMPER you will notice it has three MARKS/LINES on it that are evenly spaced on the outside perimeter of the DAMPER. Looking closer you will notice one of the MARKS/LINES is wider than the other 2 (I have this one marked with white paint in the groove). This is the one you start with for setting up the No. 1 piston at TOP DEAD CENTER (TDC). This may be determined by placing fingers on the #1 rocker arms as the (wide) mark on the damper comes near the �0� mark on the timing tab. If the valves are not moving, the engine is in the #1 firing position. If rocker arms are moving as you come up to the line then you are on TOP DEAD CENTER for the #4 piston, all you have to do is rotate the wide mark all the way around (360 deg) and back to the �0� on the timing tab. Make sure you turn the damper in the direction of normal operation (looking at damper through passenger side rear wheel well, tire removed the correct direction of rotation is clock wise). Once we have determined we are on #1 piston TDC we can now adjust both INTAKE and EXHAUST valves for #1. Correct adjustment per Pontiac service manual is: Back out adjusting nut until lash is removed. (This can be determined by rotating push rod while turning adjusting nut). When lash has been removed, turn nut in 1 � additional turns. (This is to center lifter plunger).
NOTE: For stock setup 1 � turns IS the correct adjustment.
Now once you have adjusted # 1 valves it is really easy to adjust the others. Since firing order for the V6 is 1-2-3-4-5-6
Now just turn the damper until the next MARK/LINE is in line with the �0� on the timing tab this will be TDC for Piston # 2. Adjust both Intake and Exhaust Valves.
Turn the damper again stopping at the next MARK/LINE on the damper. This will be TDC for Piston #3 Adjust both intake and exhaust valves as previously discussed above.
Turning the damper again and if you have followed directions correctly you should be back to the wide groove that we first started with when we adjusted TDC for Piston #1 except now we are at TDC for Piston #4 go ahead and adjust both valves.
Turn damper to next MARK/LINE again and we are at TDC for Piston #5, adjust valves.
Turn damper a final time to next MARK/LINE and adjust valves accordingly for Piston # 6.
You are now complete and can be sure everything is adjusted correctly. I am aware of how the Haynes manual as well as others have abbreviated this procedure and acknowledge it will work. The above procedure is the original way it was designed to be done and in my opinion leaves less room for error.
IP: Logged
09:47 PM
Jun 20th, 2006
Raydar Member
Posts: 41113 From: Carrollton GA. Out in the... country. Registered: Oct 1999
Wow. Can't believe I lost track of this thread. Nice work! You really need a Trueleo, though. It will be money well spent.
Thanks Raydar for the compliment, if you get the chance I would be interested in knowing what all you have in your motor. Maybe down the road I'll get the Trueleo, you know how it is we never stop making improvements and mods on our cars. It will give me something to look forward to down the road. They should have the whole package available by then headers, intake, etc; But I have something much more important to save up for now...especially since I live in the hot , humid Louisiana !! I have no A/C !!!!
[This message has been edited by Zoom88 (edited 06-20-2006).]
IP: Logged
07:44 AM
Raydar Member
Posts: 41113 From: Carrollton GA. Out in the... country. Registered: Oct 1999
Originally posted by Zoom88: But I have something much more important to save up for now...especially since I live in the hot , humid Louisiana !! I have no A/C !!!!
Well... There are priorities.
I live in Atlanta. I understand completely.
Right now, mine has the stock cam with 1.6 rockers, a Trueleo intake, 19 lb injectors, Darrell Morse's TB, and Sprints. I'm planning to pull it this summer to swap in a Getrag. I've got a set of FOCOA headers that are going on it, and will probably do an H272 (or maybe a 260) cam, and have the heads and lower intake ported. My last dyno was 134 HP with a non-optimal chip. I could tell a difference with the chip that's in there now (still not optimized, but better at WOT) but I haven't had it dynoed again.
Sorry for being so long winded.
IP: Logged
08:24 AM
PFF
System Bot
Oreif Member
Posts: 16460 From: Schaumburg, IL Registered: Jan 2000
Right now, mine has the stock cam with 1.6 rockers, a Trueleo intake, 19 lb injectors, Darrell Morse's TB, and Sprints. I'm planning to pull it this summer to swap in a Getrag. I've got a set of FOCOA headers that are going on it, and will probably do an H272 (or maybe a 260) cam, and have the heads and lower intake ported. My last dyno was 134 HP with a non-optimal chip. I could tell a difference with the chip that's in there now (still not optimized, but better at WOT) but I haven't had it dynoed again.
Sorry for being so long winded.
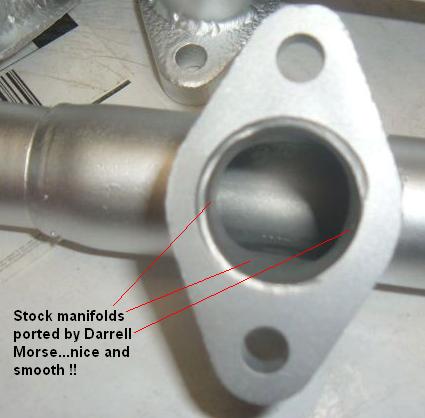
Nice, close to my setup. I have the H272 cam , I will be really interested in what you get if you go with the same cam !! Darrell did all 3 intake pieces for me and the TB.
Excellent work. I really like how you are doing the thread. The engine looks like it is coming together very nicely.
Thanks Dave I appreciate the kind words and especially all the help, input and direction you have given me on this engine build as well as other projects in the past !!
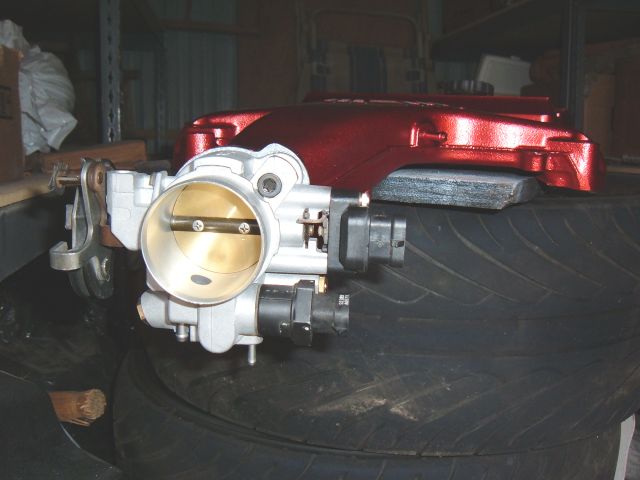
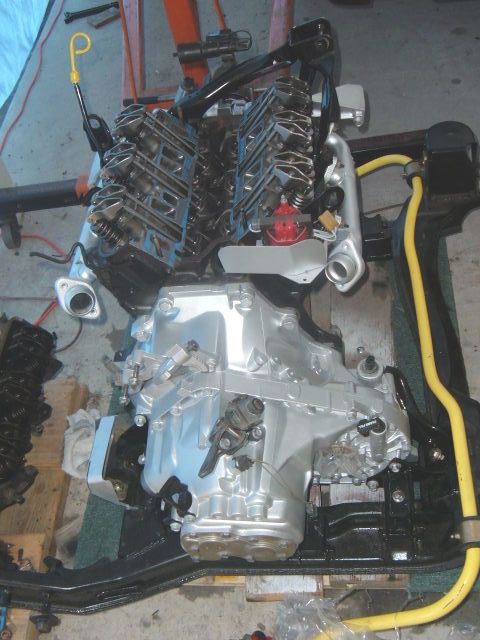
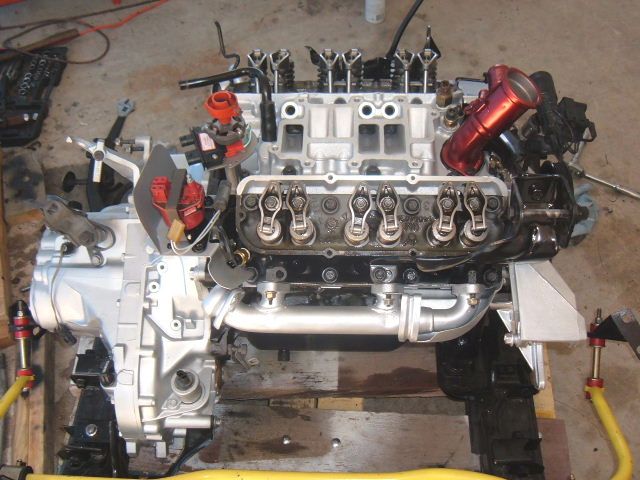
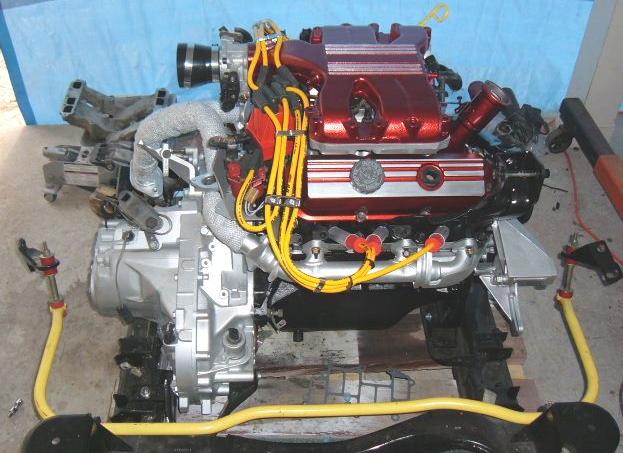
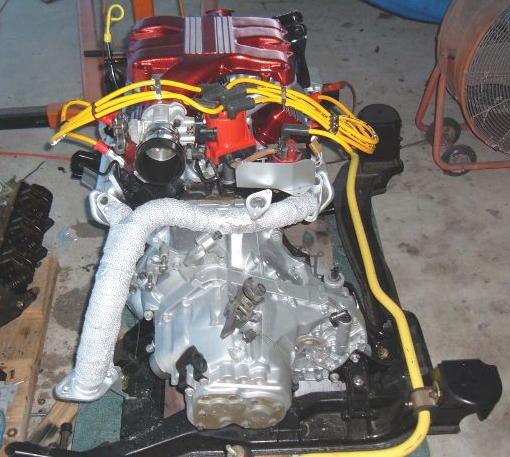
A few more updated Pics. I hope to put the motor back in the car this weekend. The plenum is just sitting on top not bolted down yet. Trying to make up my mind whether to run the plug wires over the top of the plenum neck as they are now or underneath for the 2-4-6 plug side. I used what Pipe insulators call A - tape to wrap just the Y-Pipe and then sprayed it with silver High temp header paint from Eastwood.
[This message has been edited by Zoom88 (edited 06-29-2006).]
Well the motor is finally back in the car !! Got everything just about bolted back up, ran into a problem with the y-pipe I was going to use so the exhaust is not installed. But will have another one tomorrow. Also got the new select and shift cables installed, connected along with the slave cylinder. Shouldn't have to bleed it since I just unbolted it and didn't disconnect any lines. Also got the new coilovers installed for the rear. Now if I can just remember how the wiring was all routed I will be OK !!
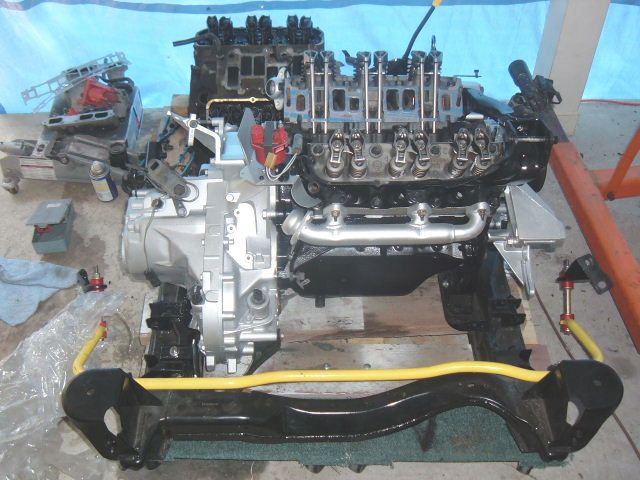
Here is a pic of the car raised and the motor on the dolly getting ready to roll it up under the car. (Poor pic....my camera lens fogged up and I didn't realize it)
[This message has been edited by Zoom88 (edited 07-07-2006).]
That is looking sweet, Zoom. I bet it will take a week to get the smile off your face when you finish the maiden voyage.
Thank You very much !! Yes, I miss driving it and can't wait !! Still have a lot of loose ends though, have to reinstall the rear brakes and E-brake cables, fill the tranny and radiator with fluids, get an alignment, collect data once I get it running so I can have a chip made and then get it dynoed !! Hope to start the motor this coming Saturday.
On another note, if there is anything anyone would like to see or know about the 3.4 swap please let me know. If I have pics I will be glad to post them and if you have a specific question I will try my best to answer it !
[This message has been edited by Zoom88 (edited 07-11-2006).]
IP: Logged
10:49 AM
1MohrFiero Member
Posts: 4363 From: Paducah, Ky Registered: Apr 2003
Here is one question. It may not be the same on an 88 but doesn't hurt to ask. On the craddle for the front tranny mount there are two pair of holes ( at least for the 85-87s) which set is your mount in ? The ones on the outside or the ones closer to the center of the craddle?
Here is one question. It may not be the same on an 88 but doesn't hurt to ask. On the craddle for the front tranny mount there are two pair of holes ( at least for the 85-87s) which set is your mount in ? The ones on the outside or the ones closer to the center of the craddle?
By front tranny mount are you refering to the one on the trunk side or firewall side of the car. The only thing I had that was different that I can remember is the Poly motor mount I got from Rodney bolted up different than the OEM one. But the holes where there , I didn't have to redrill any.
IP: Logged
10:21 AM
PFF
System Bot
1MohrFiero Member
Posts: 4363 From: Paducah, Ky Registered: Apr 2003
how about the oil dip stick? i'm using the 3.4 one, but it attaches differently to the block, which, in turn makes the heat shield not fit right. what did you do here? got any close-up pics of that area?
IP: Logged
09:29 PM
Raydar Member
Posts: 41113 From: Carrollton GA. Out in the... country. Registered: Oct 1999
Originally posted by Zoom88: Nice, close to my setup. I have the H272 cam , I will be really interested in what you get if you go with the same cam !! Darrell did all 3 intake pieces for me and the TB.
I did buy the H272 cam. Darrell Morse (he's an artist) should be receiving my lower intake sometime tomorrow. I'll hopefully be dropping the spare heads off (I hope they're not "junk") tomorrow, as well. After bugging Oreif and numerous other folks for info, I finally found a shop within driving distance of home who will port my heads. Seems to be a dying art. I was all ready to ship them to Chicago.
Good times.
Yours is looking really good. I'm looking forward to seeing what it'll do. I know that you are, as well.
Edit - Are you really lifting your car by the trunk latch? I did that once. It bent.
[This message has been edited by Raydar (edited 07-12-2006).]
how about the oil dip stick? i'm using the 3.4 one, but it attaches differently to the block, which, in turn makes the heat shield not fit right. what did you do here? got any close-up pics of that area?
I used the 2.8 oil pan and dip stick ( both off an 88), everything attaches same as it was on the 2.8.
I did buy the H272 cam. Darrell Morse (he's an artist) should be receiving my lower intake sometime tomorrow. I'll hopefully be dropping the spare heads off (I hope they're not "junk") tomorrow, as well. After bugging Oreif and numerous other folks for info, I finally found a shop within driving distance of home who will port my heads. Seems to be a dying art. I was all ready to ship them to Chicago.
Good times.
Yours is looking really good. I'm looking forward to seeing what it'll do. I know that you are, as well.
Edit - Are you really lifting your car by the trunk latch? I did that once. It bent.
We have pretty much the same motor specs. I plan to start the motor Sat or Sun and run it just long enough to check for leaks, set the timing, burp the coolant system, let the oil circulate and heat up enough to flush the cam lube and such then change the filter and oil. Thats about it until mid next week sometime when I get an ALDL cable so I can log some data for Darth to burn me a chip. Yes, I did use the trunk latch....but very carefully and with other lifting devices. I used two large floor jacks to actually lift it and used the hoist to only support the weight once it was up so I could remove the jacks just long enough to get the cradle back under the car.
IP: Logged
01:10 AM
wftb Member
Posts: 3692 From: kincardine,ontario,canada Registered: Jun 2005
dont forget to add more cam lube after you change the oil.also run shell rotella t diesel oil to keep your flat lifters alive.see the recent article in hotrod magazine re cam and lifter failures.great job , love the paint work.
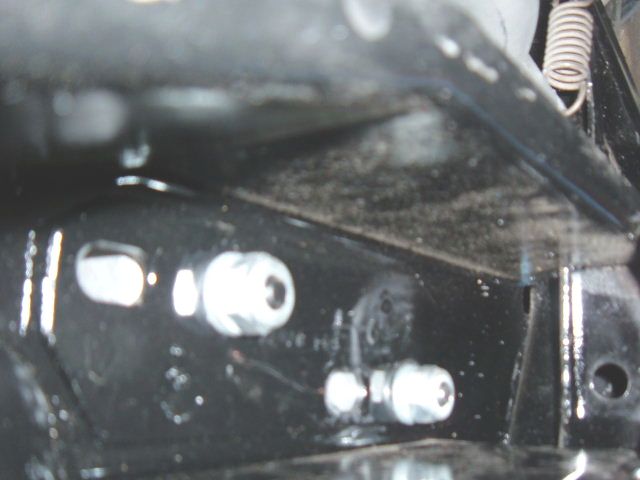
On the firewall side. There have been two sets on both Fieros I owned but the GT seems to be in the wrong set of holes.
Here is a pic of the firewall side tranny mount, as you can see in the pic there are 2 sets of holes as you mentioned (this pic was taken of an 88 Formula) The outside holes , the one that would put it nearest the direction of the drivers side tire are the ones used.