Pennock's Fiero Forum
  Technical Discussion & Questions - Archive
  Sunroof Leak Question, Photos inside

T H I S   I S   A N   A R C H I V E D   T O P I C
  

Email This Page to Someone! | Printable Version


Sunroof Leak Question, Photos inside by FieroMontreal
Started on: 05-18-2006 07:58 PM
Replies: 11
Last post by: FieroMontreal on 05-19-2006 05:07 PM
FieroMontreal
Member
Posts: 3121
From:
Registered: Jul 2001


Feedback score: (4)
Leave feedback

Rate this member

Report this Post05-18-2006 07:58 PM Click Here to See the Profile for FieroMontrealSend a Private Message to FieroMontrealDirect Link to This Post
Alright, My sunroof leaks on my Daily Driver, I just bought it recently and only found out about the leak when it started to rain real hard.. now it's been raining real hard for 4 days streight and it's starting to get annoying, I don't have a garage like the previous owner and I don't want to wreck the interior.

I searched the forums and I found this check list:

Is the glass sitting on the roof properly?
Is the Sunroof Seal in good shape?
Are the rails holding the sunroof in good Shape?
Are the drain holes Plug?

So I looked at my sunroof today, I've had many fiero's before and I must say the glass seems to be sitting very very well on the seal. The clips at the end arn't bent or rusted.

The seal looks very good, it's not cracked or dried out, infact I wouldn't be surprised if it was replaced a few years ago. Its still pretty soft, does show maybe a tiny bit of shrinkage on the two rear corners but it is not leaking from there at all.

The rails under the seal are mint, no rust what so ever and still black.

I searched for the drain holes, and I have no idea where they are, can anyone tell me, or show me some photos of where they should be?


Here is my situation, the roof leaks in two places, 1st the front drivers side corner and the other leak is by the over head console where the lights are.. this leak is coming from the junction of the headliner, metal roof and windshield so it *might* be from the windshield so lets concentrate on the other one instead.

It seems the water is being held up around and under the seal.. when you remove the glass everything looks good but once you press on the seal all the water squirts out from the outer and inner corners of the seal.. Im guessing it isn't being evacuated as it should and it builds up until it passes the seal and leaks into the car... is there a drain hole in that area?

Here are some photos of my sunroof

sunroof ok corner left rear
This images is larger than 100K. Click to view.

Sunroof ok Corner right front
This images is larger than 100K. Click to view.

Leaky Corner Left Front
This images is larger than 100K. Click to view.

Hiding water right front
This images is larger than 100K. Click to view.

Any advice or Idea's? Where are the drain holes? Is this a bad seal?


------------------
I have a Fiero.. Weeeee

IP: Logged
PFF
System Bot
Jake_Dragon
Member
Posts: 32897
From: USA
Registered: Jan 2001


Feedback score: (5)
Leave feedback


Total ratings: 403
Rate this member

Report this Post05-18-2006 08:28 PM Click Here to See the Profile for Jake_DragonSend a Private Message to Jake_DragonDirect Link to This Post
 
quote
posted by buddycraigg
Subject: VISTA VENT WATER LEAKS

1984-86 FIERO (WITH AD3)
Conditions, which contribute to water leaks on 1984 to 1986 Fiero vista vents, can be repaired by adding drainage holes to the plastic roof outer panel and replacement of hardware nuts at the hinge and latch locations on the glass panel..

This bulletin contains procedures for the addition of holes to the plastic roof outer panel, description and part numbers of new hardware nuts as well as proper sealing patterns for weatherstrips (if weatherstrip replacement is necessary).

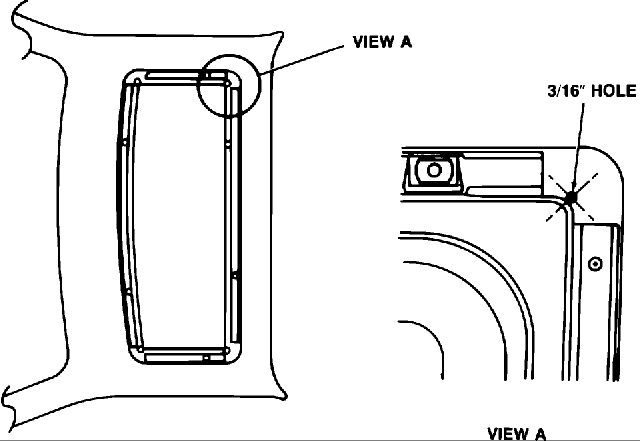
The addition of holes provides a water drain system and are to be drilled through the Plastic Roof Outer Panel Only. The holes are to be located in all four (4) corners of the weatherstrip mounting area. Figure 1 shows the location of the holes with the weatherstrip removed for illustrative purposes.

The recommended procedure for adding holes to the roof outer panel is as follows:
1. Remove the vista vent glass assembly from the vehicle and place on a clean work surface.


2. During the following drilling operations, it will be necessary to hold the weatherstrip out of the way to prevent damage. Using an electric drill motor and 3/16" drill bit, drill one hole (through the plastic roof outer panel only) in each corner of the weatherstrip cavity as shown in Figure 1, view A.
3. Reinstall the vista vent glass assembly to the vehicle and water test to insure an acceptable repair.

4. After water testing, remove the vista vent glass assembly and dry the roof inner panel by blowing compressed air through the holes in the roof outer panel. Apply a small amount of GM P/N 1052856 anti-corrosion compound (or equivalent) through the holes in the roof outer panel to protect the metal roof inner panel from corrosion caused by damage done during drilling operations.


If water leaks are noted at the hinge and latch locations, a new hardware nut is now available and provides improved appearance and sealing. (Refer to Bulletin 86-10-3.) The new hardware nut has an integral seal and no longer requires the use of bushings (Figure 2).
Due to the lower profile and improved appearance, the new nut should be used in all locations (hinges and latches) when service operations on vista vents are performed.
If the vista vent opening weatherstrip is damaged and requires replacement, it is important that the weatherstrip be properly installed and sealed that the weatherstrip be properly installed and sealed to the retainers and body panels.

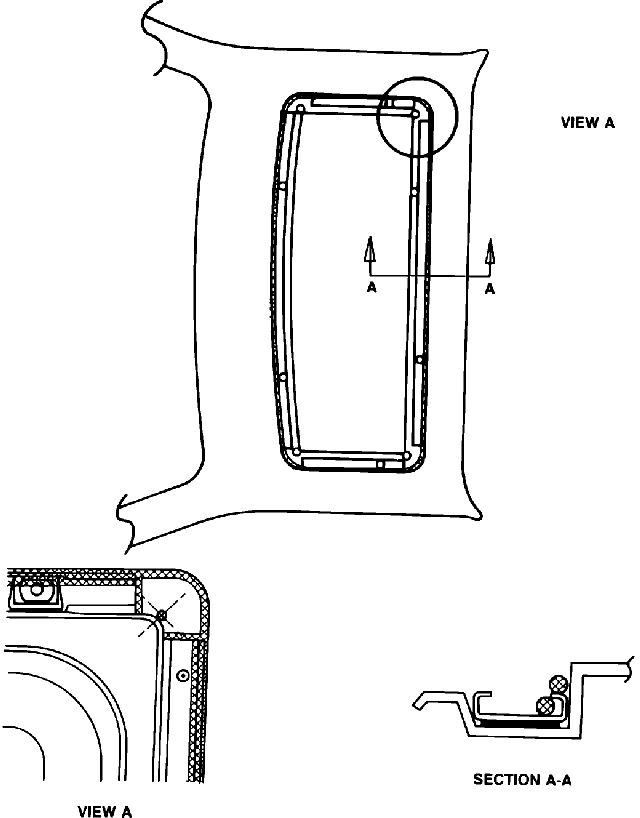
The shaded areas shown in Figure 3 (view A and section A-A) show the correct locations and sealing patterns to be used when resealing or replacing weatherstrips. Use 3M 08011 weatherstrip adhesive (or equivalent) when resealing or replacing weatherstrips.

IP: Logged
Fiero1Fan
Member
Posts: 4364
From: Brachttal, Germany
Registered: Sep 2005


Feedback score:    (19)
Leave feedback


Total ratings: 100
Rate this member

Report this Post05-18-2006 08:39 PM Click Here to See the Profile for Fiero1FanClick Here to visit Fiero1Fan's HomePageSend a Private Message to Fiero1FanDirect Link to This Post
Fantastic info Jake_Dragon. Thanks alot.
IP: Logged
FieroMontreal
Member
Posts: 3121
From:
Registered: Jul 2001


Feedback score: (4)
Leave feedback

Rate this member

Report this Post05-18-2006 08:39 PM Click Here to See the Profile for FieroMontrealSend a Private Message to FieroMontrealDirect Link to This Post
Thanks for the image, thats great!

these are NOT factory holes?

Where does the water go? will it make the metal rust? I'm not sure if this is an actual good idea
IP: Logged
Jake_Dragon
Member
Posts: 32897
From: USA
Registered: Jan 2001


Feedback score: (5)
Leave feedback


Total ratings: 403
Rate this member

Report this Post05-18-2006 08:49 PM Click Here to See the Profile for Jake_DragonSend a Private Message to Jake_DragonDirect Link to This Post
The holes were added later, there is a rail under the skin of the roof that drains off the side. Its suppose to be there on all sun roof cars.

buddycraigg did all the leg work I just found it and posted

[This message has been edited by Jake_Dragon (edited 05-18-2006).]

IP: Logged
FieroMontreal
Member
Posts: 3121
From:
Registered: Jul 2001


Feedback score: (4)
Leave feedback

Rate this member

Report this Post05-18-2006 09:39 PM Click Here to See the Profile for FieroMontrealSend a Private Message to FieroMontrealDirect Link to This Post
ok so if I understand it properly it's 4 holes total. One on each corner and they are to be placed on the inside of the seal, at the apex of the curbe, right before the ledge for the interior opening.

that should be fairly easy, I just hope I dont mess anything up hahaha

thanks for that great info

------------------
I have a Fiero.. Weeeee

IP: Logged
fierohoho
Member
Posts: 3494
From: Corner of No and Where
Registered: Apr 2001


Feedback score: (3)
Leave feedback


Total ratings: 221
Rate this member

Report this Post05-19-2006 12:02 AM Click Here to See the Profile for fierohohoSend a Private Message to fierohohoDirect Link to This Post
Just drill lightly so you don't go through the metal about 1/8" below the fiberglass.
IP: Logged
3800superfast
Member
Posts: 8568
From: ohio U.S.
Registered: Apr 2004


Feedback score: N/A
Leave feedback


Total ratings: 191
Rate this member

Report this Post05-19-2006 10:40 AM Click Here to See the Profile for 3800superfastSend a Private Message to 3800superfastDirect Link to This Post
Great Diagram & Info...Thanks.... I`m wondering also where exactly the water`s end location is, no biggie just curious.....
IP: Logged
Kohburn
Member
Posts: 7349
From: Oriental, NC
Registered: Jul 2003


Feedback score: N/A
Leave feedback


Total ratings: 188
Rate this member

Report this Post05-19-2006 10:45 AM Click Here to See the Profile for KohburnSend a Private Message to KohburnDirect Link to This Post
for the front 2 holes - the water drains down the a-pillers and out by the back of the wheel
IP: Logged
3800superfast
Member
Posts: 8568
From: ohio U.S.
Registered: Apr 2004


Feedback score: N/A
Leave feedback


Total ratings: 191
Rate this member

Report this Post05-19-2006 10:51 AM Click Here to See the Profile for 3800superfastSend a Private Message to 3800superfastDirect Link to This Post
Thank---You Sir ....
IP: Logged
fierohoho
Member
Posts: 3494
From: Corner of No and Where
Registered: Apr 2001


Feedback score: (3)
Leave feedback


Total ratings: 221
Rate this member

Report this Post05-19-2006 12:47 PM Click Here to See the Profile for fierohohoSend a Private Message to fierohohoDirect Link to This Post
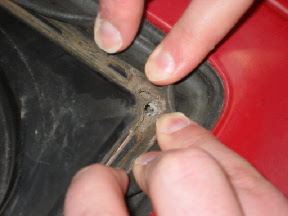
Here's a pic I had of one of the four drain holes I drilled in my 84SE, solved the leak of water into the passenger compartment.

This is the left rear hole.

[This message has been edited by fierohoho (edited 05-19-2006).]

IP: Logged
PFF
System Bot
FieroMontreal
Member
Posts: 3121
From:
Registered: Jul 2001


Feedback score: (4)
Leave feedback

Rate this member

Report this Post05-19-2006 05:07 PM Click Here to See the Profile for FieroMontrealSend a Private Message to FieroMontrealDirect Link to This Post
Great Photo! now as soon as it stops to rain I can go have some "fun"
IP: Logged


All times are ET (US)

T H I S   I S   A N   A R C H I V E D   T O P I C
  

Contact Us | Back To Main Page

Advertizing on PFF | Fiero Parts Vendors
PFF Merchandise | Fiero Gallery
Real-Time Chat | Fiero Related Auctions on eBay


Copyright (c) 1999, C. Pennock