I'm working on replacing the rear brakes on my '86 but I'm confused as to how they go back together. I've read through some other threads but I pictures would really help. Is there a thread with directions and lots of detailed pictures on how to replace 84-87 brakes?
------------------ Dr. Ian Malcolm: Yeah, but your scientists were so preoccupied with whether or not they could, they didn't stop to think if they should. (Jurassic Park)
I've just never done rear discs with parking brake lines. The car is actually missing the parking brake hardware for now though so I guess thats one less thing to mess with. I went and bought the cube-shaped tool with the nubs on it for turning the calipers in. The part that confuses me is how the inboard caliper connects to the piston of the caliper. It came with four small pieces of adhesive-backed metal plates and I'm not sure how those are suppoesed to hold everything together. The rears are torn apart already so I don't have them to go on for an example so I guess I just want some pictures that show how it all clips together.
IP: Logged
04:53 PM
tjm4fun Member
Posts: 3781 From: Long Island, NY USA Registered: Feb 2006
don't have pics, so I'll try to explain. the face of the rear caliper has 2 dimples, you engaged them with the tool to turn them in. when all the way back, you need to set those dimples vertically to match the dimples on the brake pad back. there is no room for the metalic noise pads on the caliper piston side of the rears, so me sure you have the right pads. the outers will only have pads on the contact points with the caliper frame.
Well, according to the cave, you shouldn't turn your pistons... that's only applicable to 88's... or, are you talking about something else?
It's convinient this thread is here, I was about to start my own on a very similar subject... my inner-pad doesn't seem to have any of those retaining springs... But, the calliper is very snug around the rotor anyway, even when it's dis-engaged, so everything is held together for the time being... I believe this is a problem?
Maybe someone would be nice enough to pull a wheel of their car and take some pictures for us? Maybe even be nice enough to pop the caliper off and show us how they're supposed to go together?
Here's picture of one of my caliper's disassembled. There's a few tricks to doing it properly. To remove the piston, remove the pads, e-brake crank, associated seals, and place a shop rag between the piston face and the caliper housing. Then use a LITTLE shop air applied to the brake line hole to pop the piston out of the bore. Use goggles since you can easily get brake fluid spraying around while doing this.
Once you've inspected the bores, replaced the seals, etc, start by re-installing the e-brake threaded shaft (don't mix them up... there's a left hand thread and a right hand threaded shaft and piston), then press the piston back in the bore along with it's spring, allowing the shaft to spin. Then while holding the piston in place, stick on the outer shaft seal and then the crank and it's nut. Make sure the crank is against it's casted stop on the caliper, and make sure you don't allow it to turn or else you'll end up cranking the piston back up the bore with each successive turn. To hold the crank in place, bolt on the caliper e-brake spring seat and install the spring. The rest of the assembly is obvious.
If you don't plan on disassembling the caliper, then you MUST rotate the piston while pushing on it to retract it. Think about it... if you didn't need to rotate it, then the e-brake simply wouldn't work. As you applied the e-brake, the force exerted on the piston by the pads would be the same as if you were pushing on the piston yourself to retract it. Anyways, the alternative if you can't push and turn at the same time, is to remove the e-brake crank at the rear of the piston, and then simply push on the piston. By removing the crank, this allows the shaft to rotate. Then install the crank.
IP: Logged
10:51 AM
tjm4fun Member
Posts: 3781 From: Long Island, NY USA Registered: Feb 2006
you have to have the dimples in the piston face aligned with the nubs on the pads to lock the piston. so at some point you will likely have to turn the piston. I did the rears on my 86 a number of times and always turned them in, never compressed them and never had an issue. I was just trying to point out that if you dont get the nubs on the pads engaged in the holes in the pistons, the ebrake will not work right.
I agree tjm4fun, I forgot to mention that the dimples in the piston have to positioned vertically once you've turned the piston back in, in the case of simply replacing the pads, and in the case of disassembly, before you reattach the e-brake crank.
No... You don't turn the piston. See Cave, Rear Brake. I do it all the time.
If you are leaking thu the piston, Stop. It cannot be fix. Fluid at Yellow valve in front piston or side hold in piston, deponent on what piston it as, mean bad.
------------------ Dr. Ian Malcolm: Yeah, but your scientists were so preoccupied with whether or not they could, they didn't stop to think if they should. (Jurassic Park)
I have only done the "rotate the piston" method once...was over 10 years ago and did not go so well. Ever since I have just removed the parking brake lever so it could be rotated on that side, has always worked great.
Hey Ogre, why don't you explain yourself instead of just saying no. You would have more credibility. Follow the instructions I posted and it will work.
IP: Logged
02:16 PM
Mike Gonzalez Member
Posts: 5093 From: Colorado Springs, CO. USA Registered: Jul 2001
GM DOES NOT recommend the use of piston rotation to retract the piston into the caliper in the 84-87 Fiero. Only 88 model Fiero pistons should be retracted by rotating the piston.
Work the hand brake lever on the caliper to make sure the actuator screw rotates freely. If the lever binds loosen the nut 1/4 to 1/3 turn and try it again. Don't force the lever. You can damage the screw or the caliper shell. The lever can bind from corrosion between it and the caliper. It's also possible for the screw to bind in the caliper. If the screw is jammed in the caliper then the caliper must be rebuilt or replaced. Remove the hand brake lever from the caliper. Don't loose the plastic washer between the lever and seal. Cover the actuator screw with a large socket to protect it. The socket MUST NOT touch the screw or seal! Use a large C clamp to compress the piston. Position the clamp to load on the socket covering the actuator screw. As the piston compresses the screw will rotate under the socket. Do Not allow the clamp to damage the plug in the piston face! If need be, protect the piston with a wood block. Clean away any corrosion build up around the actuator screw and on the lever. Especially on the side of the lever facing the caliper. Reassemble the lever. Don't forget to put the plastic washer back between the lever and seal. The washer protects the seal from wearing against the lever. Coat the area where of the lever facing the caliper with silicone brake grease. DO NOT use petroleum products!
Here are pictures of how to position the clamp. If your clamp is in rough shape, use a block of wood to protect the face of the piston. I know some of you have clamps that are in fairly bad shape... Trashy clamps can damage the piston or the plastic plug in the old style piston.
Rotating Pistons to retract them For safety, I have to recommend that the clamp method be used to push in the pistons regardless of type. I've tried both methods. I thought it took way more force to rotate a Fiero caliper than most of the others I've done. Most rotate and retract fairly easy. That set off alarm bells and sent me looking for the "official" method.
There are definite issues with piston rotation.
It’s confusing to allot of people. Each piston has to be turned a different direction to retract. Someone invariably turns one the wrong way. The inner and outer pistons have no indexing. People have had difficulty getting the outer piston to grip the inner one tight enough to retract when they turn it. If you aren’t careful, you could tear the dust seal. The dust seal keeps water and dirt out of the vent hole in solid faced pistons. The holes in the piston face are often worn because people run them without the pad clip on them... When that happens the clamp or big pliers are your choices and pliers can really chew up the pistons. I won’t claim the clamp method is perfect. It’s kind of a pain the in ass but it does solve the above issues. It also forces people to check over the actuator screw and arm.
The 84 to 88 inclusive use the same operating principles and same style mechanism. Only the caliper castings themselves are significantly different. Nothing Mike Gonzales said or quoted from the Ogre contradicts anything I posted above, except his statement regarding not to turn the piston.
Perhaps Mike you would like to share the source of your statement that "GM DOES NOT recommend the use of piston rotation to retract the piston into the caliper in the 84-87 Fiero. Only 88 model Fiero pistons should be retracted by rotating the piston". What could possibly happen by doing so that would prompt GM make such a recommendation? Surely not the only reason you provide: "It’s confusing to allot of people. Each piston has to be turned a different direction to retract. Someone invariably turns one the wrong way." Most average shade tree mechanics will recognize that the piston is coming out rather than retracting down the bore if they turn it the wrong way. Besides, it's a round piston in a round cylinder with a symmetrical seal. One way or another, either the piston has to turn, or the shaft as I stated earlier. If the shaft is prevented from rotating by crank being up against it's stop, then removing the crank is only one method of continuing to retract the piston. The other is to rotate the piston.
IP: Logged
03:25 PM
Mike Gonzalez Member
Posts: 5093 From: Colorado Springs, CO. USA Registered: Jul 2001
I was just posting Ogres info for you, None of that was my statement, just copied and pasted from the cave.
I dont remember where I first read not to turn the piston, actually I probably read it somewhere in a book or magazine because it was before I had any interest in the internet. All I can say is that the one time I tried to turn the piston as I had on some cars in my High School auto shop, it totally rendered my calipers useless. I might have done it wrong back then to, i'm not sure. But I have never tried to turn one since then. If turning it works...great ! It didnt for me, and I have gotten used to the way I do it and it seems alot easier and more effective to me.
IP: Logged
03:59 PM
jetman Member
Posts: 7811 From: Sterling Heights Mich Registered: Dec 2002
Hey Ogre, why don't you explain yourself instead of just saying no. You would have more credibility. Follow the instructions I posted and it will work.
You may not be aware (lot's of folks weren't) but most everyone here is cutting theogre some slack until he recovers more of his motor skills in his hands, I'm sure that it's still difficilt for him to type. There already is a full and complete explaination in the cave on this subject.
theogre used to be very loquacious in his posts and we wish him the very best in a speedy and total recovery.
[This message has been edited by jetman (edited 08-06-2009).]
If I remove the bracket for the parking brake, then protect the threaded rod it sits on with a large socket, I can then use a C clamp to push in the piston? And I need to line the slots up with the back of the inboard pad and this I can do by rotating it with the nubbed cube-tool? After its together then bolt the E brake bracket back on? Also, I don't have e-brake cables hooked up so they aren't an issue for now.
Any pictures on how the pads fit in? Bear in mind I have a pile of new parts, I just don't know how they go together. I figure I can get the caliper adjusted and then clip in the pads and just have it ready to bolt onto the spindle?
IP: Logged
08:50 PM
Mike Gonzalez Member
Posts: 5093 From: Colorado Springs, CO. USA Registered: Jul 2001
There are two different methods. One is to leave the E-brake lever on and use the "cube" to rotate the piston in, then you must make sure the dimples line up with the pad by rotating it straight in line again. The other way is to remove the E-brake lever and use a c-clamp to press the piston in and replace the E-brake lever. There is a clip that fits the end of the piston it needs to be oriented so it will hold the pad against the piston, it just snaps on to the pad. I will see if I can dig up some pictures of the assembly.
You need to get your E-brake cables hooked up and working, that is what keeps your rear brakes adjusted. Untill then you should probably make a habit of working the levers by hand once a week or so.
Yes, you've got it. As for the pads, the ones on the outside are retained by the spring clips attached to the back side of the outer pads. You just forcefully slide the clips over the outside surface of the caliper until they seat themselves in the little depressions on the caliper (see photo). As for the inner ones, you may have a circular retaining clip as shown in my previous photo, with your new pads, or not. The retaining clip just clips on the piston and temporarily holds the inner pad until you can slide the caliper over the rotor. The inner clips are not needed though as the two nubs on the back side of the pad that catch in the recesses of the piston are what keeps the pad from moving once it's installed on the rotor.
IP: Logged
09:15 PM
tjm4fun Member
Posts: 3781 From: Long Island, NY USA Registered: Feb 2006
I don't want to start a big issue with ogre. GM changed the methods of compressing the parking brake piston more than the weather changes. the root issue is if the boot is rusted to the piston, it will not spin and will tear. what is missing from these quoted methods is if you are going to use a c clamp and socket to compress, you better use the old rear brake pad to hold the pistons position. if not it will rotate and possibly tear the seal. if you are not going to use the pad to lock the piston face you might as well use the tool and rotate it in. and that is all there is on the matter. I've been doing this stuff longer than ogre and most people on this forum. you have to understand exactly what you are trying to accomplish and what the problems are. remember before you quote a service manual, that it was written for parts replacers, not mechanics. those same brake designs where used on many years of gm cars, and almost all the other models say spin them in.
[This message has been edited by tjm4fun (edited 08-06-2009).]
Yes, you've got it. As for the pads, the ones on the outside are retained by the spring clips attached to the back side of the outer pads. You just forcefully slide the clips over the outside surface of the caliper until they seat themselves in the little depressions on the caliper (see photo). As for the inner ones, you may have a circular retaining clip as shown in my previous photo, with your new pads, or not. The retaining clip just clips on the piston and temporarily holds the inner pad until you can slide the caliper over the rotor. The inner clips are not needed though as the two nubs on the back side of the pad that catch in the recesses of the piston are what keeps the pad from moving once it's installed on the rotor.
Temporarily?? I just went and ordered some new ones, because the Ogre's Cave said I needed those little buggers... And, I know mine didn't have them when I put mine back together, which is why it was such a pain getting the caliper on....
Ok, I'll look over my parts and see if I can get it together. I have new P brake cables but I don't have the center adjuster but its next on my list of repairs as soon as I get the car running again.
IP: Logged
10:35 PM
spark1 Member
Posts: 11159 From: Benton County, OR Registered: Dec 2002
The GM brake recall (86-C-16) issued in 1991 shows the compression method of retracting the piston. Ogre shows the same method minus use of a special tool. So, at least in 1991, GM recommended the compression method. See http://www.michiganfieroclub.com/files/recalls.pdf
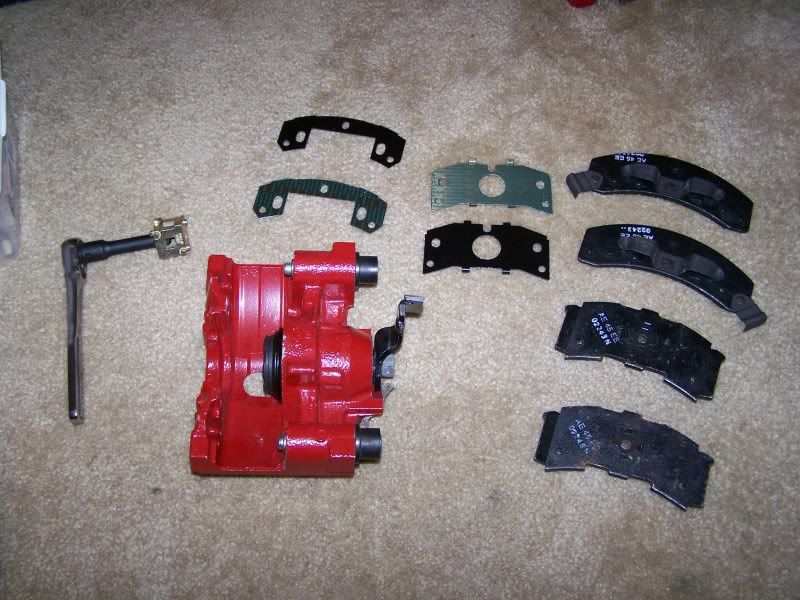
Started poking on my parts tonight and here is everything I have (and another caliper not shown):
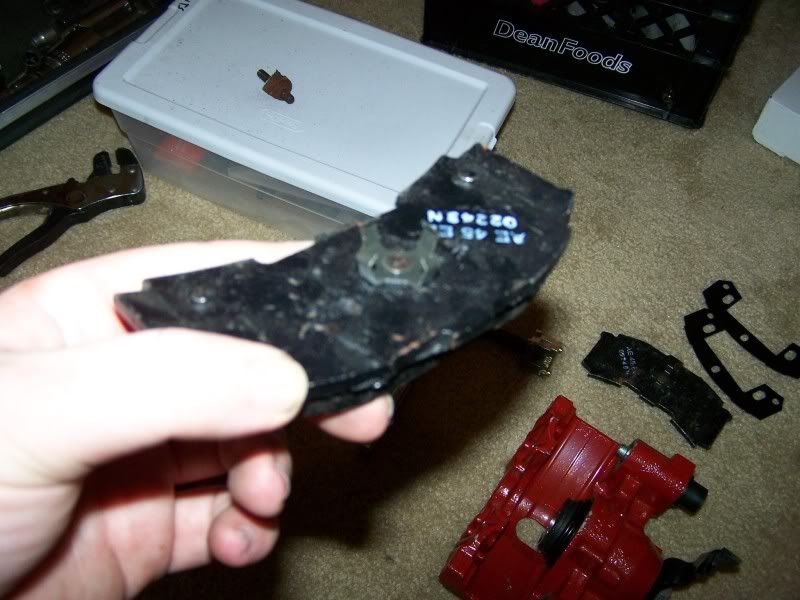
Here is the back of one of the pads. These tangs have to be bent down so they fit in the slots on the face of the piston and grabs the lip on the edge, right?
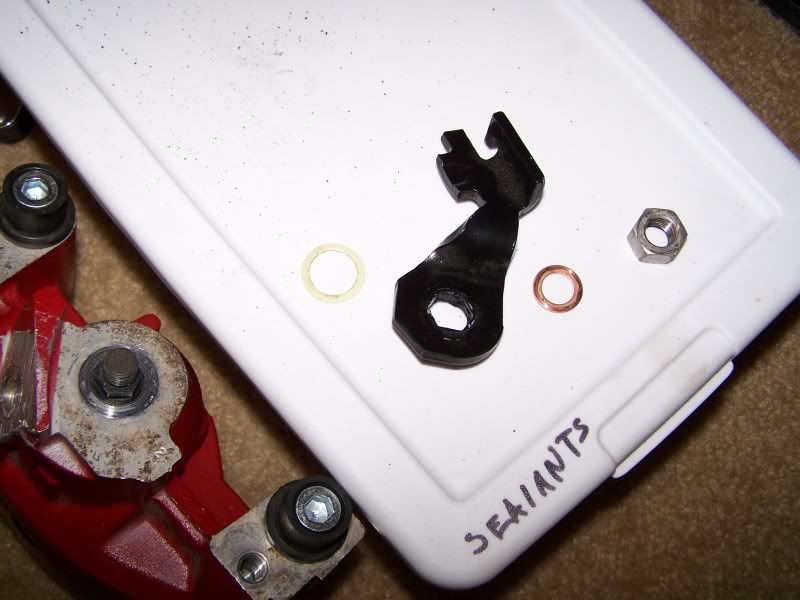
And this is as far as I need to take the P Brake arm down to get at the nut (nut, brass washer, arm, nylon washer)? I need to cover that with a socket and then I can crank away with a 6 in C clamp? I have a 4 inch and I would have tried it with that but its too short. I'll try compressing them tomorrow after a run to Harbor Freight for a larger clamp.
As it is, I've tried turning the piston face with my cube tool but it wont' budge -- am I doing somthing wrong with it?
Also, what purpose do the self-adhesive metal plates serve? Do they stick to the back of the pads or to the inside of the caliper?
[This message has been edited by Alibi (edited 08-07-2009).]
Correct me if I'm wrong... but, isn't that a front-brake pad in your hand there? the rear pads have two small pegs on the inner, and the big wings on the outer...
Thats what I was starting to wonder... I was pretty sure I had ordered the pads for the rears and not the backs but either I made a boo boo or RockAuto did.
C clamp do not rotate/turn Piston. It make the actuator spin when piston is push. Someone did wrong or bad piston/screw or rust in screw hole, etc. Bad part need replace.
------------------ Dr. Ian Malcolm: Yeah, but your scientists were so preoccupied with whether or not they could, they didn't stop to think if they should. (Jurassic Park)
Ok, went and bought brake pads from O'Reillys. The desk guy made the joke that they had been sitting there for a very long time... no wonder as I've only seen a handful of Fiero's around here.
Anyway, I have the rear pads now but they didn't come with the round sheetmetal ring with the 4 clips on it. I *might* have the old ones still but can I get away without using these?
I also bought a larger C-Clamp (6in) so I think I'm ready to at least compress the caliper pistons down.
IP: Logged
11:45 AM
PFF
System Bot
jetman Member
Posts: 7811 From: Sterling Heights Mich Registered: Dec 2002
Anyway, I have the rear pads now but they didn't come with the round sheetmetal ring with the 4 clips on it. I *might* have the old ones still but can I get away without using these?
Pads will drag and rattle without the little clips, I know because I tried that in a pinch after I lost one of those little buggers. Just cannot superglue the stupid pad to the caliper piston although I did consider it. I will say this, I do prefer the wire retaining clip over the sheetmetal clips, much easier to work with IMHO if you can find them.
quote
Originally posted by Bloozberry:
Here's picture of one of my caliper's disassembled.
Thanks for the great picture Bloozberry, that gave me the confidence I needed to perform an inspection on my caliper today.
The GM brake recall (86-C-16) issued in 1991 shows the compression method of retracting the piston. Ogre shows the same method minus use of a special tool. So, at least in 1991, GM recommended the compression method. See http://www.michiganfieroclub.com/files/recalls.pdf
At the risk of seeming like I'm beating a dead horse, I felt I had to respond to your post there Spark1. I don't intend to drag this point any further after this post, but the GM brake recall you cited uses the compression method to retract the piston because the e-brake crank was removed, thereby allowing the threaded shaft to spin freely as the piston was bottomed out. This is exactly what I stated in my first (apparently controversial) post up above for the case where either the caliper is being rebuilt, or where one removes the crank (any non-believers can re-read the post).
The GM brake recall does not however address the case where one is simply changing the pads and needs to retract the piston without any unnecessary disassembly. I stand by my original post that if you do not remove the e-brake crank, the only way to retract the piston is by pressing and turning it simultaneously.
Ok, I'm finally getting back to this. I have sourced proper rear pads but no clips. I dropped by the dealer and they don't have them, dropped by some parts stores and they don't have them... so they're in a batch of parts coming my way from the fiero store. However, I need to change these out now so I guess I'll just have to let the inner pad rattle for a week or so till I can get the clips in. No biggie as my parking brake hardware is coming in then too so I can hook it all up at once.
I bought a larger 6 in C clamp and its doing just fine to push the pistons in (after removing the bracket for the e brake).
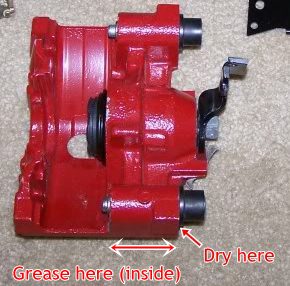
My next question: do I grease the slider pin bushings where they slide into the rubber boot? I know I grease the pins (and I even bought proper caliper pin grease for it too).
Were it mount? no. you want it to stick. what gets on from the pin is enough. Grease pin hole to. Keep rust out.
To make sure.... Use Brake Grease. Don't get sloppy. A little bit will do. No oil or grease, synthetic for regular use included, can wreck rubber parts for brake work. (Mobil 1 etc constance stuff that will kill brake part like oil will.)
------------------ Dr. Ian Malcolm: Yeah, but your scientists were so preoccupied with whether or not they could, they didn't stop to think if they should. (Jurassic Park)
Ok, I just greased the pins and got it all together. I had some clearance issues with a little nub on the back of the inboard pad. It seems that fresh pads and a full new rotor just didn't have the clearance it needed to slide in right. I ended up using my dremel to shave about .05 in. off the nub and then it just barely squeezed in. I'll install the anti-rattle clips after I get them but for now this will do I think.