Pennock's Fiero Forum
  Technical Discussion & Questions - Archive
  Step-by-step tutorial on how to do valve lash?

T H I S   I S   A N   A R C H I V E D   T O P I C
  

Email This Page to Someone! | Printable Version


Step-by-step tutorial on how to do valve lash? by Alibi
Started on: 08-09-2009 09:52 PM
Replies: 13
Last post by: TK on 08-10-2009 07:52 PM
Alibi
Member
Posts: 2199
From: Tulsa OK
Registered: Feb 2009


Feedback score:    (7)
Leave feedback

Rate this member

Report this Post08-09-2009 09:52 PM Click Here to See the Profile for AlibiSend a Private Message to AlibiDirect Link to This Post
Hi all, I'm wondering if there is a step by step tutorial on how to do the valve lash on a 2.8, preferably with pictures (I'm very visual-oriented). Or other threads with good write-ups on how to do it?

As of now, I've got the motor at TDC for cylinder 1, my freshly cleaned and valve-job'd heads are bolted on w/ new bolts, my pushrods are in place and the rockers are bolted down some just to keep the rods in place but not enough to put any pressure on them.

Now what?

Edit: Here is a shot of how my lifters look (before I put the rods in) w/ #1 at TDC.

[This message has been edited by Alibi (edited 08-09-2009).]

IP: Logged
PFF
System Bot
Hudini
Member
Posts: 9030
From: Tennessee
Registered: Feb 2006


Feedback score: N/A
Leave feedback


Total ratings: 165
Rate this member

Report this Post08-09-2009 10:22 PM Click Here to See the Profile for HudiniSend a Private Message to HudiniDirect Link to This Post
I use the 120* method using the 1 fat mark on the harmonic balancer and the 2 skinny marks. It takes 2 full revolutions of the crank this way but I'm 100% sure of my work. The Haynes manual describes how you can do it in one turn I believe.

Since the firing order is 1,2,3,4,5,6 then it follows that if #1 TDC is the fat mark, then #2 TDC is the next skinny mark, #3 TDC is the next skinny mark after that. Then #4, #5, and #6 TDC is the 2nd time around on the HB: fat mark. skinny mark, skinny mark. Does that make since? I have some pictures of the HB timing marks if you need it.
IP: Logged
jetman
Member
Posts: 7799
From: Sterling Heights Mich
Registered: Dec 2002


Feedback score: (4)
Leave feedback


Total ratings: 273
Rate this member

Report this Post08-09-2009 10:27 PM Click Here to See the Profile for jetmanClick Here to visit jetman's HomePageSend a Private Message to jetmanDirect Link to This Post
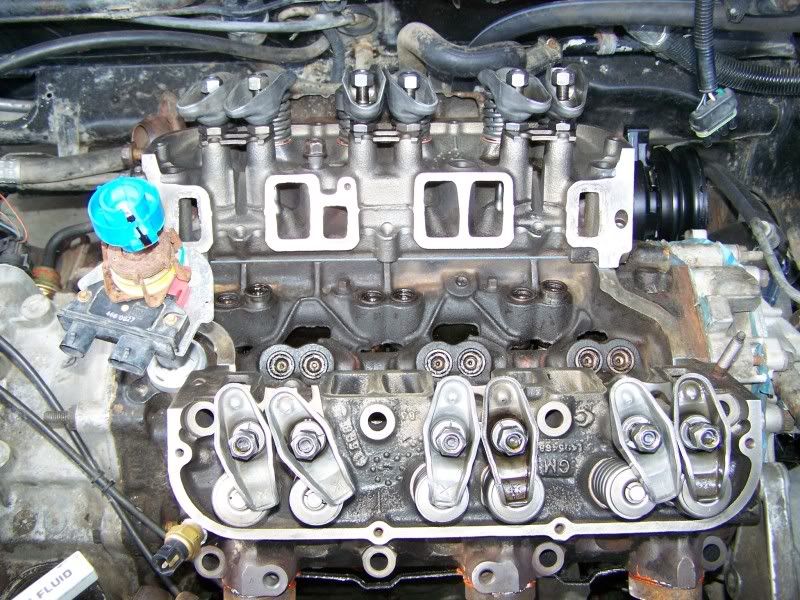
How I've adjusted my valves: 2.8 engine V-6
The idea is to get the lifter poppet part way down into its bore, about 1/4-1/2 of its travel. If you don't use up some of its travel, then your valve(s) will get loose as normal wear on valve-train parts causes the poppet to reach the top of it's travel. It will also requires more oil to remain (at pressure) in the lifter's plunger cylinder. The more volume to fill, the more chance that the plunger can be compressed, causing a ticking noise or at high revs a bent pushrod.


Make sure that the lifter being adjusted is on the base circle of the cam, this will be TDC on that piston with both valves closed. TDC #1 is where both #1 valves are closed and main fat timing mark on harmonic balancer is at zero on timing tab and distributor rotor is pointing at the number one plug wire terminal. Set your intake and exhaust valve lash on #1. Rotate the harmonic balancer clockwise 120* to the next timing mark and you know that you are at #2 TDC. Set your intake and exhaust valve lash on #2. The next timing mark after that is #3 TDC and so forth. Remember that the GM/Fiero engines have three timing marks (0*, 120* and 240*) on the harmonic balancer, which makes this much easier than the Chiltons manual method.

The lifter plunger centering adjustment is 1&1/2 turns. Most people think is too much. It is not. The 1&1/2 turns (as specified in the FSM) will center the lifter plunger on an OEM valve train (with the standard rocker ratio). The reason most think that 1&1/2 turns is too much is because they don't properly identify the zero lash point. If you are twirling the pushrod you won't be able feel the zero lash point unless your hands are 500 times (give or take) more sensitive than the average human. Anyway, while approaching the zero lash point, you should be gently rocking the pushrod up & down between the lifter and the rocker arm. That way you can feel the play diminish down to zero.

Wiggle the pushrod back and forth as you tighten the rocker nut, you will feel the pushrod end "clicking" as it moves around. The amount of movement will decrease as the nut is tightened until suddenly it stops. This is the point where the lash is out with the poppet at the top of it's bore. Now, you need to move the poppet down its bore, so you continue to tighten the rocker nut.

How much you ask? Well, the rocker stud has a 1.5mm pitch, so one full turn moves the rocker ball down 1.5mm. The rocker arm ratio (stock) is 1.5:1, so moving the rocker ball down 1.5mm moves the pushrod down 1.67x1.5mm, or 2.5mm plus or minus a very tiny bit. The lifter poppet travel is 6-8mm, so 1.5 turns on the rocker nut (factory spec) is 3.8mm at the lifter poppet, or about half-way. That's how much I tightened mine, and it worked just fine. Any less and the valves will need readjustment sooner due to wear.

I had mechanics using the Chiltons manual mess up the lash, I tried the twirl and turn method and it was noisy as marbles. Jazzman gave me the pitch and rocker ratio measurements above and I went with timing marks on the balancer and the 1-1/2 turns on rocker arms. My engine is smooth now. Lots of power. Most important to me is that I wont have to go through the work to tear the upper half of the engine out to get the lash adjusted for a very long time. Some people have had success with other methods, all the power to you. If there is an easier way, count me in! Good luck with setting your lash and I hope you are using the rubber valve cover gaskets, they are sweet and don't leak.

------------------
jetman
Silver 86 SE 2M6 4-speed, with
"check wallet light"
Now fortified with 8 essential slices of bacon goodness

IP: Logged
Alibi
Member
Posts: 2199
From: Tulsa OK
Registered: Feb 2009


Feedback score:    (7)
Leave feedback

Rate this member

Report this Post08-09-2009 10:42 PM Click Here to See the Profile for AlibiSend a Private Message to AlibiDirect Link to This Post
Thanks! Both posts make a lot of sense and help me figure out exactly what I'm doing in the first place. Man, after its been described to me it sounds really easy! Its at TDC for #1 and both lifters are down, so I set the rods to have zero lash for #1 plus 1.5 turns and then turn the balancer over to the next line (skinny) for #2 and repeat till I've done all 6 sets of lifters?

Hmm... now the question is do I do it tonight so I can go ahead and bolt down my lower manifold or do I wait till its nice and toasty tomorrow but have lots of light....

Nope, doing it tonight I have a small shoplight and a headlight so I think I'll be fine.

Edit: I have blue rubber gaskets in my top-end gasket set from Fel-Pro so I should be ready to stick my valve covers on too so that when I prime the pump I won't have oil squirting everywhere from the rods :P (erm...thats how it works on the top end, right?)

[This message has been edited by Alibi (edited 08-09-2009).]

IP: Logged
jetman
Member
Posts: 7799
From: Sterling Heights Mich
Registered: Dec 2002


Feedback score: (4)
Leave feedback


Total ratings: 273
Rate this member

Report this Post08-09-2009 10:49 PM Click Here to See the Profile for jetmanClick Here to visit jetman's HomePageSend a Private Message to jetmanDirect Link to This Post
 
quote
Originally posted by Alibi:

Nope, doing it tonight I have a small shoplight and a headlight so I think I'll be fine.


That's a sure sign of a true Fiero man.
IP: Logged
Alibi
Member
Posts: 2199
From: Tulsa OK
Registered: Feb 2009


Feedback score:    (7)
Leave feedback

Rate this member

Report this Post08-09-2009 10:52 PM Click Here to See the Profile for AlibiSend a Private Message to AlibiDirect Link to This Post
I sure wish I had a helper to turn the crank over though but meh, I'll live. I've swapped motors out (in H-body cars) by myself in backyards full of mud before so I can do pretty much anything with enough time and "persuasion"
IP: Logged
Robert 2
Member
Posts: 2401
From: St Hubert Quebec Canada
Registered: Jan 2006


Feedback score: (4)
Leave feedback

Rate this member

Report this Post08-09-2009 11:18 PM Click Here to See the Profile for Robert 2Send a Private Message to Robert 2Direct Link to This Post

This may help take the guess work out of vavle lashing.
Heres the old thread --I only copied out the method I
used as not to get things to confused. Another note is
you can switch the colors as I did after this and
changed the widest groove to white, for timing
reasons--non the less--you can change the colors
before you start or after for timing reasons, just
make sure that you change all 3 colors in a clock wise
rotation and write then down for later reference..

I did find out something interesting while I was
doing this, and that is you can mark your dampner with
3 colors to take out the guess work while lashing
vavles. There are 3 grooves on dampner, the widest one
is your timing groove, heres what I did allthough I
can see when #1 is TDC.

* . Find TDC for # 1 by hand cranking --look for # 1
lifters to stay motionless , then you`ll see # 6
lifters/pushrods just start to move up a little, look
at dampner and you`ll see the widest groove is very
close to --0--.On the timing tab, Mark that widest
groove with Black, turn clockwise and mark next groove
white, then next groove red. Then make a full 720
rotation to get back to # 1 TDC starting point.

1. Adjust # 1 with dampner at 0 and Black mark
showing.

2. Move black to white ==adjust # 2

3. move white to red=====adjust # 3

4. move red to black=====adjust # 4

5. move black to white ===adjust # 5

6. move white to red=====adjust # 6

Move red back to black and your at TDC for #1 which
was the first one you adjusted *Your Done*
IP: Logged
Alibi
Member
Posts: 2199
From: Tulsa OK
Registered: Feb 2009


Feedback score:    (7)
Leave feedback

Rate this member

Report this Post08-10-2009 12:34 AM Click Here to See the Profile for AlibiSend a Private Message to AlibiDirect Link to This Post
Got it done! I guess it only took me 30-40 minutes too! That was actually a lot easier than I thought. The only thing I didn't get was the *exact* 1.5 turns. Is it super crucial for it to be exactly 1.5 turns? Otherwise I think I got them pretty close and everything is ready to have the lower intake bolted on and maybe even the valve covers although I may wait on them till I get my wire harness snaked back through the engine bay but we'll see.

Thanks for the great tips everyone! Plusses all around

Edit: Marking each line w/ a different color is a good except all I have on me is a halfway dried-out bottle of white-out. I dumped in some rubbing alcholhol to break it up a little and then dabbed that into the grooves. Its crumbly and will probably wear off really fast but meh, it worked fine for this one time around so thats all I care about.

[This message has been edited by Alibi (edited 08-10-2009).]

IP: Logged
Robert 2
Member
Posts: 2401
From: St Hubert Quebec Canada
Registered: Jan 2006


Feedback score: (4)
Leave feedback

Rate this member

Report this Post08-10-2009 06:18 AM Click Here to See the Profile for Robert 2Send a Private Message to Robert 2Direct Link to This Post
It is important the turn and a half , yes but it doesn't have to be on a + - thousand of an inch , close to 1 1/2" turn is ok
This is just to be close to the middle of the travel of the lifter .


[This message has been edited by Robert 2 (edited 10-09-2010).]

IP: Logged
Hudini
Member
Posts: 9030
From: Tennessee
Registered: Feb 2006


Feedback score: N/A
Leave feedback


Total ratings: 165
Rate this member

Report this Post08-10-2009 11:17 AM Click Here to See the Profile for HudiniSend a Private Message to HudiniDirect Link to This Post
I agree with Robert 2, close is fine. I've used 3/4, 1 and 1.5 turns. All worked fine. 1.5 is the closest to the middle.
IP: Logged
weaselbeak
Member
Posts: 2604
From: se iowa
Registered: Jun 2008


Feedback score: (5)
Leave feedback


Total ratings: 76
Rate this member

Report this Post08-10-2009 12:03 PM Click Here to See the Profile for weaselbeakSend a Private Message to weaselbeakDirect Link to This Post
I remember 3/4 being the standard, and Ford was using 1 1/2, later they dropped to 3/4 as well. This was some years ago, and I don't know the current recommendations, but I've not found it critical.
IP: Logged
PFF
System Bot
Alibi
Member
Posts: 2199
From: Tulsa OK
Registered: Feb 2009


Feedback score:    (7)
Leave feedback

Rate this member

Report this Post08-10-2009 02:27 PM Click Here to See the Profile for AlibiSend a Private Message to AlibiDirect Link to This Post
I've ran across some older threads where arguments erupted over .75 vs. 1.5 turns. From what I've read, 1.5 makes the most sense so thats what I went with. As long as its not rocket science and if one is a bit tighter than another then I'm good.
IP: Logged
Robert 2
Member
Posts: 2401
From: St Hubert Quebec Canada
Registered: Jan 2006


Feedback score: (4)
Leave feedback

Rate this member

Report this Post08-10-2009 04:45 PM Click Here to See the Profile for Robert 2Send a Private Message to Robert 2Direct Link to This Post
As long as they don't bottom or are loose it's OK But halfway is the best
We should measure with a lifter what is the travel in it , divide by 2 , then install a dial gauge and when you just touch the top of the lifter with a pushrod , go down the measure it gives you so you will be right in the middle if you wanna be Perfect
IP: Logged
TK
Member
Posts: 10013
From:
Registered: Aug 2002


Feedback score: (2)
Leave feedback


Total ratings: 200
Rate this member

Report this Post08-10-2009 07:52 PM Click Here to See the Profile for TKSend a Private Message to TKDirect Link to This Post
When I installed my new 3.1L I spend a lot of time to see what centered the lifter correctly (to the .001"). It turns out that 1.5 turns from zero lash is just about right and being off a little doesn't matter, but 3/4 of a turn is too little. I lift the push rod up and down rather than turn it to find the zero lash point since the rod may be easy to spin even though it's already pushing the lifter down. In that situation your pre-load will be wrong.

I use 1.5T for 1.5 rockers and 1.3T for 1.6 rockers. This is based on a GM Goodwrench 3.1L iron head engine with GM lifters. Other lifters might have a somewhat different plunger range.

We had a long discussion on this here. Lots of good information from various people.
https://www.fiero.nl/forum/Forum2/HTML/092026.html

[This message has been edited by TK (edited 08-10-2009).]

IP: Logged


All times are ET (US)

T H I S   I S   A N   A R C H I V E D   T O P I C
  

Contact Us | Back To Main Page

Advertizing on PFF | Fiero Parts Vendors
PFF Merchandise | Fiero Gallery
Real-Time Chat | Fiero Related Auctions on eBay


Copyright (c) 1999, C. Pennock