Bulletin Number: 88-8-22
Reference Number: 738101R
Publish Date: 8/88
Subject: OIL PRESSURE SENSOR SERVICE (ADD SHIELD OR RELOCATE SENSOR)
Models
Affected: 1985-88 FIERO WITH 2.8L V-6 (VIN CODE 9) AND AIR CONDITIONING
"This bulletin cancels and replaces bulletin 87-8-12, dated 8/87. The title and service procedures have been changed."
1985-87 Models
Whenever an oil presssure sensor is replaced on the above vehicles, a shield should also be added to protect against water intrusion. This shield is part number 10096127.
Parts are currently available from GMSPO.
Use the following procedure to install the shield:
1. Disconnect the wire harness connector to the oil pressure sensor.
2. Push the connector through the small end of the shield, and move the shield up the harness, out of the way.
3. Reconnect the wire harness connector to the oil pressure sensor.
4. Pull the shield over the sensor, so that the large end covers the entire sensor. The shield should fit loosely over the sensor.
5. Use a silicon sealer, such as GM Silicone Sealant (P/N 1052915), inside the small end of the shield. Then, secure the small end of the shield to the wire harness with a plastic tie strap. Tighten the strap as securely as possible, and cut off any excess length.
6. Tape the wire harness and shield with electrical tape, starting at the tie strap on the shield to the first junction in the harness.
Warranty Information
Labor Operation: T1311
Labor Time : .5 Hours - For the installation of the shield
and the oil pressure sensor.
Part Number : 10096127
1988 Model Only
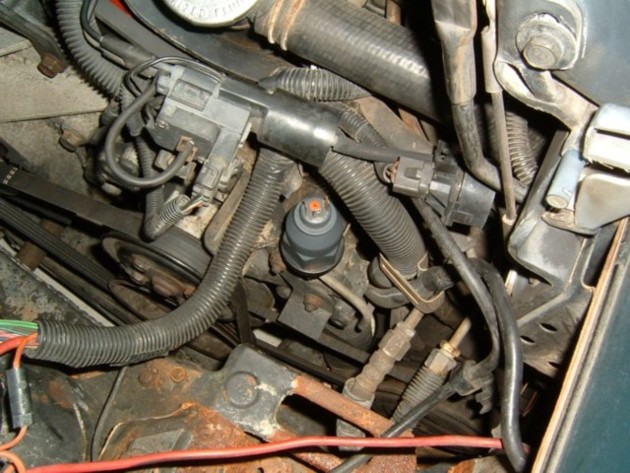
If an oil pressure sensor is replaced on a 1988 model, the sensor should be moved to the oil pump location just above the filter, using the following procedure:
1. Raise hood and remove the right hand louver assembly. Disconnect negative battery cable.
2. Remove the oil pressure sensor using tool number J35748.
3. Remove the main wire harness retaining clip.
FIGURE 1
4. Remove the oil pressure sensor mounting tube retaining bolt (Figure 1), then move the tube out of the way. Reinstall the bolt, and torque to 50 N-m (37 lb. ft.).
5. Remove the screw from the Electronic Vacuum Regulator Valve (EVRV) mounting bracket, and move the EVRV out of the way.
6. Remove the oil pressure sensor connector wire from the conduit, down to the first tape on the conduit (about 9 inches). Tape the wire to the conduit so that the wires are facing down. Route the oil pressure sensor wires near the main harness, just above the A/C compressor. Reinstall the rest of the wires back into the conduit and retape. Reinstall the main harness retaining clip, insuring that the clip does not touch the transmission cooler lines or pinch any wires.
7. Reinstall the EVRV on its mounting bracket.
8. Hoist vehicle.
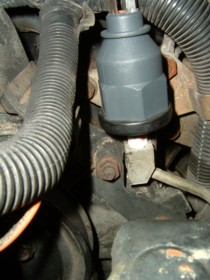
9. Remove oil filter.
FIGURE 2
10. Using a back-up wrench on the brass fitting (Figure 2), remove oil pressure sensor mounting tube and discard. Remove the brass fitting and discard it also.
11. Obtain the following parts from a hardware or plumbing supply store:
a). 1/8" nipple (1" long)
b). 1/4" to 1/8" reducer (female inside male)
c). 1/4" to 45 degree angle (female both ends)
12. Loosely assemble the nipple into the female end of the reducer, and the angle onto the male end of the reducer, using GM LocTite pipe sealer with teflon, P/N 1052080 on all joints.
NOTICE: This product is a "thread locker" as well as a sealant. Any substitute must have the same qualities.
13. Install the fitting assembly into the block, also using pipe sealer. Tighten the fitting until it is firmly seated, and the angle is correct to locate the oil pressure sensor just below, and not touching, the A/C compressor.
14. Install the oil pressure sensor, again using pipe sealer. Use the special tool to torque to 20 N-m (15 lb. ft.). Install the connector on the oil pressure sensor.
15. Replace the oil filter. Check oil level, and add additional oil if necessary.
16. Lower vehicle, reconnect negative battery cable, start engine, and run for one minute. Check for proper operation of oil pressure gauge. Shut engine off.
17. Raise vehicle, and check for oil leaks.
18. Lower vehicle.
[This message has been edited by Racing_Master (edited 05-11-2009).]