Yes, I've read the threads, got the tools, have an experienced mechanic standing by and I'm still dreading this job.
While I'm not having any w/p difficulties at the moment, I'm replacing the a/c compressor so I figured I better do this now than later. Nice brand new w/p with metal spinny-thingy, housing gasket, Right Stuff but I'm a bit low on the motivation.
Oh man alive, wish me luck.
IP: Logged
02:58 PM
PFF
System Bot
ltlfrari Member
Posts: 5356 From: Wake Forest,NC,USA Registered: Jan 2002
I've replaced both of those things on my 88 duke. If you get stuck, let me know. A few pointers... To make replacing the water pump easier, undo the engine mount bolts, the dog bone, and jack up the engine a bit. Use a "power steering pump pulley puller" and take the pulley off. The AC compressor comes out the bottom with some difficulty because of the exhaust. Remove the springs on the AC side of the exhaust to make it easier. And be careful -- mine hit me in the head when I worked it past the exhaust. Most V5 compressors come with a R12 control valve installed. Replace it with a R134a valve. You can get one here. Best price I've seen.
My motivation which was poor at best just took a hit, the mechanic was called away on a family deal. I so totally understand, family comes first. Granted, I can do this myself but the shop mechanic sees things differently than I, always knows an alternative method of doing things besides, two people always seems to make the job go faster.
So I go again, alone on yet another dramatic Fiero adventure with this theme music
IP: Logged
08:51 AM
josef644 Member
Posts: 6939 From: Dickinson, Texas USA Registered: Nov 2006
I removed the compressor from my 86 Duke because I forgot to add 4 oz of compressor oil before I installed it. Wasn't to bad. I have also switched out the water pump . I used a 13 mm open end/box end wrench. just install all of its bolts and the gasket before you tighten any of them. Then just draw them in a bit at a time so the pulley doesn't hit the bolt heads. My water pump pulley had two grooves. This way was slow but not difficult. Removing the alternator and putting it back was harder I think, than the water pump.
Joe
IP: Logged
05:50 PM
solotwo Member
Posts: 5374 From: Grand Rapids, MI. USA Registered: Jun 2002
Did the water pump and later the belt tenisoner. I didnt have to undo any engine mount bolts that I recall. If I remember I accessed some of the bolts thru the wheel well. Good luck. I have been working on brakes this afternoon and evening just completed the drivers side front now on to the passenger side. The rears I did last weekend.
IP: Logged
10:13 PM
jetman Member
Posts: 7793 From: Sterling Heights Mich Registered: Dec 2002
Today I only got things started by removing the battery and shield, draining anti-freeze and removing the a/c accumilator. Put the battery on trickle charge, took the wrong accumilator back to auto parts store. I put a "bribe" of a couple cases of Coke in the mechanics office too. I did however perform a full steam cleaning of both my 88 Fieros, seats and carpets. They both came out sweet but man alive, it was alot of wrok.
quote
Originally posted by josef644:
I removed the compressor from my 86 Duke because I forgot to add 4 oz of compressor oil before I installed it.
Thanks for posting that, I didn't know about adding any oil, will have to call both the auto parts store and Fix-n-Go as they're going to charge it up after I install the new parts.
quote
Originally posted by solotwo: I have been working on brakes this afternoon and evening just completed the drivers side front now on to the passenger side. The rears I did last weekend.
I'm telling you, I have my brakes dialed in just right including e-brake. I was looking at all of this today thinking that I would love to do a cradle drop, you know, get a clean shot at w/p and a/c compressor but I didn't want to mess with brakes.
This is the car that I did the full cradle drop on before, not like I have to worry about capture nuts spinning or siezed bolts /nuts. I'll have to sleep on this one......
IP: Logged
11:54 PM
May 2nd, 2010
TopNotch Member
Posts: 3537 From: Lawrenceville, GA USA Registered: Feb 2009
I didn't know about adding any oil, will have to call both the auto parts store and Fix-n-Go as they're going to charge it up after I install the new parts.
Most new or re-manufactured compressors have a message on the compressor or on the included paper-work stating that they are supplied without oil, and that you should add some. The proper procedure is to drain your old compressor, measure how much oil you drained, and add that much to the new one. Add more than what you drained if your system was oil-starved. There is a drain plug in the side of the compressor.
IP: Logged
09:48 AM
solotwo Member
Posts: 5374 From: Grand Rapids, MI. USA Registered: Jun 2002
That V5 compressor does have a drain hole on one side. Pull the drain plug. I used a turkey injector to add the oil. The hole was to small for any funnel I had here at home. After plugging the drain hole, use the proper socket on the center of the electric clutch to turn the compressor over a good half a dozen times before you put it back in the car. I didn't have an old compresor to drain ,so I added 4 oz of PAG oil.
IP: Logged
10:30 AM
May 3rd, 2010
jetman Member
Posts: 7793 From: Sterling Heights Mich Registered: Dec 2002
Thanks for the A/C information, this is what makes this forum great.
Ok, I'm looking at this from 2 viewpoints, cradle drop or lift the engine. TopNotch mentioned lifting the engine, do I need to undo all the mounts or just the main motor mount under the ballancer and tilt the engine up on that side?
Does that pulley need to be pressed on to the new pump or is that just tightened on with a wrench on the bolt? I was thinking about installing the pump with the 7 bolts first then putting the pulley on.
IP: Logged
10:51 AM
jetman Member
Posts: 7793 From: Sterling Heights Mich Registered: Dec 2002
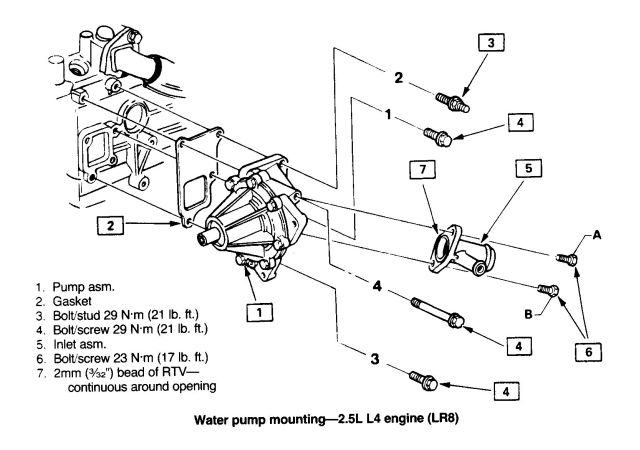
Sorry, I looked in my 86 and 88 FSM and didn't find a picture for you.
The pulley for the water pump is 'pressed' on the shaft. You have to use a GM power steering pump pulley remover tool to take it off, and to put it back on the pump. They rent at Autozone for around 35. You get your money back when you are finished with it.
[This message has been edited by josef644 (edited 05-03-2010).]
IP: Logged
01:59 PM
TopNotch Member
Posts: 3537 From: Lawrenceville, GA USA Registered: Feb 2009
TopNotch mentioned lifting the engine, do I need to undo all the mounts or just the main motor mount under the ballancer and tilt the engine up on that side?
Just the main mount, and tilt the engine up. Remember, this is just for the water pump replacement (not the AC).
quote
Does anyone have a clear diagram, parts schematic or exploded view of the A/C compressor and brackets?
There's probably one in the Helms (factory service) manual. You really don't need it, though. To remove the compressor, put the car on jack stands, remove the right rear wheel and the splash guard. (Get a new splash guard from Rodney Dickman if yours is all torn up.) The compressor is held in place by three bolts on the front end, and three smaller bolts on the back end. The back end bolts are on a bracket which must also be removed. It is held onto the engine block by two bolts. The front end bolts use 3 of the 4 mounting tabs on the compressor. One is not used.
IP: Logged
02:18 PM
jetman Member
Posts: 7793 From: Sterling Heights Mich Registered: Dec 2002
Originally posted by TopNotch: Just the main mount, and tilt the engine up. Remember, this is just for the water pump replacement (not the AC).
Ok, I understand now and after I looked, if needed, I can loosen up the mount on the other side. That will be my game plan now, out the top!
Now another question please for the experts. Removing the pulley makes the removal job easier, what about the installation? The pulley has to be pressed on first, right? How do you guys work around the pulley during installation?
I bet that you have a nice "view" of the a/c compressor without the water pump in the way too.
edit speling
[This message has been edited by jetman (edited 05-03-2010).]
IP: Logged
02:47 PM
jaskispyder Member
Posts: 21510 From: Northern MI Registered: Jun 2002
I changed out a water pump on an 88 coupe. I removed the A/C compressor at the same time. As for getting to the bolts behind the pulley, I just used standard wrenches. It was simple. I also changed out a pump on an 84, same thing.
The problem with the 88 was the A/C compressor was in the way (the bracket actually). The A/C didn't work on this car, so I just left it off.
J.
IP: Logged
02:58 PM
TopNotch Member
Posts: 3537 From: Lawrenceville, GA USA Registered: Feb 2009
Now another question please for the experts. Removing the pulley makes the removal job easier, what about the installation? The pulley has to be pressed on first, right? How do you guys work around the pulley during installation?
The tool I used to remove the pulley was also used to install it (another part of the tool, actually). I bought mine at Pep Boys for about $30, I think. It was described as a GM Power Steering Pump Pulley Puller/Installer. More expensive than renting one (since you get your money back from that), but I now have one to loan to other members of our Fiero club.
[This message has been edited by TopNotch (edited 05-03-2010).]
IP: Logged
03:04 PM
PFF
System Bot
jetman Member
Posts: 7793 From: Sterling Heights Mich Registered: Dec 2002
If I understand this correctly, use the special tool to remove the pulley, remove water pump, install new water pump and then use the special tool again to "press on" the pulley. I can borrow the tool from the auto parts store. I don't have to mess around with the water pump housing either, that's a plus. This really isn't a nightmare Fiero job as I first thought from looking at it.
While I'm at this, I'll document this with pictures, seeing as i just got my camera back from Canon factory service.
Thanks again everyone, the green pluses are on me today! (I think everyone already had one but nevertheless)
edit a nice chart for future reference,,,,
[This message has been edited by jetman (edited 05-06-2010).]
IP: Logged
03:26 PM
May 26th, 2010
jetman Member
Posts: 7793 From: Sterling Heights Mich Registered: Dec 2002
Just a quick little update. I've been busy on other projects like steam cleaning out both of my 88 "Fiero's. Man alive, even with our professional truck mount equipment, it's still alot of work but the results were terrific.
I have installed the "correct" accumilator and filter orfice. Our shop mechanic loaned me the pulley puller tool set. Now get this everyone, I did not have to raise the engine to pull the water pump pulley. I was able to work the tool under the battery tray, plenty of room working through the tray and from underneath with wrenches. I'll post pictures sometime soon for everyone.
Tomorrow I will pull the pump and possibly the compressor too. I've been taking baby steps on this project, working a little after work when I am able.
IP: Logged
09:26 PM
Jul 3rd, 2010
jetman Member
Posts: 7793 From: Sterling Heights Mich Registered: Dec 2002
Both the pump and pulley are back on the engine. I ended up taking an air powered cut off wheel and removing the center section of the battery tray to afford access for the pulley installing tool. That worked out like a champ and I'll clean up my cut with a grinding wheel then paint it prior to installing the battery.
While it was my goal of keeping everything as GM stock as possible, cutting out the small piece was the way to go and I'll reccomend it to anyone doing a water pump on Duke with A/C. That extra space means everything as you are articulating the pulley installing tool.
In as far as the A/C compressor goes, I'm taking a pass on it, I'll have the local shop install my compressor and charge the system up for me. Yeah, yeah, yeah, I'm getting soft but it took 2 stomach hernias, a twisted back and an infected root canal to stop me this time. I'm sure I'll feel better while driving around in my air conditioned car next weekend.
------------------ jetman Silver 86 SE 2M6 4-speed, with "check wallet light" Now fortified with 8 essential slices of bacon goodness
IP: Logged
07:49 PM
phonedawgz Member
Posts: 17091 From: Green Bay, WI USA Registered: Dec 2009
Just a little update in order to close out this thread.
The water pump is on, no leaks; the “Right Stuff” is absolutely fantastic stuff! There is a difference in pump impellers between 22-year old stock and a brand new pump impeller with the newer impeller looking a lot more aggressive. This may have been the reason that I didn’t have to fight as usual to burp the system. I will try to post up some pictures some day of the pumps.
A local licensed shop installed the compressor, added a R134 conversion kit, charged it up, check it out, everything is running excellent. I never had a car with A/C so this is rather exciting for me and it does blow ice cold.
All in all, I saved a boat load of money by doing a lot of my own wrenching, that’s always a good thing. I want to thanks everyone for the advice on replacing the water pump, sure it was a pain but I can pass along the tips to the next forum member doing this.
Seeing as my apartment doesn’t have A/C, you’ll probably see me and my 4 cats sleeping in the car at night, hehehehee.
IP: Logged
12:16 PM
Aug 1st, 2010
jetman Member
Posts: 7793 From: Sterling Heights Mich Registered: Dec 2002
Notice how much more aggressive the fins are on the new water pump.
Old pump.
New pump, fins are thicker, taller and more aggressive.
I’m telling you for fact, the burping procedure went far, far easier than anytime in the past. All things were equal except the pump, two burps, I was done. I was flabberghasted, this one always gave me raspberries about burping out.
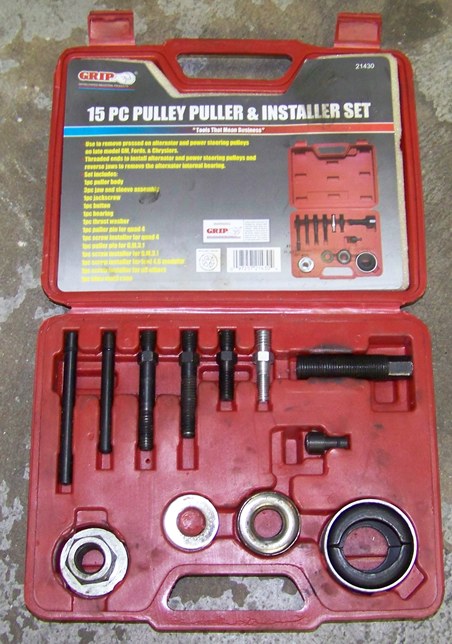
I used a pulley puller. The full kit (below) had a few more parts for universal usage.
The puller hooks up to the pulley, two parts then the sleeve, really simple.
I was able to articulate it through the battery tray without lifting the engine or anything.
Prior to installing the pulley on the new pump already on the engine, I took a cut off wheel and removed the small center section of the battery tray as marked by the red lines. To me, this was the easiest option and provided ample room to work with during reinstallation of the pulley.
If I ever have to change out a water pump, the very first thing I’ll do will be to cut the center section of the tray out, smooth the edges and I’ll have all the room I would ever need to work with. You can get at the puller tool from underneath without cutting the tray but the path of least resistance was calling me loud and clear.
The pulley puller is definitely the tool to use here. All those Duke pump horror stories are long gone once you get the pulley off, those water pump bolts are all easily accessible and was able to work everything from the top . Yes, I did look into removing the housing and pump w/ pulley from the block but I do have heat shields and there was the puzzle of getting the large assembly out of the engine bay. I've got A/C so out the top way the way to go.
Ok, there you go, almost as much work writing it up as doing the job but since it'll help my fellow forum members down the road, its well worth it.
------------------ jetman Silver 86 SE 2M6 4-speed, with "check wallet light" Now fortified with 8 essential slices of bacon goodness
[This message has been edited by jetman (edited 10-17-2010).]