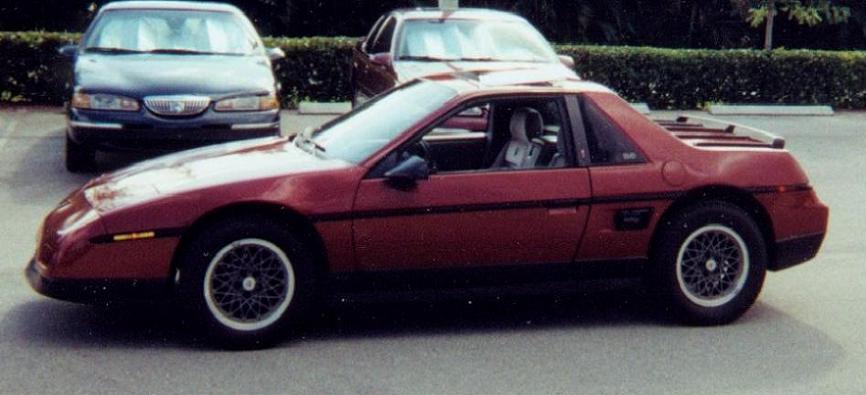
Some of you guys know me on here, I've been here for a while. Anyway, I've got a 1987 Pontiac Fiero SE / V6 that I've had roughly since I was 16 years old. I'll be 31 in April. I've had ~20 some odd other vehicles come and go throughout the years, but always managed to keep this one (it was my first car). I used it as a daily driver from 1995 all the way through 2000 and put about 100k+ miles on it. I've fixed it throughout the years, but mostly since 2000 it's pretty much just sat parked. It's been sitting in my garage now for several years, and I've accumilated about $5,000 to $6,000 worth of parts for it. All sitting in boxes up on shelves in my garage. Basically, everything I need (minus paint) to totally restore the car.
The car came pretty loaded as it was, but when I go through this process, I intend to add every other possible existing option I can, as well as maybe a few custom ones along the way. The primary intention of this rebuild though will be to keep the car as original looking as possible. Even my "upgraded" CD player is one from a 1990 Pontiac Bonneville that shares the same buttons and style as the tape deck that originally came in the 87-88 Fieros.
Anyway, I'll be keeping track of everything (as I do with all my projects and cars) on my website, http://www.PontiacPerformance.Net. I'll be hosting all my pictures there and posting major updates in this thread.
This rebuild thread won't be anything really custom or major... but it might help someone who's interested in restoring their own Fiero but at the same time:
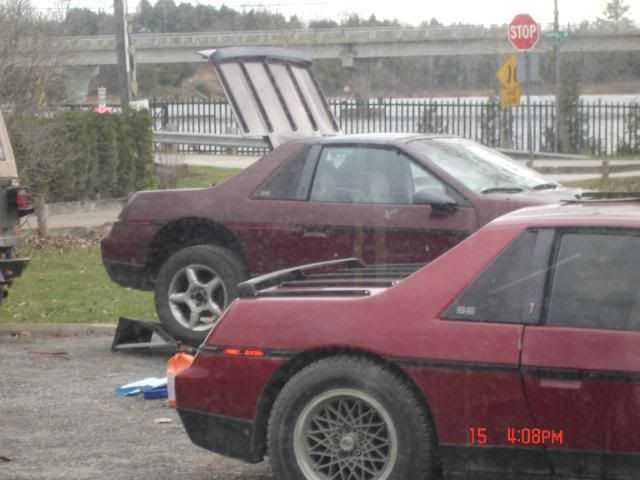
I have two '87 SE's both Burgundy/Black, they look identical to yours. both L44's. I am restoring the car in the background of the pic, it has a C&C T-Top fitted prior to delivery on April 6th 1987, it also has a Muncie/Getrag. No Air conditioning completely original except a poor quality repaint. it even has the original cassette player still.
IP: Logged
09:21 AM
82-T/A [At Work] Member
Posts: 24974 From: Florida USA Registered: Aug 2002
The paint looks like it's held up not too badly...
I'll be watching this one intently, since you're gonna be doing effectively what I want to do with mine
Yeah, I plan to start this next weekend. I'm going to start by pulling the engine. I typically like to pull it from the top just because I can take it out in pieces rather than have to worry about pulling an entire subframe out and everythin else at the same time. If I pull it from the top, I can easily put it on the stand an then worry about everything else later... in steps. The only major modification I will do (other than the motor being a 3.2 at this point) is swapping in a 4T60. I do have everything I need for a manual transmission swap, but the transmission is pretty shot... later on down the line I swap to that, but for now, I want a decent cruiser.
The paint actually isn't that awesome... it's kind of dissapointing. The paint is decent in most areas, but the clearcoat is starting to "craze" in areas around the top of the sunroof, the top of the decklid and at the very top of the front fenders... it's hard to see, but it's there.
I dissasembled a pretty rare 87 SE 5-Speed V6 a couple of years ago. It had NO options except A/C, WS6, and SE package. It must have been a quick little car. The motor is shot (I'm growing flowers out of the cyl holes in the back yard now in my garden), and I absolutely could not get a new title for it... so I stripped it. But it was unmolested so I was able to get a lot of rare parts that typically get lost... even stuff like wire loom holders and whatnot.
quote
Originally posted by rourke_87_T-Top:
I have two '87 SE's both Burgundy/Black, they look identical to yours. both L44's. I am restoring the car in the background of the pic, it has a C&C T-Top fitted prior to delivery on April 6th 1987, it also has a Muncie/Getrag. No Air conditioning completely original except a poor quality repaint. it even has the original cassette player still.
How is the paint on the one in the foreground? Have you thought about swapping those panels over? Or do you want to keep the matching VIN tags on everything (panels, etc)?
Don't know if you know... but the 87 SE is actually the rarest of the production Fieros. It's not really worth any more or less than other cars... maybe less than an Indy or a Formula, but it's the lowest production model made. They only made something like 1,700 V6 1987 SEs. And they only made 1,400 87 SEs with the 4 cyl in it.
The one in the background is a low mileage/kilometre's to be precise, T-Top. 2.8 / 282 Getrag. the car suffered a cheap paint job early in it's life. I am restoring it at the moment with many new and aftermarket parts and parts cars, paint is far down the list at the moment. The one in the foreground 2.8 auto, it has a lot of nice parts but it is my everyday driver, hauls the trailer around etc. eventually this one will be my car to modify. I just bought an Allante transmission yesterday and planning to put onto my '88 cradle etc.
[This message has been edited by rourke_87_T-Top (edited 03-25-2009).]
IP: Logged
09:32 PM
Oct 10th, 2009
Carcenomy Member
Posts: 1109 From: Invercargill, New Zealand Registered: Jan 2009
Ok, so I've actually started working on the Fiero. Work is still crazy, and I'm still going to school, but I've found a little time the past two nights and I decided to get out into the garage and start working on it.
I re-attached the trunklid and decided that I was going to start on the FRONT of the Fiero. I know the engine is good but there's a lot that needs to get done in back there. The front is all fairly straight forward and it will free up some space with the number of boxes I have all over the garage.
I pulled off the hood and it's resting on the roof. I then removed the passenger side front wheel, and removed the splash shield.
I'm actually REALLY thrilled with the condition of the car. The car's body itself (the actal space frame) has NO rust on it, at all... not even slight pitting that's caused by some surface rust. The black paint is faded into a dull dark grey, but otherwise the body looks great. I had a slight accident many years ago where I slid into the back of another car, and I can see what damage it caused. The honeycomb under the nose broke free from the bumper and there is a slight dent on the lip that the nose attaches to.
The first step I'm going to take is to rebuild the passenger side suspension with the new brakes, hub, and everything. I will be replacing EVERYTHING since I have all new parts (upgrades at that).
I've decided to go with STOCK WS6 springs (my car has the Y99 suspension). The WS6 springs maintain perfect ride-height, but provide significantly more stiffness. I currently have KYBs on it, but I'm going to go with Monroe shocks. My goal is to have a car that's tight and stiff around turns but not jarring like the KYBs (or KONIs for that matter) are.
I also want to maintain ride qualit, so I will be installing NEW rubber bushings on the top control arm to help deflect some of the road harshness and vibrations, and polyeurothane bushings on the bottom control arm to prevent control arm "deflection".
I'll go with new ball joints, a new wheel hub, new isolator bushings, bearings, a Beretta calipers, hubs, vented front rotors (with the cross-drilling and slotted upgrade), and everything else I can find.
I currently have Earl's steel braided brake lines which are ~6-7 years old... so I don't know if I should re-use them, but they probably have under 10k miles on them. I'm thinking that since I'm replacing ALL the brake lines with new stainless steel ones anyway, I should probably replace those too.
I'll post some pictures so far of the dissasembly tomorrow. I don't want to tear my car apart when I'm only working on one section (done that before... it's discouraging), so I'm going to focus on that area only until it's done. After I've done the passenger side, then I'm going to focus on the drivers side. When that's done, I'll re-do the steering rack, re-paint the front cross-member, re-do the radiator and anything else up front that I can see (including all the A/C hardware and seals) and then button it all back up.
One thing to note, even though the frame itself doesn't have any rust, the brackets which held the nose and the lower spoiler together are totally rusted. I'm going to either have to find replacements at the yard, or get some from Ed Parks.
I'm not doing such a great job of keeping up this page since it's taken me a million years to work on it. I've got the entire front end blown apart, and I'm re-doing the suspension and brakes right now. I'm just about done with the front passenger side and then I'll move on to the drivers side. When that's done, I'll finish everything else in the front that needs doing, including the brake lines, master cyl, A/C, cooling hoses, etc...
I'm not doing such a great job of keeping you motivated and paying attention to this thread!
Keep up the good work, the tidied suspension looks fantastic.
Thanks! Every little bit helps. I'm slowly getting there. I just don't have a lot of time, but I hope to use what little spare time I do have to keep the momentum going. I'm done with the passenger side, and now I'm cleaning up the entire front. I've removed everything off the front now, and I'm working to remove the steering rack.
I'll pull out the spare tire pan and clean everything up, repaint the entire front part of the chassis, and then put it all back together with new stainless steel brake (body) lines.
That reminds me, I need to get the bends redone on the lines going to my master cylinder, whoever did the RHD conversion didn't bend them tight enough, so the spare doesn't clear them when it's inflated. Very handy feature that
Keep the pix coming, it's a very lovely example.
------------------
IP: Logged
01:54 AM
82-T/A [At Work] Member
Posts: 24974 From: Florida USA Registered: Aug 2002
That reminds me, I need to get the bends redone on the lines going to my master cylinder, whoever did the RHD conversion didn't bend them tight enough, so the spare doesn't clear them when it's inflated. Very handy feature that
Keep the pix coming, it's a very lovely example.
No way! RHD conversion... I'd love to see it. Do you have any pictures?
I guess a Fiero RHD conversion probably isn't too bad since there's really nothing up front that would get in the way of anything...
There ya go! RHD conversions are relatively straight forward - the dashboard is symmetrical and the suspension isn't overly complicated. The trouble with both my '87 and the '84 before it is knowing what the rack they've used is from. I really have no idea what the '87 has! The '84's conversion was far neater, I must say - the '87s has the steering shaft on an odd angle that my foot gets caught on if I wear shoes while driving, and has no glovebox... you'll see what I mean in the pics
Funny really, might be on other sides of the world but our Fieros are pretty much identical
------------------
IP: Logged
01:41 AM
Sep 11th, 2010
82-T/A [At Work] Member
Posts: 24974 From: Florida USA Registered: Aug 2002
I'm still tearing apart most of the front end. I've got the spare tire tray out, the jack mount, washer bottle, overflow bottle, headlight motors, windshield wiper motor, brake master cyl, and the brake booster out.
The only thing left in the front that I have yet to touch is the A/C system. No matter what I do, I can't get the A/C "radiator" off (always forget what that's called). Pretty sad considering I'm MVAC certified and I don't even know what that radiator thing is called! hahah... I can't tell a condenser from an evaporator. But hey, I'm a computer programmer... I only got MVAC certified so that I could get R12 freon legally.
The steering rack is unbolted, but I haven't removed it from the steering shaft yet. I'll be replacing all the brake lines with brand new stainless steel lines I bought from the Fiero Store several years ago.
I've run into a couple of small snags, but I'm in no rush.
1 - How do I get the windshield wipers off? I know there's a little clip under the front inside of the wiper arm, but even when I attempt to pull that back, the thing still will not break free from the shaft? Is there a special tool?
2 - I THINK my A/C system has a leak. It hasn't worked in like 10 years. WHAT should I replace while I've got everything apart? The hoses still look good, but am I supposed to replace that cyl canister thing? Where is the expansion tube, and are there any filters or anything?
I also picked up a rock tumbler and dumped all my nuts and bolts in there. Should clean up nicely. $23.95 from Harbor Freight!
quote
Originally posted by Carcenomy:
There ya go! RHD conversions are relatively straight forward - the dashboard is symmetrical and the suspension isn't overly complicated. The trouble with both my '87 and the '84 before it is knowing what the rack they've used is from. I really have no idea what the '87 has! The '84's conversion was far neater, I must say - the '87s has the steering shaft on an odd angle that my foot gets caught on if I wear shoes while driving, and has no glovebox... you'll see what I mean in the pics
Funny really, might be on other sides of the world but our Fieros are pretty much identical
Damn, that's so funny to see. Yeah, I guess it's just missing the indentation on the inside where the map pocket goes. Otherwise it looks like it fits fine. They probably had to cut out the air box some when they installed the steering mount.
Figured I would make a quick update. I'm moved on to the other side of the car now. Progress is slow... but, I've got school and work, so... I'll get it eventually.
I didn't take any BEFORE pictures of the passenger side, so figured this time I would try to take SOME pictures of the progress.
Here it is before I really took too much off:
Here it is after taking a few more things off: Rotor, Steering rack, caliper bracket, caliper, brake lines, shock absorber, and some other stuff.
Here's the front of the car so far. I don't think I'm going to take the fenders off. I've decided I'm not going to do a TOTAL restoration. I'll do the paint at a later time. The paint is still decent enough on the car right now that I could drive it around and not be emberassed. I just want it to be mechanically sound, and clean up and paint all the areas that I affect. (like I did in the picture above)
I'm going to end up rebuilding the steering rack, and sand down and repaint everything I take off.
Couple of questions:
1 - I have a Steering rack from this car, and another one that I took off another car. How can I tell which one is better? Both were from 87s, one was a 5-Speed stripped out car (I THINK it had WS6) and the other one came off this car, which is an SE / V6 with Y99 suspension.
2 - How can I tell if the inner tie-rods on the steering rack are still good?
3 - I busted a bolt on the sway bar... ugh... no idea how to get that out.
4 - I checked my donor 5-Speed Getrag and it looks good. There is NO play at all in the gears. However, it's coated in a 1/2inch layer of oil crust. How can I clean this transmission? I was told that even if I plugged the holes, pressure washing it would be a BAD idea?
1. Count how many turns lock to lock. Fewer turns = quicker ratio rack
2. Pull off the bellows and check for play in the joint (pull it in and out). Should be no play/should not make a clicking sound.
4. brake cleaner, shop towels, & wire wheel. Drain and refill the Synchromesh after it's in the car anyway.
IP: Logged
10:56 PM
Sep 19th, 2010
82-T/A [At Work] Member
Posts: 24974 From: Florida USA Registered: Aug 2002
Thanks for the info RWD! I'll test it when I get in the garage later in the week.
Did a few more things, have some pictures (below).
I used Rodney's Ball-Joint Seperator tool again this time. Scared me sh1tless again each time one of them popped free. I loosened the threads a little bit, then use his tool and they pop free. First the top, then the bottom. Before I removed the bots completely, I attached a spring compressor (not in the picture), but honestly... I probably didn't need it. I then kicked the lower control arm while pulling the spring out to finally get it loose. (this is after the steering knuckle had already been removed and there was almost NO tension on the spring at all).
The lower control arm bolts are in there TIGHT!!! I'll get them off later in the week.
when i redid my balljoints. i had to cut the nut off. it would just spin the whole joint while turning the nut. i tryed everything to get it off. once i cut it off. i just used a hammer and it the top of the ball joint and tada! came out trying to put them in is another story.
IP: Logged
08:46 PM
Oct 15th, 2010
82-T/A [At Work] Member
Posts: 24974 From: Florida USA Registered: Aug 2002
I got everything blown apart on the drivers side. Sanded down and painted the control arms with epoxy paint. I put a second layer of epoxy on them, and then painted the entire wheel well opening with epoxy paint too.
I re-enforced the cross-member welds with complete welds across the entire area, then ground them down, and painted it too.
I'm going to put the bushings in tonight, and then put the entire suspension together this weekend. Then I can work on the brakes and stuff.
One thing I noticed... the replacement Fiero Store bolts (the upper control arm pivot bolt) has at least an additional 1/2" length to it than the stock OEM bolt. It's not a problem, but the clearance between the shock absorber and the bolt are PRETTY close.
It's an optical illusion in the picture because the shock is actually outboard of the bolt. As it stands right now, with the suspension FULLY retracted, there's only a half inch of space between it and the bolt. When the suspension compresses though, this clearance increases by another 1/2"
Great job. Don't you hate it when you go to install the spring, and it gums up your nice paint job?!
Yes, I absolutely do!!!
I actually have some touch-up paint. Ford Red, and generic black enamel. I used the touch-up paint to touch up all the extra parts that got scuffed. So it's not so bad. Of course, if I was going to use this car daily, it would be trashed within a year anyway... but I won't... it'll pretty much be a weekend warrior from now on.
Quick question guys... I ordered a set of TRW tie-rod ends for the front from Rock Auto. As it turns out, Rock Auto sent me actually a MOOG "Professional Series" tie-rod in a TRW box, and then a regular TRW tie-rod in a TRW box.
The MOOG one seems MUCH thicker and beefier. It has at least 20-25% more mass around the ball-joint socket than the actual TRW one did. Since I don't want to have mis-matched tie-rod ends... I acutally just ordered ANOTHER TRW tie-rod end from Rock Auto and figured that I would probably get the right one the second time around.
Is there really a huge difference between the "professional" series one, and the standard TRW tie-rod end?
TRW no longer makes tie-rods, but they are made in America and figured that at the very least, they would be made of a stronger alloy content than the ones made in China.
Just curious... is it worth it for me to order another $50 dollar tie-rod end and use the ones from MOOG?
Is it REALLY going to make a difference? In a sports car, even if I did some SOLO stuff... I doubt it would make a difference?
Hey that's looking good, I appreciate how much work is involved. The only Fiero that looks better than a Burgundy and Black SE is the Blue and Black SE.
IP: Logged
08:46 PM
PFF
System Bot
Oct 24th, 2010
DRWBRTq19 Member
Posts: 383 From: Jefferson City MO Registered: Jun 2004
Hey that's looking good, I appreciate how much work is involved. The only Fiero that looks better than a Burgundy and Black SE is the Blue and Black SE.
I agree, I LOVE the look of the factory Blue Fiero with the black ground effects on the aero-body. Actually, I guess there are TWO blue colors... aren't there? A solid medium blue in 87? and then the Medium Metallic blue ALSO from 87... both great colors... I really like that solid blue color... almost has like a satin look to it.
quote
Originally posted by DRWBRTq19:
Looking good man!
I'm curious what springs are those?
Drew
Thanks! I appreciate it. The springs are OEM style replacement springs from the Fiero Store that are meant as WS6 replacement springs.
From the Fiero Store's website:
84-87 FACTORY SPRING SET
Replace your factory suspension springs with The Fiero Store's OEM style replacements. These aftermarket springs are made to the GT WS6 style spring rates and heights. They will be a direct replacement for your GT or an upgrade to your non-GT Fiero.
Part # 59020 Price: $314.95
I then sanded them down, painted them with some etching primer, and hit them with solid red suspension epoxy. I didn't really want to make the suspension so glitzy and ricer-ish... but I just couldn't see myself putting everything back on completely "black." At least with the red spring, and the red caliper... it kind of "pops." As for the shock... I ended up re-using my KYB shocks in the front since they are still good. I just sanded them down lightly and painted them with white engine enamel.
The two US made discontinued front tie-rods from TRW that I bought from Rock Auto were completely different tie rods in identical packaging. They were dirt cheap since they were clearance, so I figured I'd order a 3rd, and just go with the matching set. The third one came in yesterday and it happened to be the LARGER of the two tie-rod end designs.
So looks like I'm ending up with the heavier duty ones!
... and some more new spare parts for the parts bin.
Same thing happened to me with the rear strut plates from Rockauto. Bought a 3rd to match one of the 2. Moog parts, guess they switched mfg sites or something.
Mark
------------------ 86 SE V6 4 speed 86 SE V6 Auto 2008 G6 GT "Street" Coupe
IP: Logged
07:30 AM
82-T/A [At Work] Member
Posts: 24974 From: Florida USA Registered: Aug 2002
Same thing happened to me with the rear strut plates from Rockauto. Bought a 3rd to match one of the 2. Moog parts, guess they switched mfg sites or something.
Mark
Yeah, kinda stinks... I SUPPOSE I could return the other one, but it's just not worth the hassle.
I'm wondering if maybe in my case, someone bought some cheap replacement ones, swapped them out and returned them, and then I happened to end up with one of those?
Quick UPDATE: I installed the front tie-rods in last night. It's nice to have the stronger beefier ones instead of the cheap looking small one I had originally installed.
I didn't rebuild my steering rack, and I didn't replace the inner tie-rods. The steering rack worked fine when it was pulled, so I didn't really see the huge need to do it. Even the outer tie rods seemed "decent" enough, but I felt that I might as well replace them. All I did was clean up the steering rack, paint the metal brackets, and re-attach it (none of the bolts broke when I removed them, and they cleaned up nice too).
The inner tie rods are tight enough that they still hold the entire tie-rod assembly in the air on their own, but I can move them easily by hand. The tolerances seem tight enough that they don't have any play... but I'll rebuild my spare WS6 steering rack one of these days, and then just swap it out. For now... it's inexpensive, puts the suspension and steering back to OE specs, and doesn't cost me any additional money. The front inner tie-rods are not something I NEED to do, or would want to do while the car is apart anyway.
Now I move on to the pedal swap, and finishing up the front brake lines...
EDIT: Quick new pic of the suspension with the brake line installed. I re-used my older stainless steel braided brake line, which was still OK. It had only been on the car for 4-5 years, with less than 10k miles total. I figured they were still decent. I also installed all new body lines from the Fiero Store. The lines are of really great quality... also stainless steel. They fit quite well, but I still had to modify the lines a little bit so that they would fit properly. They were pre-bent, but not perfect...
The "clamp" that I used on the control arm for the hose, I got from Harbor Freight. $2.99 for an assorted steel hose bracket set. So I didn't mess up the paint or have too much metal on metal contact, I bought a pair of eurothane window crank bushings (black) that I put between them. I used a bevelled flat-head screw with a nut on the other end. When I've got everything set... I might just put a single bead of JB weld in there to keep the nut from backing out.
I did a few more things this weekend. I stripped, then sanded / painted the whole front portion of the frame. Anything that I'm not refurbishing, I replaced.
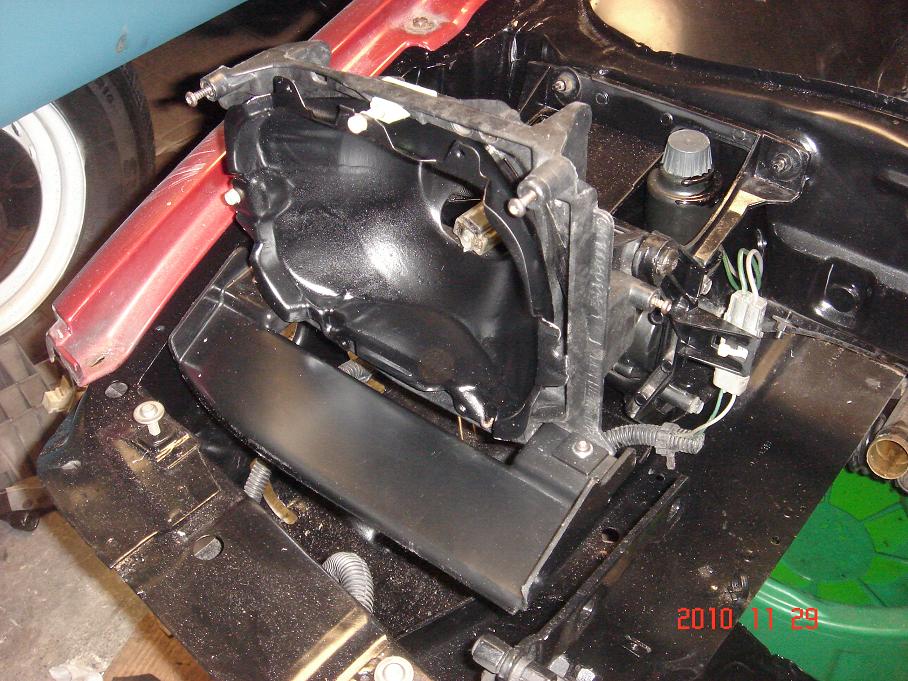
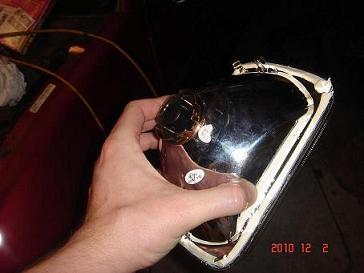
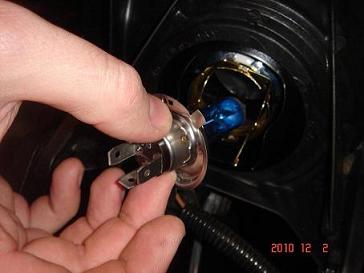
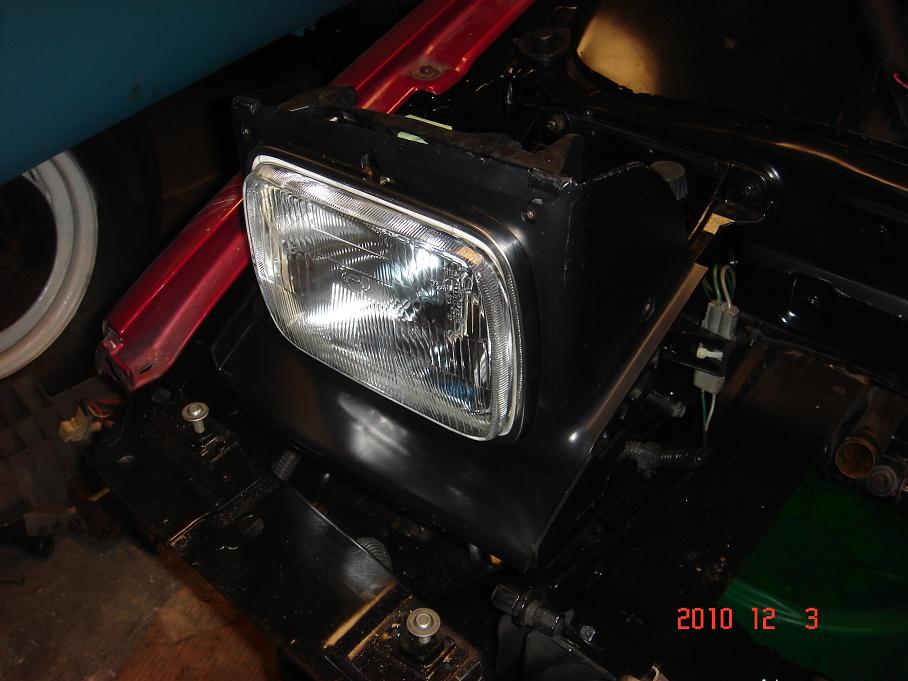
I started working on the cooling system by replacing the heater core hoses. Also started rebuilding the headlight assemblies. I rebuilt the headlights about 6 years ago... and after taking apart one of them, it's still perfect. I took everything else apart and lubricated all the plastic bushings and everything. I have to wait for my headlights to come in from the Fiero Store, but otherwise they're assembled / done.
Hope to also get the new radiator installed this weekend, as well as the upper part of the core support / rad bracket. I should also have the anti-sway bar re-installed this weekend which will completely finish up the front suspension.


![Click Here to See the Profile for 82-T/A [At Work]](/forum/Styles/CommonImages/emptyButton.gif)


 Great job. Don't you hate it when you go to install the spring, and it gums up your nice paint job?!