Pennock's Fiero Forum
  Technical Discussion & Questions - Archive
  Cruise Control Testing

T H I S   I S   A N   A R C H I V E D   T O P I C
  

Email This Page to Someone! | Printable Version


Cruise Control Testing by 2002z28ssconv
Started on: 07-26-2010 11:06 PM
Replies: 4
Last post by: masospaghetti on 10-05-2011 02:01 PM
2002z28ssconv
Member
Posts: 1436
From: Orlando, FL
Registered: Jun 2005


Feedback score:    (27)
Leave feedback


Total ratings: 50
Rate this member

Report this Post07-26-2010 11:06 PM Click Here to See the Profile for 2002z28ssconvClick Here to visit 2002z28ssconv's HomePageSend a Private Message to 2002z28ssconvDirect Link to This Post
It's been a while since our cruise control worked.
It worked fine, then I had clutch issues where I replaced the master and slave.
Then no worky. I suspected that the switch on the clutch was adjusted wrong.
But adjusting it didn't help.
The fuse was good.
The cable was attached to the throttle body.
So I just let it go and didn't worry about it.

Yesterday I decided to try and fix it.
I tested the switch by the clutch pedal.


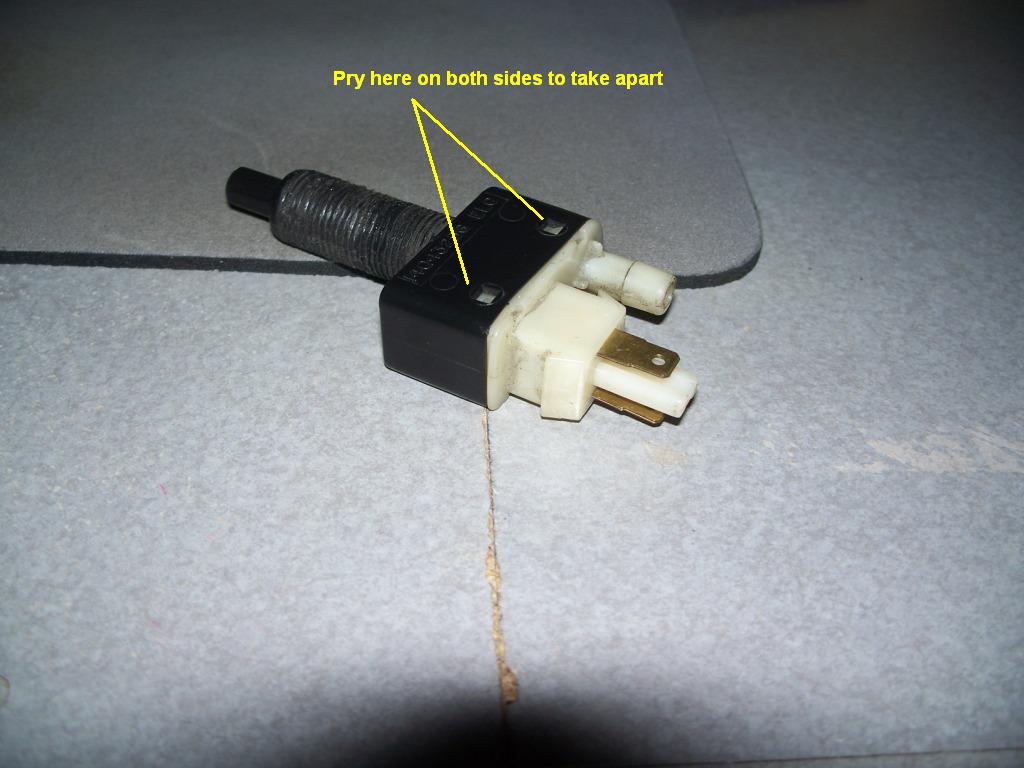
Using a multimeter set for continuity (and beep), it would test "open" most of the time and if I wiggled it it would sometimes "close" and beep.
So I removed it, took it apart and wiped all of the old goopy grease off the contacts.
I added new dilectric grease and put it back together.
It now tested good consistantly.

Nope - Still no worky.

I read the cruise control write up in Ogres Cave. I like pictures so I took a few.
There's a good write up there on how to test the multifunction stalk.
Mine was good. So on to the control module in the engine bay.

Here is how to test the ground, vent valve, engine vacuum, vacuum canister and diaphram. Unless otherwise stated, all tests were performed with the ignition OFF.

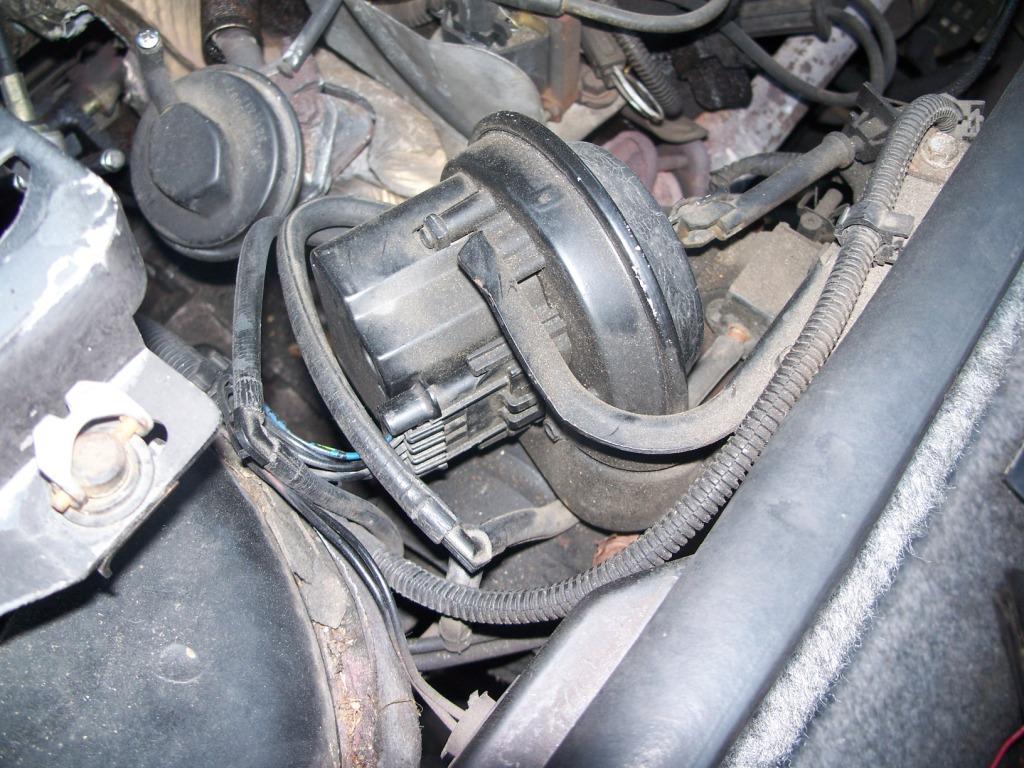
First off, a description of the parts involved.


The circled area is where the vacuum hose from the module plugs into the vent valve.


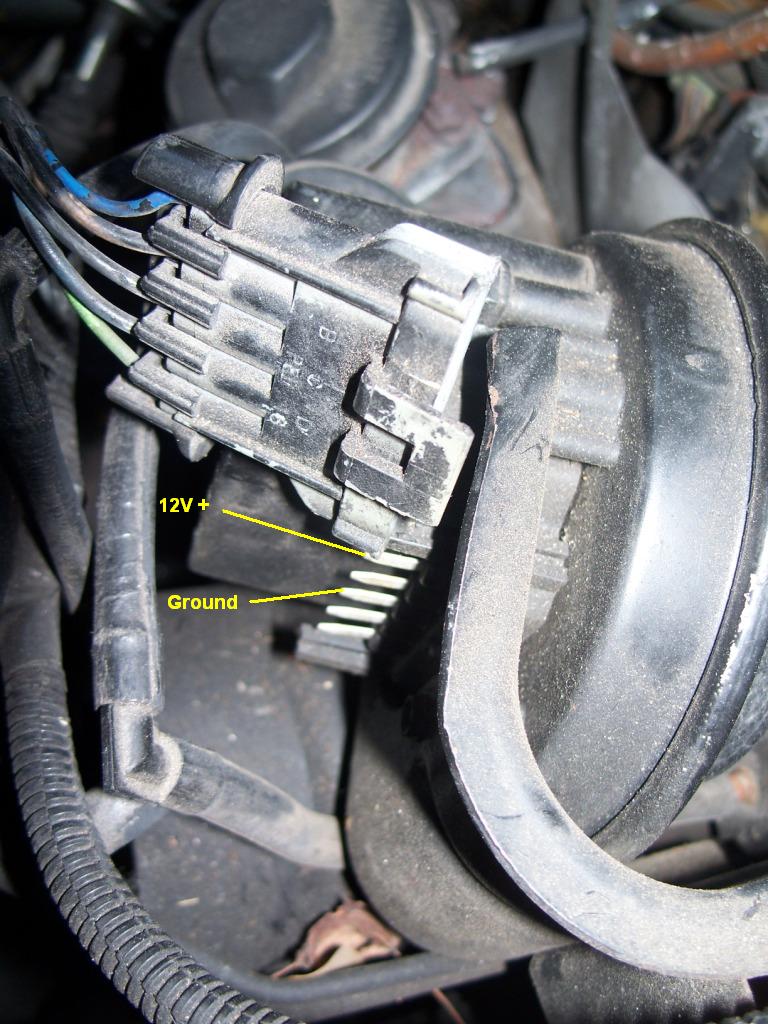
The connector plug here is unplugged. The pin layout is labeled A-E. You can only read the B C D though.
Below the connector, you can see the 5 pins that the plug connects to.
A is at the top. E is at the bottom.


Testing the ground:
With a multimieter, set for testing continuity, connect one test lead to contact C in the the connector plug and the other to a grounded point on the car.
If the tester doesn't go to zero, you have a bad ground.

Testing the vent valve:
If the vent valve is functioning properly, it will seal when contact C on the module (not the plug) is grounded and 12V + is sent to contact A on the module.
When you hotwire the vent valve you should hear a click. If you have a vacuum pump and enough hands you can hotwire the valve and apply vacuum to the top hose.
It should hold the vacuum until you disconnect the power from the contacts.
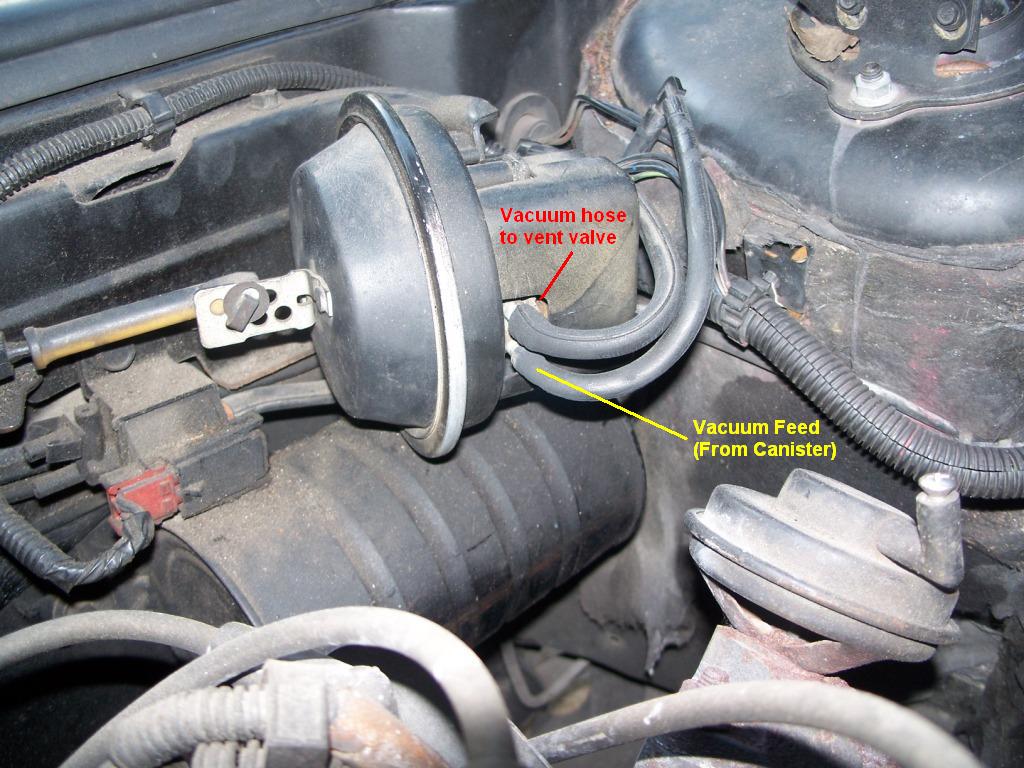
Testing the vacuum canister:
Remove the lower hose from the module. Apply vacuum with a pump. If it holds vacuum, the canister and one-way valve are working.

Testing the engine vacuum:
With the car running, disconnect the lower hose from the module. When you do this engine should slow and stumble a little. If it doesn't change, it's probably already running rough. If so, you have a vacuum leak somewhere. Insert the hose onto a vacuum gauge. Then shut the car off. Again, the vacuum should hold until the gauge is removed.

Testing the diaphram:
With the car running, disconnect both hoses from the module. Put the lower hose on the upper tube. The lower hose is a smaller diameter so be careful to not split the hose. When you disconnect the lower hose the engine should slow and stumble a little. Put your finger over the end of the hose to stop the vacuum leak. Apply power and ground to pins A & C again. You will see the diaphram start to suck in. Be ready for the RPMs to shoot up when you do this. As soon as you see that the diaphram is pulling in, disconnect the power and ground from A & C. The system will allow the vent valve to open back up and let air in.

While performing these tests, I found that a hose had developed a crack where it plugged into the vent valve. Snipping off the end of the hose and inserting it back onto the vent valve cured my problem and the cruise control works again.
IP: Logged
PFF
System Bot
2002z28ssconv
Member
Posts: 1436
From: Orlando, FL
Registered: Jun 2005


Feedback score:    (27)
Leave feedback


Total ratings: 50
Rate this member

Report this Post07-27-2010 11:12 AM Click Here to See the Profile for 2002z28ssconvClick Here to visit 2002z28ssconv's HomePageSend a Private Message to 2002z28ssconvDirect Link to This Post
WOW! A huge thanks to Fiero News dot Net !!!
This is the 88 Fiero manual downloadable PDF.
See page 1256 (Section 9B) for the cruise control info.

Now my question. I am swapping soon to a 3800 with OBDII. Everything I have read leads me to believe that the Fiero cruise control system will remain functional after the swap as long as I supply vacuum.

The manual says that the system was built into the ECM on cars with 2.5 engines.
Has anyone else who has done the 3800 swap been able to retain the factory cruise control system?
IP: Logged
mikeg3d
Member
Posts: 77
From: Ann Arbor, MI, USA
Registered: Sep 2011


Feedback score: N/A
Leave feedback

Rate this member

Report this Post10-04-2011 11:21 AM Click Here to See the Profile for mikeg3dSend a Private Message to mikeg3dDirect Link to This Post
Great write up! It did not go unnoticed!
IP: Logged
Tom Slick
Member
Posts: 4342
From: Alvarado, TX
Registered: May 2003


Feedback score:    (24)
Leave feedback


Total ratings: 66
Rate this member

Report this Post10-04-2011 05:30 PM Click Here to See the Profile for Tom SlickSend a Private Message to Tom SlickDirect Link to This Post
Awesome, my CC doesn't work. This should help me find the problem and fix it. Adding this to my favorites and giving you a '+'.
IP: Logged
masospaghetti
Member
Posts: 2477
From: Charlotte, NC USA
Registered: Dec 2009


Feedback score:    (10)
Leave feedback

Rate this member

Report this Post10-05-2011 02:01 PM Click Here to See the Profile for masospaghettiSend a Private Message to masospaghettiDirect Link to This Post
The fiero service manual has a very good troubleshooting procedure too. My CC didn't work originally and I had to fix the following

turn signal stalk
clutch pedal switch
brake pedal switch
vacuum dump valve
vacuum canister
poor grounding at servo
CC module

Normally it seems crazy all of these things would be bad but I checked them individually before and after replacement. The signal stalk had a fractured internal connection, the switches were dirty with high resistance, the vacuum dump valve was sticking open (so it was disabling the servo, always), the canister was rusted and leaking, I had about 35 ohms of resistance between the servo ground and the module ground...and lastly, with all of the above changed, it still didn't work. I changed the module last and it finally came together.

Anyway, be sure to check everything if your CC doesn't work...lot of parts to fail.
IP: Logged


All times are ET (US)

T H I S   I S   A N   A R C H I V E D   T O P I C
  

Contact Us | Back To Main Page

Advertizing on PFF | Fiero Parts Vendors
PFF Merchandise | Fiero Gallery
Real-Time Chat | Fiero Related Auctions on eBay


Copyright (c) 1999, C. Pennock