Pennock's Fiero Forum
  Technical Discussion & Questions - Archive
  LS4 / F40 swap - fieroguru (Page 6)

T H I S   I S   A N   A R C H I V E D   T O P I C
  

Email This Page to Someone! | Printable Version

This topic is 6 pages long:  1   2   3   4   5   6 
Previous Page | Next Page
LS4 / F40 swap - fieroguru by fieroguru
Started on: 12-13-2010 01:34 PM
Replies: 209
Last post by: fieroguru on 04-09-2011 10:21 PM
lou_dias
Member
Posts: 5271
From: Warwick, RI
Registered: Jun 2000


Feedback score: (3)
Leave feedback


Total ratings: 67
Rate this member

Report this Post04-07-2011 07:33 AM Click Here to See the Profile for lou_diasSend a Private Message to lou_diasDirect Link to This Post
Could I ask what your material costs for the flywheel were in total?
IP: Logged
fieroguru
Member
Posts: 12153
From: Champaign, IL
Registered: Aug 2003


Feedback score:    (45)
Leave feedback


Total ratings: 258
Rate this member

Report this Post04-07-2011 10:43 AM Click Here to See the Profile for fieroguruSend a Private Message to fieroguruDirect Link to This Post
 
quote
Originally posted by lou_dias:

Could I ask what your material costs for the flywheel were in total?


The materials cost was $160.63 for the aluminum, wear strip and ring gear.

I scored the aluminum 2 1/8" thick, 12" disk on ebay for under $100 shipped, the friction surface also came from ebay for $50 shipped and the ring gear was about $16 shipped from Amazon (wife is a Amazon Prime member = free shipping).

[This message has been edited by fieroguru (edited 04-07-2011).]

IP: Logged
fieroguru
Member
Posts: 12153
From: Champaign, IL
Registered: Aug 2003


Feedback score:    (45)
Leave feedback


Total ratings: 258
Rate this member

Report this Post04-07-2011 06:32 PM Click Here to See the Profile for fieroguruSend a Private Message to fieroguruDirect Link to This Post

fieroguru

12153 posts
Member since Aug 2003
[Sidetrack]
I came across a truck water pump for $5 + shipping and was curious how it would interfere, and since I haven't seen these before in any of the other LS4 threads I decided to share them here.

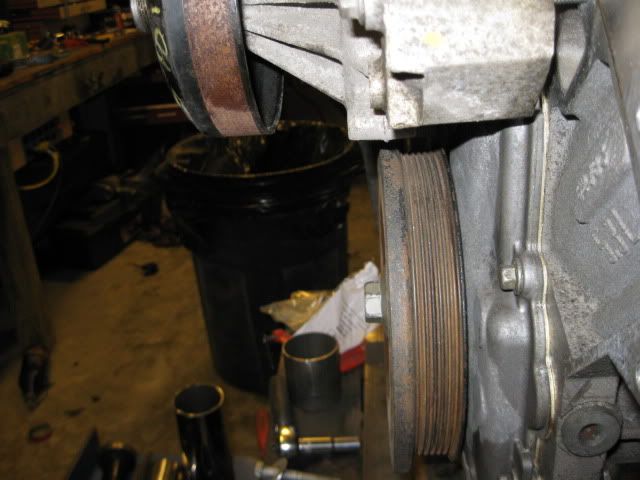
I needed to disconnect the rear engine mount to slide the water pump in place... the engine moved less than 1/16" with the 3 other mounts holding it in place. I also had to remove the cam sensor since this water pump sits right on top of the sensor hole. After those two parts are removed, the water pump then hits the bolt boss for the cam sensor and keeps the water pump about 1/4" to 3/8" from the block face. If you were to mill down the boss and clearance the timing cover slightly, then the water pump would sit flat, but I an not sure the cam sensor would ever clear the water pump (maybe it could be notched, or you could switch the the RWD timing cover... but then you may need to switch ecm calibrations and you might lose DoD):


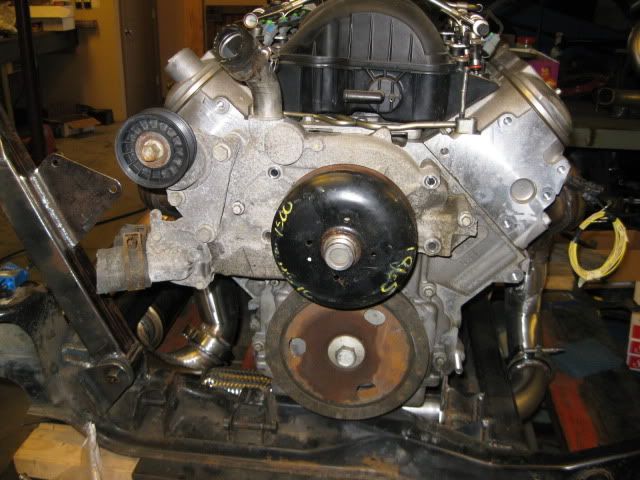
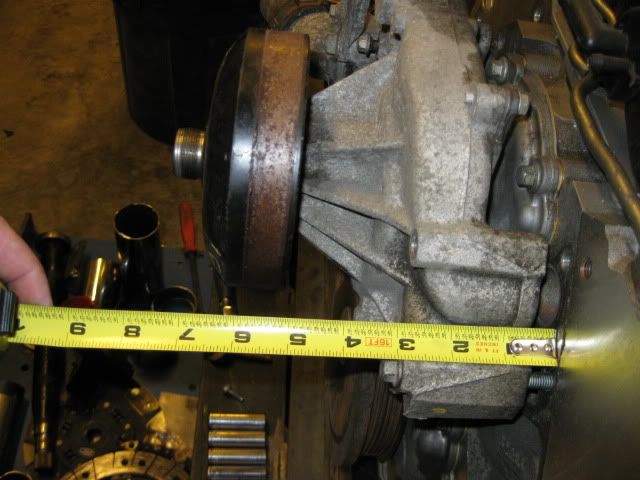
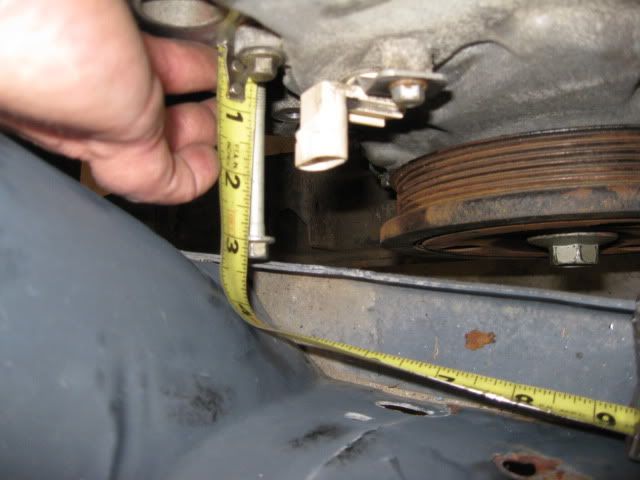
There is about 1/16" between the balancer and the bottom of the water pump... not a show stopper since you can't use the LS4 balancer anyway:


Side profile shot to show the relative depths of the balancer and the water pump pulley. Granted the Camaro/Vette pumps have the deeper pulleys, but the LS4 balancer protrudes about 2 3/4" from the block face and the RWD water pump body when mounted flat against the block protrudes about 2 3/4" as well. So the outer edge of the belt driver will be in the 3 3/4 to 4" range from the face of the engine, which is beyond the capabilities of the LS4 balancer... so it would need to be replaced with a RWD balancer.


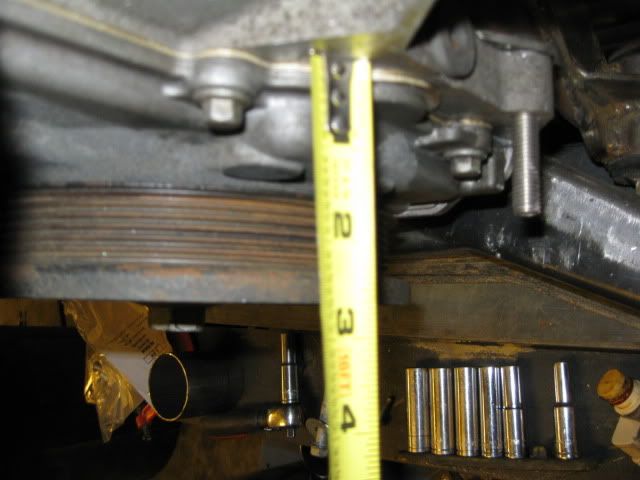
One of the larger challenges is the thermostat housing that protrudes out even further right where the frame rail is pinching in. What I was pondering is just cutting the entire left side of the pump off after the mounting bolts/engine coolant passage and then welding on a new pump inlet that went down and under the balancer to the passenger side coolant tube. They you would also need to weld a thermostat housing to the coolant outlet at the top of the pump. Since the pump protrudes about the same distance as the LS4 balancer, it probably would just barely clear the frame rail... the the pulley is another story.


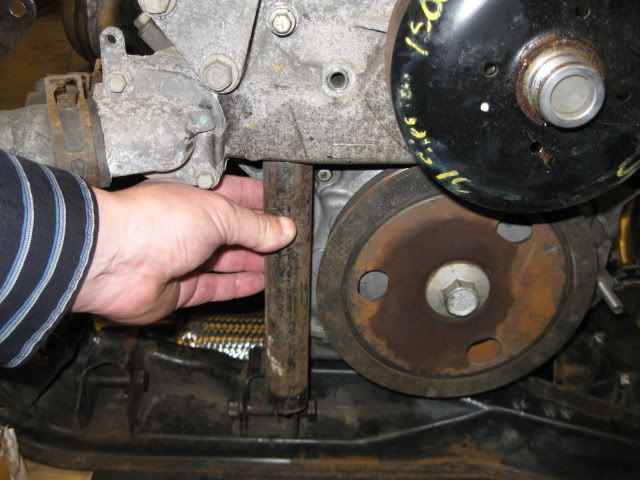
From the pictures above, if you put the belt drive at 3 3/4" to 4" a frame notch on the passenger side is going to be required... unless you move the drivetrain about 1" to the driver side which will require a frame notch on that side with the F40, but maybe not on other transmissions.

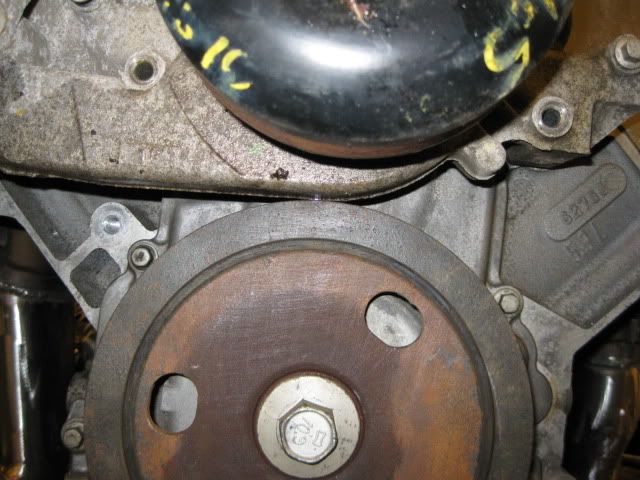
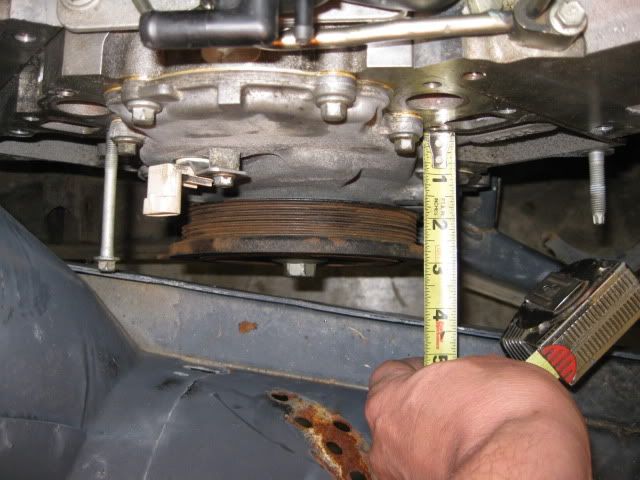
The other thing to take note of is the pump pulley is centered (vertically) between the outer most water pump bolts. With the engine as low as reasonably possible, the top of the frame rail is level with the bottom most water pump bolt. So if the engine was slightly higher a custom pulley could be designed to help it clear a slightly modified frame rail. This pulley would need to have a very small diameter above the frame rail and then enlarge for the belt portion.

So what does this all mean... I think there is a remote possibility that a significantly modified RWD pump could be used for the LS4 application. To do so it would probably be best to mount the engine about 1" higher than mine and about 1" further to the driver side to avoid a passenger side frame notch, but with the F40 you would be notching the driver side, with some of the other transmissions you might be able to avoid the driver side frame notch. Doing this drive-train shift should also allow the drive-train to clear the passenger side deck-lid hinge box. This water pump may require changing the timing cover and cam sensor location as well... and unlike my modified LS4 water pump housing that has a removable water pump insert, the RWD water pumps are replaced as an assembly. So once you modify it, you are locked into using that housing and when the water pump goes out you will either have to repeat the modification process or rebuild your modified housing.

The nice thing with the RWD pump is the modifications to it are probably less extensive than what I did on the LS4 pump housing and you end up with WAY more room to put the AC and Alternator on the front side of the engine. When I get bored or inspired I might start hacking into this RWD pump... but the last thing I need right now are more distractions/delays to finishing my current setup.

[/Sidetrack]

IP: Logged
Bloozberry
Member
Posts: 7760
From:
Registered: Jan 2009


Feedback score: N/A
Leave feedback


Total ratings: 311
Rate this member

Report this Post04-07-2011 07:16 PM Click Here to See the Profile for BloozberrySend a Private Message to BloozberryDirect Link to This Post
 
quote
Originally posted by fieroguru:

... but the last thing I need right now are more distractions/delays to finishing my current setup.


Now get to work!
IP: Logged
fieroguru
Member
Posts: 12153
From: Champaign, IL
Registered: Aug 2003


Feedback score:    (45)
Leave feedback


Total ratings: 258
Rate this member

Report this Post04-09-2011 01:13 PM Click Here to See the Profile for fieroguruSend a Private Message to fieroguruDirect Link to This Post
Put the engine/trans/cradle back in the chassis to located and tack weld the rest of the exhaust system:


Then took it back out again to work on the exhaust hangers:


Installed the sway bar just to make sure the new hangers will clear the motion of the sway bar:


Then quiet time came, so I have to wait till after naps to start fabricating the exhaust hangers.

I found a guy on ebay that sells heat shrink tubing on Ebay in 20 foot lengths, so for about $16 shipped I go 20' of 1/8, 3/16 and 1/4.
IP: Logged
88GTS
Member
Posts: 104
From: North Vancouver, BC Canada
Registered: Oct 2004


Feedback score: N/A
Leave feedback

Rate this member

Report this Post04-09-2011 06:00 PM Click Here to See the Profile for 88GTSSend a Private Message to 88GTSDirect Link to This Post
 
quote
Originally posted by fieroguru:
I found a guy on ebay that sells heat shrink tubing on Ebay in 20 foot lengths, so for about $16 shipped I go 20' of 1/8, 3/16 and 1/4.


That's a very good price! Please share your eBay source.
IP: Logged
fieroguru
Member
Posts: 12153
From: Champaign, IL
Registered: Aug 2003


Feedback score:    (45)
Leave feedback


Total ratings: 258
Rate this member

Report this Post04-09-2011 07:45 PM Click Here to See the Profile for fieroguruSend a Private Message to fieroguruDirect Link to This Post
 
quote
Originally posted by 88GTS:


That's a very good price! Please share your eBay source.


eBay member: redgriffinthree
Here is one of my auctions:
http://cgi.ebay.com/ws/eBay...geName=STRK:MEWNX:IT
IP: Logged
fieroguru
Member
Posts: 12153
From: Champaign, IL
Registered: Aug 2003


Feedback score:    (45)
Leave feedback


Total ratings: 258
Rate this member

Report this Post04-09-2011 07:59 PM Click Here to See the Profile for fieroguruSend a Private Message to fieroguruDirect Link to This Post

fieroguru

12153 posts
Member since Aug 2003
The exhaust hangers are done!

The idea is for the exhaust to rock back and forth with the engine (engine will not move much, but it will move), so I wanted the exhaust hangers to attach to the drivetrain and then cantilever out over the sway bar to support the muffler and tail pipe section. The hangers needed to allow for a slight amount of movement to the rear and to the driver side for thermal expansion, but still solidly hold the muffler/tail pipes.

I decided to make some stainless steel hangers from some of the left over exhaust pipe (16ga). Flatten it, cut it to shape and then weld it to the exhaust tubes. The 16ga material should allow some thermal expansion movement.


Then it was a matter of making the long brackets that would connect to the drive train. For the tranny side, the transmission case bolts around the differential were in the right general location, so I used them. The material is the "L" section I removed from the rear crossmember for muffler clearance. I did have to weld on a bracket to pickup the 2nd differential bolt and weld on the end piece that will attach to the stainless tabs on the exhaust. Using an angle section on this side will allow the bracket to rotate slightly to accommodate some expansion between the two rear hangers.


The passenger side one is just some 1x1 square tubing welded to the rear engine mount bracket and the tab welded to the end to connect to the stainless steel tab.


Now I can break the tack welds holding the muffler in place and remove the exhaust for the finish welding. The lower section of the exhaust is held in place with 4 bolts. 1 bolt on each V-band clamps and the 2 bolts at the tail pipe hangers... it will be rather quick to remove this in the future... my old SBC swap had 6 safety wired bolts and 2 hanger bolts and it took some time to remove.
IP: Logged
Bloozberry
Member
Posts: 7760
From:
Registered: Jan 2009


Feedback score: N/A
Leave feedback


Total ratings: 311
Rate this member

Report this Post04-09-2011 08:53 PM Click Here to See the Profile for BloozberrySend a Private Message to BloozberryDirect Link to This Post
Wouldn't it have been easier to weld smaller brackets to your rear cradle cross-member and suspend the muffler with springs like the OEM Fiero?
IP: Logged
fieroguru
Member
Posts: 12153
From: Champaign, IL
Registered: Aug 2003


Feedback score:    (45)
Leave feedback


Total ratings: 258
Rate this member

Report this Post04-09-2011 10:21 PM Click Here to See the Profile for fieroguruSend a Private Message to fieroguruDirect Link to This Post
 
quote
Originally posted by Bloozberry:

Wouldn't it have been easier to weld smaller brackets to your rear cradle cross-member and suspend the muffler with springs like the OEM Fiero?


What is this "easier" word you are referring to... not sure I know what that means.

I am probably overly concerned about it, but with the flex pipe isolating the front manifold, the rear manifold is going to take the majority of any load from the muffler/tail pipe section bouncing around, so I was focused on minimizing it. If I had left the flex joint out, then it would have been shared between the two manifolds and then the springs would have probably worked just fine.
IP: Logged
Previous Page | Next Page

This topic is 6 pages long:  1   2   3   4   5   6 


All times are ET (US)

T H I S   I S   A N   A R C H I V E D   T O P I C
  

Contact Us | Back To Main Page

Advertizing on PFF | Fiero Parts Vendors
PFF Merchandise | Fiero Gallery | Ogre's Cave
Real-Time Chat | Fiero Related Auctions on eBay


Copyright (c) 1999, C. Pennock