This is my first attempt at a repair thread with photos, so if I mess if up, please, cut me some slack.
My first clue that the harmonic balancer or dampener was bad came while I was trying to set the timing. It seemed that the timing mark would move around on me. It kept jumping positions. I also heard a rattling noise from the front of the engine. While trying to change the A/C belt my hand brush the balancer on the crankshaft and it moved. In fact it spun around on the pulley. That’s when I put it all together and realized the balancer needed to be changed.

I ordered a rebuilt balancer from Damper Doctors in Redding, California (http://www.damperdoctor.com/).
This is not a reproduction damper or one made for another engine and remarked. This is a rebuilt Fiero damper, and it looks like new. They do very good work.
The first thing I did was to mask off the damper for painting. The damper arrived painted black. I wanted to paint the timing mark white.

So I masked off everything except the deep slot for the timing mark, then I sanded the area lightly, tacked it off (to clean off the sanding dust) and painted it with primer . . .

then with white. I put on about three coats and topped it off with a little clear, to try and protect it a bit.

The contrast between the black and white of the finished paint job make the timing mark so much easier to see. I did this job a few months ago and the timing was so easy to set after this. The mark almost glows when setting the timing.
I let the paint set while I then started removing to old harmonic dampener. I went to the local parts store (in this case Autozone) and checked out a harmonic balancer puller and an installer (they are two separate tool kits) from their free tool loan program.
Most parts houses loan expensive specialty tools like these.

To get to the front of the engine I took off the right rear wheel and in inside fender skirt and the dampener is right there.

First, I took off the four bolts on the face of the pulley,

then pulled out the center bolt. As I expected, as soon as I took out the center bolt a bit of motor oil came out of the center because the crankshaft seal was leaking.
Along with the dampener I also ordered a new seal.

So, I then attached the harmonic dampener puller to the front of the dampener. I put two bolts into two of the pulley bolt holes, on opposite sides so it pulls the pulley out straight. If it does not pull straight out the dampener will bind up and not come off. I snugged up the two bolts so they were even then started tightening the center bolt.
Within a few turns the dampener popped right off . . .
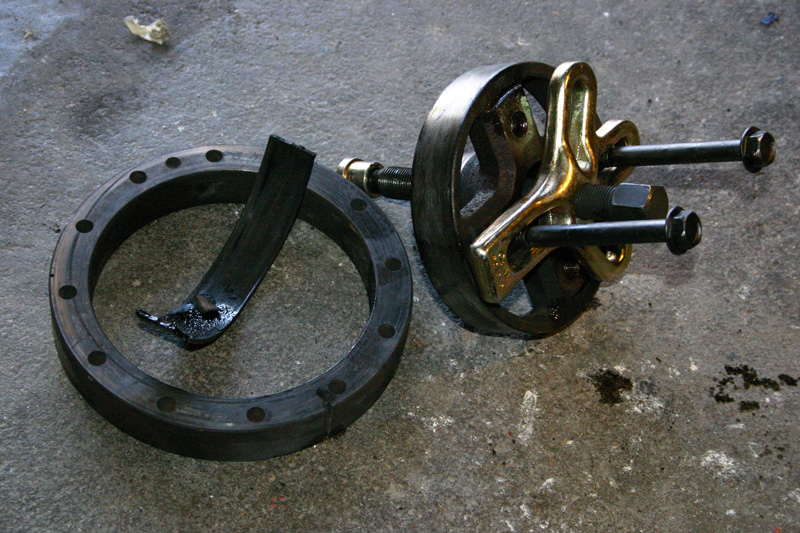
and the pieces fell to the floor.
Then I used an inexpensive seal puller to get the old oil seal out.


The seal puller helped a lot. It seems like it would have been a real pain to get the seal out without the puller.

This is the new seal and the 1 3/8-inch socket I used to drive the seal in.

I lined up the seal and tapped it in with a dead-fall mallet. It went in pretty easily.
The next step was to prepare the installation tool.

The kit is a universal installation kit so there are a lot of pieces that were not needed.

This is all that was needed. I assembled the tool on the dampener first to make sure I had it right.
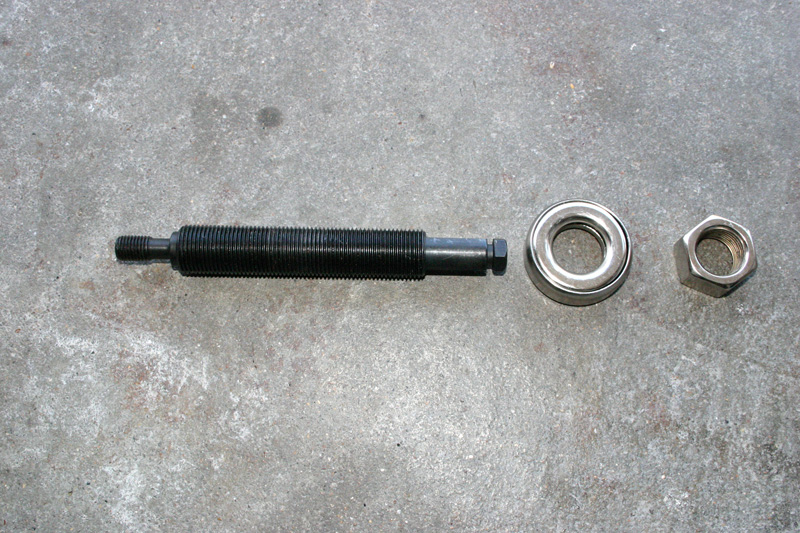
The bolt goes through the hollow, threaded shaft and the treaded fitting goes on the end. The fitting treads into the center of the crankshaft to pull the dampener on.
Then the bearing supplied in the kit goes on the end of the shaft followed by the nut.

The whole assembly slides into the harmonic balancer and then the end screws into the crankshaft.

At this point you just have to hold onto the balancer and tighten the nut. The balancer slides right onto the crankshaft and it’s done.
Then it’s just a matter of putting the pulley, belts, fender skirts and wheel.
The whole job took an afternoon. It was not bad at all.
------------------
Jim Martin
White '86 GT
California