Ok, there are a few old threads on this topic, and not sure what one to revive, so I figured I would just post a new one here..
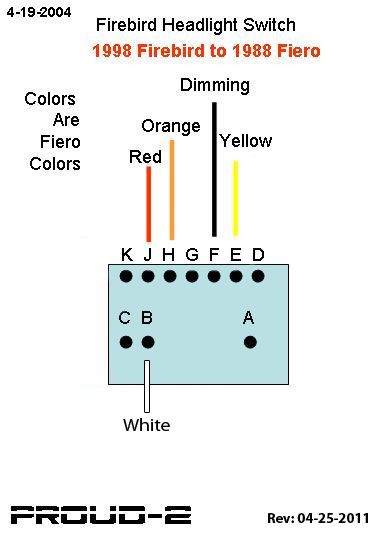
I have a couple of diagrams, that show 1998 Firebird to 1988 Fiero wiring. Is this diagram only good on the 88, was the wiring to the headlight switch different on previous years, namely my 86?
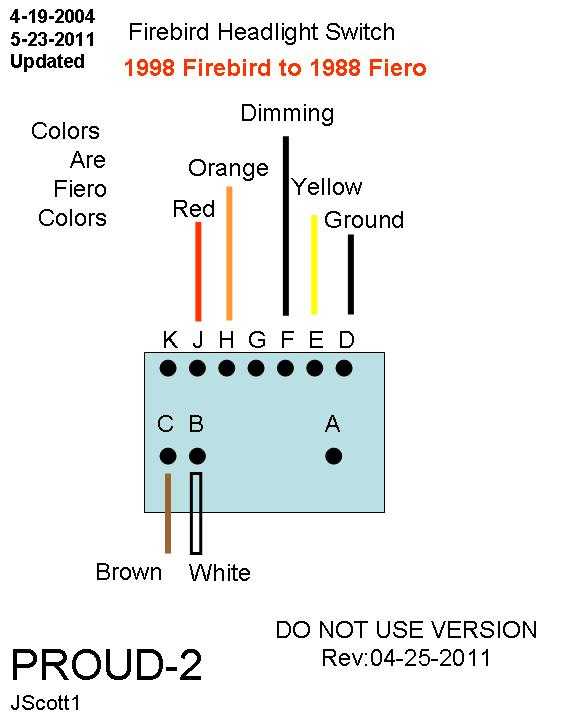
Here are the diagrams:
I am also a little confused, as I am not a wiring person
"D" in the wiring shows dimming on the Firebird, and NA on the Fiero, then ground next to it. Does "D" need to go to ground, I am not sure, as in the schematic "D" has nothing attached to it. If it does not go to "D" then where does then what line needs to be grounded? Maybe a ground is not needed to send to the lights/relays, but one of then needs to be grounded, as there is back-lighting on the switch. I am not an electrical guy, as I mentioned, but I do know that the back light bulb needs both positive and negative to work
IP: Logged
02:19 AM
PFF
System Bot
Mickey_Moose Member
Posts: 7568 From: Edmonton, AB, Canada Registered: May 2001
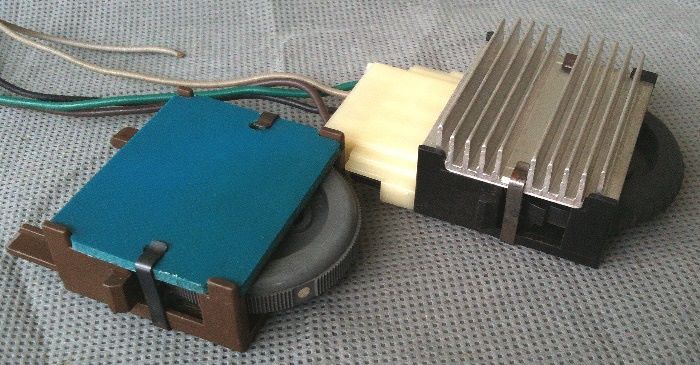
The one thing to remember here is that the Fiero has a 2 part switch dimmer vs. the Firebird which is an all in one package.
That being said, yes I would say D on the Firebird plug goes to ground - not sure why he didn't draw it in on the other diagram. Sometimes too many diagrams are bad.
I would need to look at the Firebird diagram to be 100% sure and it's been too long for me to remember what I did - and I really can't get to my car right now either to pull it apart to verify. If you are concerned, leave D disconnected, hook everything else up and try it - if things don't all work as they should connect D to ground - without the diagram I can't be sure if it was for the backlighting or part of the dimming circuit.
Sorry can't be of much better help.
IP: Logged
02:22 PM
JohnWPB Member
Posts: 5222 From: West Palm Beach, Florida Registered: May 2009
Thanks for the help, I will give it a go, but I am 99% certain the the back lighting will not work without a ground connected. I would like to know what is what, before I fry something
quote
Originally posted by Mickey_Moose:
The one thing to remember here is that the Fiero has a 2 part switch dimmer vs. the Firebird which is an all in one package.
I am not sure what you mean by this.... The Firebird dimmer wheel pops out of the switch plate, and the Fiero one does as well. They are actually the same exact size, and have the same clip placement for attaching them. I popped out the Firebird one from the switch, and replaced it with one from a Fiero switch. I heard the Firebird one will not work with the way the Fiero is wired due to the way the resistance or something is with the dimmer.
Here are the Fiero dimmer and the Firebird one side by side. The only difference I notice in appearance is the heat sink on the Firebird one, that I can easily un-clip and put no the Fiero one if needed.
IP: Logged
02:51 PM
TopNotch Member
Posts: 3537 From: Lawrenceville, GA USA Registered: Feb 2009
It appears as though the Firebird dimmer incorporates the dimmer transistor with the switch. On the Fiero, the transistor is under the dash. (Look under the dash, to the right of the steering column, and you'll see a similar heat sink.) You'd have to change some wiring to use that Firebird dimmer.
IP: Logged
03:04 PM
JohnWPB Member
Posts: 5222 From: West Palm Beach, Florida Registered: May 2009
I am just going to use the Fiero one for ease of install. It clips right into the Firebird switch housing perfectly. This way, no more wiring to get screwed up somewhere I am either going to replace the gray wheel with the one from the Firebird one, or simply hit the gray Fiero one with some black dye.
IP: Logged
03:07 PM
JohnWPB Member
Posts: 5222 From: West Palm Beach, Florida Registered: May 2009
Well, that was EASY! The 2 clips that hold the heatsinc on the Firebird one, and the blue plate on the Fiero one are all that hold the wheel in place. No small parts, springs or anything else in side. Took a whopping 30 seconds to swap the wheels.
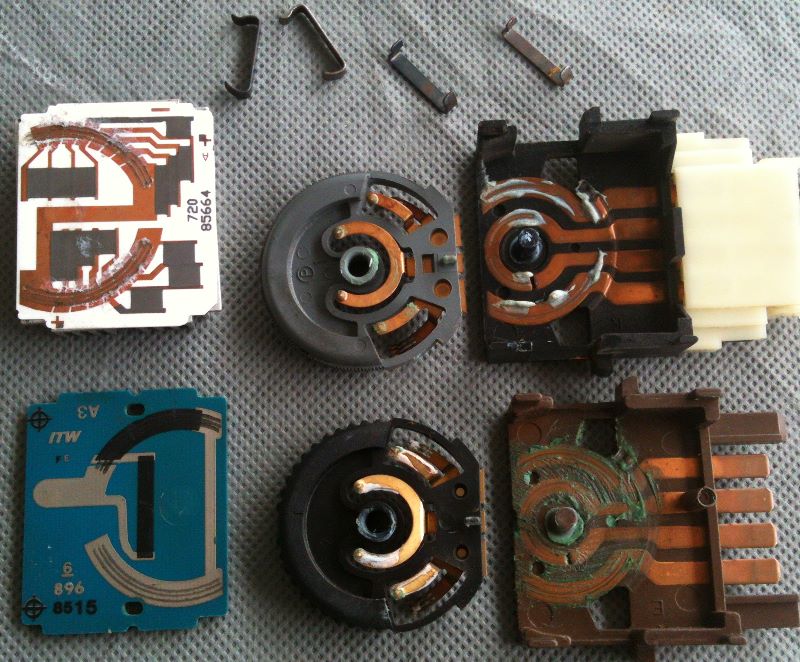
I did swap the wheels, but I can see no difference in the 2 switches. There is no circuitry whatsoever inside either, just contacts that the wheel connects with when you turn it. It does look like the Firebird has "hard stops" when the wheel is turned, but then all the pads on the board are connected with tracers. The Fiero one is just a continuous contact. One thing for sure, is the wheels are exactly the same, other than the color of course
Here is a picture with the wheels out of them, exposing what is inside:
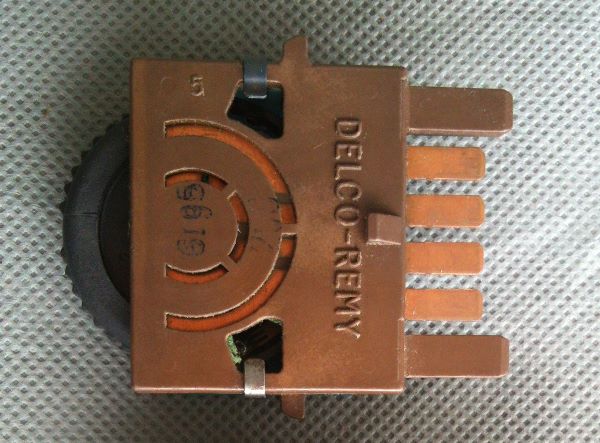
Here is the Fiero switch, reasembled with the black Firebird wheel inside.
IP: Logged
03:31 PM
May 23rd, 2011
JohnWPB Member
Posts: 5222 From: West Palm Beach, Florida Registered: May 2009
Just a friendly BUMP hoping that someone knows what wire actually needs to go to ground definitively. I had a test switch here from the junk yard, and I think I fried something in it already. I do NOT want to fry the one that has the fog light switch built into the surround plate.
[This message has been edited by JohnWPB (edited 05-23-2011).]
IP: Logged
10:32 PM
jscott1 Member
Posts: 21676 From: Houston, TX , USA Registered: Dec 2001
Those are my drawings... I'm surprised Tim didn't remember. I should have put my name instead of my car's name. lol
Anyway, I went back to my master drawings and yes, the Firebird "D" should be grounded.
But be advised the ground is only for the illumination aspect of the firebird switch. The Fiero headlight switch does not have illumination, that is why there is no corresponding pin on the Fiero headlight switch.
The headlights themselves are already grounded so only the power is switched.
When I do my firebird harness I routinely swap the backs of the switch as you have shown. They look similar but as you may or may not know the firebird switch won't work on the Fiero without swapping the backs. The wheels are interchangeable, you can use whichever one you prefer.
Okay here's what happened on the second drawing... Originally I used a relay on the white wire to lower the headlights, until later I discovered that you could use the "B" pin on the firebird switch instead. I was discussing that a while back and someone (I forget who) and he took the liberty of modifying the drawing, and introduced an error in leaving out the ground on the "D" pin. He also left off the brown wire so that drawing has two mistakes. Please use this instead.
As for the years, I used wiring diagrams for a 1998 Firebird and a 1988 Fiero so other years may vary, your mileage may vary. - Jonathan
[This message has been edited by jscott1 (edited 05-23-2011).]
IP: Logged
10:55 PM
May 24th, 2011
JohnWPB Member
Posts: 5222 From: West Palm Beach, Florida Registered: May 2009
I have yet another question. When I hook "D" up to ground, and the orange and red (always hot) to a 12v power supply on my bench, the back lit illumination does not come on. Do I have to hook another positive lead up to one of the unused pins ( K, J or A) to provide power to the bulb in the switch? Or is this handled by "F"? If it is "F" can I just supply 12v to F on the bench, to insure that the bulb works?
It's kinda important to me that the back lighting works, as I already have replacement back-lit window switches, and power mirror control assembly. All taken apart, and done to illuminate in blue to match the rest of the dash and gauges.
Fbird dimmer doesn't need transistor... Gray area are "power" resistor printed on ceramic. That's why it needs heatsink.
GM cheaper solution at work.
Fbird will work electrically but...
1. If Fbird dimmer Fit in Fiero's dash... Area doesn't have much air space for heatsink to cool. Plastic part will fail over time from too much heat. 2. Watch # of light bulbs. If Fbird dimmer maybe controls some LED and bulbs... In any case Fbird dimmer can't handle many bulbs that Fiero's dimmer can.
------------------ Dr. Ian Malcolm: Yeah, but your scientists were so preoccupied with whether or not they could, they didn't stop to think if they should. (Jurassic Park)
Those are my drawings... I'm surprised Tim didn't remember. I should have put my name instead of my car's name. lol
As for the years, I used wiring diagrams for a 1998 Firebird and a 1988 Fiero so other years may vary, your mileage may vary. - Jonathan
yea, apparently I don't really remember this that much (obvious as pointed out with the dimmer), and now that it was brought up I do seem to recall doing something with it as well - but that is all I remember, sorry
Probably one of those things that I just breezed through really fast without thinking about what wires went where (with thanks to Jonathan no doubt ) - so maybe best if I keep my mouth shut until I can get at my car or notes (which I can't seem to locate at the moment).
IP: Logged
02:24 PM
PFF
System Bot
jscott1 Member
Posts: 21676 From: Houston, TX , USA Registered: Dec 2001
I have yet another question. When I hook "D" up to ground, and the orange and red (always hot) to a 12v power supply on my bench, the back lit illumination does not come on. Do I have to hook another positive lead up to one of the unused pins ( K, J or A) to provide power to the bulb in the switch? Or is this handled by "F"? If it is "F" can I just supply 12v to F on the bench, to insure that the bulb works?
Yes, the "F" wire should go to the dimming wire (+12 V) on the Fiero. Again, the Fiero headlight switch doesn't have illumination so you have to look elsewhere. I use pin 12 on the smaller connector on the back of the instrument cluster. That way the headlight switch illumination will dim with the rest of the cluster.
[This message has been edited by jscott1 (edited 05-24-2011).]
IP: Logged
10:51 PM
May 25th, 2011
JohnWPB Member
Posts: 5222 From: West Palm Beach, Florida Registered: May 2009
Ok I just verified, and when I connect 12v to "F" and ground "D" the back illumination light does indeed come on. I will hook that to one of the other dash lights as you mentioned, so it dims with the rest of the dash/switches. Thanks again!


 ) - so maybe best if I keep my mouth shut until I can get at my car or notes (which I can't seem to locate at the moment).

