So I'm doing my lower ball joints and my boyfriend managed to install the new one crooked. We have a ball joint press but how would I go about getting it out WITHOUT damaging it? I need to re use it and it is one of rodneys, so I can't just go out a buy a new one if it does get damaged. Is there a safe way to do this? 86gt
[This message has been edited by FireGirl (edited 07-24-2012).]
Originally posted by FireGirl: So I'm doing my lower ball joints and my boyfriend managed to install the new one crooked. We have a ball joint press but how would I go about getting it out WITHOUT damaging it? I need to re use it and it is one of rodneys, so I can't just go out a buy a new one if it does get damaged. Is there a safe way to do this? 86gt
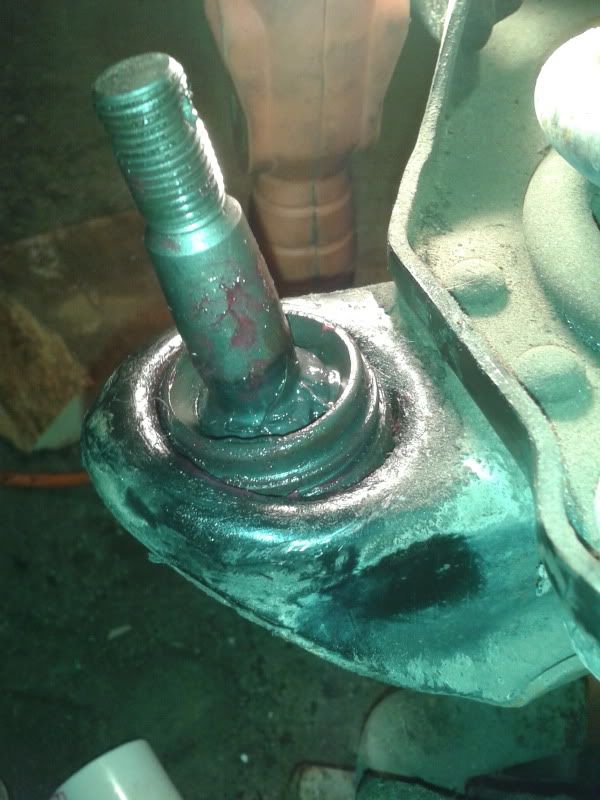
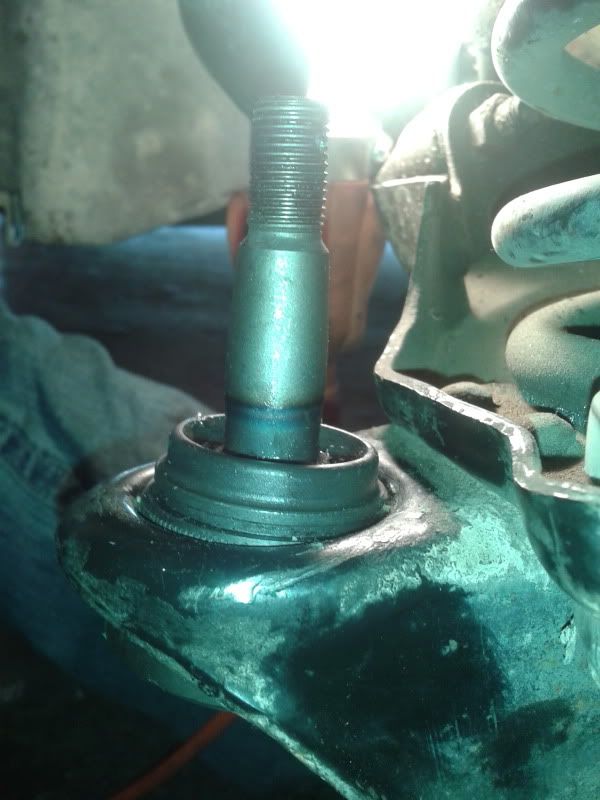
Can you get a picture to show the severity of the angle? They don't always go in perfectly straight during the start of the install but start to straighten out as you progress. If it's bad enough you may end up needing to have it tack welded in place after proper seating.
You should be able to reverse the clamp components and push it back out. When I installed mine I found that the car had to be raised quite a bit to allow me to turn the clamp upside down for the best chance at a near straight install from start to finish, sounds like that might have been what got him in trouble.
[This message has been edited by Joseph Upson (edited 07-24-2012).]
IP: Logged
05:21 AM
Shill Member
Posts: 2166 From: Spokane, WA Registered: Apr 2009
When he seated it, it went in straight. But as he continued to use the ball joint press, I guess it got crooked. He was pulling on the press hard enough to use all of his strength and putting his foot on my car for more leverage.
Edit: Sorry, forgot to log out of his account.
[This message has been edited by Shill (edited 07-24-2012).]
IP: Logged
12:01 PM
ltlfrari Member
Posts: 5356 From: Wake Forest,NC,USA Registered: Jan 2002
I think you're going to have to get creative with bits of tube around the body of the joint and the clamp to get that out without damaging it. You might also be able to push it out by pushing on the post itself (put a nut on top to protect the threads). Steady pressure is far better that belting it with a hammer. Don't forget it already takes a lot of that sort of 'abuse' when in use on the car since the knuckle sits on that post. I think I'd look atthe tubes method first, try a few test fits, see how it's gonna work out, then the post method 2nd if the tubes don't work. Oh, and gently does it this time! That, and maybe get a new boyfriend LOL!
------------------ Anything I might say is probably worth what you paid for it, so treat it accordingly!
If you have a complete ball joint install kit there should be enough parts to arrange in a manner that will allow the joint to be pushed out. That's a pretty steap angle though and you may still need to have it tack welded in place to make sure it doesn't move after it's seated properly.
I personally would put the nut on it and get a piece of flat steel to place on the high side perimeter to take the blows and knock it out with a hammer.
IP: Logged
12:41 PM
FireGirl Member
Posts: 770 From: Coeur d'Alene, Idaho Registered: Jun 2011
I tried getting it out with a press kit and the rings to fit on the bottom are either too small (1.5" goes directly over the ball joint) or too big (2" won't seat around it properly). I'm car-less, so I can't go anywhere. And I'm stuck at my boyfriend's house, and I live 32 miles away in a different state. It's just so stressful and frustrating. He's at work for another 5 hours and I just don't know what to do. I need to get my car done for my two jobs. I can't expect him or his mom to drive me everywhere, that's not right. We don't even have one side finished and it's been 4 days.
Do they even sell those rings that are just a tad bit bigger than 1.5"? It covers the diameter of my lower portion of my lower ball joint, and the space between that and the control arm is very very slim. I think that's what I need right now to get it out, I tried using the 2" ring but it just goes all sorts of crooked and does me no good
[This message has been edited by FireGirl (edited 07-24-2012).]
IP: Logged
01:13 PM
css9450 Member
Posts: 5532 From: Glen Ellyn, Illinois, USA Registered: Nov 2002
Do they even sell those rings that are just a tad bit bigger than 1.5"? It covers the diameter of my lower portion of my lower ball joint, and the space between that and the control arm is very very slim.
I had the same issue on mine. Its an '88 so I don't know if its true of ALL Fieros, or just the 88s. The smallest ring was too small, the next size larger was too big. I ended up using a piece of exhaust pipe, with a different diameter on each end. The parts stores have then in the exhaust section; just a shorty piece meant to serve as an adapter or transition between two different diameter exhausts. Even though it was a short piece, I still had to trim it somewhat to fit between the control arm and the plate on the ball joint clamp. However, it worked like a champ. I can measure it when I get home if you like.
IP: Logged
01:29 PM
FireGirl Member
Posts: 770 From: Coeur d'Alene, Idaho Registered: Jun 2011
I managed to get it out by hammering on it (I'm desperate to fix this now, threads are fine). But when I installed it, I stopped to check and it's crooked again, but not as bad. I tried hammering it out again but no luck. So I tried straightening just the side that's not in all the way, twice, but still not luck. Should I just hammer at it until it comes out?
I managed to get it out by hammering on it (I'm desperate to fix this now, threads are fine). But when I installed it, I stopped to check and it's crooked again, but not as bad. I tried hammering it out again but no luck. So I tried straightening just the side that's not in all the way, twice, but still not luck. Should I just hammer at it until it comes out?
At this point you're close enough that maybe some oil around it and an attempt to bias the pressure toward the low side underneath will be enough to do the trick as you continue to drive it through carefully watching to make sure the angle doesn't increase.
I had the same problem with the Auto Zone ball joint press, one was too big, another was too small. Just for you, I just took a spare 85-87 control arm down to Advance Auto, and found the adapter they have that works perfectly. Their loaner ball joint press is part #648617, $150 + tax deposit. According to the time stamps on the receipts, it took me ~15 minutes.
Here's the kit part #
The adapter that works is the one in the lower left corner, fits perfectly:
Here's how to assemble it:
I can see how your went back in crooked, the adapter doesn't sit flat on the arm, it's kind of angled.
Once assembled, it just pushes right out.
I measured the outer diameter of the ball joint, and it's just under 2"
[This message has been edited by RWDPLZ (edited 07-24-2012).]
IP: Logged
03:42 PM
oldbikeracer Member
Posts: 345 From: Sylvester, Georgia USA Registered: Jun 2012
From the looks of the pictures it went crooked in the oposite direction the second time. Knok her back out with a well placed rap on the high side. Next time press a little then check to see if it is started straight, if not perhaps a tap ot 2 with a smaller hammer will get it straigntened. Then press a little more and check for straightness again. This way you will gradually get it in straight. Get the neighbor weakling to help you this time so pressure is not so extreme. Explain to boy friend that you like his being strong and manly but this requires a gentler touch. I know what you are going through, I had a girl fdriend once that could have installed it with her bare hands. Good luck with it and let us know how it works out.
IP: Logged
03:48 PM
PFF
System Bot
FireGirl Member
Posts: 770 From: Coeur d'Alene, Idaho Registered: Jun 2011
Well the part that you twist to tighten the clamp, that was hitting the arm of the upper ball joint. So I took that out and put the rod through there, so i could get a more straight angle. Thanks for the tip rwdplz. Ill see if that might work.
Do you think I'm safe with continually trying to tighten it to see if it'll pop back into place?
I also struggle with the clamp space not fitting over everything, but I'm trying every single way to get it on there properly! Thanks for all the advice so far! I hope to have this side done by today....I really do...
IP: Logged
04:09 PM
urbex Member
Posts: 248 From: Glendale, AZ, USA Registered: Jul 2012
Originally posted by FireGirl:Do you think I'm safe with continually trying to tighten it to see if it'll pop back into place?
If it were me, I'd try to pop it back out, and give it another go at getting it straight. I'd also check the hole in the control arm very closely, to make sure that it's not damaged, causing the joint to go in crooked. Look for burrs, elongated hole, bent metal, etc. Might have to touch it up with a file before driving the joint in again.
BTW, go you for showing up the BF!
IP: Logged
05:15 PM
Shill Member
Posts: 2166 From: Spokane, WA Registered: Apr 2009
I had the same problem with the Auto Zone ball joint press, one was too big, another was too small. Just for you, I just took a spare 85-87 control arm down to Advance Auto, and found the adapter they have that works perfectly. Their loaner ball joint press is part #648617, $150 + tax deposit. According to the time stamps on the receipts, it took me ~15 minutes.
We have absolutely no advanced auto parts in the West. Well, there's one in LA but that doesn't really help. Any other places? Also, you said yours was just under 2"? Mine would seem just over 1.5"
Dang it, forgot to log him out again, sorry!
[This message has been edited by Shill (edited 07-24-2012).]
IP: Logged
06:29 PM
FireGirl Member
Posts: 770 From: Coeur d'Alene, Idaho Registered: Jun 2011
So, I broke the ball joint, when hammering it to get it off. Guess I can beat the crap out of it now and just use the one that's supposed to go on the other side.
IP: Logged
07:05 PM
fieroguru Member
Posts: 12448 From: Champaign, IL Registered: Aug 2003
If you have some scrap exhaust tubing, it will work for spacer tubes. If you have a hand held grinder, you can shape the tube to get the clamp more perpendicular to better seat the ball joint.
IP: Logged
07:42 PM
Dennis LaGrua Member
Posts: 15718 From: Hillsborough, NJ U.S.A. Registered: May 2000
So, I broke the ball joint, when hammering it to get it off. Guess I can beat the crap out of it now and just use the one that's supposed to go on the other side.
You should NEVER hammer on a ball joint unless you intend to throw it away. I guess that you learned this the hard way. To get those front lower ball joints in, usually a 10-15 ton hydraulic press is needed. Then you tack weld the joint to the control arm so it won't move. if you don't have a hydraulic press let a machine shop install the joints. BTW, did you grind smooth the old tack weld points with a Dremel or Die Grinder before trying to press the new joints in?
------------------ " THE BLACK PARALYZER" -87GT 3800SC Series III engine, custom ZZP /Frozen Boost Intercooler setup, 3.4" Pulley, Powerlog manifold, Northstar TB, LS1 MAF, 3" Flotech Afterburner Exhaust, Autolite 104's, MSD wires, Custom CAI, 4T65eHD w. custom axles, HP Tuners VCM Suite. "THE COLUSSUS" 87GT - ALL OUT 3.4L Turbocharged engine, Garrett Hybrid Turbo, MSD ign., modified TH125H " ON THE LOOSE WITHOUT THE JUICE "
IP: Logged
09:48 PM
FireGirl Member
Posts: 770 From: Coeur d'Alene, Idaho Registered: Jun 2011
So my boyfriend said I broke it because it spins. Aaron came over to help and said it's not broke, they are supposed to spin. Yay! so he helped with the last pita (thank you!) And we'll finish up tonight and do the other side later. As in some other week...Or month..
IP: Logged
10:28 PM
Jul 25th, 2012
FireGirl Member
Posts: 770 From: Coeur d'Alene, Idaho Registered: Jun 2011
Just did my lower ball joints. Had the same issue with not having the correct size rings in the press kit. Tried to do the job with the a-arms still attached to the car. Gave up on that quickly & removed them so I didn't have to work at weird angles. If I ever do the job again I'll heat the a-arm collar better & deep freeze the new ball joints.
IP: Logged
10:09 AM
TONY_C Member
Posts: 2747 From: North Bellmore, NY 11710 Registered: May 2001
Everyone here seem to be ignoring that the original ball joint was tack welded in place for a reason; so it won't pop loose. While a press fit may hold, but with time it may not. If the joint comes loose, loss of control could result. This is why the GM manual advises to replace the control arm as an assembly. I would strongly recommend that the front lower ball joint be press fit and tack welded in place. Don't believe that its a good idea driving without doing that.
------------------ " THE BLACK PARALYZER" -87GT 3800SC Series III engine, custom ZZP /Frozen Boost Intercooler setup, 3.4" Pulley, Powerlog manifold, Northstar TB, LS1 MAF, 3" Flotech Afterburner Exhaust, Autolite 104's, MSD wires, Custom CAI, 4T65eHD w. custom axles, HP Tuners VCM Suite. "THE COLUSSUS" 87GT - ALL OUT 3.4L Turbocharged engine, Garrett Hybrid Turbo, MSD ign., modified TH125H " ON THE LOOSE WITHOUT THE JUICE "
IP: Logged
02:05 PM
TONY_C Member
Posts: 2747 From: North Bellmore, NY 11710 Registered: May 2001
I just replaced two last weekend on an '87 and they weren't tack welded. They go in pretty snugly, as snug as other GM cars with press in style ball joints. Plus, they are always under tension from the coil spring.
My original '85 GT lower ball joints were not tack welded in either, just pressed. Plus, Rodney's ball joints come with snap rings to keep it from coming out too.
Tack welds on the joint are usually an alternative to replacing a control arm that has an oversized seat and no oversize joint option to compensate. This sometimes happens when a joint starts in at an angle and is forced through, stretching the hole so that over time or, sometimes right away the joint starts to back out of the control arm some and eventually wallows it out and starts making noise. It happened on one of my cars from just a routine replacement.
GM may have had some concern with the control arms ability to keep the joint in place initially. Whenever there is difficulty installing the joint straight there maybe a problem with it staying in place afterwards.
[This message has been edited by Joseph Upson (edited 07-26-2012).]