Suh-wheet! That looks really good, and you got a hell of a deal. I just discovered this thread. I was going to suggest Mr. Mikes seats. He makes an excellent leather repro of the Indy seat, with the correct embroidery. But I see you've already got that covered. Nevermind.
------------------ Raydar
88 3.4 coupe. A work in progress. Out of my mind. Back in 30 minutes.
IP: Logged
05:32 PM
Wipe0ut Member
Posts: 1524 From: Mankato, MN Registered: May 2002
Hey Toddster, How did you remove the ignition cylinder lock? im going insane with frustration getting it out of my indy
It is quite easy actually. I had to do it once on an 86GT T-top I had back in highschool. (it wasn't an Indy, but all the steering columns are the same I thought) Page 8-29 in the Chilton's manual explains how to do it. Hardest part for me was removing the lock plate because I am too damn cheap to go buy the tool (decided to make my own instead ). Page 8-27 and 8-28 show how to remove the steering wheel and lock plate if you haven't already.
------------------ --Jess--
If you expect the unexpected, was it really even UNexpected in the first place?
'85 SE, 4cyl, 5spd, silver/grey
'02 Honda Rancher ES 4x4 w/plow and WARN winch, 152 miles, red
'02 Yamaha R6, blue/white, 3200 miles, recent LIGHT case of roadrash
Both '02s for sale/trade for Fiero
[This message has been edited by jlhuber (edited 01-14-2003).]
IP: Logged
07:53 PM
Jan 15th, 2003
Toddster Member
Posts: 20871 From: Roswell, Georgia Registered: May 2001
Hardest part for me was removing the lock plate because I am too damn cheap to go buy the tool (decided to make my own instead ). Page 8-27 and 8-28 show how to remove the steering wheel and lock plate if you haven't already.
Jl is right. Removing the lock plate is easy if you have the right tool. I decided to make my own too. It is just a piece of steel about 5 1/4 inches long and 1 1/2 inches wide. Bend the two side down 90 degreesso they are about 1 3/16 tall. Drill a 5/8 hole in the center of the top. That's it. Screw the steering wheel nut down on it. It compresses the locking ring and allows you to remove the clip. Once that is out of the way you just need a philips and/or torx driver to dis-assemble the rest.
IP: Logged
12:52 PM
Jan 16th, 2003
Toddster Member
Posts: 20871 From: Roswell, Georgia Registered: May 2001
The engine is out. WHAT'S WRONG WITH THIS PICTURE? The #3 piston is totally twisted and bottomed out. Can't wait to get the oil pan off.
A little interesting info too. the tranny is original but the engine is not. Some one added this engine at some point but it is a used engine that has a LOT of gunk on the heads. Does not look like the oil had ever been changed.
After a close inspection this turns out to be a 1986 engine. It has the older deck but it uses a roller cam. So it can only be an '86. This is actually a good block to use since it still used the distributor instead of those crappy coil packs, but had the Roller cam of the later model engines. If it is OK inside I will rebuild it.
[This message has been edited by Toddster (edited 01-16-2003).]
IP: Logged
12:50 PM
fierobear Member
Posts: 27103 From: Safe in the Carolinas Registered: Aug 2000
Originally posted by Toddster: A little interesting info too. the tranny is original but the engine is not. Some one added this engine at some point but it is a used engine that has a LOT of gunk on the heads. Does not look like the oil had ever been changed.
After a close inspection this turns out to be a 1986 engine. It has the older deck but it uses a roller cam. So it can only be an '86. This is actually a good block to use since it still used the distributor instead of those crappy coil packs, but had the Roller cam of the later model engines. If it is OK inside I will rebuild it.
[This message has been edited by Toddster (edited 01-16-2003).]
Be careful, the 84 engine *and wiring* is different than 85+. I wouldn't be surprised if there are electrical anomalies in that car.
IP: Logged
01:21 PM
Songman Member
Posts: 12496 From: Nashville, TN Registered: Aug 2000
Sent the block to Loyal's Racing Performance Machine shop for a complete rebuild and blueprinting.
We started with a PT151L master kit which included: TRW L2256F Forged Pistons SP E381K Molly Rings Clevite CB610P Rod Bearings Clevite MC1733P Main Bearings Dura Bond CH16 Cam Bearings Fel-Pro KS2620 gasket kit EPW G2542S Matched Gear set Melling M62C HV oil pump Melling 62CSI Pick-up screen TAP HA2148 roller lifters PIO PE163B brass plugs
We also replace the roller cam that came with this 1986 block, MC1023.
The first job was to strip and inspect the engine block and head.
the head was peened and the valve seats were replaced with hardened seat inserts. Z-28 spings were used and set dialed in for equal resistance.
The block was line honed and decked. after which it was determined that it needed to be bored out .03 over. The crank was peened and together with new rods was balanced.
The head was surfaced and a new head gasket was installed that gave us a 9.21:1 compression ratio.
HP is estimated to be 126 but I will dyno it after installation to get the exact number.
Now all I have to do is start re-assembling the whole magilla.
Pics coming soon.
IP: Logged
05:09 PM
m0sh_man Member
Posts: 8460 From: south charleston WV 25309 Registered: Feb 2002
thanks for the update, i love when people well document stuff, when i swap from a 4speed in my 86GT to a 5 speed isuzu im probably going to take alot of pictures so people can see how to pull the tranny out without pulling the engine.
matthew
------------------
IP: Logged
05:33 PM
fierobear Member
Posts: 27103 From: Safe in the Carolinas Registered: Aug 2000
could have brought it down to $1800 if I elected not to go with the hardened seats and if I could have kept the original cam.
This is a great deal considering that a plain ole' factory rebuilt unit will cost you $1200-$1300 anyway.
And that price will be reduced soon by offsets on parts I am selling. The overall goal is to keep this project under $1500. I can do it with a little help from eBay.
IP: Logged
08:37 PM
Feb 23rd, 2003
Toddster Member
Posts: 20871 From: Roswell, Georgia Registered: May 2001
The Water Pump, fuel pump, ignition module, belts and filters are all new but everything else is original.
I sandblasted everything then repainted. I even painted the brackets in Engine Aluminum paint. Rebuilt the Distributor and Alternator and painted them too. painted the intake and, of course, the valve cover and air cleaner then added new graphics.
Heat wrap on the exhaust manifold will reduce ambient temperatures and means I can eliminate those pesky (useless) heat shields.
Next step is to install and fire it up! THEN...onto the body work and paint.
IP: Logged
11:47 PM
PFF
System Bot
Feb 24th, 2003
fierobear Member
Posts: 27103 From: Safe in the Carolinas Registered: Aug 2000
I'd like to know about the graphics. Where did you get the graphics? I'd like to do that to my Indy.
Same here! Ive been looking everywhere for Indy engine decals. I even mentioned something to Joe Torma and Rodney Dickman a year or so ago. Where'd ya get them?
------------------ The Force will be with you, always.
IP: Logged
02:25 AM
bHooper Member
Posts: 4157 From: greensboro, nc Registered: May 99
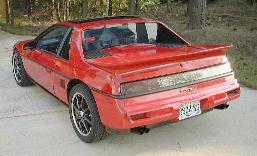
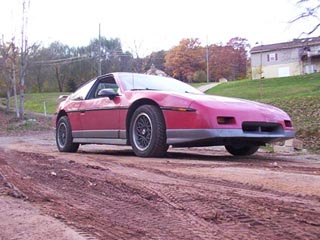
You've seen the BEFORE pics. Take a look at the AFTER!!!!
Ready to go back in!
Toddster! it looks like you are about to put that engine back in with the STOCK old pellet cat! You should for shure put a new style honeycomb cat on. They flow MUCH better than the old GM pellet jobs. Plus you engine will sound a little more aggressive.
------------------ 88GT Red 5-Speed...5K 88GT Red Auto...40K 87GT Blue 5-Speed...17K 87GT Black 5-Speed...55K 86GT Red 5-Speed...42K 85GT Black Auto...63K 95 Sierra GT(BYP)100% Stock 02 Trans Am WS6 Collector Edition #2215
Wanted: Low mileage/all original Canadian 88 GTs/Formulas/84 Indys
I'd like to know about the graphics. Where did you get the graphics? I'd like to do that to my Indy.
I got them from Fierographix, FIEROGRAPHIX@AOL.COM.
$100 for the valve cover, and aircleaner graphix. It takes some patience to apply the results are obvious!
quote
Originally posted by indypbody:
...Pellet Cat.
Way ahead of ya Tony. I ordered a new cat but as of this picture it had not come it yet. as soon as I get it I will add it and finish the heat wrap all the way to the muffler.
I still need to clean and polish the exhaust tips too. details details details
IP: Logged
03:24 PM
Kelvin Vivian Member
Posts: 1233 From: San Jose, CA, USA Registered: Jan 2001
It fires-up but runs rough. I am getting both a code 33 and 34
How is this possible? Please don't tell me I have a bad ECM. I'm getting 5 volts to the MAP sensor and I have a good ground with no open circuit. I'm going to do some continuity tests on circuit 432. Hopefully it's only a short or a bent pin somewhere.
Any ideas would be greatly appreciated.
IP: Logged
12:37 PM
PFF
System Bot
fierobear Member
Posts: 27103 From: Safe in the Carolinas Registered: Aug 2000
It fires-up but runs rough. I am getting both a code 33 and 34
How is this possible? Please don't tell me I have a bad ECM. I'm getting 5 volts to the MAP sensor and I have a good ground with no open circuit. I'm going to do some continuity tests on circuit 432. Hopefully it's only a short or a bent pin somewhere.
Any ideas would be greatly appreciated.
My Indy has been driving me nuts. I can't get the bugs out of that damn car to save my life. Welcome to the club. Must be an 84 Fiero thing.
IP: Logged
01:35 PM
Fiero5 Member
Posts: 8882 From: Arecibo, PR Registered: Jun 2000
Mine started running rough one day until we replaced the MAP sensor. Just a thought assuming that you didn't do that already?
Also, has the radiator fan been replaced yet? The original 84 fans have glued on magnets that will let go after awhile that can fry your entire cars wiring which is not fun. Been there, done that
Steve
------------------
IP: Logged
02:07 PM
fierobear Member
Posts: 27103 From: Safe in the Carolinas Registered: Aug 2000
Also, has the radiator fan been replaced yet? The original 84 fans have glued on magnets that will let go after awhile that can fry your entire cars wiring which is not fun. Been there, done that
Steve
Magnets glued onto *what*? I'll check it out.
What did you do, replace the fan and relay with a later model type?
IP: Logged
02:13 PM
Toddster Member
Posts: 20871 From: Roswell, Georgia Registered: May 2001
Mine started running rough one day until we replaced the MAP sensor. Just a thought assuming that you didn't do that already?
Also, has the radiator fan been replaced yet? The original 84 fans have glued on magnets that will let go after awhile that can fry your entire cars wiring which is not fun. Been there, done that
Steve
Yeah, I have a box of spare MAP sensors. Tried 3 different ones, same problem. Now that I've done all the "up Stream" things I have to check downstream. My instinct tells me it's the computer. I'll know by the end of the day.
Thans for the tip on the fan too. It's bone stock. I'll take care of it. I have a spare '88 fan around here somewhere. Is it plug and play or do Ineed to splice the wires?
I had to rebuild a frozen brake caliper, pick-up a set of used rims and tires, and take care of some nit-picky details but I took it for it's first test drive today and the outlook is promising!
Handled well but for the crappy old shocks. The brakes need a little work. And the tranny is a little "stiff" from sitting for so long but all in all a great first drive. The engine purs like a kitten.
I'm down to the paint and detail work now!
Pics of the engine compartment coming soon.
IP: Logged
10:17 PM
Mar 16th, 2003
My7Fieros Member
Posts: 3357 From: Germantown, TN Registered: Jun 2000


 ). Page 8-27 and 8-28 show how to remove the steering wheel and lock plate if you haven't already.


 Toddster! it looks like you are about to put that engine back in with the STOCK old pellet cat! You should for shure put a new style honeycomb cat on. They flow MUCH better than the old GM pellet jobs. Plus you engine will sound a little more aggressive.


