Driving lights on custom brackets. All with quick connects so I can switch back to stock for safety checks
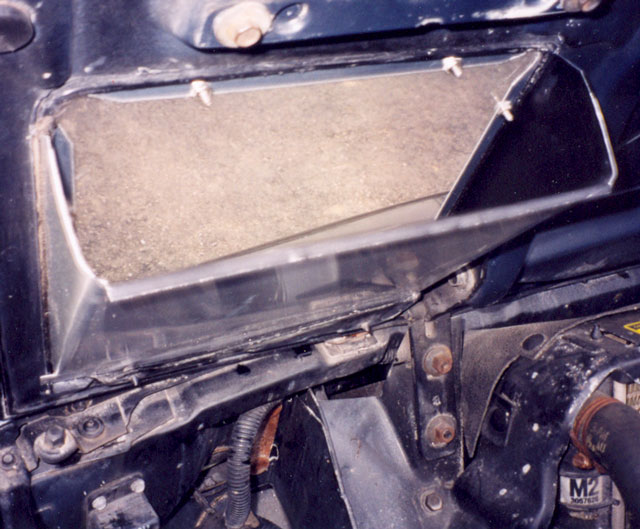
Notice the vents drilled in the bottom. 48 - 1/4" holes are about 3 sq in. of vent. More holes, more vent. Cheap and effective.
The casements were black aluminum flat stock picked up at the local aluminum siding place for $3
They were glued in place with gasket silicon and tabs on the front go in the two slots.
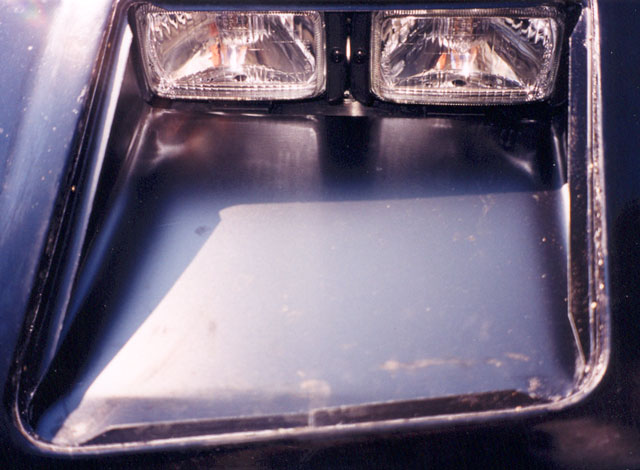
Here are the lights without lexan in place
Again, the local aluminum installer made me 1/2"X3/8" channel which I put in around the edges with brass 1/2" nails and black gasket silicone. The nails are held in place by the 1/4" lexan
This is the template for the light bracket
These lights are easy to aim. You just losen the 1/2" nut on the bottom and pivot or tilt them to the desired level and tighten it up.
No bouncing because they are solidly mounted on the fire wall.
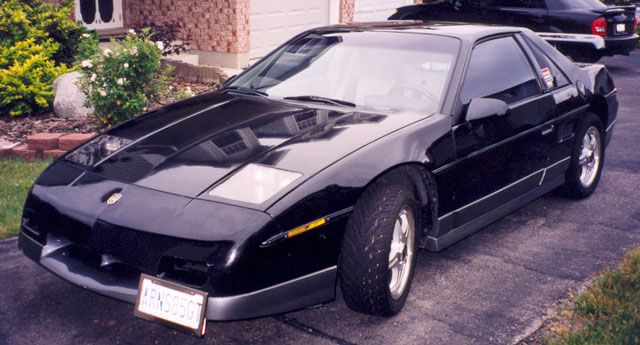
Here is the car with the lights in place
Here's to having some fun
Arn
IP: Logged
06:35 PM
PFF
System Bot
Krhyme Member
Posts: 216 From: Kalamazoo, MI Registered: Jun 2004
how much this whole project run ya? and how much time you think start to finish? Also, how much real mechanical knowledge needed and any special tools?
alssssoooo... any chance you could "blackout" those lights? you know how they produce those aftermarket blackouts for headlights? I have no idea what kinda coating they use or whatever, but would it be possible? I think that'd make a verrrryyy smooth look....
sorry for so many questions, but I like this mod, and would do it in a heartbeat... but I'm fairly broke, can't weld, and dont' have specialty tools... so just wondering if I could pull this off....
Tinted Lexan is available for "blackout" but it is no good to see at night. If you are in a major urban area with streetlights everywhere, it might be ok.
The cost in Canadian $ is
Driving lamps $60 1/4" lexan pieces $20 Quick connects and plugs $10? Aluminum pieces $13 Brass pins $1.50 Black silicone - I had on hand for engine work
The vents took a drill and a bit. I also have to paint them because of the raw edges.
Glad you like the look. So do I.
Arn
IP: Logged
07:15 PM
Krhyme Member
Posts: 216 From: Kalamazoo, MI Registered: Jun 2004
wow... break that down to American and thats not too pricey at all really.....
how much actual fabrication work/know how will I need? cuz... drills/bits/wrenches etc I have.... I have basic tools... just nothing fancy... certainly not a welder or anything....
also... I'm a little confused as to the 'vents'... are they needed for a specific reason? and also, how much time we talking? My car is also my daily driver so anything I do to it I generally need it driveable again within 24 hours....
Arn, those looked sweet on the weekend. I must say that your car is impressive all around. I wouldn't mind trying something like that with mine when I get her on the road.
------------------ Jay Brintnell Owner / Design Lead WordMark.ca Communications
Due to interest at the Southwestern Cruise, I am bringing this thread back to life.
The headlight conversion is cheap to do, and if you end up not liking it, you can switch back with a minimum of fuss. Nothing has to be permanently changed.
The venting I am going to change, and I am still considering external venting.
You buy 4 blue quick connects made for spicing one wire onto a running line. Radio Shack has them or any automotive supply
You then buy a package of red bayonet style electrical connector plugs.
You use the blue connectors to attach the low beam (tan) wire to a wire to run to the inside light and the high beam wire to the outside light.
low beam wire__________________to original light plug ----------------> new wire \________to new bayonet plug to the new light
The bayonet style plugs join your new wires from the wiring harness to the lights. The lights will generally have one hot line with a male bayonet plug already.
The ground for each light is usually the mounting bolt or if there is a ground wire separate you attach it at the ground screw in the diagram.
The rest of the wires are left unattached.
If you change your mind, you only disconnect the 4 blue disconnects and unbolt the chassis from the mounting bolts on the fire wall.
You do not alter the existing wiring.
I hope this helps.
Arn
(had trouble with diagraming it)
[This message has been edited by Arns85GT (edited 08-18-2004).]
IP: Logged
02:43 PM
NotAFieroAnyLonger Member
Posts: 4413 From: 75762/Texas/USA Registered: Dec 2003
I'm in a generally urban environment with very little 'country' nite driving.
If you set up the low's with 55 w bulbs and the highs with 100w bulbs it works well for my application. (lows in the middle and raised 1/4")
If you buy the more expensive lights, you get more lumens out of them, but I went with the cheapies. It all depends on the light quality you need and buy.
If you are in God's country and are driving in really pitch black conditions, I would go with the expensive type, depending on how much light you like.
Good luck
Arn
IP: Logged
11:16 AM
skitime Member
Posts: 5765 From: Akron, PA, USA Registered: Aug 2000
How's the light output from this setup ? I would like to try this, but would use it on my daily driver.
The light output is barely enough to be safe and is illegal in most states if not all. Headlights have a beam pattern to prevent blinding oncoming motorists as well as broad beam to light the sides of the road. Driving light have a full bright pattern for only the width of the beam with little or no light to brighten the side of the road. Driving lights do not have a high and low beam. As a result you risk other drivers on the as well as pedestrian or objects at the side of the road and yourself on turns since the beam is too narrow. And a course you risk a ticket from the cops. Other than that the project is great. The whole problem with this mod is there are no true quad headlights that fit in the width of single Fiero headlight. Guess if you can read between the lines my advise on this mod.
------------------ Red 88 GT T-Top 3800 INTERCOOLED SUPERCHARGED White 88 GT Stock Please give me a rating if you appreciate my contribution. History of Skitimes Car
IP: Logged
11:32 AM
intlcutlass Member
Posts: 1431 From: Cleveland,Oh.44067 Registered: Nov 2002
Originally posted by skitime: The whole problem with this mod is there are no true quad headlights that fit in the width of single Fiero headlight. Guess if you can read between the lines my advise on this mod.
As far as the non-pop ups.... I agree.
I really like the ones Wmac (I think it was), did, and that is a quad setup, just circular instead of square. I know thats not apples to apples comparison, but my point is just that, I wonder if it would be legal to use those headlights instead of the square ones, in a non pop up?
IP: Logged
12:15 PM
skitime Member
Posts: 5765 From: Akron, PA, USA Registered: Aug 2000
I really like the ones Wmac (I think it was), did, and that is a quad setup, just circular instead of square. I know thats not apples to apples comparison, but my point is just that, I wonder if it would be legal to use those headlights instead of the square ones, in a non pop up?
I would think so. I forgot about his conversion. Thanks for reminding me.
I bought lamps that throw a flat field of light. They are more directional than the stock lights and don't throw light out the sides, or up in drivers' faces. To be fair, I also don't generally drive by what is in the ditch.
As the template states, the system is 'Not DOT Approved'. It is, however quite functional, and I highly doubt I'll get a ticket in my jurisdiction.
I kept my original lights so I can plug them in if I need a safety certification. The whole rig comes apart with minimal fuss.
The number of lumens, and light dispersement pattern is dependent on the light product you buy. There are probably hundreds of choices and it takes some shopping, and according to your wallet.
A four light system has an inherent advantage inthat your beams are dedicated and shielded from stones etc.
The system I have serves me just as well as the OE pop-ups, and more reliably.
I agree that the plug and play systems being sold with Camaro lights are really nice but for a guy on a budget, this mod is a good deal and will work.
Arn
IP: Logged
12:35 PM
kooljess Member
Posts: 1135 From: FIEROS WEST USA Registered: Jul 2004
Heck.................I just installed my HID's and once you start driving with one of them on it's hard to go back to the standard lighting that the majority have.