|
|
|

|
The Fastback 86 Ferrari/PONTIAC GT Taillights by Fastback 86
| Started on | : 03-16-2005 03:59 AM |
| Replies | : 55 |
| Last post by | : fierogirls-mom on 04-06-2005 04:09 PM |
|
|
|
|
Mar 16th, 2005
|
Fastback 86
Member Posts: 7849
From: Los Angeles, CA
Registered: Sep 2003
|
I was going to just throw a thread of pics together when I finished the project, but then I thought about how its more fun to watch a build thread than the readers digest recap. Plus, its been a year since my last real build up thread (my engine swap). So, without further blathering on my part (about this, anyway), heres my project. I've always thought one of the coolest things about the GT is the way PONTIAC lights up across the back. However, I also think the F355 tail light kits are really cool looking. But having one means I can't have the other...or does it? I want both, so I'm going to get both. This isn't a new idea, I know its been thought of before by many people. I know at least 2 people have already done it. But, I'm going about it a very different way, so I figured it was thread worthy. Instead of sticking some round tail lights behind the stock GT outer lenses, I've done away with the stock lenses. I started out with a Kahines 1 piece panel. My first ideas revolved around cutting the word Pontiac into the panel. That would've been fun.  Thankfully, AusFiero came up with a better idea. Instead of cutting the letters in, why don't I just put a window in the panel, mask off the letters, and paint it? Remove the masks and it says PONTIAC. So, that in mind, I set off. Thankfully, AusFiero came up with a better idea. Instead of cutting the letters in, why don't I just put a window in the panel, mask off the letters, and paint it? Remove the masks and it says PONTIAC. So, that in mind, I set off. First thing I did today was modify the reflectors. I picked up a set from shawnkfl and mattm. I wanted the reflectors so I could still mount the bulbs to make the letters light up. That, and I didn't want to cut up MY tail lights. The chop saw made short work of reflectors, leaving me with this: 
Then, it was time for measurements. Lots of them. Then a few more. Once I was sure, I headed to TAP Plastics at the suggestion of Steven Snyder. I took the panel with me and talked to them about exactly what I wanted to do. They cut me a piece of acrylic plexiglass 21"x4" and recommended E6000 epoxy. The lot cost me $11. The first thing I noticed when I got home is that the panel has a slight curve to it. My 4" tall piece was not going to sit flat, and it certainly wasn't going to bend. Luckily, the curve is so slight that by trimming it down to 21"x3" did the trick, and still let me plenty of room for the lettering. Satisfyed, I began transferring my measurements to the panel. 
You'll notice I crossed out some of the lines. I tried to place the clear piece exactly where the letters on the stock tail lights are, but I quickly realized it looked odd. The letters are not centered vertically on the stock tail lights. You don't notice it normally, but when compared to the round lights of the 355 kit, it was obvious. It was easy enough to fix, I just moved my marks up 1/4". **A quick sidenote. Notice the tool sitting under the panel. That is the Fein Multimaster. It is possibly the coolest tool available. Its not a circular saw or reciprocating saw. The best I can describe it is as an oscillating saw. The blade moves side to side, kind of like waving your hand. It only moves about 1/16" in either direction, at variable speeds. This makes plunge cuts not only possible, but very easy. In my case, it made cutting into the fiberglass a breeze. No drilling holes, no saber saw, no cut of wheels. Just set the blade against the panel and let the weight do the cutting. Once its through, just follow the lines. Continuing on, heres the panel with the hole cut out. 
I cut the hole a little too small, so I had to spend some time opening it up a little more so the plexiglass would fit. I used packing tape to hold the plexi in place until I put the epoxy on, and while its drying. 
More in the next post.
IP: Logged


|
03:59 AM
|
|
|
PFF
System Bot
|
|
|
|
Fastback 86
Member Posts: 7849
From: Los Angeles, CA
Registered: Sep 2003
|
Here's the outside of the panel all sealed up so no epoxy can leak out. I found out later when I went to apply the epoxy that its so thick it wouldn't have leaked, but better safe than sorry. 
Here's a shot from the back side. You can't see it, but I got in there with some 80 grit sand paper and roughed things up. The E6000 specifically called for that, but its a good idea even if the instructions don't. I roughed up the fiberglass out to about 1/2" from the edges of the hole, and the plexiglass in 1/2" all the way around. That still leaves me wiggle room when I make the letters, so the roughness and/or epoxy won't show through from the other side. 
And the last one for tonight: the epoxy in place. Its a little hard to see, since it goes on and sets clear, but its there. 
Thats as far as I've gotten for now. The E6000 wants 1-3 days to fully harden, so I won't be updating this until at least Friday. Thats fine with me, seeing as I have to work tomarrow and thursday. Until then, I'm happy to answer questions when I have a chance. Hope you like it so far. Scott [Fastback 86]
IP: Logged
|
|
04:07 AM
|
|
Fastback 86
Member Posts: 7849
From: Los Angeles, CA
Registered: Sep 2003
|
Forgot to mention - MyFiero.com rules for image hosting! 
IP: Logged
|
|
04:08 AM
|
|
MilleniumFiero
Member Posts: 1225
From: Pearl Harbor, Hawaii USA
Registered: Dec 2002
|
holy smokes that is a good idea im surprised no one has thought of that before ------------------
prowling the pacific...

87 GT - V8 - 5 Speed
IP: Logged
|
|
05:15 AM
|
|
MilleniumFiero
Member Posts: 1225
From: Pearl Harbor, Hawaii USA
Registered: Dec 2002
|
double post sorry ------------------ prowling the pacific... 87 GT - V8 - 5 Speed [This message has been edited by MilleniumFiero (edited 03-16-2005).]
IP: Logged
|
|
05:17 AM
|
|
Toddster
Member Posts: 20871
From: Roswell, Georgia
Registered: May 2001
|
Hey, where did you get the money for all of this? Oh yeah!  Good work. Can't wait to see it.
IP: Logged
|
|
10:15 AM
|
|
YELLOWFIERO88
Member Posts: 1329
From: Cincinnati, Ohio
Registered: Nov 2004
|
My light panel is sitting next to me. I am doing the same thing as you are you just beat me to it. I will be running the LED lights in mine instead of the vette lights. Red one on the outside and yellow ones on the inside. I am also going to use led's to light up the pontiac sign. Good luck it looks good so far. ------------------
.jpg)
88GT 3.4SC
88GT T-TOP
86SE VERT (building soon)
IP: Logged
|
|
11:30 AM
|
|
shawnkfl
Member Posts: 2457
From: Largo, Florida
Registered: Oct 2004
|
i was wondering what you were up to with those parts. looks good. keep the pics coming! do the fiero parts fit into the fiberglass mold decent? how about a pic showing the parts mated together?
IP: Logged
|
|
11:47 AM
|
|
watts
Member Posts: 3256
From: Coaldale, AB, Canada
Registered: Aug 2001
|
| | | quote | Originally posted by Fastback 86:
The first thing I noticed when I got home is that the panel has a slight curve to it. My 4" tall piece was not going to sit flat, and it certainly wasn't going to bend. |
|
One of the nice things about plexi, is that it WILL quite happily bend if heated enough (gently!). Waaaaaay back in high school, I drove a '66 Dodge Monaco Convertible (383 commando powered galacto-tank!). Anyhow, one of my tail lights was smashed and they were even harder to find back then (lets just say early 80's) than our fastback ones are now! Mine was the 'vert version of this:

(you can see what a wierd shape they are!) So, being the most creative on in my plastics class, I had to do something.... I did up a sort of mold out of wood, and drapped the sheet of plexi over it. Put the whole mess in our oven (at school) and heated it up. Watching carefully through the window, I waited until it sagged just enough then quickly whipped it out. It cools and hardens pretty quick in the fairly cold room. Trimmed to shape, and stuck it on with double sided tape. Was fine until I sold the car a few years later. Anyhow, what you could do (could have done?) is rest the sheet on the concave surface, then heat the whole sheet up with a heat gun (waving it all over it quickly) until it sags into place. Possibly have someone else stand by with an air nozzle to cool it at the exact "right" moment.
IP: Logged
|
|
12:08 PM
|
|
Fastback 86
Member Posts: 7849
From: Los Angeles, CA
Registered: Sep 2003
|
Shoulda, woulda, coulda I guess. I didn't want to risk cracking it. It should work out pretty well, as the panel only has a slight curve to it. When I cut the plexi down to 21x3, I could lay it flat on the panel, so its pretty darn close. Once the epoxy sets, I'll flip it over and fill in the seam with bondo, and use that to smooth the transition. Ideally, when its all done and painted, you won't be able to tell, at least not unless you look super close at the right angle or something. Shawn - They fit very well, actually. Kahines did a good job of reproducing the dimensions of the stock tail lights, so the modified reflectors fit nicely into the back of the panel. I'll take a picture of it on Friday, once I'm sure the epoxy is all good and hardended.
IP: Logged
|
|
02:55 PM
|
|
|
Mar 22nd, 2005
|
Fastback 86
Member Posts: 7849
From: Los Angeles, CA
Registered: Sep 2003
|
Lots of work getting done! The E6000 is holding up great. I've already got the letters cut out and on the panel, now I'm doing the body work. The first layer of bondo is down and sanded, but there were a few spots I wasn't happy with, so I'm adding some more and working it over again. Its looking good. I'm hoping to sand it again tonight and get the first layer of primer down. I'm taking lots of pictures, but I won't be able to post them until probably thursday night. If I can get to my other computer before then, I will, but don't count on it. I should have lots of progress pics by then. Also, I'll probably have pics of my Fiat X1/9 scoops too, as I'm doing body work on paint on those at the same time.
IP: Logged
|
|
02:09 AM
|
|
|
PFF
System Bot
|
|
pavo_roddy
Member Posts: 4351
From: State with a city named Gotham
Registered: Apr 2004
|
Hi all, Your way of going about this is exactly the same way I want to do to the rear end of a ZR-2 kit! Except I thought of modding in the window and going to a craft store looking for some good looking stencils, mask them on, then paint over the rest......Voila!! Though I am still wondering what I want to actually put there though, the hardest part of the design so far.....
IP: Logged
|
|
03:09 AM
|
|
|
Mar 23rd, 2005
|
Fastback 86
Member Posts: 7849
From: Los Angeles, CA
Registered: Sep 2003
|
CLOSE CALL I had it all set up in the garage today, the panel sitting on stands. Everything was all primed. I go to the bathroom for just a minute and my mom comes home and tries to park on top of it all. Luckily, it was in the middle of the garage, so her Jimmy just went over it, but it did catch the under carriage and put a few gouges and scratches in the panel. Very lucky it wasn't cracked or worse. Anyway, its all fixed up and primed again. When I have time, tomarrow or thursday, I'll sand it and start with coats of gloss black. Once the black is dry, I'll remove the masks, clean up anything that needs it, and give it a few layers of clear coat. I'm doing the side scoops at the same time, so I'll have a bunch of mods all at once. Then I just gotta install and do some wiring.
IP: Logged
|
|
02:27 AM
|
|
|
Mar 25th, 2005
|
Fastback 86
Member Posts: 7849
From: Los Angeles, CA
Registered: Sep 2003
|
Ok, here are the pics I promised. The modding part of the project is done now, and just waiting to be installed. Hopefully, that will be within the next few days. Here are all the pics: Here's where I left off. Last pic I posted, I had bonded in the plexi. Now the letters are cut out.
 All bondo'd up and sanded smooth and waiting for paint.
 Primer on. Notice the scoops too. Did it all at the same time. The scoops needed to have a few knicks and such filled.
 Here's a shot of the damage I had to fix when my mom ran over it. You can see the Jimmy nosing into the picture.
 A look from the back.
 Paint going on...getting close
 More to come...
IP: Logged
|
|
02:48 AM
|
|
Fastback 86
Member Posts: 7849
From: Los Angeles, CA
Registered: Sep 2003
|
And the rest... All done.
 And a close up.

Its been a bit of a roller coaster ride. At some points, I had doubts about how it would come out. Especially after painting it black when I removed the masks before clear coating. I could see a lot of little things I didn't like. Part of it is I'm by no means an autobody guy, and don't ever care to be. Other part is I'm a perfectionist, which is tied to the first part. I must say, though, just adding the clear coat made it look a lot better. From a few feet back, it looks awesome. Up close, you can see some things, but its as good as I can get it. I'm pleased with it, and if it ever bugs me enough, I can pull it all apart and try again.
Stay tuned, by the end of the weekend I hope to have it installed, and I'll of course have more pics of that.
IP: Logged
|
|
02:53 AM
|
|
Malakyt
Member Posts: 731
From: Tucson, AZ
Registered: Jun 2003
|
amazing... wow. I love it. Cant wait to see it in person this june
IP: Logged
|
|
02:58 AM
|
|
Musmaro13
Member Posts: 538
From: Lapeer, MI 48446
Registered: Jan 2005
|
You did my dream taillights! They look AWESOME. Keep up the good work man.
IP: Logged
|
|
03:19 AM
|
|
ICouldaBeenAV8
Member Posts: 692
From: Chatsworth, California; Clearwater, Florida, and Milwaukee, Wisc.
Registered: Jun 2003
|
Why can't I see the pictures?
IP: Logged
|
|
12:30 PM
|
|
Fastback 86
Member Posts: 7849
From: Los Angeles, CA
Registered: Sep 2003
|
| | | quote | | Originally posted by ICouldaBeenAV8: Why can't I see the pictures? |
|
I'm really not sure. Seems some people are having trouble seeing pics hosted on myfiero.com. I'll have to talk to them about that. I'll try to get the pics up on my CarDomain page soon too.
IP: Logged
|
|
01:45 PM
|
|
Black-Azz-GT
Member Posts: 2326
From: Florida Keys
Registered: Oct 2003
|
Very nice!
IP: Logged
|
|
01:58 PM
|
|
datacop
Member Posts: 1426
From: Indianapolis, IN, USA
Registered: Jan 2004
|
Holy crap.. that's friggin beautiful!
IP: Logged
|
|
02:18 PM
|
|
|
PFF
System Bot
|
|
|
|
Sourmug
Member Posts: 4538
From: Calgary, Alberta, Canada
Registered: Sep 2002
|
Very nice! I think that a great alternative to the stock GT lights. Good Job, a + for you. Nolan
IP: Logged
|
|
05:53 PM
|
|
BrewCheese
Member Posts: 1809
From: NW Indiana
Registered: Feb 2003
|
Now that is a thing of joy and beauty forever! Jason
IP: Logged
|
|
06:28 PM
|
|
Riceburner98
Member Posts: 2179
From: Natick, Ma, USA
Registered: Apr 2002
|
Awesome, just awesome! Can't wait to see that thing lit up! ------------------
Bob Williams
Multi-colored '86 Mutt, a work in progress! (3800SC running great! Fixed the bent roof, now I need an intercooler! Yeehaa!)

IP: Logged
|
|
06:41 PM
|
|
Sourmug
Member Posts: 4538
From: Calgary, Alberta, Canada
Registered: Sep 2002
|
Did you make your own letter masks? If so, what did you use for a template? Thanks
Nolan
IP: Logged
|
|
07:36 PM
|
|
Fastback 86
Member Posts: 7849
From: Los Angeles, CA
Registered: Sep 2003
|
| | | quote | | Originally posted by Sourmug: Did you make your own letter masks? If so, what did you use for a template? Thanks
Nolan |
|
The stock tail lights. Taped some printer paper over them, set up a stool, got a pencil, and turned on the ignition. Used a ruler for the straight lines, made dots around the curves and connected them as smoothly as possible. I then took my template and taped it to the panel in the correct position and used a razor blade to cut the letters. I cut both the paper and the mask on the plexi glass at the same time. Then I just peeled the rest of the mask off the plexi. Started with this (this is actually after I cut the template, I didn't get a pic of the template before I cut it):
 Came out with this:
IP: Logged
|
|
09:00 PM
|
|
FastIndyFiero
Member Posts: 2546
From: Wichita, KS
Registered: Aug 2002
|
| | | quote | | Originally posted by Fastback 86:
I'm really not sure. Seems some people are having trouble seeing pics hosted on myfiero.com. I'll have to talk to them about that. I'll try to get the pics up on my CarDomain page soon too.
|
|
If you want, just e-mail them to me and I can get them up on my Photobucket account tonight. Just use harleyhat1@hotmail.com. Like I said, looks pretty darn sweet. I would trade at least 3 bowls of Wheaties for a panel like that. 
Nate
IP: Logged
|
|
09:16 PM
|
|
|
Mar 26th, 2005
|
Fastback 86
Member Posts: 7849
From: Los Angeles, CA
Registered: Sep 2003
|
Heh heh, thanks Nate. I'll talk to you about it in chat tonight. I still need to talk to isthiswhereiputausername? though and see if he can fix it, since its his server. In tail light news, I washed the car and installed Navigator NV-803 trailer back up lights where the reflectors used to be today. Dang those suckers are bright. I love it!  I was apprehensive about taking off the rear fascia, but it was actually really easy. Thanks to Ed Herring, who suggested using a fork (the kind you eat with) for removing the push-pull rivets holding most of the fascia on. I was apprehensive about taking off the rear fascia, but it was actually really easy. Thanks to Ed Herring, who suggested using a fork (the kind you eat with) for removing the push-pull rivets holding most of the fascia on. Duplicolor wants 5 days for the clear coat to be totally set, so I'm giving it as much time as I can, which is until Sunday night. I'll install them then, provided I can find dual filiment red-colored bulbs in time. The red bulbs I have right now are single filiment and of no use to me.
IP: Logged
|
|
12:15 AM
|
|
roys88fiero
Member Posts: 1042
From: Tucson,AZ
Registered: May 2003
|
Awesome tail lights ! ! ! i cant wait to see them in your car... + for you. -Roy ------------------
Real Sports cars only have 2 seats....

Matching numbers GT
#17889 of 26,402 made in 1988, 1of 241 yellow GT's
IP: Logged
|
|
01:10 AM
|
|
Fastback 86
Member Posts: 7849
From: Los Angeles, CA
Registered: Sep 2003
|
Opinion Poll! I'm off to hunt for those dual filiment red bulbs today, but I need to decide how to set it all up. Should I... Put the red bulbs in the inner lenses and the amber bulbs in the outer lenses, a la Ferrari? or... Put the amber bulbs in the inner lenses and the red bulbs in the outer lenses? I honestly can't decide which I would like better, though I'm leaning towards the second one. Thoughts?
IP: Logged
|
|
01:43 PM
|
|
|
Mar 28th, 2005
|
Fastback 86
Member Posts: 7849
From: Los Angeles, CA
Registered: Sep 2003
|
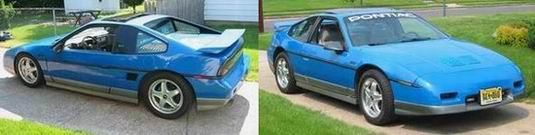
Here it is!!! The tail lights are in and so are the pics! Have a look for yourself - 


Not bad, eh? There's a couple little things I want to change (the red bulbs I'm using, for one), but for all intents and purposes, thats how she'll look. Seeing it all finally come together is so awesome, it came out just as I had hoped, better even. Definately worth the time and money. I got my 355 lights and my PONTIAC too!
IP: Logged
|
|
02:14 AM
|
|
|
PFF
System Bot
|
|
Rickady88GT
Member Posts: 10649
From: Central CA
Registered: Dec 2002
|
Nice job! Turned out good. ------------------

IP: Logged
|
|
02:17 AM
|
|
Fastback 86
Member Posts: 7849
From: Los Angeles, CA
Registered: Sep 2003
|
Thanks Rick! I love your paint job! Also, I forgot to add that I'm leaving on vacation tomarrow morning, and won't be back till Friday night. So, any questions will have to wait till then. Sorry, just the way it worked out. Thanks again for looking and all the compliments!
IP: Logged
|
|
03:54 AM
|
|
yellowstone
Member Posts: 9299
From: Düsseldorf/Germany
Registered: Jun 2003
|
Very nice! Gave me some ideas :-) ------------------

www.yellowfiero.com/fiero.html
17" DEZENT T wheels with 215/40 tires front and 235/45 rear, KONI shocks, EIBACH lowering springs, drilled/slotted rotors, SS brake hoses. PU dog bone, all bushings and engine mounts, K&N air and oil filters, OZELOT exhaust, Mercedes SLK yellow paintjob, Mr. Mikes leather seats, door skins, shift and e-brake boots. MP3 deck and custom subwoofer behind passenger seat, F355 style front. Fiero Store rear swaybar, strut tower brace, black carpet, air intake. Rodney Dickman's competition short shifter, SS vacuum lines and deck lid strut. Billet aluminum dash kit from Kitcarman.
IP: Logged
|
|
05:49 AM
|
|
Monkeyman
Member Posts: 15833
From: N. Wilkesboro, NC, USA
Registered: Nov 1999
|
Holy doodoo, Batman!! That has got to be one of the coolest mods I've ever seen. Brilliant imagination. Two thumbs up to you. Dave
IP: Logged
|
|
10:55 AM
|
|
|
Mar 29th, 2005
|
Australian
Member Posts: 4701
From: Sydney Australia
Registered: Sep 2004
|
love it
IP: Logged
|
|
01:49 PM
|
|
doublec4
Member Posts: 8289
From: Oakville, Ontario, Canada
Registered: Jun 2003
|
I don't know how I missed this thread! What a good idea, if I was a fastback owner I'd be all over that.
IP: Logged
|
|
10:30 PM
|
|
GTFiero1
Member Posts: 6508
From: Camden County NJ
Registered: Sep 2001
|
that looks awsome, a plus for you ------------------
+ an 88 Caprice 9C1 Police Package
--Adam--
IM AOL: FieroGT5speed
IP: Logged
|
|
11:14 PM
|
|
|
Mar 30th, 2005
|
Steven Snyder
Member Posts: 3326
From: Los Angeles, CA
Registered: Mar 2004
|
| | | quote | Originally posted by Fastback 86:
Here it is!!! The tail lights are in and so are the pics! Have a look for yourself -
|
|

That looks INCREDIBLE! Whoa!
IP: Logged
|
|
12:38 AM
|
|
sonic50
Member Posts: 3873
From: All over the USA
Registered: Aug 2004
|
IP: Logged
|
|
12:46 AM
|
|


