My 87GT basket case has been pretty much a ground-up restoration. One of the best things about this kind of project is learning new techniques. Today I tried my hand at urethane bumper repair. Sure I could have searched e-bay for a much better fascia and since I have replaced so much on this car already, what’s one more part? But GT noses are getting to be in short supply and the tricks that I learn by fixing the one I already had could be put to some more creative uses later on. Also, it looked so bad to begin with, it was kind of like a challenge.
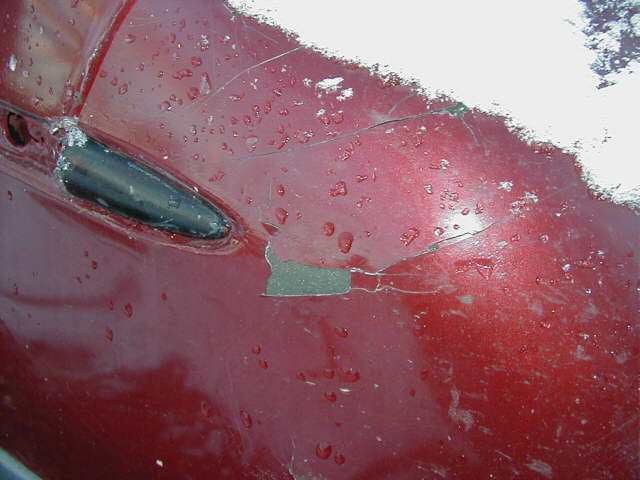
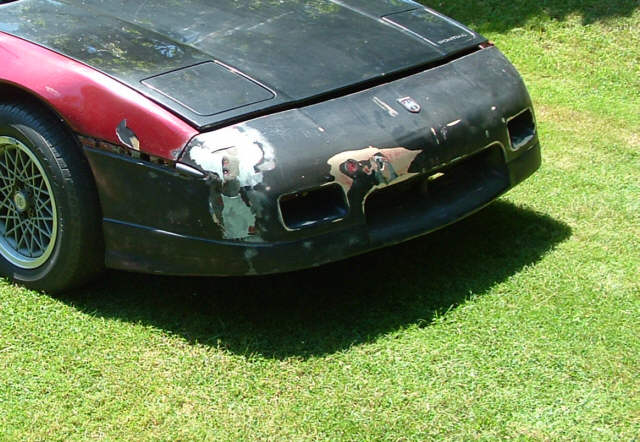
Pictures of the way it looked as purchased. Lots of cracking body filler hid the mess that was really underneath.
A pretty sad looking mess!
First, the bumper was stripped down to the factory primer and most of the Bondo was chipped out.
I used a chemical stripper, as there were multiple layers of bad paint. Most people recommend against this, because the urethane will absorb some of the solvents. I could actually see the plastic swell a little bit in places. I found the secret is to allow lots of time for the chemicals to evaporate back out of the plastic before you continue sanding, painting etc. Since I was not in a hurry, a couple weeks sitting in the sun did the trick. The plastic resumed it’s normal smooth finish.
------------------
IP: Logged
11:10 PM
PFF
System Bot
Gordo Member
Posts: 2981 From: East Guilford, NY, USA Registered: Mar 2002
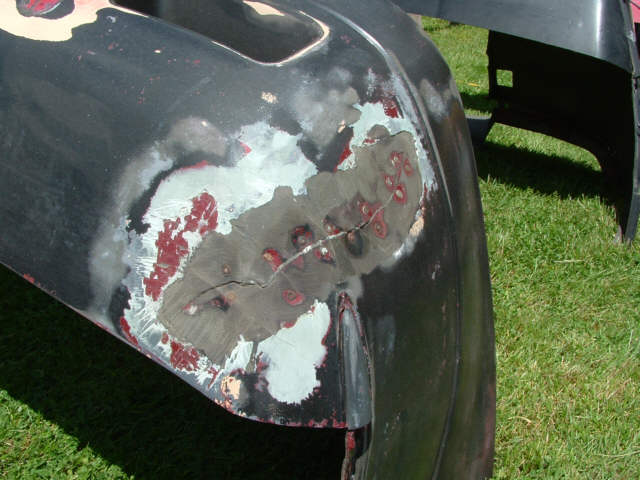
With the paint & most of the Bondo gone, you can see how badly it was repaired before. Most people would have just thrown it away.
My toy…
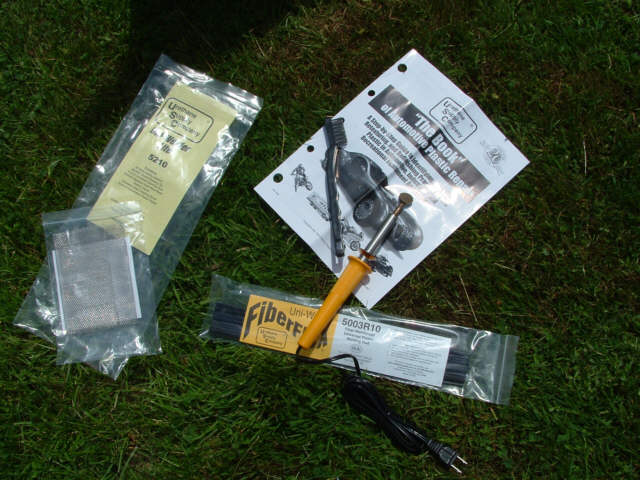
This is an inexpensive “plastic welder”. It’s basically a soldering iron with a large flat foot on the end. I ordered the whole kit from urethane supply company. It comes with the welder, instructions, stainless reinforcing screen and enough Fiberflex filler rod to do a whole lot of repair (or customizing)
IP: Logged
11:17 PM
jscott1 Member
Posts: 21676 From: Houston, TX , USA Registered: Dec 2001
After things are lines up pretty well, you have to groove the back side of the tear.
I used a die grinder with a round stone. I was surprised how quickly and easily this is done. Next, the flex filler is added. Since the iron is fairly low watt it takes a while to warm up. It stays just the right temperature to melt the filler and not damage the bumper.
Next the tape is removed and the top surface is grooved
Try to grind through most of the crack. It's pretty easy to tell. The kit also came with excellent instructions detailing techniques for various types of plastic.
Fill the top surface, same as the bottom.
The repair is now ready for sanding & finishing with flex-filler
(more to come)
[This message has been edited by Gordo (edited 05-31-2005).]
IP: Logged
07:28 AM
Dennis LaGrua Member
Posts: 15733 From: Hillsborough, NJ U.S.A. Registered: May 2000
Nice work. As our cars age, replacement facias are bound to become more scarce . This may require fixing your old one. I've had luck repairing facia tears using epoxy specially made for plastic. I then finsih off the repair with 3M Easy Sand flexible filler. You can even use this stuff to fill holes. The repairs done this way seem to last. If your facia is dented out of shape, I've found that a heat gun helps restore the shape but often steel bracing needs to be glued to the inside of the facia to keep it straight. Facias can certainly be repaired to like new condition, but the process takes time.
Looks good so far - I've talked to others about getting a "plastic welder" (I usually reinforce the inside of the crack with fiberglass matte & some 2-part urethane epoxy, then just grind/fill/sand/repeat with the epoxy on the outside). Thanks for the link!
As for the chemical stripper - I'd still have some cocerns about that. Even though it would seem that it's totally evaporated from the part, it may still cause issues when it comes to repainting. I'd definitely look into using a good sealer before prime & paint - although it may not totally avoid the issues, it certainly could reduce or delay them!
This looks totally awesome. In the future I would suggest avoiding the stripper as well. With a random orbit sander I was able to sand my fascia down to the factory primer in no time at all and it was badly cracked and had I don't know how many layers of paint.
IP: Logged
09:52 AM
USFiero Member
Posts: 4877 From: Everywhere and Middle of Nowhere Registered: Mar 2002
there are business that specialize in bumper repair like keystone. I had one local body shop tell me they wouldn't use the bumpers that had been refurbished by them because they used waterbased primer. I think some of the other body and paint guys here on the forum said that you could get by with the keystone work if you scuff sanded it first. I applaud you on doing this yourself, and I'm watching this thread since I may be doing some mods and repairs on some smaller panels like the doors and fenders on mine soon.
------------------ John DuRette Custom 85 ; 87 Coupe in the driveway. "Kinda makes you nostalgic for a Members Only jacket"
IP: Logged
02:04 PM
Marvin McInnis Member
Posts: 11599 From: ~ Kansas City, USA Registered: Apr 2002
Be extremely careful when using heat on urethane parts! Urethane and some other plastics contain deadly cyanides, which can be released when they are heated above their melting points. (Please ... no "I've been inhaling urethane vapor all my life and it hasn't hurt me" replies. People can read this and make safety decisions for themselves.) It's always a good idea to consult the manufacturers' MSDS sheets for plastic materials before heating them much above 150 or 160 degrees F.
The on-line MSDS for FiberFlex indicates that it is a relatively safe hot-melt adhesive, so melting into the urethane is not part of the repair process. Just be careful not to apply more heat to the urethane than is necessary for a good bond to the FiberFlex.
[This message has been edited by Marvin McInnis (edited 05-31-2005).]
IP: Logged
02:30 PM
Gordo Member
Posts: 2981 From: East Guilford, NY, USA Registered: Mar 2002
Be extremely careful when using heat on urethane parts! Urethane and some other plastics contain deadly cyanides, which can be released when they are heated above their melting points. (Please ... no "I've been inhaling urethane vapor all my life and it hasn't hurt me" replies. People can read this and make safety decisions for themselves.) It's always a good idea to consult the manufacturers' MSDS sheets for plastic materials before heating them much above 150 or 160 degrees F.
The on-line MSDS for FiberFlex indicates that it is a relatively safe hot-melt adhesive, so melting into the urethane is not part of the repair process. Just be careful not to apply more heat to the urethane than is necessary for a good bond to the FiberFlex.
Thanks for the info. That's good advice. I don't believe that this welder will get hot enough to melt the urethane and since it was a nice day, I made my repairs outdoors. I am usually not in the habit of checking msds sheets though. You make a good point.
IP: Logged
05:11 PM
PFF
System Bot
Eclipse Member
Posts: 2040 From: Woodstock, Ontario Canada Registered: Jun 2004
I am currently working on restoring a fascia like yours and this is excellent! Good point about the orbital sander. I've been wondering what would be best to use.
I was also hunting around and found that jc whitney sells fiero bumpers.
------------------ Jay Brintnell Owner / Design Lead - WordMark.ca Communications
IP: Logged
10:30 PM
Firefox Member
Posts: 4307 From: New Berlin, Wisconsin Registered: Feb 2003
Be extremely careful when using heat on urethane parts! Urethane and some other plastics contain deadly cyanides, which can be released when they are heated above their melting points.......
That's something that I tend to forget mentioning in my paint threads. Today's paints are dangerous to spray due to the chemicals including the cyanides, and when spraying or doing any other work with chemicals, fresh air is a must. Even working outdoors sometimes isn't good enough, especially if there is no wind. Charcoal resperators only remove so much stuff from the air you breathe, and a fresh air filtered air supply is the best way to go. Even limited exposure is dangerous.
Also, keep a nice fire extinguisher handy!
Mark
IP: Logged
10:32 PM
Jun 1st, 2005
Gordo Member
Posts: 2981 From: East Guilford, NY, USA Registered: Mar 2002
Here's another shot of the repair, ready for filling & sanding.
I was amazed at how little time it took to fuse this bumper back together so, on to the real challenge.
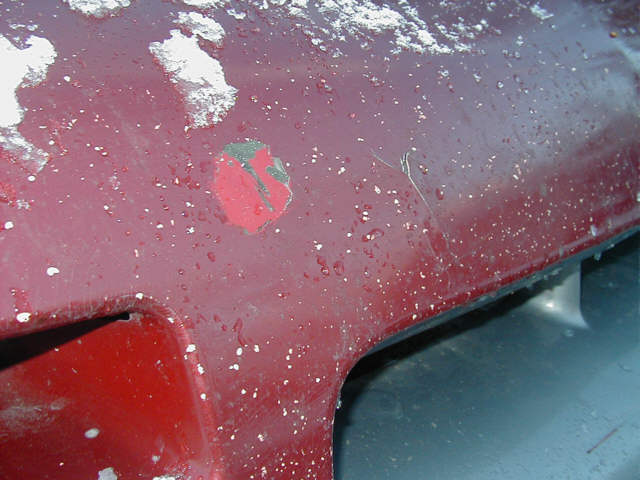
My GT nose was in really bad shape. It had been damaged years ago and filled with bondo. Of course, everything was cracking. I removed all of the old filler using a wire brush in my die grinder. As you can see, they riveted both sides of the tear together with a piece of galvanized sheet metal. I decided to leave this reinforcement alone and simply fuse the crack back together.
Once again, I ground a slot along the length of the crack.
I melted the FiberFlex rod onto the groove and covered the rivets as well.
IP: Logged
08:21 PM
Gordo Member
Posts: 2981 From: East Guilford, NY, USA Registered: Mar 2002
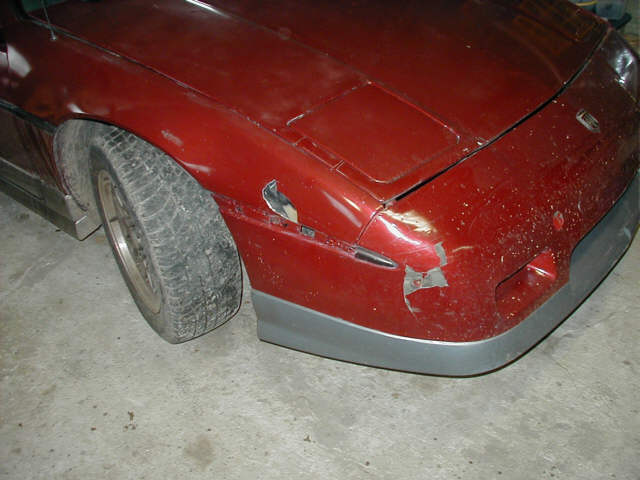
I know, it doesn't look very promising at this point but it is now a much more stable repair. I also fixed two smaller tears in the front using the same methods.
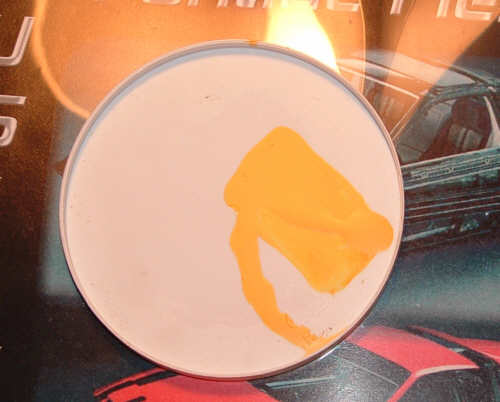
For finishing, I used a two part epoxy flexible filler, also from Urethane Supply company.
Mixing equal parts, 50-50
The epoxy cures for sanding in about 15 minutes. After several layers to build up the original contour, this is the result. Notice that as applied, it has a natural gloss. This is helpful because you can check the contour by the way light reflects off it.
Finish sanding & urethane primer is next...
------------------
[This message has been edited by Gordo (edited 06-01-2005).]
IP: Logged
08:28 PM
CTFieroGT87 Member
Posts: 2520 From: Royal Oak, MI Registered: Oct 2002
This is looking very good. I wish I had this much time to fix my current nose last year. I think I'm gonna buy your repair setup to fix a nose on my 86GT.
------------------ Christian Thomas 87 Pontiac Fiero GT Burgandy/Silver 5.7L ZZ4 5spd 301rwhp/345rwtq Next Mod: Not sure yet
IP: Logged
08:38 PM
F-I-E-R-O Member
Posts: 8410 From: Endwell, NY Registered: Jan 2005
I know that this really belongs in OT, but I thought you meant...
Bladder and urethral repair is usually performed to prevent urine leakage associated with stress incontinence.
Stress incontinence is the involuntary leakage of urine when laughing, coughing, sneezing, or lifting, which can result from deformity or damage to the urethra and bladder from decreased muscle tone caused by multiple births, menopause, or other causes.
------------------
There isn’t much better in this life than finding a way to spend a few hours in conversation with people you respect and love. You have to carve this time out of your life because you aren’t really living without it.
[This message has been edited by F-I-E-R-O (edited 06-01-2005).]
IP: Logged
08:41 PM
F-I-E-R-O Member
Posts: 8410 From: Endwell, NY Registered: Jan 2005
Hey neighbor! Thanks for all the photos! I dont need to do this (right now) but it's good to know for the future. Might even lead to some custome work, who knows. It's awesome when people take the time to explain as well as you did a process for doing something rather than tell everyone that thye worked on their car this weekend.
IP: Logged
08:49 PM
dougk109 Junior Member
Posts: 7 From: Bellefonte, PA, USA Registered: Mar 2002
Absolutely beautiful. You have so much talent. See dad, even 2000 miles away you can still teach me great things. Have you decided what color you will paint the car if you ever finish it?
IP: Logged
12:19 AM
PFF
System Bot
YELLOWFIERO88 Member
Posts: 1329 From: Cincinnati, Ohio Registered: Nov 2004
there are business that specialize in bumper repair like keystone.
Keystone redid my yellow bumbers. It was under $200 a piece to strip, fix, and prime them. Money well worth it. The only thing that ticked me off was they removed my vin stickers after I told them not to. You scuff them down with soapy water and a scuff pad then paint.
Gordo, great looking job. If I had more time I would have done mine myself.
Is this the one you are giving to your daughter?
------------------ 88GT 3.4SC 88GT T-TOP 87GT VERT (build in progress)
IP: Logged
12:40 AM
Gordo Member
Posts: 2981 From: East Guilford, NY, USA Registered: Mar 2002


.jpg)