Pennock's Fiero Forum
  General Fiero Chat - Archive
  CHEAP and easy performance air intake for about $8

T H I S   I S   A N   A R C H I V E D   T O P I C
  

Email This Page to Someone! | Printable Version


CHEAP and easy performance air intake for about $8 by R Runner
Started on: 08-13-2006 03:11 PM
Replies: 15
Last post by: R Runner on 08-15-2006 09:55 PM
R Runner
Member
Posts: 3689
From: Scottsville, KY
Registered: Feb 2003


Feedback score:    (12)
Leave feedback


Total ratings: 98
Rate this member

Report this Post08-13-2006 03:11 PM Click Here to See the Profile for R RunnerSend a Private Message to R RunnerDirect Link to This Post
Hello........

At our Gateway Fiero Club meeting last week, we got on the subject of air intakes. I told the group that I had modified mine for $8 and was surprised to find that all were interested but, no one had done this to their car or had thought of the idea. I thought I would share.
The idea is simple: replace the air box with a pipe. The cheap part is that you can get the items at Home Depot for $3.06 (two are needed) plus tax. Below is a lis of what you need:

1. Two 3" dia. "articulating" 90 degree elbows
2. 2 Short 1/8" aluminum rivets
3. 3" hose clamp (I think just one)
4. Hand tools (hammer, flat screw driver, rivet gun)
5. A drill and small bit.

The pictures below show the process:

The tools and parts


Drill out this rivet on the first 90 degree elbow


Open the joint and seperate the sections


Drill out this rivet on the second 90 degree elbow


Attach the two longer tubes


Use the aluminum rivet


Tap down sharp edges


The result should be about 11.5" to 12" long. More on the next post..........

[This message has been edited by R Runner (edited 08-13-2006).]

IP: Logged
PFF
System Bot
R Runner
Member
Posts: 3689
From: Scottsville, KY
Registered: Feb 2003


Feedback score:    (12)
Leave feedback


Total ratings: 98
Rate this member

Report this Post08-13-2006 03:28 PM Click Here to See the Profile for R RunnerSend a Private Message to R RunnerDirect Link to This Post
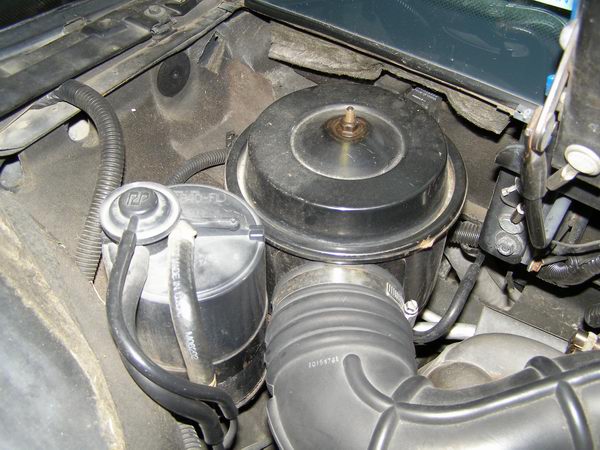
To install it, you will need to remove the air cleaner box, rear wheel, fender liner (pull it back) and the outside air intake grille.

Since I installed mine some time ago, all I have are pictures of the finished product however the procedure is something like this....

1. Remove the air filter box
2. Remove the DS rear wheel
3. Remove the forward side of the wheel liner
4. Remove the outside air intake grille
5. Remove the air (water trap) box
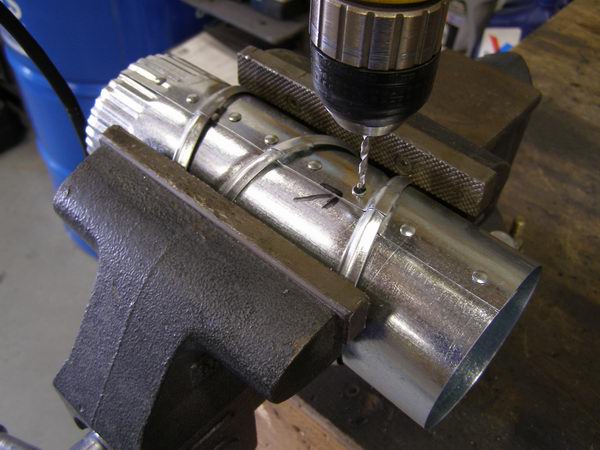
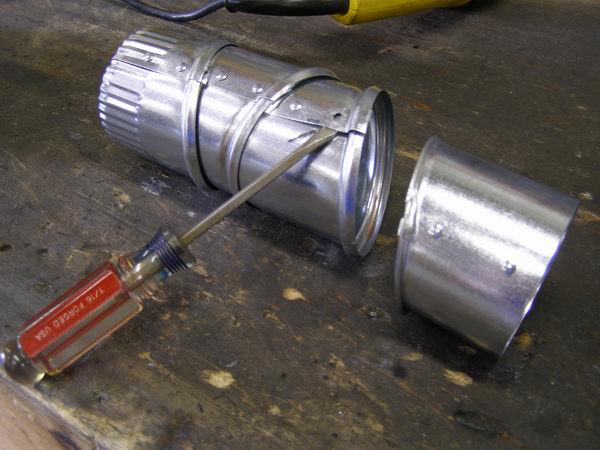
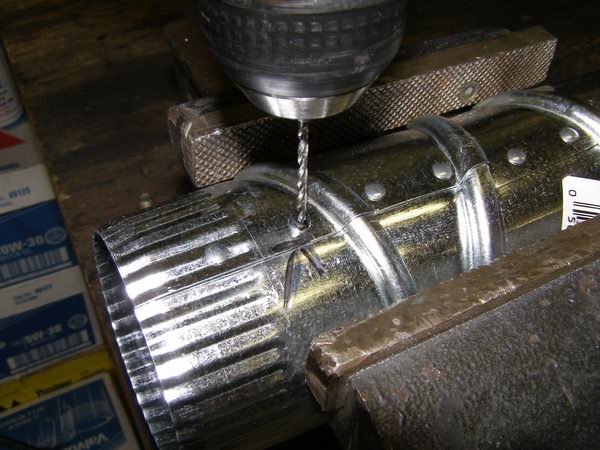
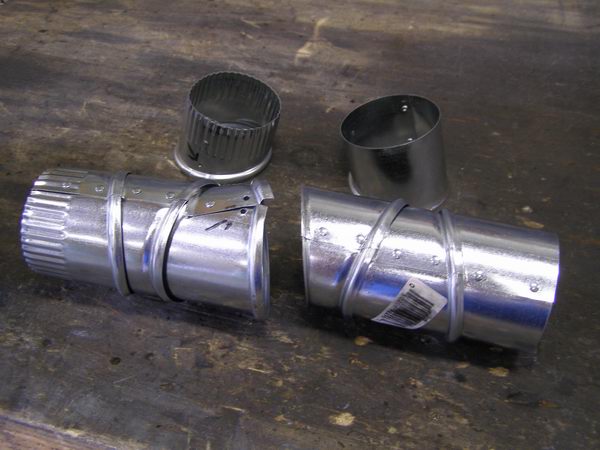
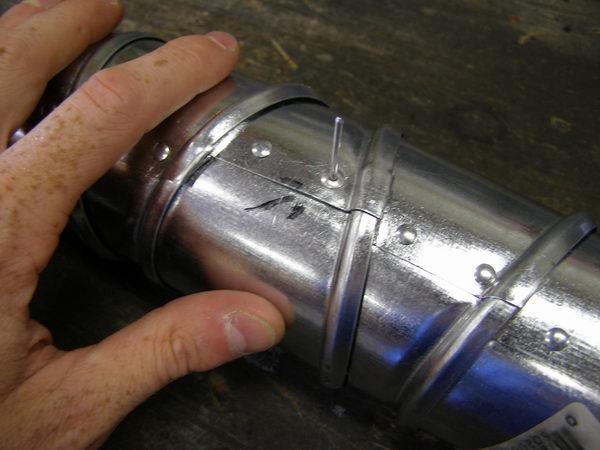
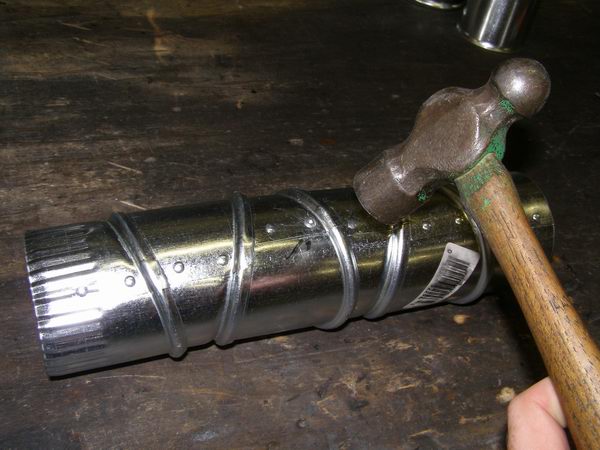
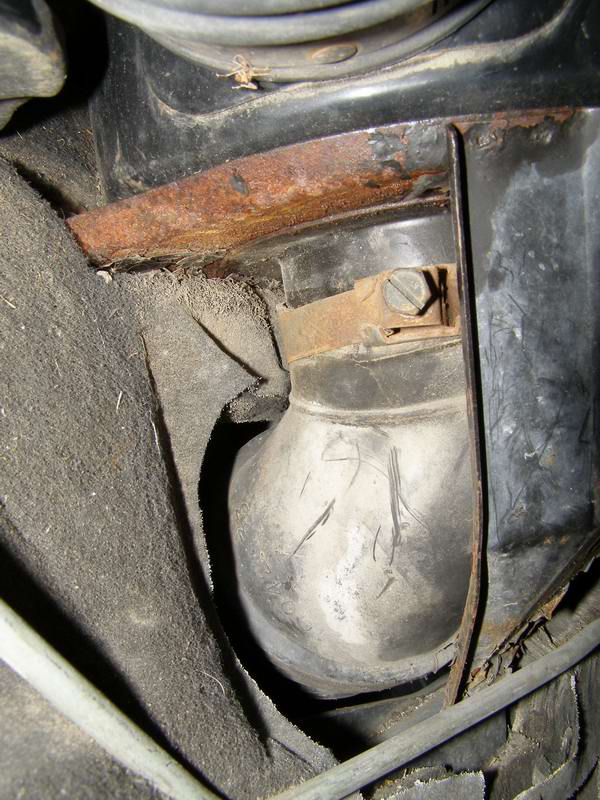
6. Put in the new tube. Rotate the sections for the best fit. Use some 3" hose clamps if possible.
7. Put it all back together


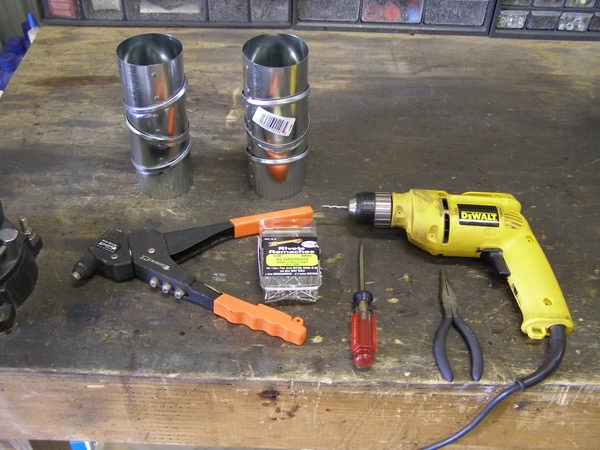
A few tips. It might be a good idea to use an oil type air filter. I have never had a problem with water getting in to the engine, but then again I have always used a K&N. I don't think this will be a problem. Also, make sure you get galvanized air duct for the hardware store. It will last (as you can see from the installed photos. Install the smooth edge toward the outside of the car.

If you want to make a second one, just put the two short sections together (with a rivet) and connect to another 90 degree elbow from the harware store. They just slide into each other. Actually that is what is in my car before I discovered the easier way to do it described in the previous post.

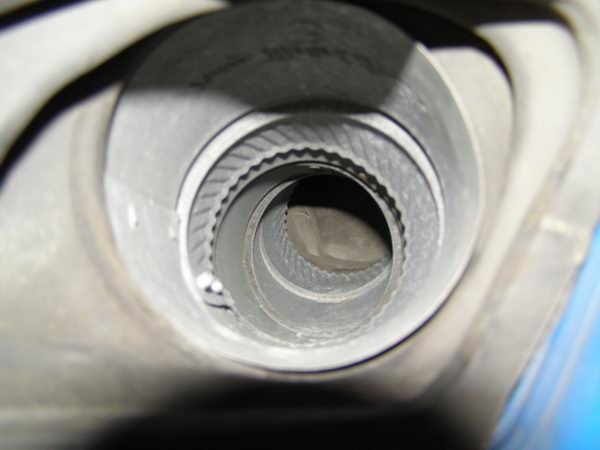
All of the sensors should be fine. They mount above this tube.

BTW, if you are going to the Gateway Fiero Cookout on September 10th, and you want one of these, let me know. I'll sell you one for the cost of material and help you install it.

------------------
Paul

Home Built Tube Chassis IMSA Race Car - 3.8 lb./hp | DAILY DRIVER and PROUD OF IT! 1987 Fiero GT 130,xxx, 3.1 motor, HHP swaybar, Full poly..... For a full history of the Fiero SS: http://www.cardomain.com/ride/789315

IP: Logged
Capt Fiero
Member
Posts: 7657
From: British Columbia, Canada
Registered: Feb 2000


Feedback score: N/A
Leave feedback


Total ratings: 260
Rate this member

Report this Post08-13-2006 06:39 PM Click Here to See the Profile for Capt FieroClick Here to visit Capt Fiero's HomePageSend a Private Message to Capt FieroDirect Link to This Post
Well looks like I have a project for tomorrow.

That is too simple to not do it.

Thanks

------------------
85GT 5spd ,93 Eldorado 4.9 Dual O2 Custom Chip, Archie Clutch. Custom Exhaust. MSD Everything 245/50/16's Not Your Average 4.9 Capt Fiero Com --- My Over View Cadero Pics Yellow 88GT 5spd Stock.

IP: Logged
Arns85GT
Member
Posts: 11159
From: London, Ontario, Canada
Registered: Jul 2003


Feedback score: (1)
Leave feedback


Total ratings: 202
Rate this member

Report this Post08-13-2006 06:49 PM Click Here to See the Profile for Arns85GTSend a Private Message to Arns85GTDirect Link to This Post
Just curious. Where is the filter, or do you use one?

Arn
IP: Logged
R Runner
Member
Posts: 3689
From: Scottsville, KY
Registered: Feb 2003


Feedback score:    (12)
Leave feedback


Total ratings: 98
Rate this member

Report this Post08-13-2006 07:47 PM Click Here to See the Profile for R RunnerSend a Private Message to R RunnerDirect Link to This Post
The only thing you replace is the air box. The air filter and the canister it is held in stays stock.
The purpose of this mod is to reduce the air flow problems in the intake by eliminating the "water trap" box. If you have already done an exhaust mod to improve flow, this change should improve both HP and fuel mileage.
There is a sensor in the rubber boot between the air box and the filter canister. This piece stays sock as well.

Oh yea. Don't forget to clean the air filter canister before putting it back together. They get pretty dirty.

I don't know, maybe everyone knows about this mod already. The first (and usualy least expensive) rule of hot rodding is to improve breathing. Remove stock restrictions in the intake and exhaust. "Free" hp. After all, the engine is just a big air pump.

Paul
IP: Logged
R Runner
Member
Posts: 3689
From: Scottsville, KY
Registered: Feb 2003


Feedback score:    (12)
Leave feedback


Total ratings: 98
Rate this member

Report this Post08-13-2006 08:06 PM Click Here to See the Profile for R RunnerSend a Private Message to R RunnerDirect Link to This Post

R Runner

3689 posts
Member since Feb 2003
Here are some pictures from the inside.........

The stock air canister is retained.....


Here is a picture of the elbow (stock) under the canister. The new piece fits into this where the air box used to be (other side as viewed from the camera).


I wish I had some pictures of it being installed.

Paul
IP: Logged
mickeyswing52
Member
Posts: 297
From: sturgeon bay ,wis usa
Registered: Jan 2006


Feedback score: N/A
Leave feedback

Rate this member

Report this Post08-13-2006 09:30 PM Click Here to See the Profile for mickeyswing52Send a Private Message to mickeyswing52Direct Link to This Post
Couldn`t you just use the aluminum dryer flex tube they have at Home Depot instead of the 2 elbows. The flex tube comes in many size diameters and could be streached to what ever length you need.
IP: Logged
Erik
Member
Posts: 5625
From: Des Moines, Iowa
Registered: Jul 2002


Feedback score: (3)
Leave feedback


Total ratings: 168
Rate this member

Report this Post08-13-2006 09:30 PM Click Here to See the Profile for ErikSend a Private Message to ErikDirect Link to This Post
cool ...a 4 inch flexible expandible aluminum dryer vent hose works real good too
IP: Logged
banditbalz
Member
Posts: 2070
From: Barrie Ontario Canada
Registered: May 2000


Feedback score: N/A
Leave feedback


Total ratings: 99
Rate this member

Report this Post08-13-2006 09:34 PM Click Here to See the Profile for banditbalzClick Here to visit banditbalz's HomePageSend a Private Message to banditbalzDirect Link to This Post
 
quote
Originally posted by mickeyswing52:

Couldn`t you just use the aluminum dryer flex tube they have at Home Depot instead of the 2 elbows. The flex tube comes in many size diameters and could be streached to what ever length you need.


That's exactly what I did about 15 years ago on my GT. I think I spent about $5.00 in parts. I Left the air canister where it's suppose to be,

------------------
got boost? L67 in progress...

IP: Logged
buger_57
Member
Posts: 526
From: Iowa, US
Registered: Jun 2005


Feedback score: N/A
Leave feedback

Rate this member

Report this Post08-14-2006 01:03 AM Click Here to See the Profile for buger_57Send a Private Message to buger_57Direct Link to This Post
any gains in performance or sound?
IP: Logged
Jax184
Member
Posts: 3524
From: Vancouver, Canada
Registered: Jun 2005


Feedback score: N/A
Leave feedback


Total ratings: 111
Rate this member

Report this Post08-14-2006 01:31 AM Click Here to See the Profile for Jax184Click Here to visit Jax184's HomePageSend a Private Message to Jax184Direct Link to This Post
It's too bad that the Fiero already has a cold air intake that's more than enough for eather stock engine...
IP: Logged
PFF
System Bot
Formula88
Member
Posts: 53788
From: Raleigh NC
Registered: Jan 2001


Feedback score: (3)
Leave feedback


Total ratings: 554
Rate this member

Report this Post08-14-2006 09:31 AM Click Here to See the Profile for Formula88Send a Private Message to Formula88Direct Link to This Post
 
quote
Originally posted by mickeyswing52:

Couldn`t you just use the aluminum dryer flex tube they have at Home Depot instead of the 2 elbows. The flex tube comes in many size diameters and could be streached to what ever length you need.


Here's a better idea. Go to Pep Boys (or other auto parts store). They sell flexible air cleaner duct hose. Get the 3" dia. hose and use it. Remove the water diverter and clamp the hose to the base of the OEM air filter canister. Then all you need to do is attach it to the fender vent. On my car I took a piece of 3" dia. PVC pipe about 2" long and stretched the rubber grommet in the fender vent over the PVC. I then clamped the grommet and the flex duct to the PVC pipe.

Also, for a little extra Rodney sells a kit that has a very nice fiberglass piece that attaches to the fender to connect the hose to. I'd have gone with that if he had it available when I did mine.
IP: Logged
Formula88
Member
Posts: 53788
From: Raleigh NC
Registered: Jan 2001


Feedback score: (3)
Leave feedback


Total ratings: 554
Rate this member

Report this Post08-14-2006 09:33 AM Click Here to See the Profile for Formula88Send a Private Message to Formula88Direct Link to This Post

Formula88

53788 posts
Member since Jan 2001
 
quote
Originally posted by buger_57:

any gains in performance or sound?


No real measurable gain in performance, but it does sound better. (although that's subjective)
IP: Logged
R Runner
Member
Posts: 3689
From: Scottsville, KY
Registered: Feb 2003


Feedback score:    (12)
Leave feedback


Total ratings: 98
Rate this member

Report this Post08-14-2006 05:50 PM Click Here to See the Profile for R RunnerSend a Private Message to R RunnerDirect Link to This Post
 
quote
Originally posted by mickeyswing52:

Couldn`t you just use the aluminum dryer flex tube they have at Home Depot instead of the 2 elbows. The flex tube comes in many size diameters and could be streached to what ever length you need.


I guess you could. I prefer this type because it is rigid and has a smooth inside.
IP: Logged
Scurvy
Member
Posts: 865
From: Richmond, Va
Registered: Nov 2005


Feedback score: N/A
Leave feedback

Rate this member

Report this Post08-15-2006 12:02 AM Click Here to See the Profile for ScurvySend a Private Message to ScurvyDirect Link to This Post
No offense but isn't this a home build of Rodney's version?
IP: Logged
R Runner
Member
Posts: 3689
From: Scottsville, KY
Registered: Feb 2003


Feedback score:    (12)
Leave feedback


Total ratings: 98
Rate this member

Report this Post08-15-2006 09:55 PM Click Here to See the Profile for R RunnerSend a Private Message to R RunnerDirect Link to This Post
I never saw Rodney's kit before, but yes, it looks like the same idea.

Anyway, the idea is a better air intake for under $10. People have been doing this mod for a long time. I'm guessing since 1984.

Paul
IP: Logged


All times are ET (US)

T H I S   I S   A N   A R C H I V E D   T O P I C
  

Contact Us | Back To Main Page

Advertizing on PFF | Fiero Parts Vendors
PFF Merchandise | Fiero Gallery
Real-Time Chat | Fiero Related Auctions on eBay


Copyright (c) 1999, C. Pennock