Pennock's Fiero Forum
  General Fiero Chat - Archive
  Finale Roadster Build Thread (Page 2)

T H I S   I S   A N   A R C H I V E D   T O P I C
  

Email This Page to Someone! | Printable Version

This topic is 2 pages long:  1   2 
Previous Page | Next Page
Finale Roadster Build Thread by jstricker
Started on: 03-21-2007 09:57 PM
Replies: 49
Last post by: exoticse on 06-30-2007 09:15 AM
Saxman
Member
Posts: 5151
From: Melbourne, FL
Registered: May 2005


Feedback score:    (8)
Leave feedback


Total ratings: 114
Rate this member

Report this Post04-05-2007 08:39 PM Click Here to See the Profile for SaxmanClick Here to visit Saxman's HomePageSend a Private Message to SaxmanDirect Link to This Post
Lookin' good, John. Most impressive work.

Thanks for keeping us informed - and educated!

Pass the popcorn...

(Wahoo - page 2 is mine!)

_____________________
Saxman

[This message has been edited by Saxman (edited 04-05-2007).]

IP: Logged
jstricker
Member
Posts: 12956
From: Russell, KS USA
Registered: Apr 2002


Feedback score:    (11)
Leave feedback


Total ratings: 370
Rate this member

Report this Post04-05-2007 10:12 PM Click Here to See the Profile for jstrickerSend a Private Message to jstrickerDirect Link to This Post
I'm going to back up a little and cover something that I've talked about in the past but since there are always new people and there are a couple of Finale/Fino builders and owners reading this, I'm going to go over it again.

I've used the term "Peel Ply", "Flox" and "Micro" a couple of times and haven't really explained what they are so I'll do that now.

Peel Ply is clean, washed Dacron. You can buy it at the fabric shop if you like but they often put chemicals in it that doesn't react well with the resins so if you do go that route be sure to wash it in hot water before you try to use it. Peel Ply will allow the resin to soak through and it's excellent to squeegee through to make a better part. It also leaves the surface perfectly prepared to accept another layer of glass so you don't have to sand/rough up the previous layer before you add another. Simple to use and when the resin is FULLY CURED it will peel right off. Be SURE that you remember to peel it off because, since it won't adhere, you're next layer of glass will delaminate very easily if you forget.

Micro is short for Microballoon/Resin mix and it is strictly a filler. If you looked at the raw microballoons under a good magnifying glass you'd see they are actuall very tiny white spheres. This is what they look like right out of the bag.


The consistency is about like powdered sugar or flour, but it doesn't clump together. I'll repeat, this is ONLY A FILLER! It has almost no structural strength. The advantage to using it over regular body filler is it's expansion and contraction rate is very similar to the fiberglass you are using it on so it's less prone to sanding. You mix it with resin to the consistency of cake frosting after it's been in the fridge (the frosting, not the micro ) You can vary that and make it "wet", "dry", "very dry" or anything in-between. If you're working on vertical surfaces you want it pretty dry so it won't sag or you can cover it with peel ply as I showed in the pictures on the fuel filler. The drier it is (more micro, less resin) the easier it will sand.

Next we have "Flox". Flox is small shredded clean cotton. It is puffy and much larger than micro and it is an excellent adhesive and structural filler. I showed using it, for instance, to hold in the screens over the vent openings. This is what it looks like in it's raw form.


It sands well too but it comes off when sanding about like you see it in the cup. It will take much less resin to make Flox and, again, you can make it wet, dry, or whatever in between. This is a pretty wet Flox mix and you normally won't use it this wet.


This is more typical of what you'll mix. Notice that it will hold the mixing stick up all on it's own and that it has a rough appearance in the cup.


I like to use West Systems Resins. They cure at a very predictable rate and have the advantage of being able to use pumps so that you don't have to count drops of hardener. They are very consistent and easy to use.


To mix I like to use real, unwaxed mixing cups.


The only other thing you need is a good squeegee, some chip brushes, and some tongue depressors to use as mixing sticks. I get nearly all of my glassing supplies from either Fiberglast or Wicks Aircraft Supply. Both of these companies have excellent supplies (meaning FRESH) and great inventory. Both have good customer service but Wicks sets the standard as far as I'm concerned. I normally get my orders 2 days after I place them. Once I didn't. On the third day I called and the customer service rep, as soon as I gave them my order number, said "that order got mis-routed by UPS and we've already reshipped. our computer tracks each order and the normal routing to our customers and if it sees that something is going the wrong way we know it before they do" That, my friends, is customer service.

John Stricker

[This message has been edited by jstricker (edited 04-05-2007).]

IP: Logged
jstricker
Member
Posts: 12956
From: Russell, KS USA
Registered: Apr 2002


Feedback score:    (11)
Leave feedback


Total ratings: 370
Rate this member

Report this Post04-05-2007 10:14 PM Click Here to See the Profile for jstrickerSend a Private Message to jstrickerDirect Link to This Post

jstricker

12956 posts
Member since Apr 2002
Jonathan,

You're going to LOVE the dash build up then...........

John Stricker
 
quote
Originally posted by jscott1:

Oh my...I just discovered this thread... I love these kind of build ups!

This car is amazing!!


IP: Logged
jstricker
Member
Posts: 12956
From: Russell, KS USA
Registered: Apr 2002


Feedback score:    (11)
Leave feedback


Total ratings: 370
Rate this member

Report this Post04-05-2007 10:38 PM Click Here to See the Profile for jstrickerSend a Private Message to jstrickerDirect Link to This Post

jstricker

12956 posts
Member since Apr 2002
OK, time to get back to building something.

You have to remember that this was the first production roadster kit out of the mold and there were some things that Archie hadn't gotten to yet. One of them was the rear section/waterfall and B Pillar covers. Rather than wait we decided to make our own caps.

We started by cutting our bases out of plywood and fastening them to the top of the firewall.


This was glued down solidly to the B pillar (that had been filled with pour foam) and left to cure. The adhesive we used was Flox as it grabs the foam and will NOT let go.


After that had fully cured, we made a dam out of masking tape around the edge of the plywood base.


Add in a dash of Pour Foam...........


Carve and shape to suit.................


Then add 3 layers of glass, covered with peel ply to save sanding work later.


And you have a couple of B Pillar caps.


The wing blending is coming along, still quite a ways from ready to prime, but getting there.


For whatever reason my sanity left me and I decided I wanted to do the gas filler door differently and use a billet aluminum one. So we had to make some changes to the area we already had moved. Using a holesaw I cut out the fender large enough to accomodate the door.


I floxed, glassed and filled in the 1/4" plywood behind it to make a smooth solid surface to mount on and then a test fit of the new filler.


In retrospect, I wish I had left it alone as it would have been a smoother appearance, but the door does add some "bling" (or so I'm told).

Anybody need a new, large windshield washer fluid tank??


I ordered this from the Fiero Store and decided I liked the looks of the smaller early model ones better but all of mine were junk. Dan Moffatt came to the rescue as we were working on his 4.9L conversion at the time and brought me a small one that cleaned up like new so it got mouned instead. I'm serious about getting rid of it if someone needs one of the bigger ones, it's doing me no good here at gathering dust.

We also built the headlight mounting brackets at the same time we were working on the B pillar caps. Hey, you have to be doing SOMETHING while the glass is curing.


These are made from 1" steel strap and at this point still in the unfinished state.


These will mount the Dodge Caravan headlights like we used on the copper Finale. I like the way they mount and they are very sturdy. Also if you destroy one with a rock hit or whatever, they are easily available from Dodge, a junkyard, or the aftermarket.


HID lamps are also available for them, or so I've read. I don't expect this car to be driven much at night (and not at all by me) so the stock ones are fine.


And for tonight, I leave you with this picture and we'll see if any of you bright people can figure out what it is and where it goes.


John Stricker

IP: Logged
DanFiero
Member
Posts: 2815
From: Cedar Rapids, Iowa
Registered: Jul 2002


Feedback score: (5)
Leave feedback


Total ratings: 96
Rate this member

Report this Post04-13-2007 02:07 PM Click Here to See the Profile for DanFieroSend a Private Message to DanFieroDirect Link to This Post
A little bump for some very good information!!


Dan
IP: Logged
Jake_Dragon
Member
Posts: 32903
From: USA
Registered: Jan 2001


Feedback score: (5)
Leave feedback


Total ratings: 403
Rate this member

Report this Post04-13-2007 05:54 PM Click Here to See the Profile for Jake_DragonSend a Private Message to Jake_DragonDirect Link to This Post
Thanks for keeping up with the forum. Great information, going to have to go get some Flox and get to work on my car.
Thanks again

Jake
IP: Logged
jstricker
Member
Posts: 12956
From: Russell, KS USA
Registered: Apr 2002


Feedback score:    (11)
Leave feedback


Total ratings: 370
Rate this member

Report this Post04-14-2007 08:29 PM Click Here to See the Profile for jstrickerSend a Private Message to jstrickerDirect Link to This Post
I know I need to post some more and, in fact, I have one started on the computer in the house. I'm at the shop right now (working on the roadster ) but when I get back in I'll post some more to the thread.

Jake, I get almost all my composite parts from Wicks Aircraft Supply if you need flox, micro, resin, carbon fiber, graphite, whatever. I also do some business with Fiberglast and they're good to deal with as well.

John Stricker
IP: Logged
jstricker
Member
Posts: 12956
From: Russell, KS USA
Registered: Apr 2002


Feedback score:    (11)
Leave feedback


Total ratings: 370
Rate this member

Report this Post04-14-2007 10:02 PM Click Here to See the Profile for jstrickerSend a Private Message to jstrickerDirect Link to This Post

jstricker

12956 posts
Member since Apr 2002
Yeah, I'm a little tardy on the updates. I've been trying to get pictures organized and every time I sit down to post I get interrupted with something else.

When I'm doing this stuff one of the things I like to do is try new products and different things. Most of the time I wish I hadn't as they rarely work as advertised, but once in a while you get lucky. My Carquest guy really recommended that we try some of this:


So we got a quart. One thing about it that looked promising was that you can either squeegee it on or use a roller. We used a roller. That kind of makes sense, since most of it is going to be sanded off anyway.

This images is larger than 102400 bytes. Click to view.


Doesn't look bad in these pictures. After drying completely we started sanding and I was not impressed. It sanded fairly hard and was terrible about clogging the sandpaper.

Speaking of that, I picked up several packages of 3M's "Sandblaster" Paper.

3M Sandblaster Paper

It really, really works well as far as long life and non-clogging. I only found it up to 320 grit but 3M says they have it up to 400 grit. It costs about 50% more than regular paper but you use a whole lot less of it.

The true bane of fiberglass work is pinholes. They keep coming up even though you fill and sand and fill and sand. There is a product that airplane builders use called "Smooth Prime" that also contains a UV blocker that I've used before and didn't care for because it sanded very, VERY hard, but I tried it again, this time spraying it on instead of using a roller.


It really does kill the pinholes better than anything else I've tried, but spray it on and don't roll it on like the instructions suggest. It just gets too thick and there's too much sanding if it's rolled on.

As you can see, things are coming along and getting closer at this point.


This images is larger than 102400 bytes. Click to view.

Note that on this picture and the one before, those little depressions aren't there in the door and fender at the lower front of the door and the lower rear of the fender. I wanted that smoothed and filled them in. I checked for clearance several times and it looked OK, but very close. Later, on final adjustment of the front clip and door panel, there was interference when the door was fully opened and all that work had to come back out and the depressions are still there. If you went with a VDC, you could fill them as you can open the door over 1/2 way before it even gets close, but for conventional hinges.........fuggitaboutit.

The B pillar caps came out very nice and you can see the lip that the B pillar interior pieces will fit under.

This images is larger than 102400 bytes. Click to view.

The rear ends with any custom tail lights take WAY too much time to get right. I'd say that the back end of this car, and the copper Finale, took at LEAST as long as the rest of the stock body panels put together.

This images is larger than 102400 bytes. Click to view.

I really liked the looks of the smoothed door and fender, too bad it didn't work out.


This is how the door fit with little to no adjustment and just bolting it on.


It took a slight amount of grinding and tweaking to make flush, but not nearly as much as the first Finale took. Such are the variations in fiberglass parts. Sometimes you win, sometimes you don't.

Everybody makes mistakes, here's one of mine. I drilled the mounting holes for the front clip and when we started adjusting, it just wasn't far enough back. All of the mounting holes had to be elongated and the mounts shimmed up. This was not acceptable.


I considered glassing the holes shut and redrilling, but got some fender washers instead, stacked about 20 of them, clamped them in the mill, and made them fit in the channel and beneath.


Much better. And the clamping load is spread over a much larger area as well. (yeah, I meant to do that. that's my story and I'm sticking to it!)

The rockers got glassed in, smoothed, and primed.


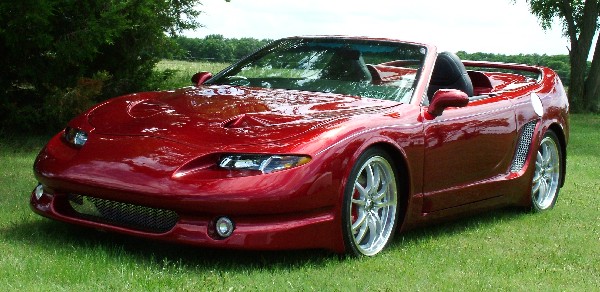
As you can tell, we're getting to the "details" part of the build. A lot of the re-body's are now ready to go to paint, but I wanted this car to be built up to the next level, or b eyond, when it came to fit and finish.

I'm very happy with the way the header came out.


It's definitely getting there.


John Stricker

[This message has been edited by jstricker (edited 04-14-2007).]

IP: Logged
jstricker
Member
Posts: 12956
From: Russell, KS USA
Registered: Apr 2002


Feedback score:    (11)
Leave feedback


Total ratings: 370
Rate this member

Report this Post04-14-2007 10:19 PM Click Here to See the Profile for jstrickerSend a Private Message to jstrickerDirect Link to This Post

jstricker

12956 posts
Member since Apr 2002
I wanted to keep the look smooth but didn't want to mess with a power antenna like we did on the first Finale so I decided to hide the antenna inside the fender. Made a simple aluminum L bracket to mount it to and ensure a good ground to the base.


And the antenna mounted


A dab of flox holds it to the inner fender above the wheel well so it can't bang around. Seems to work fine and picks up a lot of stations, I can't tell any difference from the stock mounting location in reception ability.

This is the Solstice belt and retractor assembly.


We mounted it to the heavy steel plate on the inside of the B Pillar. The plate is also there to reinforce the chassis from flexing after the top removal and it's a stoug piece of steel.


The shoulder loop is mounted as high as possible with backup plates on the rear of the firewall and tubing spacer over the bolts to keep from crushing the light gauge steel used in the inner firewall.

This was the cutout we had to make to assure clearance for the belts and get the retractor inside the B Pillar.


That's it for tonight, wife's home and I have to make supper.

John Stricker
IP: Logged
exoticse
Member
Posts: 8655
From: Orlando, Fl
Registered: Jun 2003


Feedback score: N/A
Leave feedback


Total ratings: 108
Rate this member

Report this Post06-30-2007 09:15 AM Click Here to See the Profile for exoticseSend a Private Message to exoticseDirect Link to This Post
Bump ? I think he finished this right ?

** edit/ Never mind, i answered my own question - see below**

https://www.fiero.nl/forum/Forum1/HTML/065661.html

[This message has been edited by exoticse (edited 06-30-2007).]

IP: Logged
Previous Page | Next Page

This topic is 2 pages long:  1   2 


All times are ET (US)

T H I S   I S   A N   A R C H I V E D   T O P I C
  

Contact Us | Back To Main Page

Advertizing on PFF | Fiero Parts Vendors
PFF Merchandise | Fiero Gallery
Real-Time Chat | Fiero Related Auctions on eBay


Copyright (c) 1999, C. Pennock