|
|
|

|
Pantera parts ! by opm2000
| Started on | : 07-07-2004 11:05 PM |
| Replies | : 529 |
| Last post by | : War Hammer on 02-18-2009 06:26 PM |
|
|
|
|
Oct 29th, 2004
|
opm2000
Member Posts: 1347
From: Versailles, Ky USA Heart of the Bluegrass
Registered: Dec 2000
|
Now that's a link, Cheever ! 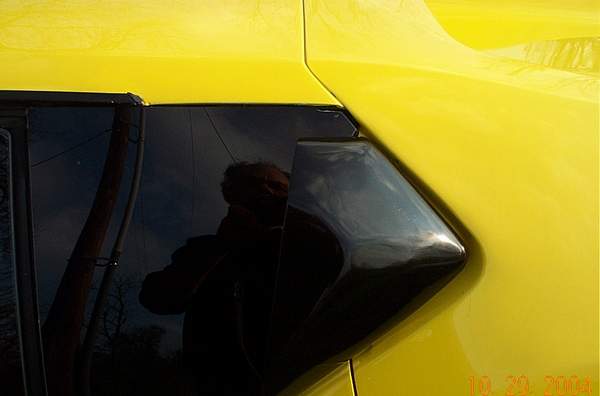
There's a lot going on in this pic. The interface of the rear clip, with the stock aft roofline of the notchback Fiero. And the Pantera gills are removed, and scoops are installed. The sailpanel was made by FieroSails, after a meeting at Ed's Swapmeet this spring. Very nice work. With a tiltback, the scoop has to be shortened a bit, as seen here, and the sailpanel has an "ear" to fill the void. 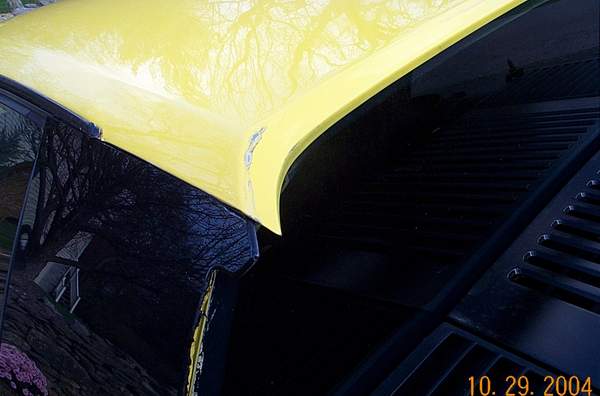
Not the greatest image, but it shows the items mentioned above wtih the rear clip raised. 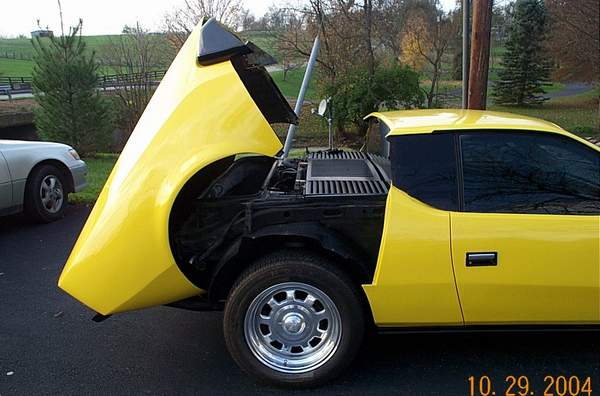
Here I'm trying to show you what kind of space you have to access the trunk. I wouldn't want to put a flat tire in the trunk from this angle, but it can be done. Other, more usual items are easily put in & out of the trunk. It is not as accessable as with a stock Fiero, but it deffinately is usable. Of course if it's a big issue, ditch the tilt clip and build the stock Pantera rear clip, with more normal trunk access. 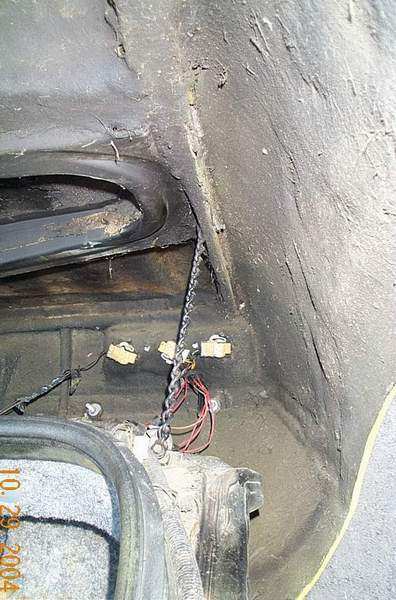
The limit chain, which holds the rear clip. Clever idea, but I think a hydraulic strut, or an electric/hydraulic trunk opener would be great here. 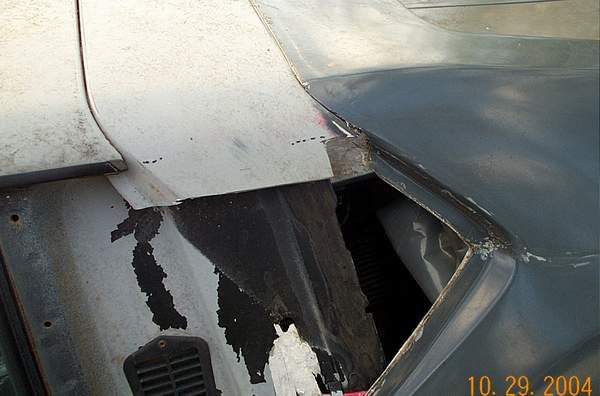
This is how the Fiero rear clip is cut and used. We cut it a bit oversized, and will fine tune it so it matches the drip rail line. 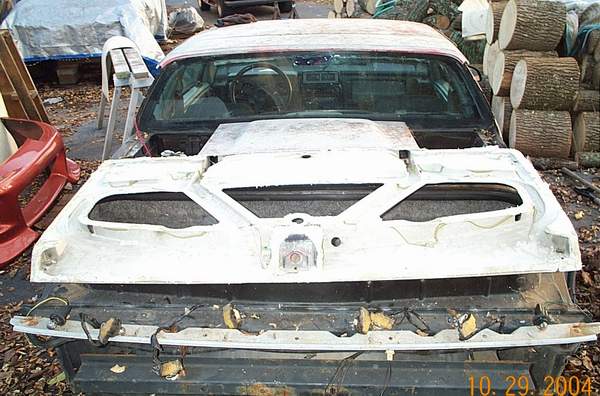
The trunk skin is removed, for eventual bonding to the rear clip. If you like, I think the skin can stay on, but there is a weight savings by removing it. The trunk section is cut from the power hump section, and the trunk section is bonded to the rear clip. Neat.
IP: Logged


|
10:26 PM
|
|
|
Nov 1st, 2004
|
rverhalen
Member Posts: 1289
From: Winston-Salem, NC
Registered: Apr 2004
|
Waiting for a Pantero Kit 4000.00 plus Waiting to get the new larger wheels (unknow value yet) Already having your Geo Tracker taillights in pristine condition for free Priceless.... Can you tell I am sooooooooooooooo ready for this kit and adding a turbo to the car? Just send over more pictures to my email address and we can go from there!  Thanks
Robert Ver Halen
rverhalen@triad.rr.com
336-462-1040
IP: Logged


|
07:52 PM
|
|
datacop
Member Posts: 1426
From: Indianapolis, IN, USA
Registered: Jan 2004
|
I was over at Dave's house last weekend to get the tools to jack up our car and stuffs.. Looked over the molds he had, chop gun he's using, and the parts he's producing in his shop.. I HAVE to tell you guys.. the finish product that this man is producing is SECOND to NONE!! The detail in the molds is incredible. The prep work in producing a class one finish on those molds is amazing. The finished pieces that he pulls out of the molds are so high quality.. they look like they require almost NO prep work for finish. It is truly amazing to see such high quality fiberglass pieces being produced first hand. If I had the extra cash.. this is the kit I would buy, if only because of the care that I see Dave putting into each one of his layups.
IP: Logged


|
09:20 PM
|
|
blackrams
Member Posts: 32769
From: Covington, TN, USA
Registered: Feb 2003
|
Datacop, You are so right! Dave is a true craftsman. My Pantero project car was on the trailer this weekend and towed to Gene's place for the 4.9 install, just as soon as he's done, on with the body. Hopefully it will be ready for some of the shows this summer.
------------------
Ron
aka: Blackrams
IP: Logged


|
09:32 PM
|
|
|
Nov 14th, 2004
|
VISCERAL
Member Posts: 638
From: Chicago, IL
Registered: Apr 99
|
updates?
IP: Logged


|
08:37 PM
|
|
|
Nov 16th, 2004
|
blackrams
Member Posts: 32769
From: Covington, TN, USA
Registered: Feb 2003
|
Visceral, My project car, (88 Coupe) is currently getting the 4.9 conversion, so Dave is busy building more parts. He's gotten the process down to a fine point, his qork is first rate and he's producing some fine looking fiberglass parts. Once the engine install is complete, then we'll start mounting the body on the car. I believe this is the best way to do this. I can just see lots of dinged up fiberglass if I did it the other way. Will post pics just as soon as we have something worthy of posting. Thanks for your interest. ------------------
Ron
aka: Blackrams Fieros
IP: Logged


|
05:04 AM
|
|
eunospeed
Member Posts: 342
From: Lexington, KY
Registered: Sep 2002
|
I've been lucky enough to see all this stuff first hand and Blackrams is right, everything is looking very nice! The kit is going to be sweet and look real nice on the Fiero platform. Can't wait to see how the motor swap is going.
IP: Logged


|
08:10 AM
|
|
opm2000
Member Posts: 1347
From: Versailles, Ky USA Heart of the Bluegrass
Registered: Dec 2000
|
I've started making the molds for the wheel flares shown earlier. These flares are the type which are fairly small (as compared to the GT5 or GTS type) and they were originally meant to be riveted onto the body. At first that sounds sort of crazy, but I've actually seen several pics of both street car and racing Panteras with the flares nicely riveted on. Go figure. I saw them as easily reproduced factory style flares that could be sanded down along the edges and faired into the body by the builder to give a nicer look. I personally like their size, they are quite an enhancement over the standard flares on the original body. I will most likely use these type flares on my own Pantera build. But along the way, I decided to take a break from things and try making up a set of flares, inspired by the GT5 or GTS style. How they will turn out will no doubt be a custom size and shape, but you understand where the inspiration comes from. Here, a fence is constructed to hold the 2 part foam which is to be poured into the wheel flare area. 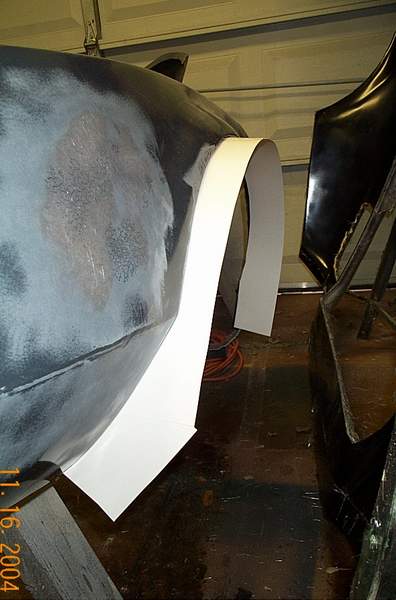
And here is the foam a day later. This type of foam does not react with the poly resin, and it shapes easily. If you tried making foam cores for your fiberglass projects and found that the foam did wierd stuff like melting when you applied resin, you had the wrong foam. After mixing and pouring small batches of foam, wait a day and then have at it. Tools of choice here are a hack saw, a very coarse broad rasp, a surform, a sanding block, 30 grit and 80 grit paper. Somewhere in there is a shape, we just have to let it out:> 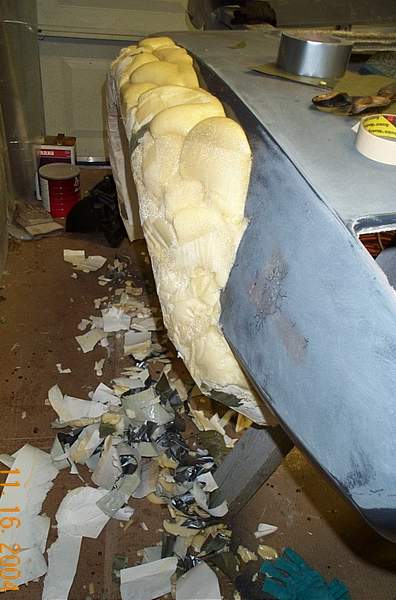
And here is a shape begining to emerge after removing most of the foam that was poured. 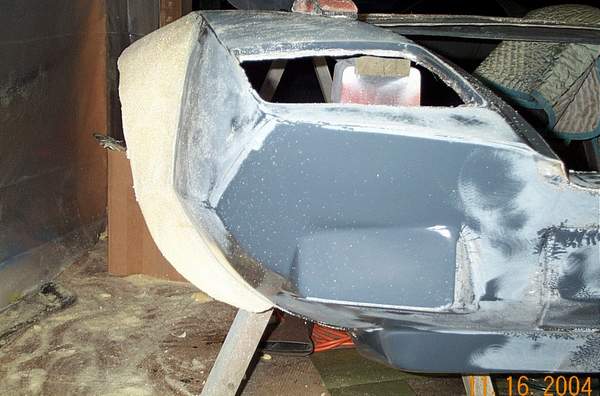
The trick in this exercise is to see if I can make both sides look alike. Maybe not. Anyhow, after rough shaping, the foam will be coated with bondo and the surface brought down to a very smooth finish. In these photos, we are nowhere near that step. 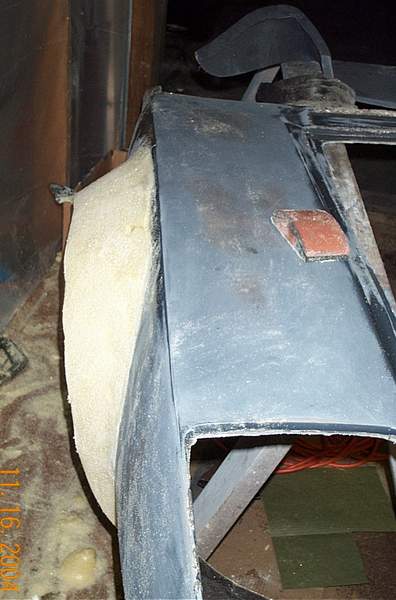
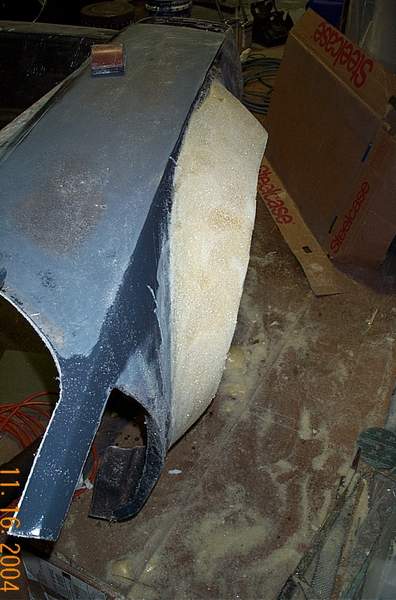
David Breeze
IP: Logged


|
07:59 PM
|
|
|
Nov 17th, 2004
|
mrfixit58
Member Posts: 3330
From: Seffner, Fl, USA
Registered: Jul 99
|
Very cool. I love the "how to" threads. Keep up the great work,
Roy
IP: Logged


|
10:16 AM
|
|
|
Nov 21st, 2004
|
opm2000
Member Posts: 1347
From: Versailles, Ky USA Heart of the Bluegrass
Registered: Dec 2000
|
A small update on the "2nd generation" wheel flares: The first flare was poured and rough shaped, as seen above. The opposite side flare was poured and allowed to set overnight. I needed to do two things next: establish a constant reference for shaping both flares,....and establish the wheel well opening in a straight & level condition. The cardboard fence was made to bow inwards a bit to assure there would be foam to work with. But now the excess has to be removed and the wheel well established. 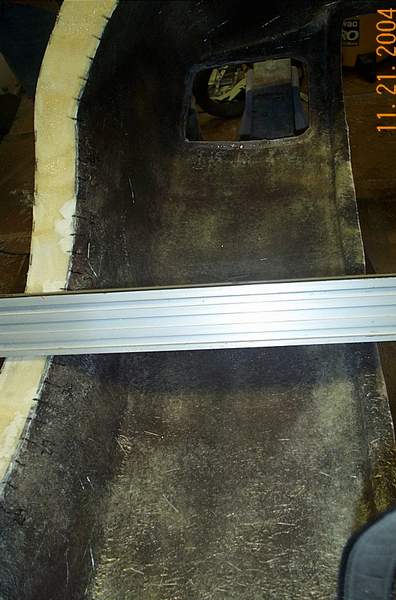
Both items were accomplished by indexing the inside edges of both wheel wells, and laying a straight edge along the index marks. This quickly identifys where there is too much foam, so you just sand it away, and it leaves you with two new wheel wells that are straight & level. These become the reference for all shaping from here out. I now made a sieres of marks 2" out from the stock wheel well, and trimmed the outside edges of the new wheelwells. Now we are ready to begin shaping the outside. 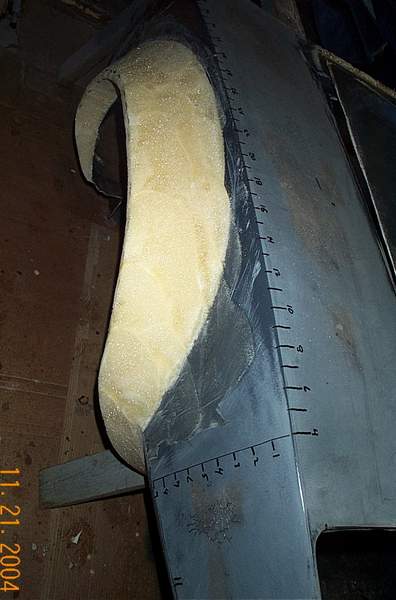
Since the wheel well has been reshaped, I did some fine tuning sanding of the first flare, getting it as close to what I wanted as the foam allows. Now I indexed the outside of the fender to establish reference points for shaping the second flare. These x/y axis marks allow me to locate points where the flare meets the fender, and to transfer those points to the other side. Note the dip in the upper front edge of the flare. This could be filled with foam, but I'll catch it with the bondo stage, later. 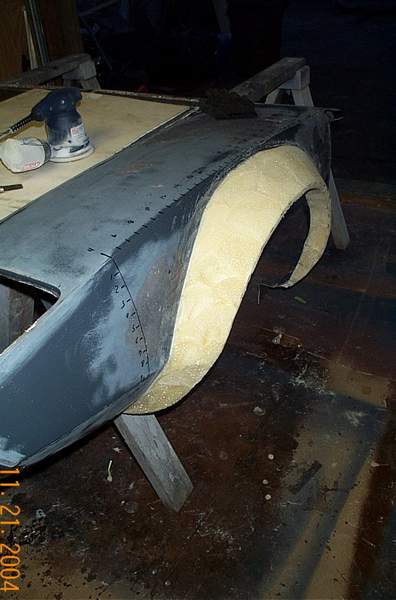
So, the other side was indexed and rough shaped. The fine tuning requires lots of rechecking the index measurements and just plain old looking at one side, then the other. Anyhow, we took it outside and gave it one more close look and fine tuning. Now we are ready to apply a thin skin of bondo. This will fill the pores of the foam and allow even finer smooth sanding, and will help highlight any high or low spots, not visible on the foam. David Breeze [This message has been edited by opm2000 (edited 11-21-2004).]
IP: Logged


|
08:23 PM
|
|
|
Nov 22nd, 2004
|
opm2000
Member Posts: 1347
From: Versailles, Ky USA Heart of the Bluegrass
Registered: Dec 2000
|
I've been wondering about the space createdby the new wheel flares and would appreciate any thoughts you all might have. Look at drawing A. It shows the fiberglass body and new flare in crossection. Right now, the bottom edge is "straight & level" and fairs directly into the stock wheel well trim line. The thought here is this will help greatly when the builder fits the flare onto the body. The bottom edges match the stock opening exactly, and the outer "fender edges" are faired to fit onto the body. The outer skin recieves a layer of fiberglass cloth for permanant attachment. Now the bottom edge can either be glassed on in a similar fashion, or the space can be opened up by removing some of the flare and some of the stock fender....and then glassed in. 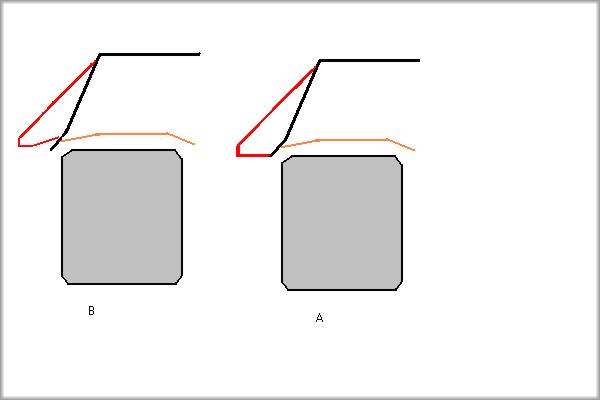
Now look at drawing B. It shows essentially the same thing except Here we have removed enough of the foam to come close to where the Fiero inner fender liner is. This means we are looking at two completely different plugs for the wheel flares. This option would have the benefit of being pre cut to accomodate large tires or wider spaced tires. But it would not have the convience of matching up to the stock wheel opening for initial alignment. Which way should I make this? Seems like you could accomplish the same end result with either design. David Breeze
IP: Logged


|
02:27 PM
|
|
|
PFF
System Bot
|
|
The Black Widow
Member Posts: 422
From: Minot, ND
Registered: Sep 2003
|
David:
wish i could tell ya, I would think B would be better for an more authenic look, since you can acomidate much larger tires. They both seem good, that would be the only reason I like B though. Keep us posted, this is an awesome build! Cant wait to see it when I come home!
-Matt
IP: Logged


|
03:31 PM
|
|
Jake_Dragon
Member Posts: 32977
From: USA
Registered: Jan 2001
|
Why not trim the inside and make a new liner? 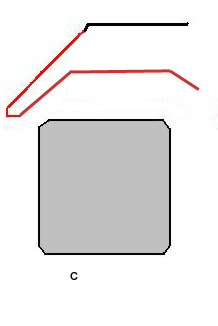
IP: Logged


|
04:36 PM
|
|
|
Nov 23rd, 2004
|
opm2000
Member Posts: 1347
From: Versailles, Ky USA Heart of the Bluegrass
Registered: Dec 2000
|
Both good points, and that got the wheels turning. Blackrams was giving a bit of input this weekend while helping on the second flare. His concern all along has been to devise a way to tie in or fasten down the inner fender liners. I checked the front end of the yellow prototype car, to see again where the stock fender liner sets in relation to the stock Pantero wheel well outline. The Fiero liner generally parallels the Pantero outline on the majority of the front and back sides of the circle. Between 10 oclock and 2 oclock, the Fiero liner transitions from right on the Pantero outline...to a higher point (above the outline) which is at a maximum at 12 oclock. If that's clear, then yes, a new liner, or transition piece would be in order. What I'm thinking is to create the flare molds and new flares with the straight & level bottom, as in drawing A. This makes it very easy to align the flare to the body, and to get it right. Once attached to the body, the builder would only have to take a Dremel and cut off a slice of the bottom section between 10 oclock and 2 oclock, leaving a 1/2" +/- lip in the cutout area. To this lip a new liner or transition liner could be attached. Bear in mind, we are working on the front fenders right now, the clearances will be somewhat different for the rears. Now, all this wide flare business brings about the question...how do you economically get either a wider stance for your wheels & tires....or where do you find wider wheels. I'm thinking 275 to 315 on the rear and maybe 245 or so on the front. I'm not a big fan of droping big bucks on a whole new front end, or on custom built wheels. David Breeze [This message has been edited by opm2000 (edited 11-23-2004).]
IP: Logged


|
10:21 AM
|
|
|
Dec 5th, 2004
|
VISCERAL
Member Posts: 638
From: Chicago, IL
Registered: Apr 99
|
bump
IP: Logged


|
09:44 AM
|
|
|
Dec 7th, 2004
|
opm2000
Member Posts: 1347
From: Versailles, Ky USA Heart of the Bluegrass
Registered: Dec 2000
|
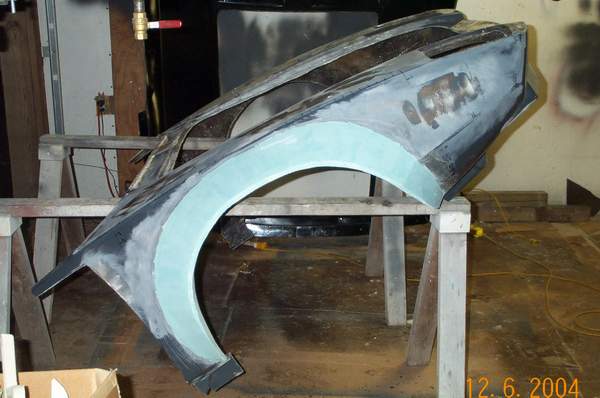 Sorry for the poor pics 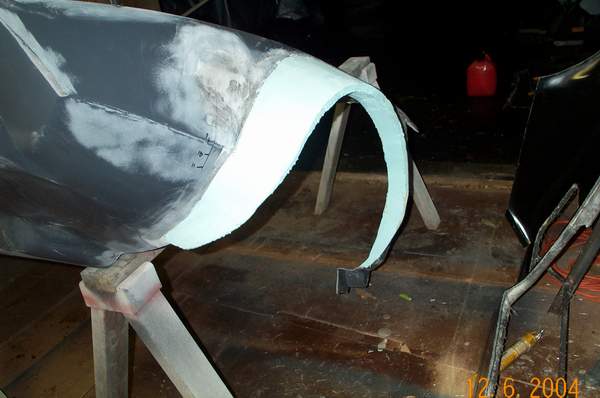
The foam has been covered with fine grade Bondo several times. At first filling the foam to provide a stiff skin to work with. Then filling pinholes. Then looking for low areas. At each filling I've sanded using 80 grit to knock down high spots and do general shaping. This has about gone it's course and I,m ready to shoot on a coat of primer, then sand most of it off, in search of the final smooth surface. The overall shape has turned out pretty well. The front of the flares will blend right in with the add on air dam, and the back of the flares will blend right into the enlarged "runningboard " type sideskirts. David Breeze
IP: Logged


|
06:34 AM
|
|
RCR
Member Posts: 4416
From: Shelby Twp Mi
Registered: Sep 2002
|
|
shawnkfl
Member Posts: 2457
From: Largo, Florida
Registered: Oct 2004
|
ok. i'm sold! i've been looking at other kits but i'm now sold on this one. i love the lins and look of the pantera. i'll be patiently waiting for one of these!!
IP: Logged


|
12:11 PM
|
|
|
Dec 8th, 2004
|
VISCERAL
Member Posts: 638
From: Chicago, IL
Registered: Apr 99
|
IP: Logged


|
01:26 AM
|
|
blackrams
Member Posts: 32769
From: Covington, TN, USA
Registered: Feb 2003
|
| | | quote | | Originally posted by shawnkfl: ok. i'm sold! i've been looking at other kits but i'm now sold on this one. i love the lins and look of the pantera. i'll be patiently waiting for one of these!! |
|
Patience is a virtue, this is work! 
Dave is producing a very user friendly kit, if I can do it, anyone can.
------------------
Ron
aka: Blackrams Fieros
IP: Logged


|
07:23 PM
|
|
|
Dec 10th, 2004
|
opm2000
Member Posts: 1347
From: Versailles, Ky USA Heart of the Bluegrass
Registered: Dec 2000
|
RCR & Visceral, Thanks for the tip on finding the contour gauges. I ordered a big one this week. So far I've used the grid indexing for initial shaping, and I've been making cardboard profile templates to check the profile similarity. A guage will be much easier to use. Shawnkfl,
Thanks for the interest, and hang in there. It's encouraging to hear that you guys have an interest in building a Pantera. Right now, Blackram's donor is recieving it's 4.9 transplant, and when that's finished we go directly to full body installation. With his build I'll assemble the text & pics for the Builder's Manual cd. I'm fairly limited on space in my shop, so things progress in bits and spurts. I'm all set up to layup both a front & rear clip this weekend. At the same time, the wheel flares are ready for a coat of Duratec, so hopefully a lot more will happen to them the following week. The first full kit to be sold is now complete, but the builder is waiting on me finishing up the wheel flare molds, understandably. It seems to me that there is enough flexablility in the layup schedule, and I don't plan on doing a high volume production rate, so I almost think that each kit will be customized to each builder's desires. Anyone with an interest can pm or email me to discuss particulars and time frame. When I acquired this project, I wanted to bring it to the Fiero and Kit Builder Communities as something with classic looks, but open to customizing....and easily built....and affordable. For example, I think I've worked out how to assemble the rear clip mounting and hinge structure into an almost foolproof and super easy installation. And the wheel flares I'm molding will be a good close tolerance fit. These things all add up to make your project something you can assemble in a very short time, and then get out there and enjoy it. David Breeze
IP: Logged


|
12:32 PM
|
|
|
PFF
System Bot
|
|
|
|
|
Dec 12th, 2004
|
bubbajoexxx
Member Posts: 1630
From: Ontario Canada
Registered: Aug 2003
|
opm2000 Please dont take this comment the wrong way I would just like to know why you are not making the rear of the car with the proper cam shell deck lid your kit looks good but would be 100% better with the correct deck lid and the engine compartment easer to access with the camshell as more area is opened and you dont have to slide under the rear clip . 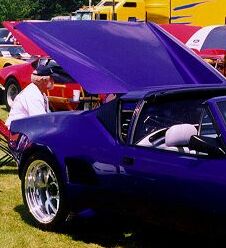 [This message has been edited by bubbajoexxx (edited 12-12-2004).]
IP: Logged


|
10:21 AM
|
|
blackrams
Member Posts: 32769
From: Covington, TN, USA
Registered: Feb 2003
|
Bubbjoe, I'll let Dave answer that question for himself, but it is still an option. The kit that Dave and I are producing for my 88, will have a rear deck lid hatch, though not exactly like the orginal, I feel it works very well with the Fiero and will use the orginal decklid hinge points. It also needs to be noted that engine access is so much easier with the tilt clip it's almost child's play, the whole rear clip takes about 10 minutes to remove. IMHO, this is not a reproduction, it's a kit car. No offense taken. I hope this answers at least part of your question. Happy Fieroing. ------------------
Ron
aka: Blackrams Fieros
IP: Logged


|
10:34 AM
|
|
opm2000
Member Posts: 1347
From: Versailles, Ky USA Heart of the Bluegrass
Registered: Dec 2000
|
Hey Bubbajoe, I'm glad you like the Pantera Kit. Maybe you'll tackle one after your Stretch is completed :> As Blackrams pointed out, the master mold for the rear clip is made in such a way that if you prefer a traditional "clamshell" Pantera deck, then we can make one which exactly reproduces that on a real Pantera. 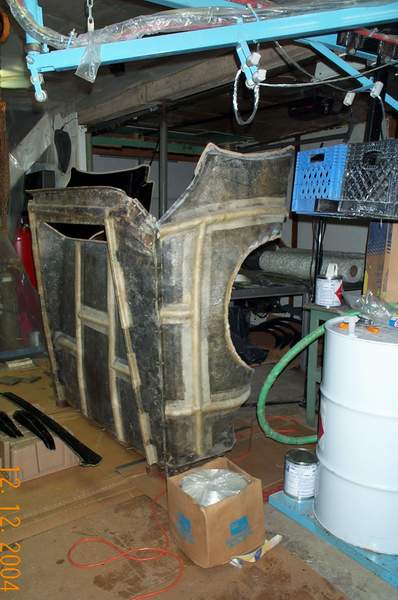
This is the backside of the rear clip master mold. It's actually four big sections that bolt together. You'll see a flange bolted together running straight down from the "v" notch where the gills or scoops are. To create a traditional deck, we simply insert a long piece of vinyl in between those flanges during mold assembly. The result is a perfectly fitting rear section with a turned down lip for the deck to set on...and a matching deck with a matching lip as well. This type lid would only require hinges installed along the rear roof section to be totally stock. So far I've built three rear clips, and they have all been "tilt" configured. With the tilt deck, you lose the body line above the wheel wells from the clamshell deck...but you do pick up a body line from the wheel wells up to the gill/scoop area. It's mostly a matter of builder preference. I can tell yu that the tilt clip is tons of fun at car shows and at the gas station, whenever you fillup. Flip back the tilt deck to access your fuel tank and you'll have an instant audience :> For daily mechanicing, the tilt deck gives pretty decent access. For serious, heavy duty mechanicing, just pull the hinge pin, free the restraint chains, and two guys can set the whole rear clip on a set of sawhorses, no sweat. David Breeze
IP: Logged


|
07:01 PM
|
|
bubbajoexxx
Member Posts: 1630
From: Ontario Canada
Registered: Aug 2003
|
opm2000
hopefully in 2 years I will have the nessesary funds to do it as I plan building one for my wife with the camshell look
IP: Logged


|
09:04 PM
|
|
The Black Widow
Member Posts: 422
From: Minot, ND
Registered: Sep 2003
|
David, you and Ron kick ass, Ill be home in January so I cant wait to check it out! Totally awesome!
-Matt
IP: Logged


|
09:10 PM
|
|
|
Dec 13th, 2004
|
opm2000
Member Posts: 1347
From: Versailles, Ky USA Heart of the Bluegrass
Registered: Dec 2000
|
Hi Matt, Be sure and come by my place when you make it back in to town. I'm hosting an open house for the Bluegrass Fiero Folks and any other Fiero/Hotrodder types who might want to attend....sometime between now and Janurary 5th. Any idea what your schedule is? David Breeze
IP: Logged


|
12:05 PM
|
|
opm2000
Member Posts: 1347
From: Versailles, Ky USA Heart of the Bluegrass
Registered: Dec 2000
|
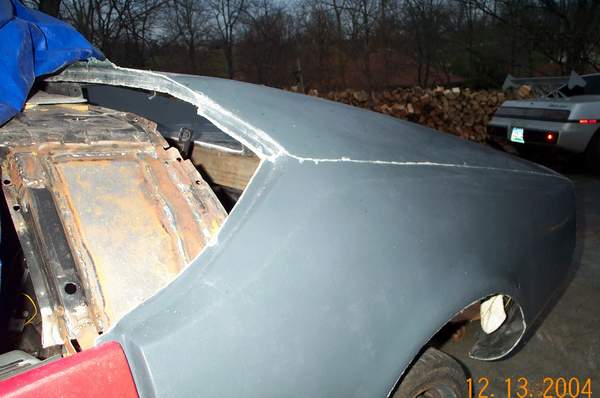 As a follow up on the stock, clamshell type decklid, this pic may help. Here you can see a one-piece tilt-clip pantera part. You can see the clay line along the clamshell parting edge, though. And if you look closely (sorry about the pic quality) you can see that it is just above the "fender" line, all stock geometry. In this pic, the rear clip is setting in it's true position on the chassis. The roofline doesn't match because I've done a 4" choptop on it, and will have to modify the rear clip to fit the lowered roofline. I plan to cut along the clamshell parting line and do the necessary recontouring only to the clamshell portion. From there, I'm still not sure if it will become a tilt-clip or a clamshell deck. David Breeze
IP: Logged


|
06:58 PM
|
|
|
Jan 18th, 2005
|
RCR
Member Posts: 4416
From: Shelby Twp Mi
Registered: Sep 2002
|
It's been a while....Any update? Bob
IP: Logged


|
08:19 AM
|
|
|
Jan 19th, 2005
|
opm2000
Member Posts: 1347
From: Versailles, Ky USA Heart of the Bluegrass
Registered: Dec 2000
|
Well, between the Holidays and the cold weather, I got distracted a bit: 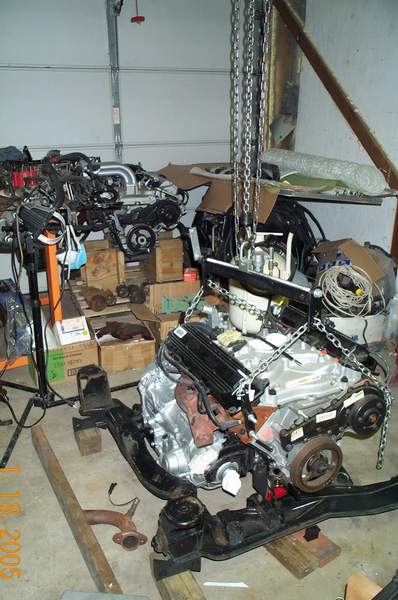
Anyhow, the front flares are shaped and ready to have molds made around them. I'm in the middle of shaping the new front air dam, and it flows into the front flares, so thee is a holdup untill the air dam is finished. The rear flares are almost ready for the bondo phase: 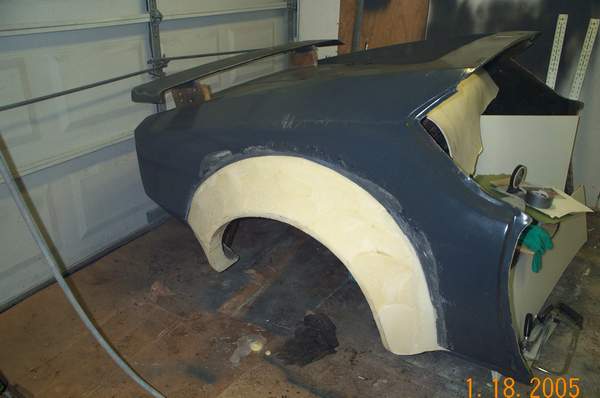
BTW, how do you like the wooden wingstands? I was using this photo for a shaping reference ( http://www.panteraplace.com/Pantera%20Pics/Meredith%201.JPG ), and Blackrams pointed out that the red car had what looked like a Fiero wing. He and Scrabblegod dug around and came up with this wing, and it fits perfectly, matching body lines and angles. 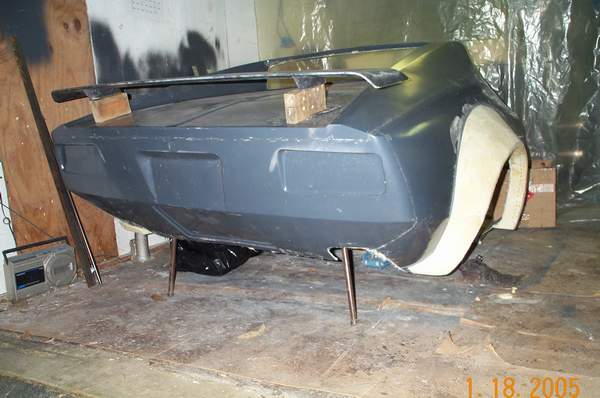
David Breeze
IP: Logged


|
06:34 AM
|
|
RCR
Member Posts: 4416
From: Shelby Twp Mi
Registered: Sep 2002
|
Looks great David, (nice to see you visit Ari's, too). The wing looks real good, but I would suggest fiberglass wing stands.  I like the old 70's era coffee table legs sticking out of the bottom, too.
IP: Logged


|
08:43 AM
|
|
|
PFF
System Bot
|
|
rverhalen
Member Posts: 1289
From: Winston-Salem, NC
Registered: Apr 2004
|
I still want one Dave! Just waiting for the flared version ready for my car! It is looking good Great work, Thanks
Robert Ver Halen
IP: Logged


|
10:15 AM
|
|
PaulJK
Member Posts: 6638
From: Los Angeles
Registered: Oct 2001
|
MAN those flares are NICE !!!! This may sound crazy, but would an 88GT look good with your front end with flares and a stock rear section with the rear flares ? Any Photoshoppers wanna do one ? Can this be done ? Personally I've always liked the factory fiero GT rear end but those flares are irresistable  .. ..
IP: Logged


|
11:31 PM
|
|
|
Jan 21st, 2005
|
PaulJK
Member Posts: 6638
From: Los Angeles
Registered: Oct 2001
|
bump for Dave's flares  .....
IP: Logged


|
01:35 AM
|
|
Voytek
Member Posts: 1924
From: Calgary, Alberta, Canada
Registered: Jan 2001
|
Wow!!  This is an awesome thread! Makes me want to do more stuff to my Fiero. I alread spent an entire winter in the garage a couple years ago. Maybe it's time to do it again! Please keep us posted. And thanks for the details - I love what you're doing. One question, though. I would like to construct an air dam for my Mazda RX8. How did you make a mold for your air dam? I can see that you used the expandable foam for the flares but I don't think I saw too much on the front dam. Any info would be appreciated. 
------------------

IP: Logged


|
10:55 AM
|
|
opm2000
Member Posts: 1347
From: Versailles, Ky USA Heart of the Bluegrass
Registered: Dec 2000
|
RCR, I really like the open forums where ideas are shared, too. Pennock's and Ari's are tops. BTW, I thought that was real resourcefull, using the coffee table as a work stand :] Robert,
Hang in there, the flares will be finished soon. They do look good, Blackrams has given them his nod of approval, so I'm proceeding on with them. Paul,
First chance I get I'll set the front clip that has the flares onto a chassis with the doors still attached. Maybe someone could Photoshop it a bit easier then. Voytek,
Thanks. I will say that the front air dam took more preliminary thinking thru than almost anything. Right now it's about 1/2 way thru shaping, and the front clip it's on is upside down on the work table. I promise to get a rightside up picture in this weekend sometime. David Breeze [This message has been edited by opm2000 (edited 01-21-2005).]
IP: Logged


|
12:31 PM
|
|
blackrams
Member Posts: 32769
From: Covington, TN, USA
Registered: Feb 2003
|
| | | quote | | Originally posted by RCR: Looks great David, (nice to see you visit Ari's, too). The wing looks real good, but I would suggest fiberglass wing stands. 
I like the old 70's era coffee table legs sticking out of the bottom, too. |
|
Hey now, those professional looking stanchions were my idea. Oh, OK, we'll try to come up with something a little different than these.
News Flash: Just thought of this, Styrofoam Cups would make a great stanchion, light weight and aerodynamic (somewhat), different heights available, 8 oz., 10 oz., or 16 oz. for the really raised look. When not in use, can be used as orginally intended, well, maybe.  ------------------
Ron
aka: Blackrams Fieros
Freedom isn't Free, infact it comes with a very high price.
Pantero Creations [This message has been edited by blackrams (edited 01-23-2005).]
IP: Logged


|
07:27 PM
|
|
PaulJK
Member Posts: 6638
From: Los Angeles
Registered: Oct 2001
|
Oh man, I can feel my wallet starting to get lighter .... and there's not that much in there to start with ..... Can you make a bolt-on clip that looks like this ? 
Maybe leave off the lower spoiler / air dam and make it tilt. YOWEEEE ... [This message has been edited by PaulJK (edited 01-21-2005).]
IP: Logged


|
10:08 PM
|
|
|
Jan 22nd, 2005
|
VISCERAL
Member Posts: 638
From: Chicago, IL
Registered: Apr 99
|
 
nice wing:
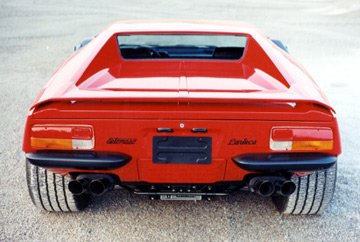 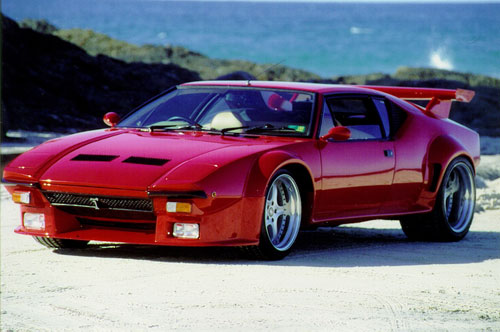
[This message has been edited by VISCERAL (edited 01-22-2005).]
IP: Logged


|
01:14 PM
|
|
blackrams
Member Posts: 32769
From: Covington, TN, USA
Registered: Feb 2003
|
Nice pics. Now does anyone know where we can get some similar looking wheels at a reasonable price. ------------------
Ron
aka: Blackrams Fieros
Freedom isn't Free, infact it comes with a very high price.
Pantero Creations
IP: Logged


|
07:47 PM
|
|


