|
|
|

|
Madcurl's Arch Rival !! by exoticse
| Started on | : 04-07-2005 02:39 AM |
| Replies | : 2019 |
| Last post by | : madcurl on 02-10-2009 06:10 PM |
|
|
|
|
Feb 23rd, 2007
|
BullRider
Member Posts: 108
From: Victoria, BC, Canada
Registered: Sep 2006
|
| | | quote | Originally posted by Archie:
Most of the times I've done a single wiper before, I've used the Fiero motor & head unit & modified the wiper arm/blade. Then you you don't have to make an off model fit the GM wiring & controls. In this case we need to find is an articulated arm that goes where we want it and fits the GM hub.
Archie |
|
You see the need for this all the time for replica cars, such as my Countach. My car uses the stock Fiero wiper motor. I removed the wire lead for the auto-home, so I just turn off the wiper when its where I want it to rest. I've heard, however, that if you want a full (or almost full) 180 degree sweep, the rear wiper motor from a '93 Ford Aerostar van is perfect. My windshield area: 
IP: Logged


|
01:26 PM
|
|
|
Feb 24th, 2007
|
Gokart Mozart
Member Posts: 12143
From: Metro Detroit
Registered: Mar 2003
|
| | | quote | Originally posted by Songman:
The stock window is still wrong if you just move the top straight down and widen it. Even if the curve of the window was correct, the front edge of the glass would still not be right. You would effectively, be not rolling the window all the way up too so the window would hit the top seal before it ever got close to the a pillar. |
|
Forgot it tilted in when it got to the top.
IP: Logged


|
07:43 AM
|
|
Songman
Member Posts: 12496
From: Nashville, TN
Registered: Aug 2000
|
I was down at Orville's yesterday checking on the progress of his latest project.He's incorporating some really neat things into this one. I told him to drop in on this thread next time he checked the forum.
IP: Logged


|
09:57 AM
|
|
Deabionni
Member Posts: 4087
From: Kalkaska, MI
Registered: Mar 2004
|
I wonder if there is a way to use a monoblade system like Mercedes uses. I found a couple of aftermarket kits online for VW's and such, so I wonder how much work it would be to incorporate a kit like that into a Fiero. Kit 1.Kit 2.Kit 3.This site sells the kit as well, but they are updating that page at the moment. Here'd more detailed pics of what the monoblade system looks like in a Mercedes.
IP: Logged


|
10:29 AM
|
|
madcurl
Member Posts: 21401
From: In a Van down by the Kern River
Registered: Jul 2003
|
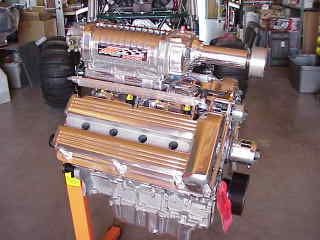 Hehehe. Thanks for the link Deabionni. Archie has already purchased the Mercedes mono wiper for #020 windshield. I'm now wanting to change out all of my old style 1900's Fiero wiper blades. Geezs, out with the old, in with the new....especially when it comes to a choptop. I don't think I'll ever want to go back to the stock Fiero windshield nor the wipers either. I can purchase (1) blade vs. (2) blades and less of a dual worry about scratching the darn windshield. [This message has been edited by madcurl (edited 07-09-2008).]
IP: Logged


|
12:13 PM
|
|
jscott1
Member Posts: 21676
From: Houston, TX , USA
Registered: Dec 2001
|
| | | quote | Originally posted by madcurl:
Archie has already purchased the Mercedes mono wiper for #020 windshield. I'm now wanting to change out all of my old style 1900's Fiero wiper blades... |
|
I'm with you on this one... I'm ready to go Mercedes too, but I didn't want to get in a bidding war with Archie on the same setup.
IP: Logged


|
02:17 PM
|
|
|
Feb 25th, 2007
|
madcurl
Member Posts: 21401
From: In a Van down by the Kern River
Registered: Jul 2003
|
Pipe Dream: imagine the possiblities.... 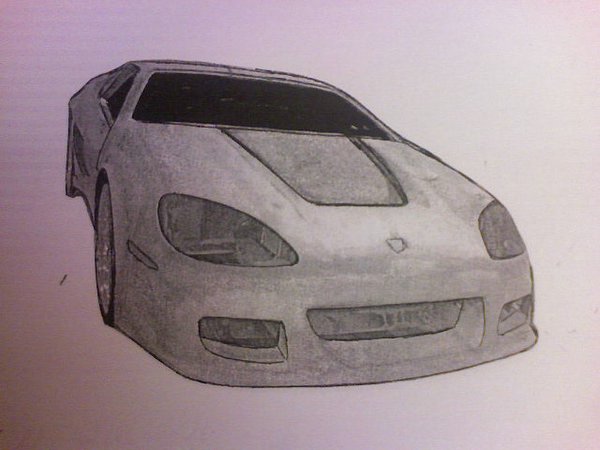
IP: Logged


|
03:07 PM
|
|
|
Feb 26th, 2007
|
madcurl
Member Posts: 21401
From: In a Van down by the Kern River
Registered: Jul 2003
|
Still dreaming: 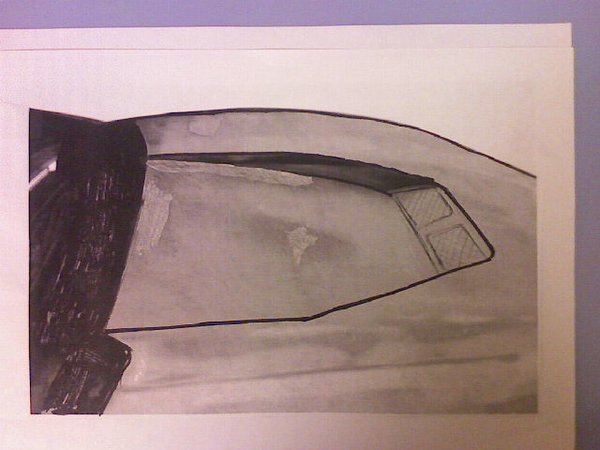
IP: Logged


|
12:30 AM
|
|
bubbajoexxx
Member Posts: 1630
From: Ontario Canada
Registered: Aug 2003
|
| | | quote | Originally posted by madcurl:
Still dreaming:
 |
|
why not remove 6 inches of the spare tire well and drop the hood center to form a full imsa style rad. duct for full air flow trough the rad [This message has been edited by bubbajoexxx (edited 02-26-2007).]
IP: Logged


|
09:18 PM
|
|
|
Feb 27th, 2007
|
XzotikGT
Member Posts: 897
From: Spanaway, WA, USA
Registered: Mar 2004
|
It is kinda dificult to go too deep in that are because of the brake master cylinder being so high up. ------------------
1987 GT 3.4 DOHC turboed
Updated page 11/3/06
http://www.cardomain.com/memberpage/167457/1
IP: Logged


|
09:32 PM
|
|
|
Feb 28th, 2007
|
j.forbiddendesigns
Junior Member Posts: 8
From: lawrence, KS
Registered: Feb 2007
|
Hi, i've been watching this thread for awhile now, the work is inspiring to say the least. I just have a question, i know it was asked before so i am probably just dumb but what type of winshield are you using? is it a eclispe or what model? thanks
IP: Logged


|
11:34 PM
|
|
|
PFF
System Bot
|
|
|
Mar 1st, 2007
|
exoticse
Member Posts: 8655
From: Orlando, Fl
Registered: Jun 2003
|
What is really amazing is how with a handful of orchestrated tweeks, Madcurl will turn what many considered the car's biggest weakness (the front) into probably it's strongest and best feature.
He has so many different ideas floating around in his head it is scary. All the stuff u see is probably 2 or 3 years old (conceptually from his mind), he is just now getting around to doing it.
For every mod u see he probably has 5 or 6 versions or ways he can take it. He changes his mind as things go along sometimes, but it is usually because he likes one idea he had originally over the other.
We are watchng this one, hehehehe but his mind is already on the next projects.
As far as this one goes just watch when he is done his work, as always, will speak for itself.
IP: Logged


|
12:02 AM
|
|
Archie
Member Posts: 9436
From: Las Vegas, NV
Registered: Dec 1999
|
Well, we are going to need amazing to get this baby in there. The MB wiper assembly came in &, as suspected, it's a lot bigger than the EBay ad made it appear. From now on this assembly will be referred to as "The Crab", you'll see why when you look at the pictures. 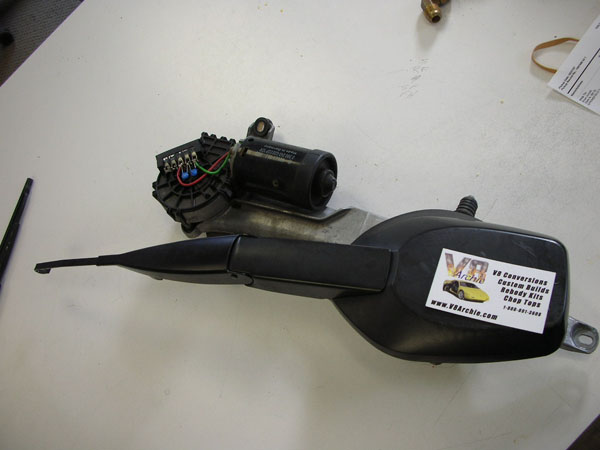 Notice how tall the Crab is when in the side view. Notice also how it's being heald by it's claw with it's legs hanging down. 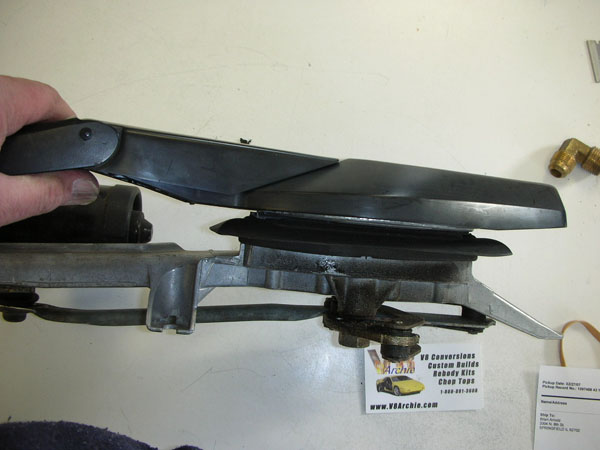 Here it is in it's attack mode as it is attacking our windshield. How'd you like to have this crawling up your chest?  Archie
IP: Logged


|
10:22 AM
|
|
SAFASTRO
Member Posts: 604
From: Calgary, Alberta, Canada
Registered: Nov 2006
|
WOW....that thing IS huge! I'm not really sure how you'll make that one work, but I know you have something up your sleave Archie! Can't wait to see this part of the car completed and working. ------------------

IP: Logged


|
10:49 AM
|
|
Songman
Member Posts: 12496
From: Nashville, TN
Registered: Aug 2000
|
I have no doubt that you can make it fit in there, Archie. Just keep thinking how cool it is going to be when you get it done. Make a few cuts where it will fit down inside where the current wiper mechanism is and it will work out fine. [This message has been edited by Songman (edited 03-01-2007).]
IP: Logged


|
10:51 AM
|
|
madcurl
Member Posts: 21401
From: In a Van down by the Kern River
Registered: Jul 2003
|
Operation: King Claw, hehe. ------------------  "Anyone can make a copy of something, it may look good but it ever is the real car. Make something from your imagination, something unique, something nobody has, anything is possible and, ideas can be a reality." "Anyone can make a copy of something, it may look good but it ever is the real car. Make something from your imagination, something unique, something nobody has, anything is possible and, ideas can be a reality."[This message has been edited by madcurl (edited 03-01-2007).]
IP: Logged


|
12:10 PM
|
|
88White3.4GT
Member Posts: 1604
From: Hayward, CA
Registered: Dec 2003
|
Where will it sit when "king claw" isn't being used? :O
IP: Logged


|
12:21 PM
|
|
jscott1
Member Posts: 21676
From: Houston, TX , USA
Registered: Dec 2001
|
| | | quote | Originally posted by Archie:
Well, we are going to need amazing to get this baby in there.
The MB wiper assembly came in &, as suspected, it's a lot bigger than the EBay ad made it appear.
Archie |
|
I'm glad you bought it instead of me...your fabrication skills will make it work somehow. The only concern I have is the motor and electronics weatherproof? It looks like it will have to sit in the cowl where it will definitely get wet.
IP: Logged


|
12:57 PM
|
|
BH2OFiero
Member Posts: 136
From: Bridgewater, N.S., Canada
Registered: Jan 2007
|
Wow...that is way bigger than I would have expected it to be. You've got your hands full trying to conceal that. ------------------

IP: Logged


|
01:35 PM
|
|
madcurl
Member Posts: 21401
From: In a Van down by the Kern River
Registered: Jul 2003
|
| | | quote | Originally posted by 88White3.4GT:
Where will it sit when "king claw" isn't being used? :O |
|
Hmm. It'll be Pinching something??
IP: Logged


|
02:23 PM
|
|
SAFASTRO
Member Posts: 604
From: Calgary, Alberta, Canada
Registered: Nov 2006
|
It's too bad you'll have to mess with the tightness of this cowl hood. I guess it may be a blessing in disguise to be able to hide the claw under it!! 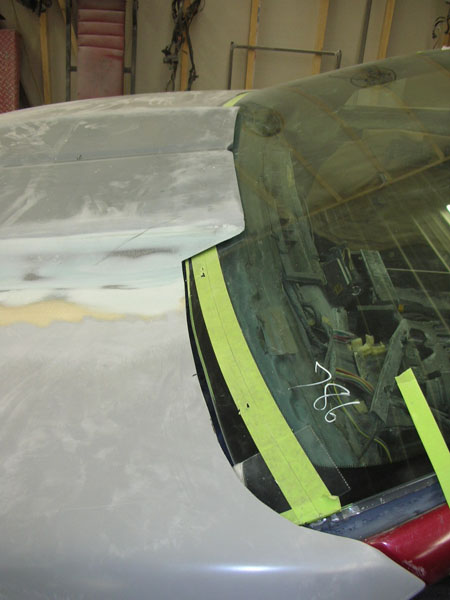 [/QUOTE] ------------------

IP: Logged


|
02:34 PM
|
|
|
PFF
System Bot
|
|
|
|
exoticse
Member Posts: 8655
From: Orlando, Fl
Registered: Jun 2003
|
| | | quote | Originally posted by SAFASTRO:
It's too bad you'll have to mess with the tightness of this cowl hood.
I guess it may be a blessing in disguise to be able to hide the claw under it!!
 |
|
[/QUOTE] Welllllllllll,.....not quite hehehehehe Stay tuned. [This message has been edited by exoticse (edited 03-01-2007).]
IP: Logged


|
02:45 PM
|
|
Scurvy
Member Posts: 865
From: Richmond, Va
Registered: Nov 2005
|
If you follow the sketches and concepts it appears the top of the cowl will be coming off, thus exposing the claw
IP: Logged


|
04:28 PM
|
|
madcurl
Member Posts: 21401
From: In a Van down by the Kern River
Registered: Jul 2003
|
| | | quote | Originally posted by Scurvy:
If you follow the sketches and concepts it appears the top of the cowl will be coming off, thus exposing the claw |
|
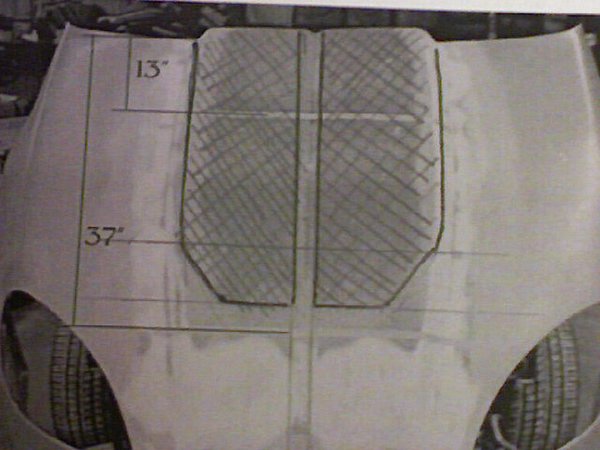
Hmm. Part of the three or four "clues" was on a previous page. | | | quote | Originally posted by exoticse:
The madness continues,.......
|
|
I will say this: The scoop (cowl as some call it) is actually a "head-fake" for other items not seen right now. I guess the key word is, "tweek" cause I rarely bolt anything onto the car w/o first doing something. Granted, 4.9, "Archie and the Crew" and others have aided in tweeking items too along the way. [This message has been edited by madcurl (edited 03-01-2007).]
IP: Logged


|
05:54 PM
|
|
|
Mar 5th, 2007
|
bubbajoexxx
Member Posts: 1630
From: Ontario Canada
Registered: Aug 2003
|
| | | quote | Originally posted by madcurl:
Operation: King Claw, hehe. |
|
I dont see any real problems installing the unit as you can remove the stock hood latch and the upper section of the panel and form a new panel with the right size hole for the wiper as there is plenty of room with the latch out . and for latching the hood I recomend using the latches from an 80,s jag they are easy to install as they are a set. and are fairly small and mount on the outside corners of the hood
IP: Logged


|
11:39 AM
|
|
jscott1
Member Posts: 21676
From: Houston, TX , USA
Registered: Dec 2001
|
| | | quote | Originally posted by bubbajoexxx:
I dont see any real problems installing the unit... |
|
Thanks from me for the installation tips...
IP: Logged


|
02:51 PM
|
|
BH2OFiero
Member Posts: 136
From: Bridgewater, N.S., Canada
Registered: Jan 2007
|
any updates....?
IP: Logged


|
04:14 PM
|
|
DrCPU
Member Posts: 708
From: North Dumfries, On, Canada
Registered: Jan 2004
|
I think the part should be listed in Archie's products as "Clawzilla"!
Curly - your such a tricky character!
Looking forward to seeing how this goes together!
IP: Logged


|
04:50 PM
|
|
Archie
Member Posts: 9436
From: Las Vegas, NV
Registered: Dec 1999
|
| | | quote | Originally posted by bubbajoexxx:
I dont see any real problems installing the unit as you can remove the stock hood latch and the upper section of the panel and form a new panel with the right size hole for the wiper as there is plenty of room with the latch out .
|
|
We didn't see any real problems based on the pictures on EBay either but after getting the part you realize how heavy the modifications are going to be & what the trade off is going to be to make it work. Here is a copy of the pictures and analysis that I sent to Curley after we had a chance to look at it in it's Full Size. ITEM A) Starting with picture 5549. The �flair� that we are going to have to put on the hood that will have to flair up to cover the base of the windshield will need to come up to cover most of the green tape. It will have to start 4 or 5 inches forward of the base of the windshield so that it will taper smoothly up over the windshield. You�ll need to keep this in mind as we talk about the wiper because the wiper has enough swing that it will violate the green tape area at both ends of the sweep of the wiper. ITEM B) In picture 5733 we have the wiper assembly up as close as it can be to the windshield & located in the center of the car. In this picture the wiper blade is at the lowest end of it�s stroke on the drivers side of the car. Please note how much of the green tape the blade covers. Also note that at the other end of the stroke on the passenger side of the car it covers just as much of the green tape. This means that the �flair� of the hood is going to have to be notched out to clear the wiper or it�s going to have to come out quite a bit higher above the windshield so that the wiper & arm stay below the �flair�. NOW, we�ve covered the fore & aft location of the wiper & the left to right location of the wiper. NOW for how DEEP we can mount the wiper assembly. ITEM C) In picture 5724 you�ll see the area I identify as the Rubber Seal. When we dig the hole to mount the wiper assembly down into, we will not be able to mount it any lower than where this rubber seal will be even with the face of the windshield. If you look at the area in this picture above the rubber seal you�ll see that the wiper assembly �head� is at least 2-1/2� above the rubber seal (see 2� x 3.5� business card in picture) If you�ll look at picture 5535, you�ll see that in the center of the car at the base of the windshield, that the windshield is at least �� above the current location of the hood. So the �Bubble that is going to have to be put on the hood to clear the head of the wiper assembly is going to have to be at least 3� taller than where our �flair� was going to have to be in item �A� above. ITEM D) Now when we dig the hole to mount the wiper assembly down into, we may run into another problem. The area where the stock Fiero wiper arms are normally mounted is only so deep & I�m concerned that it is not deep enough & that is cannot be made deeper. Go back to picture 5724. See the items I�ve marked �Actuator & Actuator arm� When the wiper is turned ON these parts are moving. When we get the wiper assembly mounted deep enough to get the rubber seal in the area described in ITEM C above there may not be room for the Actuator & Actuator arm to work in. You don�t want to take the floor out of this area because then you�re getting into the heater & A/C & blower motor area. ITEM E) I just noticed this & it may be a problem too. Go back to picture 5724 note the �Wiper Motor� is Higher than the Rubber Seal. There could be a problem clearing this too in the same areas as item �D� above. So there you go, these are just the items I�ve found so far, I�m sure that is not all we will run into on this. 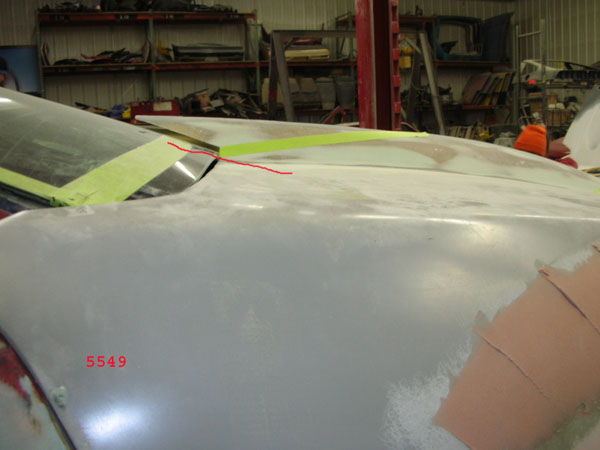 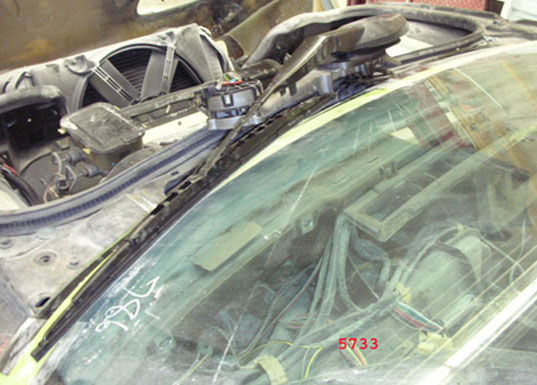 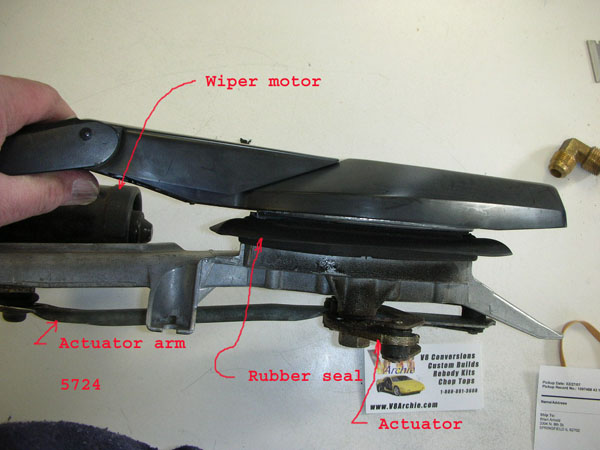 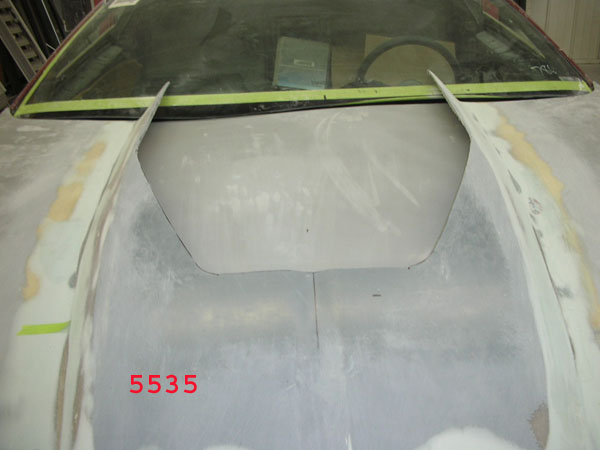 Now no one is saying that it will not work, however it will take sacrifices & we have determinded that we don"t want to make those sacrifices. So at this point we've decided to use a cable drive single wiper like I used on my GT40. Hope that helps Archie
IP: Logged


|
05:03 PM
|
|
madcurl
Member Posts: 21401
From: In a Van down by the Kern River
Registered: Jul 2003
|
| | | quote | Originally posted by madcurl:
Operation: King Claw, hehe. |
|
Operation: King Crab (claw) had too much of a pinch and would mess-up my scoop pipe dreams, hehe. Either mees-up the C6 flipper ($$$$) for a $25 part wasn't going to fly. I can sell it to my friend who drives those 6-figure(s) Mercedes, hehe. 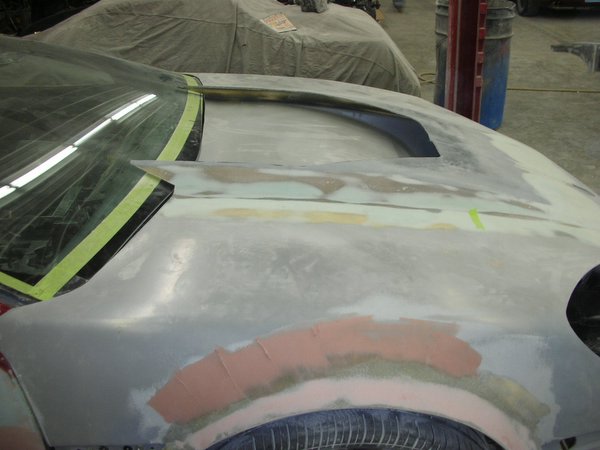 [This message has been edited by madcurl (edited 03-05-2007).]
IP: Logged


|
05:13 PM
|
|
exoticse
Member Posts: 8655
From: Orlando, Fl
Registered: Jun 2003
|
No comments yet on the new hood mod ??
IP: Logged


|
05:37 PM
|
|
|
PFF
System Bot
|
|
FieroWannaBe
Member Posts: 2292
From: USA
Registered: Oct 2004
|
| | | quote | Originally posted by exoticse:
No comments yet on the new hood mod ?? |
|
IDK, it doesnt look finished yet.
IP: Logged


|
06:12 PM
|
|
Finally_Mine_86_GT
Member Posts: 4809
From: Hyde Park, New York
Registered: Sep 2006
|
i have an idea for a wiper... it would have to be all custom and i'm not done with the blueprints yet... if you do it right you won't even know it's there and it probably won't work with heavy snow... let me know and i'll describe it the best i can to archie.
IP: Logged


|
09:53 PM
|
|
|
Mar 12th, 2007
|
BH2OFiero
Member Posts: 136
From: Bridgewater, N.S., Canada
Registered: Jan 2007
|
bump
IP: Logged


|
10:17 AM
|
|
Gokart Mozart
Member Posts: 12143
From: Metro Detroit
Registered: Mar 2003
|
| | | quote | Originally posted by bubbajoexxx:
and for latching the hood I recomend using the latches from an 80,s jag they are easy to install as they are a set. and are fairly small and mount on the outside corners of the hood |
|
Another idea is to use the latches from the Solstice/Sky.
IP: Logged


|
10:48 AM
|
|
madcurl
Member Posts: 21401
From: In a Van down by the Kern River
Registered: Jul 2003
|
| | | quote | Originally posted by Gokart Mozart:
Another idea is to use the latches from the Solstice/Sky. |
|
Good ideas but, from the begining, I planned on using duel Dakota Digital actuators for the C6 flipper. Latches & locks are okay but, "hit'n the swithces" is better. I can always use fake latches just for looks.
IP: Logged


|
11:22 AM
|
|
F-I-E-R-O
Member Posts: 8410
From: Endwell, NY
Registered: Jan 2005
|
 Now that's thinking outside the box! I can't wait to see how it gets finished off. Wow. Wow. Wow... ------------------

My Fiero Store
My Fiero Store 2
IP: Logged


|
11:47 AM
|
|
madcurl
Member Posts: 21401
From: In a Van down by the Kern River
Registered: Jul 2003
|
| | | quote | Originally posted by F-I-E-R-O:
Now that's thinking outside the box! I can't wait to see how it gets finished off. Wow. Wow. Wow...
|
|
Thank you. My intentions were never to use the hood scoop "as-is" but to utilize certain "key" parts. What appears isn't really my intended goal for the Karl Molden hood. There's several steps left. The side fender was the first step, followed by the altered nose openings ans such. In other words, the scoop is nothing more than a "head fake."
IP: Logged


|
03:36 PM
|
|
88White3.4GT
Member Posts: 1604
From: Hayward, CA
Registered: Dec 2003
|
 looks good, i thought you were going to cut down a little more towards the front of the hood. I like how it comes to points at the window, looks aggresive.
IP: Logged


|
04:55 PM
|
|
madcurl
Member Posts: 21401
From: In a Van down by the Kern River
Registered: Jul 2003
|
| | | quote | Originally posted by 88White3.4GT:
looks good, i thought you were going to cut down a little more towards the front of the hood. I like how it comes to points at the window, looks aggresive. |
|
Remember, the center wiper blade will need clearance. The area new the windsheild will meet-up with the end-towers. Do you remember that 70k kit kar? Well, that's part of the clue, hehe. 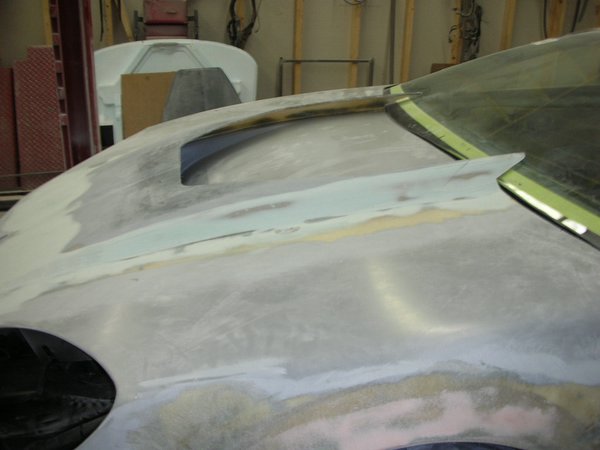 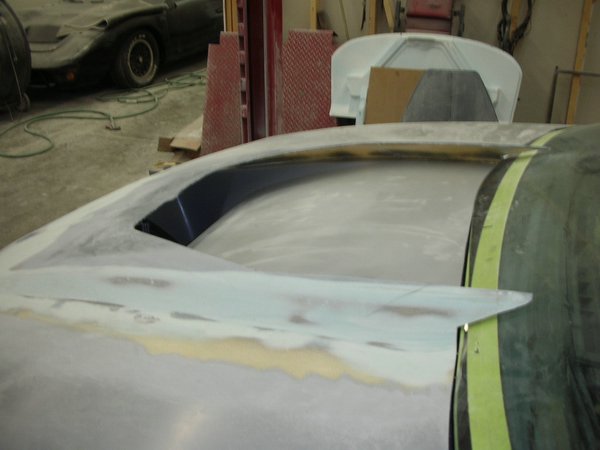 [This message has been edited by madcurl (edited 03-12-2007).]
IP: Logged


|
07:25 PM
|
|


 [/QUOTE]


