Pennock's Fiero Forum
  General Fiero Chat - Archive
  Rear Cradle Bolts

T H I S   I S   A N   A R C H I V E D   T O P I C
  

Email This Page to Someone! | Printable Version


Rear Cradle Bolts by ICCAMDFIERO
Started on: 02-06-2010 05:49 PM
Replies: 6
Last post by: Jason88Notchie on 02-08-2010 11:37 AM
ICCAMDFIERO
Member
Posts: 308
From: St. Charles IL
Registered: Sep 2009


Feedback score: (3)
Leave feedback

Rate this member

Report this Post02-06-2010 05:49 PM Click Here to See the Profile for ICCAMDFIEROSend a Private Message to ICCAMDFIERODirect Link to This Post
So while in the process of my sc3800 swap I had to saw off the heads to the rear cradle bolts to drop my cradle. Bolth the rear cradle bolts just spin. I was wondering what others have done to remove the rear cradle bolts when they just spin? I know I have seen a thread of someone cutting into the frame to remove them. But I really dont want to cut into the frame if I dont have to. Anyone have any ideas, or know of a solution? Thanks --Greg
IP: Logged
PFF
System Bot
olejoedad
Member
Posts: 18980
From: Clarendon Twp., MI
Registered: May 2004


Feedback score: (5)
Leave feedback


Total ratings: 206
Rate this member

Report this Post02-06-2010 06:03 PM Click Here to See the Profile for olejoedadSend a Private Message to olejoedadDirect Link to This Post
Bolts are frozen to the bushing sleeve. Cut the bolts between the mounting flanges on the spaceframe, drop the cradle, and install new bushings and bolts before reinstalling the cradle.

Anti-seize is your friend.

EDIT - Sorry, read that wrong, I was thinking of the front bolts.

Cut a flap in the spaceframe with a cut off wheel and remove the headless bolt and the nut. Leave the flap open until you reinstall the cradle and then weld the nut to the spaceframe and weld the flap closed.

[This message has been edited by olejoedad (edited 02-06-2010).]

IP: Logged
Back On Holiday
Member
Posts: 6238
From: Downingtown, PA
Registered: Jul 2001


Feedback score:    (17)
Leave feedback


Total ratings: 153
Rate this member

Report this Post02-06-2010 06:28 PM Click Here to See the Profile for Back On HolidaySend a Private Message to Back On HolidayDirect Link to This Post
WAY too many links to post, heres the searchs

http://www.fierosearch.com/...here=SUB&SearchQuery Type "cradle bolts"
www.fierosearch.com/cgi-bin...here=SUB&SearchQuery Type "cradle bolts"

[This message has been edited by Back On Holiday (edited 02-06-2010).]

IP: Logged
fieroguru
Member
Posts: 12251
From: Champaign, IL
Registered: Aug 2003


Feedback score:    (45)
Leave feedback


Total ratings: 259
Rate this member

Report this Post02-06-2010 06:46 PM Click Here to See the Profile for fieroguruSend a Private Message to fieroguruDirect Link to This Post
 
quote
Originally posted by ICCAMDFIERO:
But I really dont want to cut into the frame if I dont have to. Anyone have any ideas, or know of a solution? Thanks --Greg


I do not like cutting the frame to fix this issue either...

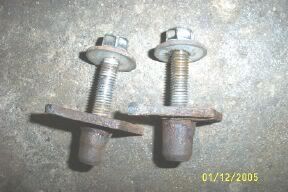
Since you already cut the heads off, and the witch hat nut (it is shaped like a witch's hat) is already spinning, just take a big hammer and knock what is left up into the frame rail. Doing this will help remove what is left of the sheet metal tab that used to hold the witch hat nut in place and keep it from spinning. Then remove the bolt/witch hat assy from the frame rail either through the oval holes in the side, or by removing the rear bumper assembly to have full access to the inside of the frame rail.

Once you have the witch hat removed, it will be much easier to remove it from what is left of the bolt since you can clamp the bolt side in a vice and use a large cresent or pipe wrench to remove the witch hat nut (or get out the torch to heat up the nut to help break it free). Once the witch hat nut is free, it needs to be welded to a piece of steel bar. The size/shape isn't that important, but it needs to be longer than the frame is wide so it will keep the witch hat nut from spinning.


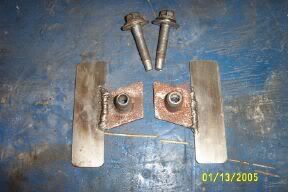
Once done, slide the new witch hat/steel bar assy back in and line up the nut with the hole. I left the assy free to move on both of my 88's, but some may want to secure them so they do not move around when there is not a cradle bolted in place - RTV on the bottom surface of the bar or drilling 2 small holes on the bottom of the frame rail and plug welding it into plate both do the trick - just make sure it is in the right place before welding.

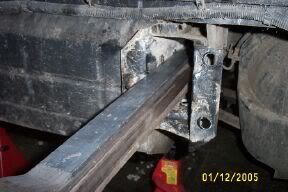
If you take the rear bumper assy off (my preferred method) you will have full access to the witch hat nut area to clean up what remains of the sheet metal tab that used to hold in in place. In this pic, the modified witch hat/bar assy is installed.


In the event the witch hat is spinning and you do not want to cut the bolt, after taking the rear bumper assy off you will have full access to the witch hat nut:


Use a long pry bar to remove what is left of the sheet metal tab and then fill the inside of the frame rail with steel to wedge against the bottom flange of the witch hat nut to keep it from spinning.


The bottom piece next to the flange on the witch hat nut needs to have a sharp 90 degree corner (no rounded corners). Once the steel is in place, you can apply the needed effort to break the bolt free from the witch hat nut (usually not much, just more than a rusted/busted piece of sheet metal could withstand).


Once the bolts are out, remove the witch hat nuts from inside the frame rails and perform the bar modification:

[This message has been edited by fieroguru (edited 02-06-2010).]

IP: Logged
rourke_87_T-Top
Member
Posts: 1347
From: Toronto Ontario Canada
Registered: Jan 2009


Feedback score:    (9)
Leave feedback

Rate this member

Report this Post02-06-2010 09:28 PM Click Here to See the Profile for rourke_87_T-TopSend a Private Message to rourke_87_T-TopDirect Link to This Post
I took rear rebar off as well, you just need to prevent the witch hat from spinning and when I re-installed the cradle, I threw the witch hat nuts in the scrap pile and used extra wheel lug nuts, with large washers from the top of an old pair of struts, that way I could slip a 3/4" box end wrench onto them in the future but that's just my preference.
IP: Logged
ICCAMDFIERO
Member
Posts: 308
From: St. Charles IL
Registered: Sep 2009


Feedback score: (3)
Leave feedback

Rate this member

Report this Post02-06-2010 10:56 PM Click Here to See the Profile for ICCAMDFIEROSend a Private Message to ICCAMDFIERODirect Link to This Post
Thanks for all the help guys! I'll probably end up taking off the rear bumper. I'll have to do a quick search and see how hard it is. I've never had to remove one before.
IP: Logged
Jason88Notchie
Member
Posts: 1817
From: Elyria, Ohio, USA
Registered: Oct 2009


Feedback score: N/A
Leave feedback

Rate this member

Report this Post02-08-2010 11:37 AM Click Here to See the Profile for Jason88NotchieSend a Private Message to Jason88NotchieDirect Link to This Post
I did this the same way as Rourke did. However I used bolts that were Almost the same dia. as the hole (can't remember off had the exact bolt size, but it fit perfect) and the nut to coinside. Worked out good.
IP: Logged


All times are ET (US)

T H I S   I S   A N   A R C H I V E D   T O P I C
  

Contact Us | Back To Main Page

Advertizing on PFF | Fiero Parts Vendors
PFF Merchandise | Fiero Gallery
Real-Time Chat | Fiero Related Auctions on eBay


Copyright (c) 1999, C. Pennock