Paul, Thanks for the reply. I used Evercoat “SMC Panel Adhesive” for the bonding of the scoop to the hood. I covered the SMC with Evercoat “Lite Weight” non clog filler. The putty on top is just the stuff you get at the local auto parts store, so I don’t know what type it is. I used this same process when I grafted the T/A scoops in the front fenders and it worked great, but they are also a lot smaller and are not affected by the heat of the sun. What are the issues when putting the “Lite Weight” on the “SMC”? Also the putty on top of the “Lite Weight”? Are you saying I should purchase some of the Evercoat “Vette Panel Adhesive/Filler” and put that on top of the SMC panel adhesive vs. the "Lite Weight"? If it matters, the thickness of the "Lite Weight" is very thin in most areas. It was more of a filler over the SMC that had bumps/grooves from applying.
Also, the guide coat was primer, not the carbon based stuff. I know because it clogged up the sand paper, and kicked my *** the whole time I was sanding. I also should have put on a lot less of it, but as I started to apply it, I wanted to see what the hood looked like all one color.
I’m more concerned with the areas of the hood that I sanded down into the bare hood. I tried to sand down to just the black coat and not go into the hood, but in a few spots it just didn’t work out. IF I was to order up a quart of the Vette Panel Adhesive/Filler can I work that out into the paint and then sand down as needed (not going back into the hoods surface)? I’m thinking that if I get the filler, I can apply a good coat to the top and work it out 5-6 inches from the scoop, and feather it smooth. (make sence). If I go this route, are you telling me I have to get all the "Lite Weight" off first?
I was going to cover it all with a good coat of primer, and sand it, repeating as often as needed to get a good foundation for the top paint. I guess I just figured that I could primer; spot putty and repeat as needed until I got a good surface to paint. Are the issues I may face all related to the product not sticking, lifting or being affected by the sun or vibration?
Well some folks use bondo on the SMC & it lasts for a while. The reason the SMC requires a different filler is it's infused with the mold release. That way they don't have to prep the molds with every part they make. But it doesn't allow for most things to stick well to it. If the putty is just a tube with no hardener then you need to sand/grind it off. You've seen this page with part #s for materials, right? http://gafieroclub.org/bbs/index.php?topic=469.0 You never put filler over any paint of primer (not even feathering the edges), with the only exception being PPG epoxy primer. What type of primer did you use? Any good primer should be fine over the bare SMC. As I said I like to use the PPG epoxy as it has the best adhesion properties. ~ Paul aka "Tha Driver"
Originally posted by boomme: thanks paul, after getting a quote from the shop on what they'd charge to put in the scoop, I'm thinking if I go with a scoop, it's be more economical just to buy the entire decklid from you and have it painted. plus, that'd allow me to keep my stock lid in case I ever wanted it. I'm assuming the deck lids you sale line up pretty well (mine is a n 87 notchie)?
Should line up perfectly. They are the exact same dimensions as the original decklids & hoods.
IP: Logged
01:51 PM
qwikgta Member
Posts: 4671 From: Virginia Beach, VA Registered: Jan 2001
Well some folks use bondo on the SMC & it lasts for a while. The reason the SMC requires a different filler is it's infused with the mold release. That way they don't have to prep the molds with every part they make. But it doesn't allow for most things to stick well to it. If the putty is just a tube with no hardener then you need to sand/grind it off. You've seen this page with part #s for materials, right? http://gafieroclub.org/bbs/index.php?topic=469.0 You never put filler over any paint of primer (not even feathering the edges), with the only exception being PPG epoxy primer. What type of primer did you use? Any good primer should be fine over the bare SMC. As I said I like to use the PPG epoxy as it has the best adhesion properties. ~ Paul aka "Tha Driver"
Well reading your thread on the other forum I see im in way over my head. Your discussion is paint and body shop 101 and i am the guy who painted his car with Krylon Spray paint. So, I guess Ill just continue with my Walmart body work and do the best I can. I always have the other hood, and its already the correct color.
Thanks a bunch, and I guess I should have understood before I started that this level of work is why paint and body shops charge so much.
Originally posted by qwikgta: Thanks a bunch, and I guess I should have understood before I started that this level of work is why paint and body shops charge so much.
But the only thing body shops teach you, is how to sign your name. At least you're learning a bit about body work, this way.
Well reading your thread on the other forum I see im in way over my head. Your discussion is paint and body shop 101 and i am the guy who painted his car with Krylon Spray paint. So, I guess Ill just continue with my Walmart body work and do the best I can. I always have the other hood, and its already the correct color.
Thanks a bunch, and I guess I should have understood before I started that this level of work is why paint and body shops charge so much.
Rob
Well you got off to a great start. All you need to do to make sure it lasts (IMO) is to cut out the bondo & finish it with SMC filler, & once you get that smooth prime & block out. Use the guide coat (flat black spray paint) on the primer, & if you use a catalyst-hardened primer then you can use the catalyst-hardened putty to fill in the low spots & scratches. If you're using lacquer primer (although I don't recommend it) then you need to block & re-prime until you get it smooth & flat. EDIT: & yes folks have no idea how much work & time is involved in doing body work right until they try it themselves. ~ Paul aka "Tha Driver"
I understood it was a big undertaking before I started, I just didn't do the research on the proper supplies. I knew enough to use the SMC adhesive on the scoop to bond it to the hood. I knew enough that if you just glassed it on or "bondo'd" it, that it would crack. I just didn't understand that the Evercoat Filler was not the correct filler to put on top of the SMC. I did't realize that there was a specific SMC filler to use. I will order it in the A.M. along with the 2 part putty you indicated.
I know it will come out OK, its jsut that I have to spend another $50+ bucks on the supplies for the new stuff, and the stuff I have is not going to be of much use. (Why do I always pick the 95 deg days to do this) Live and learn, and yea, I understand why the body shops charge so much, I have at least 10 hours of sanding on this thing (over the last 3 days), a garage full of dust, and sore finger tips to show for it, now I have to sand all my work off, and start over. I'm sure that with the right materials, i'll get the end result that im looking for, its just I was thinking I was over half way done, and now I realize I have a longer road ahead.
Stand by for the next update.
Rob
IP: Logged
11:00 PM
Jul 6th, 2011
qwikgta Member
Posts: 4671 From: Virginia Beach, VA Registered: Jan 2001
Could a guy use just SMC? Would it be longer lasting or for some reason does it not sand as well or something?
I don't think you understand the terminology. SMC is the fiberglass the hoods are made of (as well as the decklid, headlight doors, & roof sections). What you use to fill in imperfections/bodywork is "SMC filler", or "SMC adhesive/filler". The adhesive/filler is good for both bonding parts together & finishing out the top surface. It does dry harder than bondo & is therefore harder to sand. ~ Paul aka "Tha Driver"
Yea. $68.48 in new supplies. Pick them up tonight. Start working on "Phase II" of the hood this weekend.
Rob
Don't get discouraged. It won't be long before you're back under primer & after that & blocking you'll soon be ready for paint. Look at it this way: now you know how to block it all down & get it ready, since you've already done it once. .
IP: Logged
02:08 PM
Erik Member
Posts: 5628 From: Des Moines, Iowa Registered: Jul 2002
I don't think you understand the terminology. SMC is the fiberglass the hoods are made of (as well as the decklid, headlight doors, & roof sections). What you use to fill in imperfections/bodywork is "SMC filler", or "SMC adhesive/filler". The adhesive/filler is good for both bonding parts together & finishing out the top surface. It does dry harder than bondo & is therefore harder to sand. ~ Paul aka "Tha Driver"
OK, so I have not picked up the supples yet, I had to stay long at work. I have some SMC adhesive left, but the other product is called SMC adhesive/filler. the stuff I have does not say its "filler". So Paul, I can just use the SMC adhesive vice buying a new batch of "filler". And yea this stuff dries HARD, its a *itch to sand.
Rob
IP: Logged
09:18 PM
qwikgta Member
Posts: 4671 From: Virginia Beach, VA Registered: Jan 2001
OK, so I have not picked up the supples yet, I had to stay long at work. I have some SMC adhesive left, but the other product is called SMC adhesive/filler. the stuff I have does not say its "filler". So Paul, I can just use the SMC adhesive vice buying a new batch of "filler". And yea this stuff dries HARD, its a *itch to sand.
Rob
Sorry, I don't have an answer for that. I've always bought the dual purpose shtuff. Maybe contact the manufacturer? You're starting sanding with 40 grit, right? ~ Paul aka "Tha Driver"
I don't think you understand the terminology. SMC is the fiberglass the hoods are made of (as well as the decklid, headlight doors, & roof sections). What you use to fill in imperfections/bodywork is "SMC filler", or "SMC adhesive/filler". The adhesive/filler is good for both bonding parts together & finishing out the top surface. It does dry harder than bondo & is therefore harder to sand. ~ Paul aka "Tha Driver"
Thanks I guess my question is why use bondo as well, couldn't you just use SMC filler? Or wont it smooth out?
Thanks I guess my question is why use bondo as well, couldn't you just use SMC filler? Or wont it smooth out?
That's the thing: you're not supposed to use bondo on SMC. It doesn't stick near as well as SMC filler. It does take more time to get the SMC filler smooth because it does dry harder. ~ Paul aka "Tha Driver"
The SMC adhesive/filler is easier to sand than the strait adhesive from what a recall. It's been a few years since I've used it but that's my recollection.
Nolan
[This message has been edited by Sourmug (edited 07-07-2011).]
IP: Logged
06:35 PM
Jul 9th, 2011
qwikgta Member
Posts: 4671 From: Virginia Beach, VA Registered: Jan 2001
Sorry, I don't have an answer for that. I've always bought the dual purpose shtuff. Maybe contact the manufacturer? You're starting sanding with 40 grit, right? ~ Paul aka "Tha Driver"
$90 bucks later I have a new batch of supplies. Picked up some good primer and a bunch of misc stuff while at the Paint Store.
I still can't believe that when I looked at your web site, you have the new STM hood scoop that I wanted to do all along. Now when i finish this hood, I may have to take my old hood, and do that one up.
........ Update soon.
Rob
[This message has been edited by qwikgta (edited 07-09-2011).]
IP: Logged
09:12 AM
Oct 10th, 2011
qwikgta Member
Posts: 4671 From: Virginia Beach, VA Registered: Jan 2001
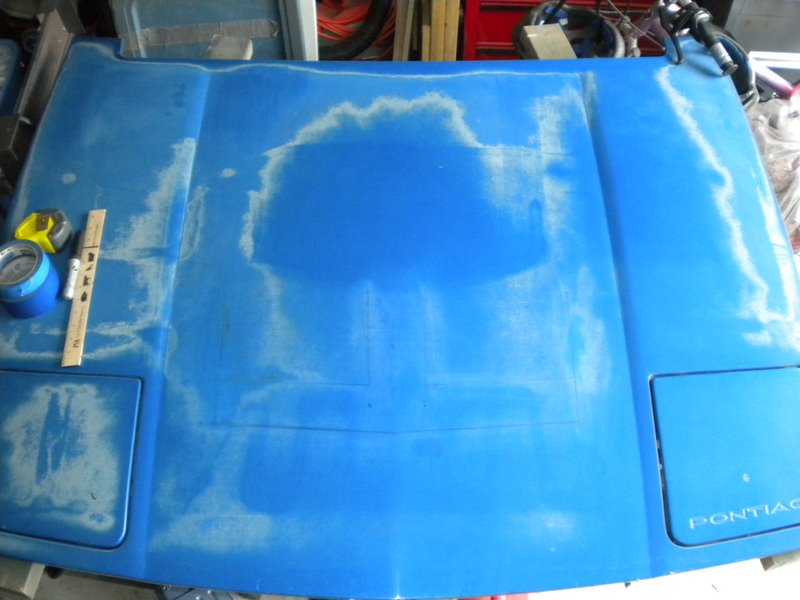
Sorry for the long lag time between updates, but I had not gotten around to any significant updates. I had sanded off all the old featherlite filler, back down to the SMC filler. I bought some new SMC and some of the high dollar finishing filler. I recoated it with SMC and got it 98% perfect, and then used the Metal Glaze on it for a 100% smooth finish. I sanded it all down with 200, 380 and 800 grit paper until is was SMOOTH. Then hit it with 2 coats of Primer. Tomorrow I plan to wet sand it all, with 800 and then primer it some more. One last wet sand, one last coat of primer and then I can paint it. Still need to finish the bottom, but the top looks great.
I turned the original pic 90 degrees, to better show what it looks like on the car.
More pics with I get the bottom done, and finish painted. Then some with it on the car.
Rob
[This message has been edited by qwikgta (edited 10-10-2011).]
yea, the 800 was overkill, and I only did it because I had done the area that I had painted the old guide coat and wanted to insure an all around finish. I wet sand with 400 and then 800 on the last coat. It worked for the rest of the car, so I dont want to do anything differant with the hood.
I didn't get to it today, so I'll have to wait until next sunday.
Rob
IP: Logged
04:00 PM
PFF
System Bot
L67 Member
Posts: 1792 From: Winston Salem, NC Registered: Jun 2010
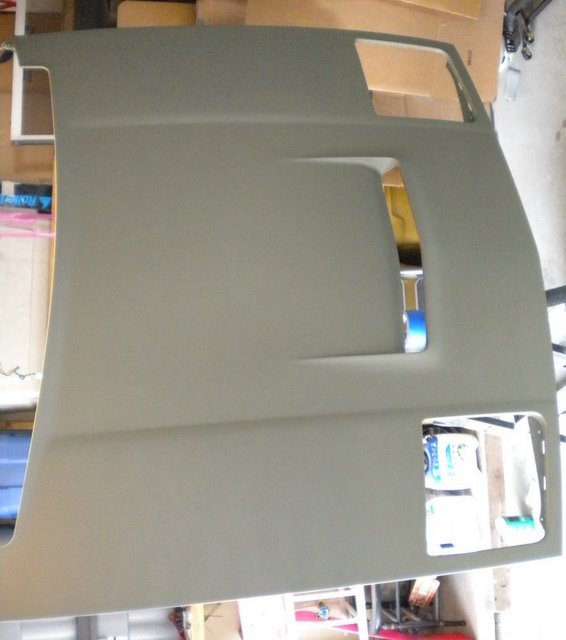
No real update. Completed first wet sand, filled some small imperfections. Put on second coat of primer. Started to work on the bottomside. I want to clean it up so it looks good open too.
last shot shows the bottom, first coat of SMC filler. Small pockets on the ends I made with some glass/resin. I'll be sanding this down, and using a smaller amount of filler to clean it up. Nothing major because it wont be seen that much.
More pics when I can get the first coat of paint on.
I so want to have the guts to do this.... I have 2 spare hoods… just no good equipment (no compressor) or experience doing it alone. Been a helper a few times but never the driver. Lol
------------------ Rescued & resuscitated 1984 Indy Fiero Pace Car presently reversibly modified...LOL!
IP: Logged
11:01 AM
qwikgta Member
Posts: 4671 From: Virginia Beach, VA Registered: Jan 2001
I so want to have the guts to do this.... I have 2 spare hoods… just no good equipment (no compressor) or experience doing it alone. Been a helper a few times but never the driver. Lol
Ya just got to roll up your sleeves and do it. You can't really "screw" it up. You may make more work, but its all fixable.
I so want to have the guts to do this.... I have 2 spare hoods… just no good equipment (no compressor) or experience doing it alone. Been a helper a few times but never the driver. Lol
I will be pulling molds for the full skin & inner structure sometime in the (hopefully near) future. After that you could buy just the skin & bond your inner piece to it, or buy a full bolt-on hood. If someone wanted to buy one soon I could do it quicker with a deposit so I could buy more resin... I love the "reversible mods" option you've chosen. I hate to see an Indy chopped up beyond restorability. With only 2,000 made they WILL be worth money SOME day. ~ Paul aka "Tha Driver"
Prices are on the website. Full skin - Part Number AV2002 $295 + shipping. Complete bolt-on hood - Part Number AV2003 $595 + shipping. Prices are subject to change once I start making them, if they're more of a pain to make than I think they will be. Of course, if someone ordered one now the price would be locked in for them. Best way to ship is Greyhound, if you have a station near you to pick it up. I think skins would be about $100, full hoods around $150 to ship. Local pickup (N. E. Ga.) is welcome. I do still need to come up with scrap front hoods to use the metal out of (so I don't have to fabricate all 7 metal pieces). ~ Paul aka "Tha Driver"
No real update. Completed first wet sand, filled some small imperfections. Put on second coat of primer. Started to work on the bottomside. I want to clean it up so it looks good open too.
Rob
Rob, I've been quietly following this thread watching your progress. If this is a first glass project, you're doing a fine job. Looks like this is going to turn out well and you'll have something to be very proud of.
quote
Originally posted by Tha Driver:
Local pickup (N. E. Ga.) is welcome. I do still need to come up with scrap front hoods to use the metal out of (so I don't have to fabricate all 7 metal pieces). ~ Paul aka "Tha Driver"
Paul, I've been thinking about updating my hood for quite a while. Have looked at several options and almost bought one version but changed my mind when I couldn't get the seller to respond to an email request. Regardless, I like the Angel (Version 2) hood vent. I don't rush into anything so don't expect an order until I see one installed but, I'll be looking for an example.
On another note, thought I'd suggest something for your website. I think you'd be better off if you can show your products installed versus just showing the parts. I think it would make a greater impact for potential buyers to envision what it's gonna look like on their car.
------------------ Ron "While you cannot control the length of your life, you can control the width and depth." Live life to it's fullest, you may not see tomorrow.
Paul, I've been thinking about updating my hood for quite a while. Have looked at several options and almost bought one version but changed my mind when I couldn't get the seller to respond to an email request. Regardless, I like the Angel (Version 2) hood vent. I don't rush into anything so don't expect an order until I see one installed but, I'll be looking for an example.
On another note, thought I'd suggest something for your website. I think you'd be better off if you can show your products installed versus just showing the parts. I think it would make a greater impact for potential buyers to envision what it's gonna look like on their car.
I plan to. If anyone ever finishes any of the installations I'll put the photos on the website. Or if I ever get any of them done on any of my cars. I just don't have the time or the money - especially the money - to make the parts for my car(s) & put it together & paint it. Notice there are photos of the first hood vent on the site. Also ones of the headlight vents on the T-Top, albeit still in white gelcoat (on the white car). Thanks, ~ Paul aka "Tha Driver"
Prices are on the website. Full skin - Part Number AV2002 $295 + shipping. Complete bolt-on hood - Part Number AV2003 $595 + shipping. Prices are subject to change once I start making them, if they're more of a pain to make than I think they will be. Of course, if someone ordered one now the price would be locked in for them. Best way to ship is Greyhound, if you have a station near you to pick it up. I think skins would be about $100, full hoods around $150 to ship. Local pickup (N. E. Ga.) is welcome. I do still need to come up with scrap front hoods to use the metal out of (so I don't have to fabricate all 7 metal pieces). ~ Paul aka "Tha Driver"
So what if I bolted on a spare hood, drove up and dropped it off with you to convert to a bolt on... LOL!
If you're going to do that pick the worst condition hood you have. Bring it & lotsa cash & I'll get right on making the molds & a nice bolt-on hood for you. ~ Paul aka "Tha Driver"
I spent more time on the bottom of the hood, than the top. The top was easy in that it was a large, flat area to work. The bottom had a lot of curves, and I had to use more time getting into all the tight spots. I finlly had to just stop and paint it. I can still see a few flaws but its only when its open they can be seen.
Rob
IP: Logged
09:20 AM
qwikgta Member
Posts: 4671 From: Virginia Beach, VA Registered: Jan 2001


 .
.