Pennock's Fiero Forum
  Totally O/T - Archive
  Miata roll cage build (Page 1)

T H I S   I S   A N   A R C H I V E D   T O P I C
  

Email This Page to Someone! | Printable Version

This topic is 2 pages long:  1   2 
Previous Page | Next Page
Miata roll cage build by Doug Chase
Started on: 03-03-2006 07:02 PM
Replies: 52
Last post by: Boondawg on 06-27-2006 04:51 PM
Doug Chase
Member
Posts: 1487
From: Seattle area, Washington State, USA
Registered: Sep 2001


Feedback score: N/A
Leave feedback


Total ratings: 88
Rate this member

Report this Post03-03-2006 07:02 PM Click Here to See the Profile for Doug ChaseSend a Private Message to Doug ChaseDirect Link to This Post
Hi All,

I built a cage in a Miata recently and I thought some folks here might be interested in seeing the process.

The car is a D Prepared autocross car. A local autocrosser recently purchased the car more or less in the condition seen here. He wants a full cage so he can remove the windshield (already done), for safety, and so he can take it to the track if he feels like it.

The first step is to figure out the height of the main hoop and front hoop. The rules say that "...a straight line drawn from the top of the main hoop to the top of the front hoop shall pass over the driver’s helmet..." The Hard Dog roll bar that came with the car made this job easy. The wooden broomstick is in the location of the front hoop.

With that done, it's time to remove the Hard Dog bar and get to work. Next step: mounting plates for the main hoop and door bars:

More progress to follow. I'll keep this updated daily, or close to it.

------------------
Doug Chase
Chase Race
Custom: cages, exhausts, fabrication
Duvall, WA
425-269-5636

IP: Logged
PFF
System Bot
Scott-Wa
Member
Posts: 5392
From: Tacoma, WA, USA
Registered: Mar 2002


Feedback score: N/A
Leave feedback


Total ratings: 147
Rate this member

Report this Post03-04-2006 03:46 AM Click Here to See the Profile for Scott-WaClick Here to visit Scott-Wa's HomePageSend a Private Message to Scott-WaDirect Link to This Post
Wasn't the windsheild a structural safety feature on those?

Looking forward to the rest of the build

IP: Logged
Jake_Dragon
Member
Posts: 32858
From: USA
Registered: Jan 2001


Feedback score: (5)
Leave feedback


Total ratings: 403
Rate this member

Report this Post03-04-2006 08:08 AM Click Here to See the Profile for Jake_DragonSend a Private Message to Jake_DragonDirect Link to This Post
What is the deal with the no windshield?
Is it so they can see better? Does it make the car faster? I would think the open cockpit would cause more air turbulance.
Looking forward to more pictures.
IP: Logged
maryjane
Member
Posts: 69757
From: Copperas Cove Texas
Registered: Apr 2001


Feedback score: (4)
Leave feedback


Total ratings: 441
Rate this member

Report this Post03-04-2006 09:01 AM Click Here to See the Profile for maryjaneSend a Private Message to maryjaneDirect Link to This Post
It takes a lot of confidence I guess to start cutting away on a car--especially someone elses car, but your past work puts that concern to rest. I'm jealous as heck of your abilities Doug.
Thanks for sharing this cage build and all the rest you've shared over the years..
IP: Logged
sonic50
Member
Posts: 3873
From: All over the USA
Registered: Aug 2004


Feedback score: N/A
Leave feedback


Total ratings: 92
Rate this member

Report this Post03-04-2006 11:14 AM Click Here to See the Profile for sonic50Send a Private Message to sonic50Direct Link to This Post
Good luck with the build. Can't wait to see more photos.

Scott

------------------

www.iamanascarfan.com

IP: Logged
Doug Chase
Member
Posts: 1487
From: Seattle area, Washington State, USA
Registered: Sep 2001


Feedback score: N/A
Leave feedback


Total ratings: 88
Rate this member

Report this Post03-05-2006 02:49 AM Click Here to See the Profile for Doug ChaseSend a Private Message to Doug ChaseDirect Link to This Post

 
quote
Originally posted by Scott-Wa:

Wasn't the windshield a structural safety feature on those?

Looking forward to the rest of the build

Thank you.

I looks like the windshield added some chassis stiffness and some rollover protection. The cage will stiffen things up way beyond what the windshield did, and the rule I quoted above ensures that the driver is well protected in a rollover. The intent is that the driver's head should never touch the ground.

 
quote
Originally posted by Jake_Dragon:

What is the deal with the no windshield?
Is it so they can see better? Does it make the car faster? I would think the open cockpit would cause more air turbulence.
Looking forward to more pictures.

Thanks!

You would not believe what a difference removing the windshield makes. You get so used to windshield pillars that you don't realize how much view they block until they're gone. You know that feeling you get when you jump into a convertible and you look around and you have zero blind spots? Without a windshield it's like that for the front, too. Very nice.

As for the turbulence, the windshield is an enormous amount of drag because it punches a very large hole in the air. I talked with a gentleman that road raced an X1/9 several years ago and if I remember correctly he said he picked up about 10 mph at the end of the front straight of his home track when he removed the windshield. This Miata is primarily an autocross car and will be less effected because of lower speeds. Still, the rear deck will get paneled in to reduce some drag there.

 
quote
Originally posted by maryjane:

It takes a lot of confidence I guess to start cutting away on a car--especially someone elses car, but your past work puts that concern to rest. I'm jealous as heck of your abilities Doug.
Thanks for sharing this cage build and all the rest you've shared over the years..

Thanks for the compliment, that's very kind of you. To be perfectly clear, the owner removed the windshield before I got the car. There is plenty of cutting left, though, as you'll see.

 
quote
Originally posted by sonic50:

Good luck with the build. Can't wait to see more photos.

Scott

Thank you! Here's the next step.

The main hoop mounting plates are welded in place, and the main hoop is bent and tacked in place.

------------------
Doug Chase
Chase Race
Custom: cages, exhausts, fabrication
Duvall, WA
425-269-5636

IP: Logged
Doug Chase
Member
Posts: 1487
From: Seattle area, Washington State, USA
Registered: Sep 2001


Feedback score: N/A
Leave feedback


Total ratings: 88
Rate this member

Report this Post03-05-2006 05:35 PM Click Here to See the Profile for Doug ChaseSend a Private Message to Doug ChaseDirect Link to This Post

Doug Chase

1487 posts
Member since Sep 2001
Front hoop mounting plates are made.

Why did I choose to do it like this instead of an L-shaped plate that mounted on the floor and went up the rocker panel?


------------------
Doug Chase
Chase Race
Custom: cages, exhausts, fabrication
Duvall, WA
425-269-5636

IP: Logged
twofatguys
Member
Posts: 16465
From: Wheaton Mo. / Virginia Beach Va.
Registered: Jul 2004


Feedback score: (2)
Leave feedback


Total ratings: 227
Rate this member

Report this Post03-05-2006 06:59 PM Click Here to See the Profile for twofatguysSend a Private Message to twofatguysDirect Link to This Post
A lot stronger than just a typical L bracket, Looking good.
Brad
IP: Logged
Doug Chase
Member
Posts: 1487
From: Seattle area, Washington State, USA
Registered: Sep 2001


Feedback score: N/A
Leave feedback


Total ratings: 88
Rate this member

Report this Post03-06-2006 05:59 PM Click Here to See the Profile for Doug ChaseSend a Private Message to Doug ChaseDirect Link to This Post
Removed a couple brackets to make room for the front hoop:

And bent the front hoop:

 
quote
Originally posted by twofatguys:

A lot stronger than just a typical L bracket, Looking good.
Brad

Yep. It has the added benefit of leaving the dead pedal usable.

------------------
Doug Chase
Chase Race
Custom: cages, exhausts, fabrication
Duvall, WA
425-269-5636

IP: Logged
Doug Chase
Member
Posts: 1487
From: Seattle area, Washington State, USA
Registered: Sep 2001


Feedback score: N/A
Leave feedback


Total ratings: 88
Rate this member

Report this Post03-07-2006 02:10 PM Click Here to See the Profile for Doug ChaseSend a Private Message to Doug ChaseDirect Link to This Post
Next came the rear braces and mounting plates:

The picture below is looking into the trunk to see where the bottom ends of these braces land:

------------------
Doug Chase
Chase Race
Custom: cages, exhausts, fabrication
Duvall, WA
425-269-5636

IP: Logged
Jake_Dragon
Member
Posts: 32858
From: USA
Registered: Jan 2001


Feedback score: (5)
Leave feedback


Total ratings: 403
Rate this member

Report this Post03-07-2006 05:01 PM Click Here to See the Profile for Jake_DragonSend a Private Message to Jake_DragonDirect Link to This Post
Looking good. I always loved working with pipe, mostly hand rails but it was always fun.
Thanks for sharing your work.
IP: Logged
PFF
System Bot
MinnGreenGT
Member
Posts: 11545
From: Lakeville, MN 55044
Registered: Jul 2001


Feedback score: (1)
Leave feedback


Total ratings: 274
Rate this member

Report this Post03-07-2006 05:03 PM Click Here to See the Profile for MinnGreenGTClick Here to visit MinnGreenGT's HomePageSend a Private Message to MinnGreenGTDirect Link to This Post
Very nice! Although I have to admit it kind of makes me want to see the car get rolled just to see how well it holds up!
IP: Logged
Jefrysuko
Member
Posts: 3491
From: Oreana IL
Registered: Apr 2000


Feedback score:    (17)
Leave feedback


Total ratings: 108
Rate this member

Report this Post03-07-2006 09:51 PM Click Here to See the Profile for JefrysukoSend a Private Message to JefrysukoDirect Link to This Post
 
quote
Originally posted by MinnGreenGT:

Very nice! Although I have to admit it kind of makes me want to see the car get rolled just to see how well it holds up!

LOL, I usually think the same thing when looking at a roll cage but then feel bad thinking it.

IP: Logged
Doug Chase
Member
Posts: 1487
From: Seattle area, Washington State, USA
Registered: Sep 2001


Feedback score: N/A
Leave feedback


Total ratings: 88
Rate this member

Report this Post03-08-2006 02:07 PM Click Here to See the Profile for Doug ChaseSend a Private Message to Doug ChaseDirect Link to This Post
 
quote
Originally posted by MinnGreenGT:

Very nice! Although I have to admit it kind of makes me want to see the car get rolled just to see how well it holds up!

Hey now, don't be wishing any bad luck on my customers.

Now the hard part. Making the front strut tower braces. This is difficult because you only get one chance to drill the correct hole in the firewall. After spending a couple hours with a ruler, straight edge, level, plumb bob, and calculator, I bullseyed the left one:

Next up is the right one.

------------------
Doug Chase
Chase Race
Custom: cages, exhausts, fabrication
Duvall, WA
425-269-5636

IP: Logged
Doug Chase
Member
Posts: 1487
From: Seattle area, Washington State, USA
Registered: Sep 2001


Feedback score: N/A
Leave feedback


Total ratings: 88
Rate this member

Report this Post03-09-2006 02:14 PM Click Here to See the Profile for Doug ChaseSend a Private Message to Doug ChaseDirect Link to This Post
The right brace is complete.

------------------
Doug Chase
Chase Race
Custom: cages, exhausts, fabrication
Duvall, WA
425-269-5636

IP: Logged
Boondawg
Member
Posts: 38235
From: Displaced Alaskan
Registered: Jun 2003


Feedback score: N/A
Leave feedback


Total ratings: 342
User Banned

Report this Post03-09-2006 02:21 PM Click Here to See the Profile for BoondawgSend a Private Message to BoondawgDirect Link to This Post
Really nice work, my friend!
IP: Logged
Doug Chase
Member
Posts: 1487
From: Seattle area, Washington State, USA
Registered: Sep 2001


Feedback score: N/A
Leave feedback


Total ratings: 88
Rate this member

Report this Post03-10-2006 01:30 PM Click Here to See the Profile for Doug ChaseSend a Private Message to Doug ChaseDirect Link to This Post
 
quote
Originally posted by Boondawg:

Really nice work, my friend!

Thanks Boondawg!

I made mounting boxes where the tubing hits the front strut towers. If you're trying to figure out the perspective on the photo below, the camera is above the cowl at the rear of the engine and is looking at the left front strut tower. Those capped off brake lines are where the master cylinder used to be. It needed to be removed for welding access.

The strut tower braces are also finalized in shape and length, and are tacked in place.

------------------
Doug Chase
Chase Race
Custom: cages, exhausts, fabrication
Duvall, WA
425-269-5636

IP: Logged
1986 Fiero GT
Member
Posts: 3383
From: Eden, NY USA
Registered: Mar 2005


Feedback score:    (10)
Leave feedback


Total ratings: 54
Rate this member

Report this Post03-10-2006 01:56 PM Click Here to See the Profile for 1986 Fiero GTSend a Private Message to 1986 Fiero GTDirect Link to This Post
Wow, I'm impressed... Very good work, Doug.

Oh, and I have a small question... I happened to be looking at the Fiero cage section, and I saw that your prices had doubled. Is this because of materials, or were you just not charging enough? I was just wondering, because I know that prices of raw materials has taken a huge leap since Katrina. Keep up the good work.

IP: Logged
Doug Chase
Member
Posts: 1487
From: Seattle area, Washington State, USA
Registered: Sep 2001


Feedback score: N/A
Leave feedback


Total ratings: 88
Rate this member

Report this Post03-10-2006 02:17 PM Click Here to See the Profile for Doug ChaseSend a Private Message to Doug ChaseDirect Link to This Post
 
quote
Originally posted by 1986 Fiero GT:

Wow, I'm impressed... Very good work, Doug.

Thank you very much!

 
quote
Originally posted by 1986 Fiero GT:

Oh, and I have a small question... I happened to be looking at the Fiero cage section, and I saw that your prices had doubled. Is this because of materials, or were you just not charging enough?

Good question.

Although steel prices have been continually increasing over the past few years, the reason is primarily the second one - I wasn't charging enough before. Building one of the 6 point bars takes 20 - 30 hours so at my shop rate of $50/hr that's $1000 - $1500 that I have invested in labor, not even including materials. As the shop is getting busier I can't afford to spend time on projects where I only end up making $10-15/hr (or less!). I will eventually cease making mail order Fiero roll bars / roll cages altogether because the car I have been using as a jig will get turned into a race car. In the meantime, though, they're still available, but they have to be viable from a business standpoint.

Make sense?

------------------
Doug Chase
Chase Race
Custom: cages, exhausts, fabrication
Duvall, WA
425-269-5636

IP: Logged
Jake_Dragon
Member
Posts: 32858
From: USA
Registered: Jan 2001


Feedback score: (5)
Leave feedback


Total ratings: 403
Rate this member

Report this Post03-10-2006 08:53 PM Click Here to See the Profile for Jake_DragonSend a Private Message to Jake_DragonDirect Link to This Post
Nice work, when you build something with your own two hands and can stand back at the end of the day and say look I made that.
I would love to work in a weld shop again, I welded for 15 years and miss it.
IP: Logged
Doug Chase
Member
Posts: 1487
From: Seattle area, Washington State, USA
Registered: Sep 2001


Feedback score: N/A
Leave feedback


Total ratings: 88
Rate this member

Report this Post03-13-2006 03:26 PM Click Here to See the Profile for Doug ChaseSend a Private Message to Doug ChaseDirect Link to This Post
 
quote
Originally posted by Jake_Dragon:

Nice work, when you build something with your own two hands and can stand back at the end of the day and say look I made that.


Thanks. That's definitely one of the rewards of it.

Main hoop diagonal and harness bar:


------------------
Doug Chase
Chase Race
Custom: cages, exhausts, fabrication
Duvall, WA
425-269-5636

IP: Logged
PFF
System Bot
Doug Chase
Member
Posts: 1487
From: Seattle area, Washington State, USA
Registered: Sep 2001


Feedback score: N/A
Leave feedback


Total ratings: 88
Rate this member

Report this Post03-14-2006 01:43 PM Click Here to See the Profile for Doug ChaseSend a Private Message to Doug ChaseDirect Link to This Post
Here are the mount plates where the front hoop will attach to the firewall. The left one was pretty straightforward:


The right one required a more surgical approach when welding:

Tip: If you're welding near something that you don't want to catch on fire, covering it up with a wet towel helps. So does a metal plate, obviously.


Here you can see the bar that will attach the front hoop to the firewall, and you can also see why the surgical welding approach was needed:

------------------
Doug Chase
Chase Race
Custom: cages, exhausts, fabrication
Duvall, WA
425-269-5636

IP: Logged
1986 Fiero GT
Member
Posts: 3383
From: Eden, NY USA
Registered: Mar 2005


Feedback score:    (10)
Leave feedback


Total ratings: 54
Rate this member

Report this Post03-14-2006 03:27 PM Click Here to See the Profile for 1986 Fiero GTSend a Private Message to 1986 Fiero GTDirect Link to This Post
 
quote
Originally posted by Doug Chase:


Good question.

Although steel prices have been continually increasing over the past few years, the reason is primarily the second one - I wasn't charging enough before. Building one of the 6 point bars takes 20 - 30 hours so at my shop rate of $50/hr that's $1000 - $1500 that I have invested in labor, not even including materials. As the shop is getting busier I can't afford to spend time on projects where I only end up making $10-15/hr (or less!). I will eventually cease making mail order Fiero roll bars / roll cages altogether because the car I have been using as a jig will get turned into a race car. In the meantime, though, they're still available, but they have to be viable from a business standpoint.

Make sense?

Alright, thanks for clearing that up... Makes perfect sense, I was just curious why you had doubled your prices in jut a few months time. Thanks Doug!

IP: Logged
Doug Chase
Member
Posts: 1487
From: Seattle area, Washington State, USA
Registered: Sep 2001


Feedback score: N/A
Leave feedback


Total ratings: 88
Rate this member

Report this Post03-15-2006 02:26 PM Click Here to See the Profile for Doug ChaseSend a Private Message to Doug ChaseDirect Link to This Post
Right side door bars are in:


When you have multi-tube junctions, the notches can get interesting. The picture below is the notch in the rear of the top door bar (shown above) where it meets the main hoop and harness bar:

------------------
Doug Chase
Chase Race
Custom: cages, exhausts, fabrication
Duvall, WA
425-269-5636

IP: Logged
Boondawg
Member
Posts: 38235
From: Displaced Alaskan
Registered: Jun 2003


Feedback score: N/A
Leave feedback


Total ratings: 342
User Banned

Report this Post03-15-2006 03:13 PM Click Here to See the Profile for BoondawgSend a Private Message to BoondawgDirect Link to This Post
 
quote
Originally posted by Doug Chase:

When you have multi-tube junctions, the notches can get interesting. The picture below is the notch in the rear of the top door bar (shown above) where it meets the main hoop and harness bar:

Yep, been there, done that.
WITHOUT one of them angled tubing cutters.
All figured, cut, & finished by torch and hand grinder.
Had a lot of waste leftover.
Nothing as complex as what you are doing though!

Alot of people don't realize just how many manhours go into the construction of a R.O.P.S.
I don't think I would do it for sale.
People FREAK when you tell them how much! (allmost ALL in manhours)

The work you are doing is some of the best I've seen.
I don't think those joints could BE any tighter!
Nice!

IP: Logged
Jake_Dragon
Member
Posts: 32858
From: USA
Registered: Jan 2001


Feedback score: (5)
Leave feedback


Total ratings: 403
Rate this member

Report this Post03-15-2006 06:50 PM Click Here to See the Profile for Jake_DragonSend a Private Message to Jake_DragonDirect Link to This Post
I use to build these things before I got into computers.
The legs are as tall as I am.
Scrubber
These are about as tall as my leg
Cyclones

Man if I keep looking in here I will be out cutting up my car this weekend

IP: Logged
Scott-Wa
Member
Posts: 5392
From: Tacoma, WA, USA
Registered: Mar 2002


Feedback score: N/A
Leave feedback


Total ratings: 147
Rate this member

Report this Post03-15-2006 09:26 PM Click Here to See the Profile for Scott-WaClick Here to visit Scott-Wa's HomePageSend a Private Message to Scott-WaDirect Link to This Post
 
quote
Originally posted by Jake_Dragon:

I use to build these things before I got into computers.
The legs are as tall as I am.
Scrubber
These are about as tall as my leg
Cyclones

Man if I keep looking in here I will be out cutting up my car this weekend


Hmm... swinging off topic in the off topic section... that sure looks a lot like how the Dyson vacuums work... I suspect their patents wouldn't hold up in court after seeing those.

IP: Logged
Doug Chase
Member
Posts: 1487
From: Seattle area, Washington State, USA
Registered: Sep 2001


Feedback score: N/A
Leave feedback


Total ratings: 88
Rate this member

Report this Post03-16-2006 01:53 PM Click Here to See the Profile for Doug ChaseSend a Private Message to Doug ChaseDirect Link to This Post
 
quote
Originally posted by Scott-Wa:

Hmm... swinging off topic in the off topic section...

I don't mind getting off topic in my off topic thread as long as it's interesting. Those cyclone air cleaners are cool. A friend and I talked about making something like this as a part of a two stage air filter for my rally car.

 
quote
Originally posted by Boondawg:


Yep, been there, done that.
WITHOUT one of them angled tubing cutters.
All figured, cut, & finished by torch and hand grinder.
Had a lot of waste leftover.
Nothing as complex as what you are doing though!

Alot of people don't realize just how many manhours go into the construction of a R.O.P.S.
I don't think I would do it for sale.
People FREAK when you tell them how much! (allmost ALL in manhours)

The work you are doing is some of the best I've seen.
I don't think those joints could BE any tighter!
Nice!

A torch? Wow. I use a tubing notcher to do the initial cuts. They still often have to be fine tuned with a bench grinder / angle grinder / die grinder, but I bet this still saves a lot of time over a torch. You are quite right about the amount of hours that go into something like this. LOTS.

So moving on with more on the same topic, here's my favorite notch in the whole cage. This one is on the center diagonal. This piece shares the load of the front strut tower braces and transfers it to the rest of the cage:


The interesting notch is where meets the door bar, main hoop, and harness bar. Looks simple from this angle, right?


Here's what it looks like without the other tubes. Kinda cool, eh?

------------------
Doug Chase
Chase Race
Custom: cages, exhausts, fabrication
Duvall, WA
425-269-5636

IP: Logged
Boondawg
Member
Posts: 38235
From: Displaced Alaskan
Registered: Jun 2003


Feedback score: N/A
Leave feedback


Total ratings: 342
User Banned

Report this Post03-16-2006 03:17 PM Click Here to See the Profile for BoondawgSend a Private Message to BoondawgDirect Link to This Post
 
quote
Originally posted by Doug Chase:

A torch? Wow. I use a tubing notcher to do the initial cuts.

A torch was all I had. And like I said, lots of mistakes and waste.
The end products was NOTHING as fine as what you're doing!
All mine was for construction equipment.
Not preatty, and never tested in a rollover.
Although a huge boulder did fall on one of mine while I was in it.
It held, with narry a cracked weld.
Quite a bend, though.

Compare your work to Eddie Van Halen.
I'm Tiny Tim.

Who would you rather hear play?!

[This message has been edited by Boondawg (edited 03-16-2006).]

IP: Logged
Jake_Dragon
Member
Posts: 32858
From: USA
Registered: Jan 2001


Feedback score: (5)
Leave feedback


Total ratings: 403
Rate this member

Report this Post03-16-2006 03:39 PM Click Here to See the Profile for Jake_DragonSend a Private Message to Jake_DragonDirect Link to This Post
You can use The coolest forum addition ever [booktext] [/booktext] and it will leave out all of our side tracking.

The Cyclones were great. They were used to control dust, we could suck up cotton balls and baby powder and none of it would come out the clean side. It would all end up in the bucket at the bottom. I always wondered why they were not used in other operations. We had one over our cut off saw, it would drop the metal dust into a bin and vent the air out side of the building. No filters just the cyclone, it was about twice the size of the one in the picture and made out of steel. The scrubber was the same thing. Water and paper came in and swirled around keeping the paper dust in the bottom but letting the clean air out the top. I had a lot of fun building those and a lot of other stuff. Too bad they closed the door, I would love to moon light and make some side money.

I had a press to notch the pipe for our hand rails, 90 and 45 only. It worked but I could do just as well with a grinder.

IP: Logged
Jefrysuko
Member
Posts: 3491
From: Oreana IL
Registered: Apr 2000


Feedback score:    (17)
Leave feedback


Total ratings: 108
Rate this member

Report this Post03-16-2006 10:20 PM Click Here to See the Profile for JefrysukoSend a Private Message to JefrysukoDirect Link to This Post
 
quote
Originally posted by Doug Chase:

Those cyclone air cleaners are cool. A friend and I talked about making something like this as a part of a two stage air filter for my rally car.

You see this alot on construction machinery and ag tractors etc. For certain applications your filter can get completely clogged in as little as 100 hours without them. I could definetly see a rally car as one of those applications.

At Caterpillar we call them Dust Ejectors. I havn't disected one yet but somehow the exhaust gas is used to create the cyclone from a 2" tube off the muffler.

IP: Logged
PFF
System Bot
Doug Chase
Member
Posts: 1487
From: Seattle area, Washington State, USA
Registered: Sep 2001


Feedback score: N/A
Leave feedback


Total ratings: 88
Rate this member

Report this Post03-17-2006 01:33 PM Click Here to See the Profile for Doug ChaseSend a Private Message to Doug ChaseDirect Link to This Post
The right a-pillar bar (for lack of a better term) is in:


Here's another angle on the whole thing so far:

------------------
Doug Chase
Chase Race
Custom: cages, exhausts, fabrication
Duvall, WA
425-269-5636

IP: Logged
Boondawg
Member
Posts: 38235
From: Displaced Alaskan
Registered: Jun 2003


Feedback score: N/A
Leave feedback


Total ratings: 342
User Banned

Report this Post03-17-2006 02:03 PM Click Here to See the Profile for BoondawgSend a Private Message to BoondawgDirect Link to This Post
Man, that is one sturdy cage!
There's that much car there?
And to think, if everything goes right, it will never be used!

Looking at the structual quality of your work, thank god the ones I did on equipment were never put to the test!

I don't think they would have done their job!
They did protect my head from falling trees and rocks, though!

[This message has been edited by Boondawg (edited 03-17-2006).]

IP: Logged
Doug Chase
Member
Posts: 1487
From: Seattle area, Washington State, USA
Registered: Sep 2001


Feedback score: N/A
Leave feedback


Total ratings: 88
Rate this member

Report this Post03-19-2006 03:44 PM Click Here to See the Profile for Doug ChaseSend a Private Message to Doug ChaseDirect Link to This Post
 
quote
Originally posted by Boondawg:

Looking at the structual quality of your work, thank god the ones I did on equipment were never put to the test!

I don't think they would have done their job!

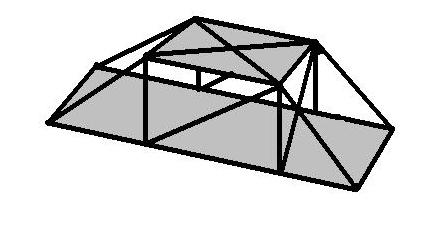
Actually this cage doesn't look bad at all. Everything (almost) is triangulated. Triangles are very strong structures. The Miata cage looks a lot more sexy because it's not as square as the one you posted, but yours looks like it should be pretty strong. I'm guessing the person sits in the middle of it facing towards the left side of the picture?

Another thing that makes a difference in strength is tubing quality, size, and thickness. For the Miata cage I used DOM (drawn over mandrel) tubing. It's fairly strong tubing for various reasons. See http://www.steeltubeinstitute.org/domprocesses.htm if you're interested. The tubing used in this car is 1.5" OD x 0.095" wall thickness. This is dictated by the rules and is based on the weight of the car. For larger, heavier cars the requirements go all the way up to 1.75" x 0.120" wall tubing.

Anyway, moving on, the left a-pillar bar is in:

------------------
Doug Chase
Chase Race
Custom: cages, exhausts, fabrication
Duvall, WA
425-269-5636

IP: Logged
Boondawg
Member
Posts: 38235
From: Displaced Alaskan
Registered: Jun 2003


Feedback score: N/A
Leave feedback


Total ratings: 342
User Banned

Report this Post03-19-2006 04:05 PM Click Here to See the Profile for BoondawgSend a Private Message to BoondawgDirect Link to This Post
If you get a chance, could you include a close-up of one of your welds on one of the multi-angle cuts?
I have always had problems keeping up my flow when changing angles.

Ofcourse, i'm still burning with sticks...............

IP: Logged
Doug Chase
Member
Posts: 1487
From: Seattle area, Washington State, USA
Registered: Sep 2001


Feedback score: N/A
Leave feedback


Total ratings: 88
Rate this member

Report this Post03-20-2006 06:53 PM Click Here to See the Profile for Doug ChaseSend a Private Message to Doug ChaseDirect Link to This Post
 
quote
Originally posted by Boondawg:

If you get a chance, could you include a close-up of one of your welds on one of the multi-angle cuts?
I have always had problems keeping up my flow when changing angles.

Ofcourse, i'm still burning with sticks...............

I dug through all my pictures of this build and I don't have any weld close-ups. Once the owner gets the car finished and brings it out to race I'll get some more photos.

Here the driver's side door bars are bent and tacked in place, along with a brace for the a-pillar bar:

I am now done making tubes but the cage isn't done yet. At this point the cage is just tacked together so there is lots of welding to do. Then some interior reassembly is needed. Stay tuned. We're almost there.

------------------
Doug Chase
Chase Race
Custom: cages, exhausts, fabrication
Duvall, WA
425-269-5636

IP: Logged
Doug Chase
Member
Posts: 1487
From: Seattle area, Washington State, USA
Registered: Sep 2001


Feedback score: N/A
Leave feedback


Total ratings: 88
Rate this member

Report this Post03-21-2006 04:22 PM Click Here to See the Profile for Doug ChaseSend a Private Message to Doug ChaseDirect Link to This Post
Now it's time to weld it all up. There are some places where it is difficult or impossible to weld all the way around a tube. The solution?
.
.
.
.
.
.
.
.
.
.
.
.
.
.
.
.
.
.
.
..
.
.
.
.
.
.
.
.
.
.
.
.
.
.
.
.
.
.
.
Weld everything possible while it's in the car, then take it out of the car and weld up the rest.

------------------
Doug Chase
Chase Race
Custom: cages, exhausts, fabrication
Duvall, WA
425-269-5636

IP: Logged
Boondawg
Member
Posts: 38235
From: Displaced Alaskan
Registered: Jun 2003


Feedback score: N/A
Leave feedback


Total ratings: 342
User Banned

Report this Post03-21-2006 05:38 PM Click Here to See the Profile for BoondawgSend a Private Message to BoondawgDirect Link to This Post
 
quote
Originally posted by Doug Chase:

There are some places where it is difficult or impossible to weld all the way around a tube. The solution?
take it out of the car and weld up the rest.

And that was what I was wondering when I was asking about keeping my flow going around all them weird cuts.
I did mine already mounted on the equipment.
Yes, it sucked!

But next time........................

IP: Logged
Doug Chase
Member
Posts: 1487
From: Seattle area, Washington State, USA
Registered: Sep 2001


Feedback score: N/A
Leave feedback


Total ratings: 88
Rate this member

Report this Post03-22-2006 05:08 PM Click Here to See the Profile for Doug ChaseSend a Private Message to Doug ChaseDirect Link to This Post
 
quote
Originally posted by Boondawg:


And that was what I was wondering when I was asking about keeping my flow going around all them weird cuts.
I did mine already mounted on the equipment.
Yes, it sucked!

I hear you. I was able to cheat on a lot of the welds by removing the cage from the car, but some, like the strut tower braces (front and rear) and the lower door bars had to be done in the car. That means lying on my back with my head crammed into the footwell and welding above me. It sounds like you know the drill.

This brings us to our last installment. It's time for the finishing details. These were pretty simple on this car because it's so stripped down.

- Before the left front shock tower brace gets welded in place I had to make a slight modification so the brake booster isn't trapped in place. You can see why this was needed in this picture.

- I also needed to move the location of the throttle cable (because of that same bar) and modify the pedal to work with the new location. Forgot to get pictures of that.

- Then re-install the master cylinder, bleed the brakes, and re-route the fuel pump wire.

- The steering wheel needed to be hung, as did the gauge panel:


- The wiring bar (under the right side of the dash) also had to be hung since it was displaced by the bar that goes through the firewall there. You can sort of see it in this picture:


And then it went home:


Here's how the parts tally worked out:

21 pieces of tubing
13 bends
4 tubing ends were flat, square cuts
6 tubing ends were flat, angled cuts
2 tubing ends were rounded, angled cuts
30 tubing ends were notched, and many of these were angled, too

10 mounting plates
6 were simple plates
4 were boxes made out of three pieces each

As you can see, there's more to building a cage than bending a couple tubes.

Any questions?

------------------
Doug Chase
Chase Race
Custom: cages, exhausts, fabrication
Duvall, WA
425-269-5636

IP: Logged
Jake_Dragon
Member
Posts: 32858
From: USA
Registered: Jan 2001


Feedback score: (5)
Leave feedback


Total ratings: 403
Rate this member

Report this Post03-22-2006 05:53 PM Click Here to See the Profile for Jake_DragonSend a Private Message to Jake_DragonDirect Link to This Post
Are you useing mig or tig?
Hot sparks in the ear was enough for me to start tig welding as much as I could.
Thanks for sharing!
IP: Logged
Previous Page | Next Page

This topic is 2 pages long:  1   2 


All times are ET (US)

T H I S   I S   A N   A R C H I V E D   T O P I C
  

Contact Us | Back To Main Page

Advertizing on PFF | Fiero Parts Vendors
PFF Merchandise | Fiero Gallery | Ogre's Cave
Real-Time Chat | Fiero Related Auctions on eBay


Copyright (c) 1999, C. Pennock