|
|
|
How to reupholster a seat by 30+mpg
Started on | : 09-05-2005 06:31 PM |
Replies | : 146 (19531 views) |
Last post by | : reinhart on 09-14-2018 01:58 PM |
|
|
|
Sep 5th, 2005
|
30+mpg Member Posts: 4060 From: Russellville, AR Registered: Feb 2002
|
Due to a request on another thread, this will attempt to show some steps to reupholster a stock Fiero seat w/ OEM type fabric. You'll need access to the following items: sewing machine seam ripper sharp scissors wire cutters hog ring pliers marker (I used a roller ball pen) One may still purchase grey ripple seat cloth for US$14.98/yd from http://www.yourautotrim.comThey may still have saddle tan also. 
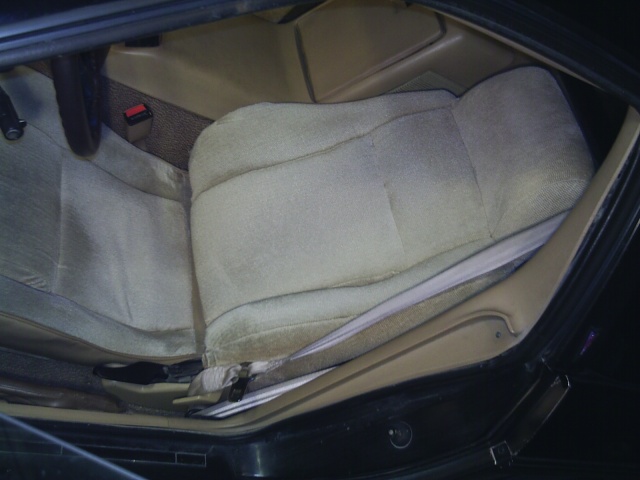
Unbolt the seat w/ a 13mm wrench & remove. 
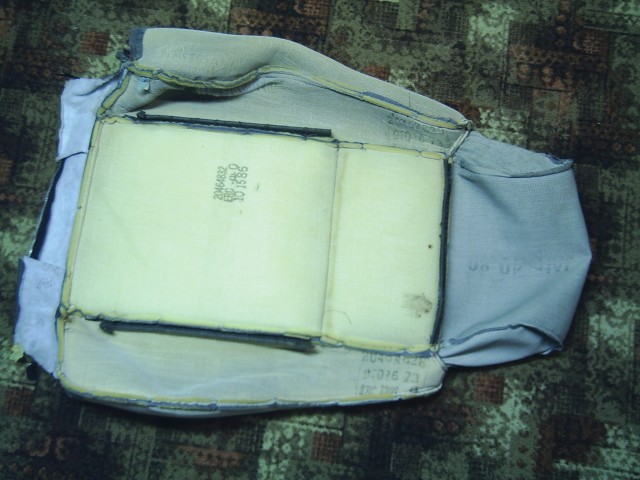
Unzip the seat back at the bottom & pull up. Using the wire cutters, cut the hog rings on the left & right vertical rods & remove them. Don't damage the black material. Pull the upholstery up until the horizontal rod is exposed. Cut the five hog rings. Remove the rod from the upholstery. Remove the upholstery from the seat.  With the seam ripper, cut the stitches at one end of any seam in the upholstery. If done at the proper end, grab the loose stitching and remove it for the entire seam. If it doesn't want to cooperate, try the other end of the seam. Repeat until all panels are separated. 
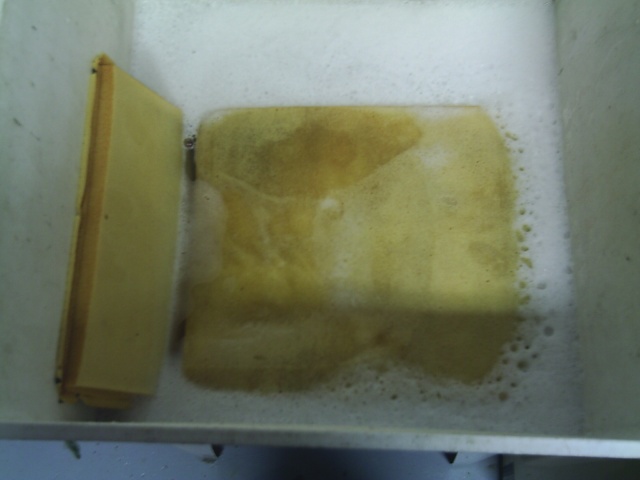
Next separate the foam from the fabric without damaging anything except the thread holding them together. Then layout the fabric panels on the material.  (PS If nobody finds this thread useful, I'll just let it die & not waste time writing & posting pics.) [This message has been edited by 30+mpg (edited 06-02-2006).]
|
06:31 PM
|
|
PFF
System Bot
|
|
|
Vendetta Member Posts: 751 From: Atlanta, Georgia Registered: Jul 2004
|
Keep goin i am about to do this myself actually. Thanks Austin
|
06:54 PM
|
|
iSh Member Posts: 153 From: Atlanta Registered: Aug 2005
|
| quote | Originally posted by Vendetta: Keep goin i am about to do this myself actually. Thanks Austin |
|
|
07:08 PM
|
|
Mark Member Posts: 1097 From: Pittsburgh, Pa. Registered: Jul 99
|
By all means, continue. This is good stuff. Also, please address any work necessary on the seat foam. Thanks!
|
07:55 PM
|
|
bomaze Member Posts: 119 From: Lockport, NY USA Registered: Sep 2003
|
Please continue I find this very interesting and insightful. I can't wait until you post some more info. Thanks, keep the info coming!!!! [This message has been edited by bomaze (edited 09-05-2005).]
|
08:07 PM
|
|
NY_FIERO Member Posts: 1554 From: mexico NY Registered: May 2002
|
Yes, I agree. This is GOOD stuff.
|
09:29 PM
|
|
Sep 6th, 2005
|
The Poopsmith Member Posts: 1154 From: Portland, OR Registered: Mar 2005
|
Yeah keep it up and then show us the way to put some cool custom upholsterd graphics on the seat. Sewing rules!
|
05:53 AM
|
|
Jake_Dragon Member Posts: 32977 From: USA Registered: Jan 2001
|
I would also like to see how you finished the project.
|
06:55 AM
|
|
30+mpg Member Posts: 4060 From: Russellville, AR Registered: Feb 2002
|
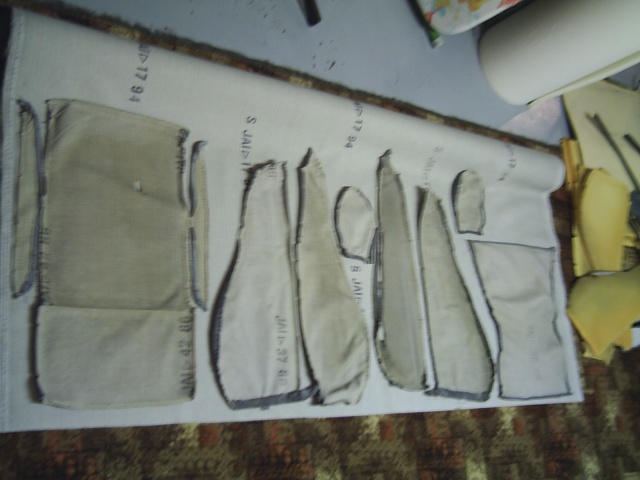
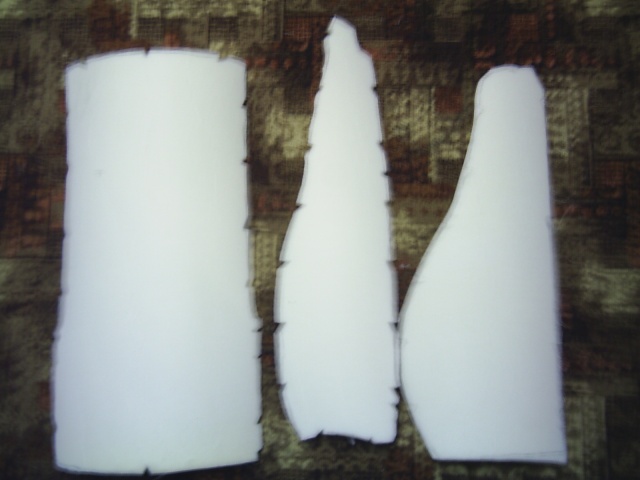
Iron patterns to flatten folds & wrinkles prior to tracing outlines. 2 most important points: 1. Don't let your pattern move on the new fabric as you trace the out line, may want to use straight pins. It's OK to make the traced pattern on the fabric a little bigger than the old stuff. NOT OK to make it a little smaller 2. Notice the old material has "V" notches or darts in the edge every so often. You must get these in exactly the same position on your new material.  Cut out the patterns & leave a little extra on the edge. Cut the "V"s using the tips of the scissors as to not cut past the point of the V. Then one may go back and trim to size. Don't cut inside the lines.  [This message has been edited by 30+mpg (edited 06-03-2006).]
|
06:55 PM
|
|
RWDPLZ Member Posts: 15079 From: Registered: May 2002
|
Please continue! I've always wanted to do this (my driver's seat is in BAD shape) ------------------
 1984 Fiero SE
|
08:24 PM
|
|
Sep 7th, 2005
|
30+mpg Member Posts: 4060 From: Russellville, AR Registered: Feb 2002
|
How about some pics of Fiero seats with worn fabric?
|
08:10 AM
|
|
PFF
System Bot
|
|
carnut122 Member Posts: 9122 From: Waleska, GA, USA Registered: Jan 2004
|
Exactly which material is it that one should buy? I suppose one should alos buy the heavy duty thread from the same site? The las seats I re-upholstered, I did on a singer home sewing machine. The machine had a hard time with the material. Can this material be sewn on a home-grade machine? Please continue with the lesson! I'm sure that I'll be following in your footsteps!!
|
08:04 PM
|
|
maryjane Member Posts: 70039 From: Copperas Cove Texas Registered: Apr 2001
|
Very interesting post and informative instructions. Question: You said not to make the pattern any smaller than the original piece. Isn't the old piece probably stretched from years & years of sitting in the seat? If so, isn't there a chance, that when you get all thru, that your brand new cover won't fit very tightly?
|
08:59 PM
|
|
F-I-E-R-O Member Posts: 8410 From: Endwell, NY Registered: Jan 2005
|
This must be fate... I just bought a bunch of material that I liked to use for something, my wife has our sewing machine out to fix my daughters pants, and to find this post- I guess I'll be taking my seats out tomorrow.
|
09:09 PM
|
|
Sep 8th, 2005
|
30+mpg Member Posts: 4060 From: Russellville, AR Registered: Feb 2002
|
| quote | maryjane: Very interesting post and informative instructions. Question: You said not to make the pattern any smaller than the original piece. Isn't the old piece probably stretched from years & years of sitting in the seat? If so, isn't there a chance, that when you get all thru, that your brand new cover won't fit very tightly? |
|
No, not a big enough of one to be concerned about from my experience. Besides, have patience, this issue will be dealt with in a future installment. 
|
08:20 AM
|
|
cancerkazoo Member Posts: 672 From: MI, USA Registered: Aug 2001
|
| quote | Originally posted by maryjane: Very interesting post and informative instructions. Question: You said not to make the pattern any smaller than the original piece. Isn't the old piece probably stretched from years & years of sitting in the seat? If so, isn't there a chance, that when you get all thru, that your brand new cover won't fit very tightly? |
|
Probably could add a 1/4"- 1/2" of foam to fill the seat back out also. Just spray glue the seat foam and cut peices to add thickness. ^ The 1st thing I would think of doing.
|
09:05 AM
|
|
Kohburn Member Posts: 7349 From: Oriental, NC Registered: Jul 2003
|
|
Shibbypoopalot Member Posts: 138 From: Wayzata, MN Registered: Aug 2005
|
Question on laying out the old seats and tracing them: Do we want to cut out the cigarette burns and rips and stuff too??  Alright, I'm sorry. This is awesome. Thanx a ton. I can get rid of my cheap-o seat covers now!
|
01:48 PM
|
|
30+mpg Member Posts: 4060 From: Russellville, AR Registered: Feb 2002
|
| quote | Originally posted by carnut122: Exactly which material is it that one should buy? I suppose one should alos buy the heavy duty thread from the same site? The las seats I re-upholstered, I did on a singer home sewing machine. The machine had a hard time with the material. Can this material be sewn on a home-grade machine? Please continue with the lesson! I'm sure that I'll be following in your footsteps!! |
|
Depends on what you want your seats to look like, ask for a sample. I'm using "ripple grey" to recover an 87 driver's seat. Some home machines may be beefer than others.
|
06:43 PM
|
|
Gordo Member Posts: 2981 From: East Guilford, NY, USA Registered: Mar 2002
|
I couldn't help but notice the directions that you laid the pieces on the fabric. It looks like you matched the original direction of the fabric pattern. Nice!
|
08:27 PM
|
|
30+mpg Member Posts: 4060 From: Russellville, AR Registered: Feb 2002
|
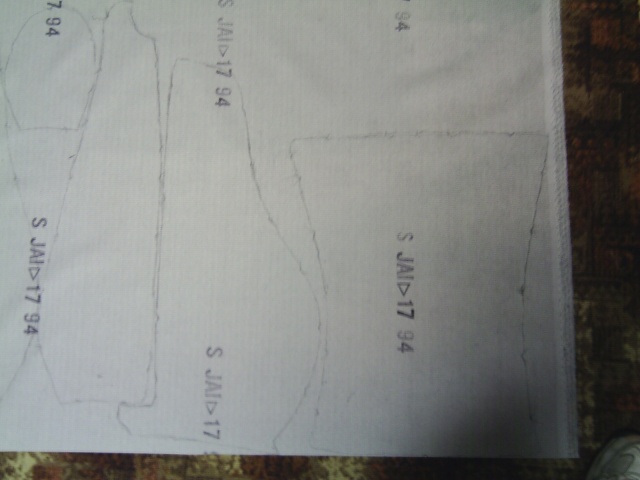
After the individual panels have been cut out, take a panel and lay the old panel flat on top of it. Check the edges for the proper V notches carefully. Any that are missed (and you will find some), any that are cut slightly off or are not cut deep enough, re-cut them using only the very tips of the scissors. All notch points on the new panels should be as close to the location of the notch points on the old panel. Repeat for each panel. This is the most key step up to this point. DO NOT skip it! You have been warned!! [This message has been edited by 30+mpg (edited 06-06-2006).]
|
09:05 PM
|
|
PFF
System Bot
|
|
|
Sep 9th, 2005
|
30+mpg Member Posts: 4060 From: Russellville, AR Registered: Feb 2002
|
| quote | Originally posted by 30+mpg: How about some pics of Fiero seats with worn fabric? |
|
We have pics of about everything else on this forum. 
|
06:31 PM
|
|
Sep 12th, 2005
|
30+mpg Member Posts: 4060 From: Russellville, AR Registered: Feb 2002
|
Next use the same technique to cut the five new panels from seat foam to replace the worn and dirty ones. The old foam measured 1/4" thick. The new foam I'm using is 1/2" thick. This answers part of the question of streched fabric or loose patterns.  Cut the notches accurately based on the old foam.
|
09:47 PM
|
|
Sep 13th, 2005
|
30+mpg Member Posts: 4060 From: Russellville, AR Registered: Feb 2002
|
 1/2" thick Seat Foam panels 3 of 5 cut 2 of 3 notched [This message has been edited by 30+mpg (edited 09-13-2005).]
|
07:49 PM
|
|
Sep 14th, 2005
|
dguy Member Posts: 2416 From: Beckwith Township, ON, Canada Registered: Jan 2003
|
Alright dude, are you working slowly or just posting slowly to keep everyone watching this thread in suspense?
|
09:24 AM
|
|
30+mpg Member Posts: 4060 From: Russellville, AR Registered: Feb 2002
|
Working full time actually. Leave at 6:20 am & get home at 5 pm. Last evening I also replaced a broken A/C belt. Last Sat. I removed the front lowering springs from my project car and replaced them with stock to keep the stops from crashing on bumps. Also installed missing torque rods for the deck lid. Plus duties of normal married life.  If anyone can't wait and gets ahead of me, post instructions & pics! [This message has been edited by 30+mpg (edited 09-15-2005).]
|
09:16 PM
|
|
Sep 15th, 2005
|
LAMBO Member Posts: 1677 From: Lucas, Iowa, USA Registered: May 2000
|
Excellent topic. I will be following this one closely. Thank you!
|
12:28 PM
|
|
Sep 16th, 2005
|
30+mpg Member Posts: 4060 From: Russellville, AR Registered: Feb 2002
|
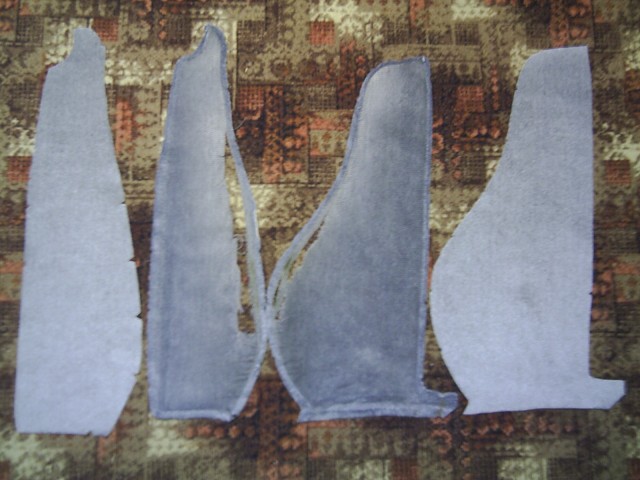
Trim all panels to the marked lines, if you haven't already done so. Sew the foam panels to the fabric panels. If any of the notches don't match up use the old panels to check it out before sewing. Use any thread and stay as close to the edges as possible. [This message has been edited by 30+mpg (edited 10-13-2005).]
|
11:01 PM
|
|
Sep 20th, 2005
|
30+mpg Member Posts: 4060 From: Russellville, AR Registered: Feb 2002
|
For the front panel, grey thread is required due to the exposed horizontal stitching for the dual thickness seat foam piece. A spool of slate grey Button thread from Wal-Mart for $0.96 is what I plan to use for exposed seams. [This message has been edited by 30+mpg (edited 09-21-2005).]
|
09:21 PM
|
|
Sep 21st, 2005
|
matchmade Member Posts: 435 From: Nashville,TN USA Registered: Sep 2004
|
+ for you. I've been wanting to attempt this for a while and my mother-in-law is an excellent seamstress and says she could help. I've just been wanting to get my hands on a spare seat skin before trying because I don't want to mess up my current seats any worse in case I fail to get the job done right. Please keep the updates coming, I look forward to seeing the end result!
|
10:24 AM
|
|
Sep 22nd, 2005
|
30+mpg Member Posts: 4060 From: Russellville, AR Registered: Feb 2002
|
The front foam piece that I want to reuse looks stained. So it gets washed.
|
08:27 PM
|
|
PFF
System Bot
|
|
Sep 26th, 2005
|
Darren's 87 coupe Member Posts: 673 From: Yukon , OK Registered: Sep 2001
|
Are you doing both seats? If you are, have you noticed any differences at all between the pass and drivers seats? I'm talking only about the upholstery. I think you can put a pss on a driver seat, but want to know for sure. I would also have to use my pass seat as a pattern since the drivers is so torn up. Thanks a ton for this thread. It really look good so far. Darren ------------------
|
03:47 PM
|
|
30+mpg Member Posts: 4060 From: Russellville, AR Registered: Feb 2002
|
I've recovered both in my other Fiero. I think there is only one set of bottom patterns and one set of back patterns for both seats. [This message has been edited by 30+mpg (edited 10-03-2005).]
|
06:25 PM
|
|
30+mpg Member Posts: 4060 From: Russellville, AR Registered: Feb 2002
|
| quote | Darren's 87 coupe: Thanks a ton for this thread. ... Darren
|
|
OBTW The button thread is too heavy for the wife's machine, so I'm using a pale upholstery thread instead.
|
06:28 PM
|
|
Oct 2nd, 2005
|
Mike OHIO Member Posts: 1089 From: NC Registered: Jul 2005
|
how many yards of fabric was used per seat?. does the new fabric match the color of the old perfectly? mike
|
09:52 PM
|
|
connecticutFIERO Member Posts: 7696 From: Registered: Jun 2002
|
This is one of the most useful and interesting threads I have seen here. Thanks for doing this.
|
09:58 PM
|
|
DPWood Member Posts: 540 From: Aylmer, Ont. Canada Registered: May 2002
|
Clicked the bookmark on this one. My wife is planning this for both our cars over the winter. Keep up the instructions and a + for you David ------------------ His Fiero: 1984 2M4 Coupe Her Fiero: 1984 2M4 Convertible
|
10:31 PM
|
|
Oct 3rd, 2005
|
30+mpg Member Posts: 4060 From: Russellville, AR Registered: Feb 2002
|
| quote | Originally posted by Mike OHIO: how many yards of fabric was used per seat?. does the new fabric match the color of the old perfectly? mike |
|
1 per. Only if the old was never exposed to sunlight. 
|
09:53 PM
|
|
30+mpg Member Posts: 4060 From: Russellville, AR Registered: Feb 2002
|
Project has been on hold due to installing a new flex plate on my daily driver. Almost have everything reconnected. Got a code 41 on my 87 coupe project car, 3800 V6 camshaft sensor problem. If you have more than one Fiero that you're trying to keep in service, things like this seat project take time.
|
10:00 PM
|
|
Oct 6th, 2005
|
30+mpg Member Posts: 4060 From: Russellville, AR Registered: Feb 2002
|
Here's photos of the upholstery on my daily driver that I did several years ago.   [This message has been edited by 30+mpg (edited 06-06-2006).]
|
08:04 PM
|
|