|
|
|

|
Poly Suspension Upgrade (all pics) by MulletproofMonk
| Started on | : 09-04-2008 09:56 AM |
| Replies | : 153 (24612 views) |
| Last post by | : pmbrunelle on 05-27-2024 05:43 PM |
|
|
|
|
Sep 4th, 2008
|
MulletproofMonk
Member Posts: 3092
From: Dayton, OH (Bellbrook, OH 45305)
Registered: Oct 2005
|
Well, I wanted to do a Poly upgrade on my 87 GT. Lots of people here have posts with what to do... but then only have a picture of the before and after. I'm a picture kind of guy or show me and I can duplicate it after that. Now that I have done the upgrade, the text makes more sense. So, Madess helped me with the upgrade and we took pictures of everything. Maybe this will help someone like me... Sorry for all those on dialup...
-Brian


|
09:56 AM
|
|
|
PFF
System Bot
|
|
|
|
MulletproofMonk
Member Posts: 3092
From: Dayton, OH (Bellbrook, OH 45305)
Registered: Oct 2005
|
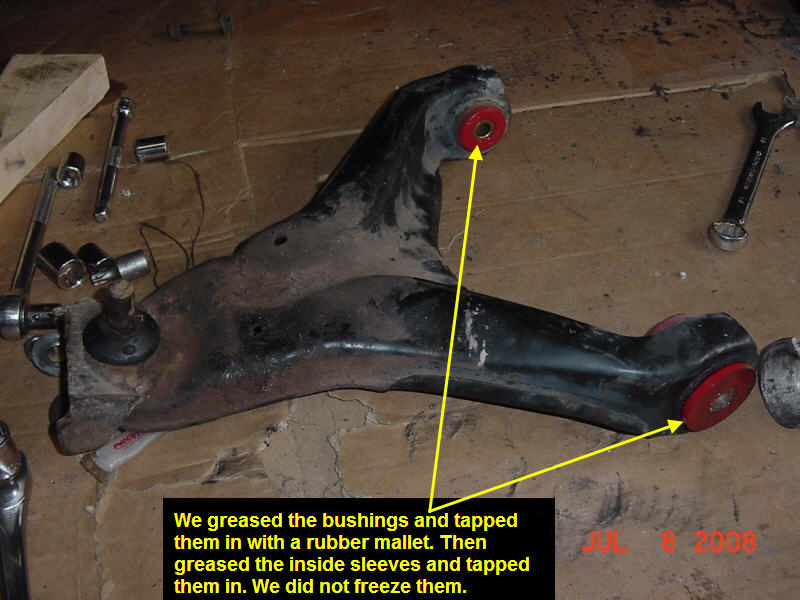
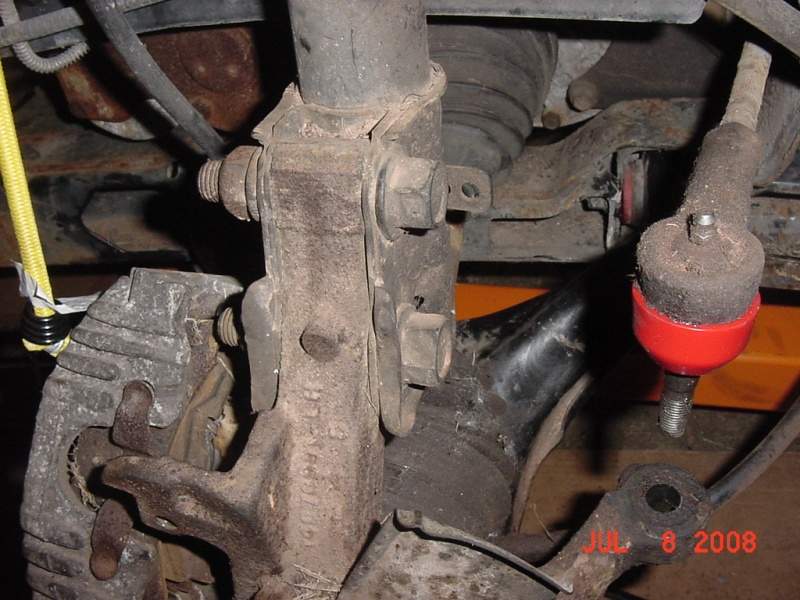
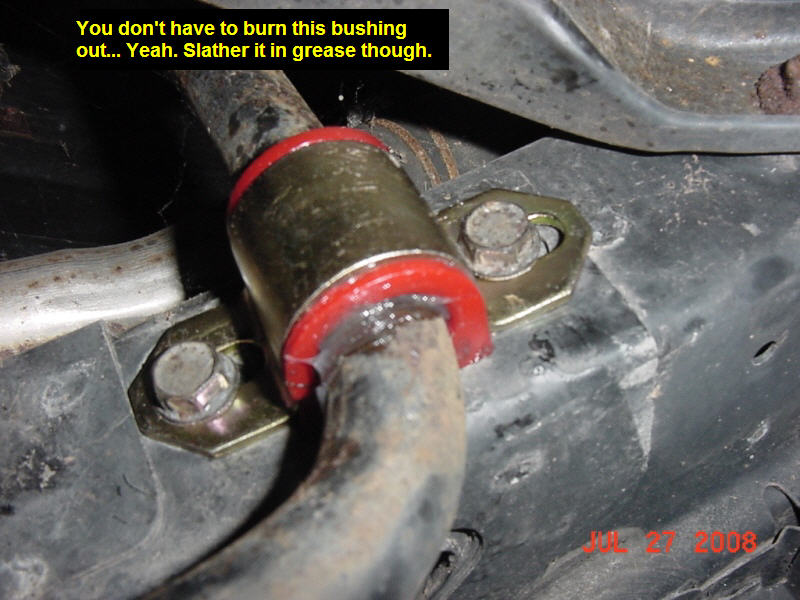
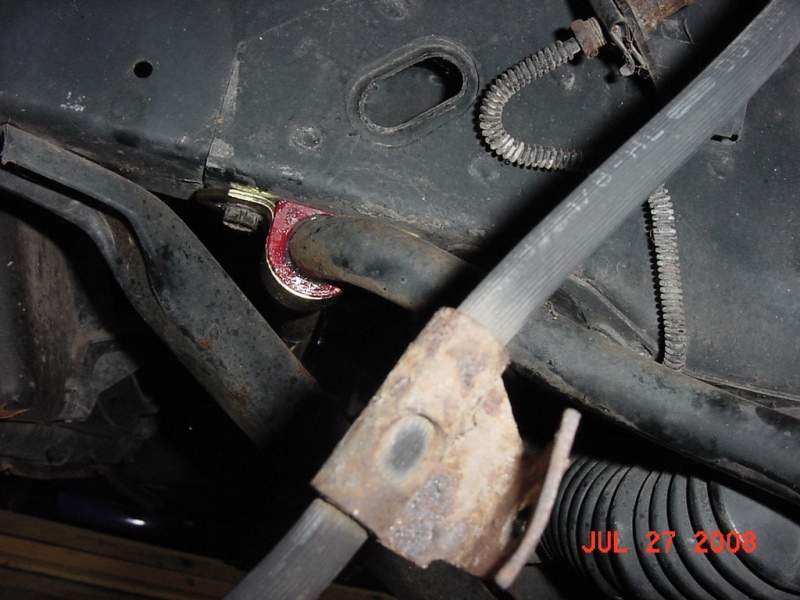
84-87 Rear Poly Bushings 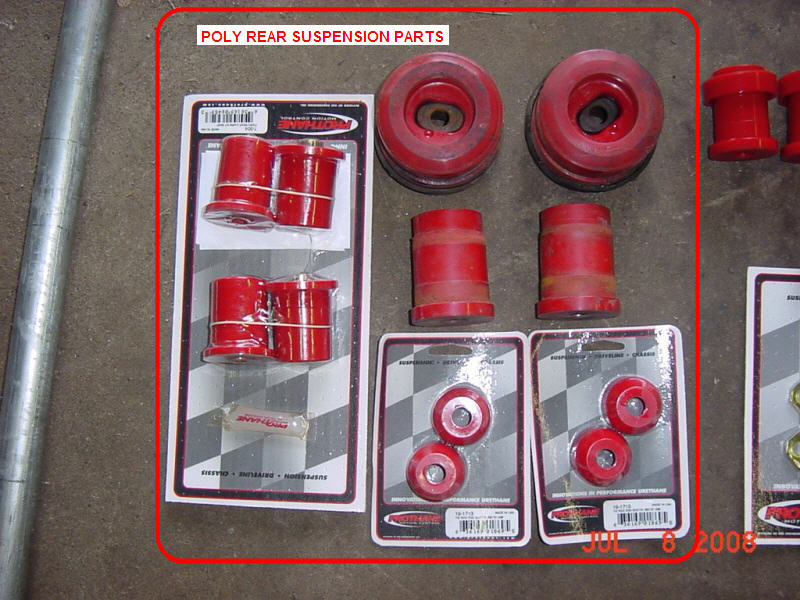 84-87 Rear Torque Specs from Ryan's excellent site: http://www.gmtuners.com/fil...7_Fiero_TQ_Specs.pdf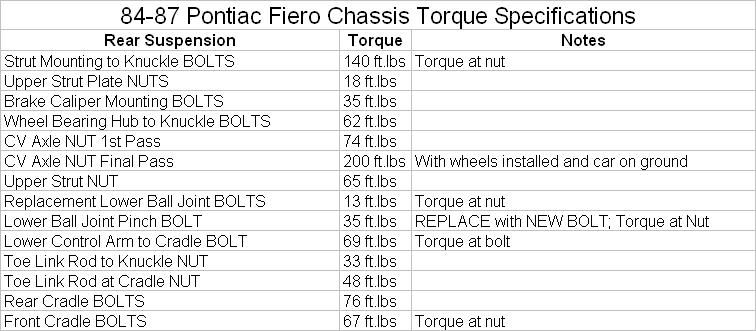 | | | quote | Originally posted by Raydar:
The 220 ft.lbs. for the hub/bearing bolt into the knuckle is horribly wrong.
I'll have to dig for the correct value. It's more like 62 ft/lbs. (Same as the rears.)
|
|
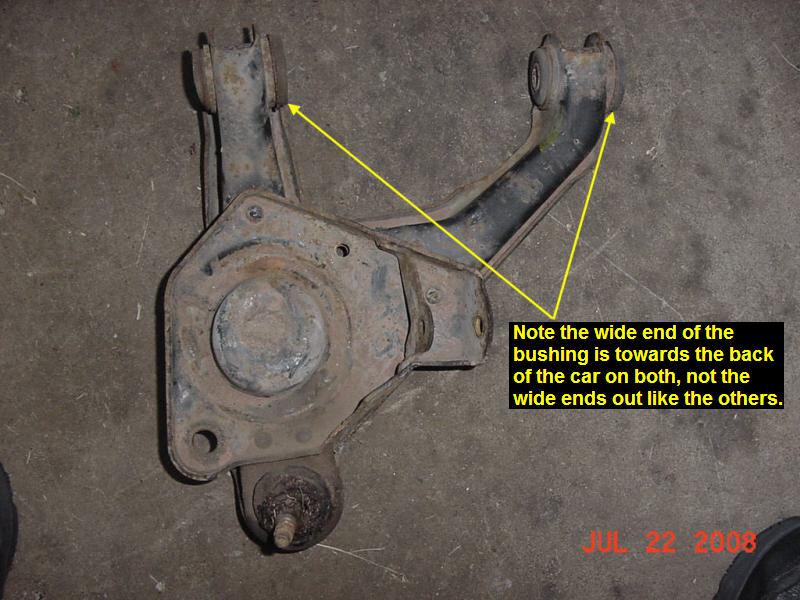
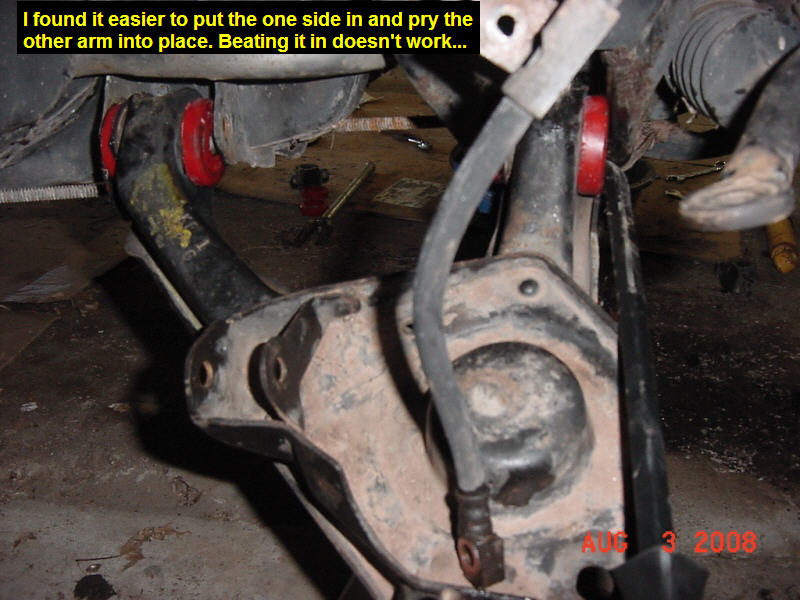
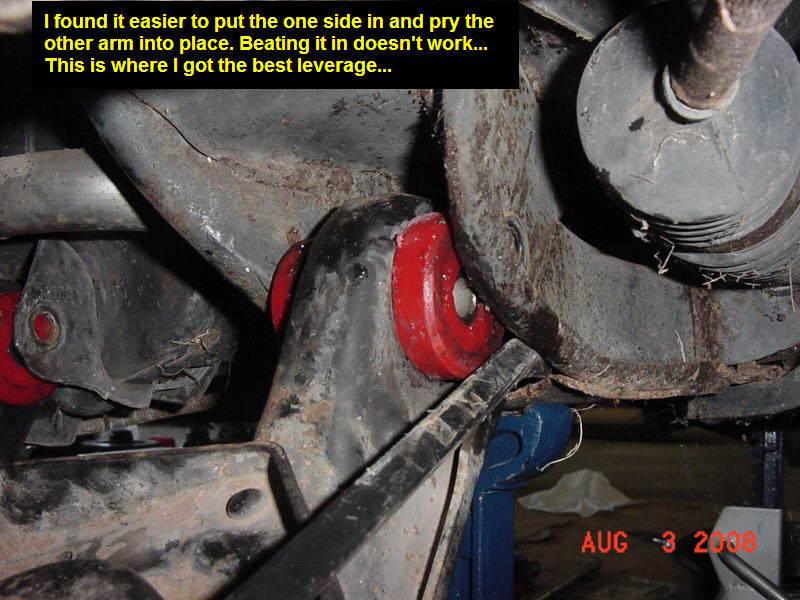
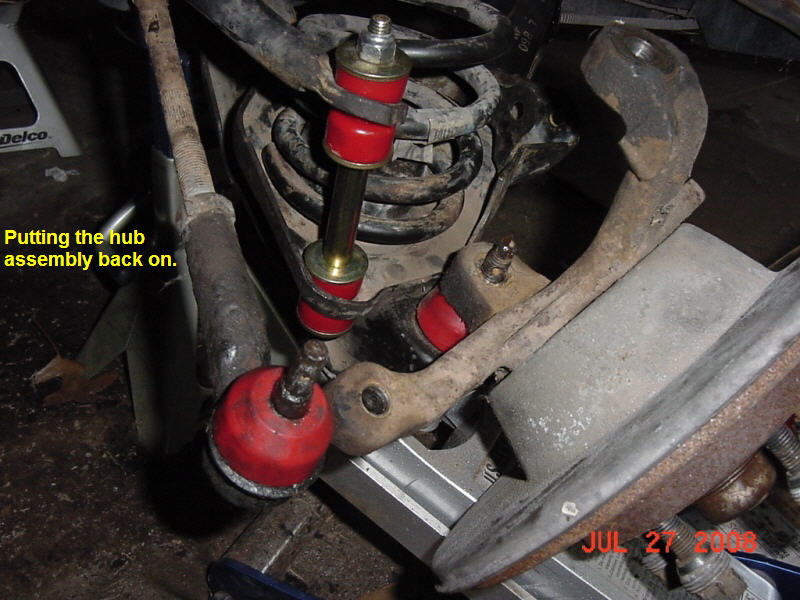
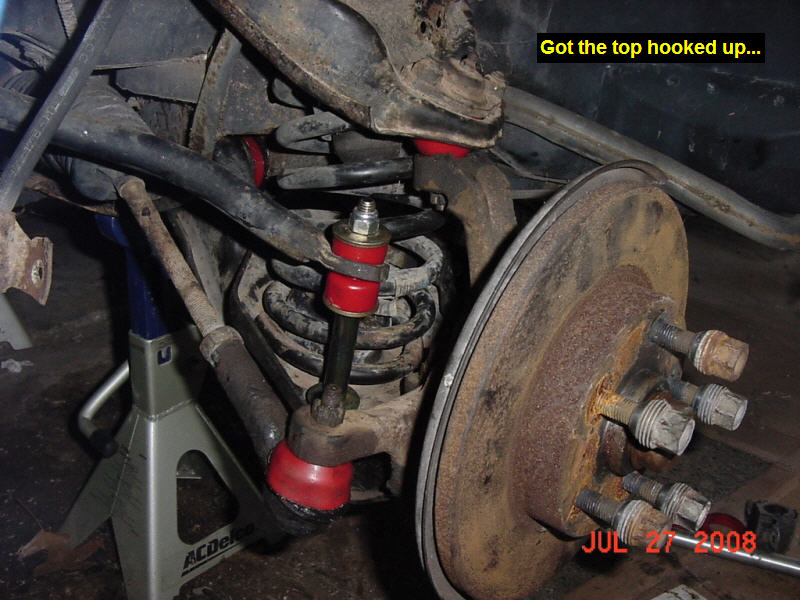
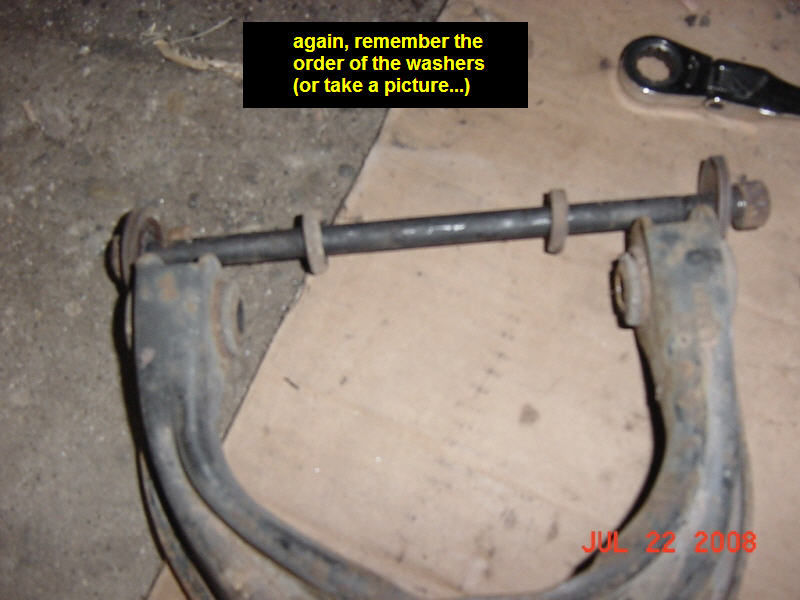
Dogbone  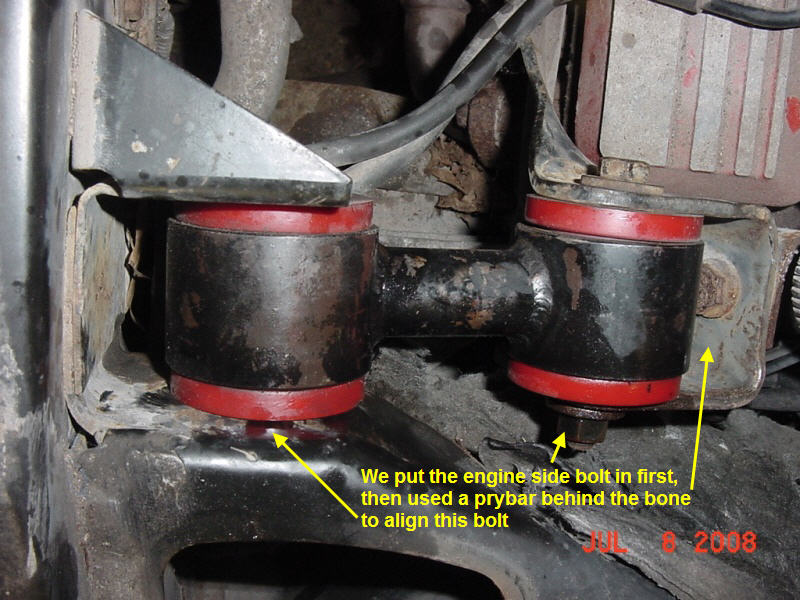 84-87 Rear Poly Suspension Upgrade 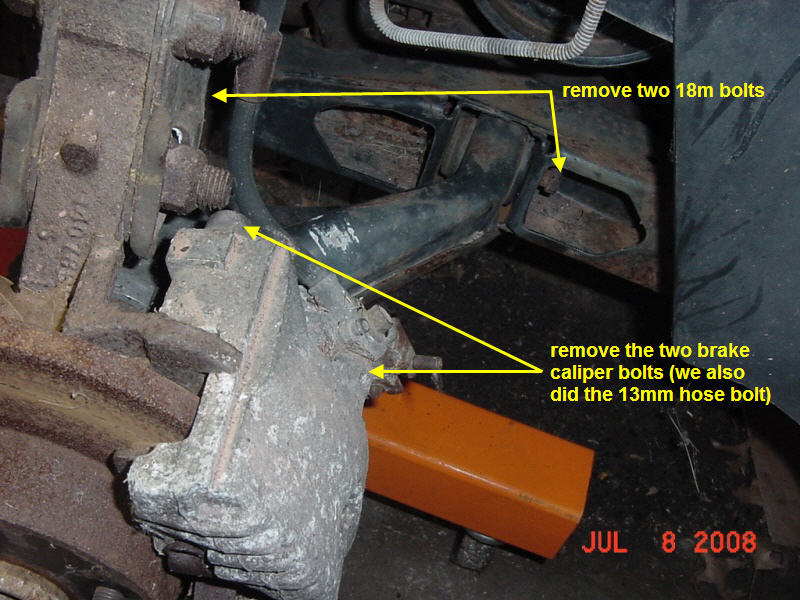 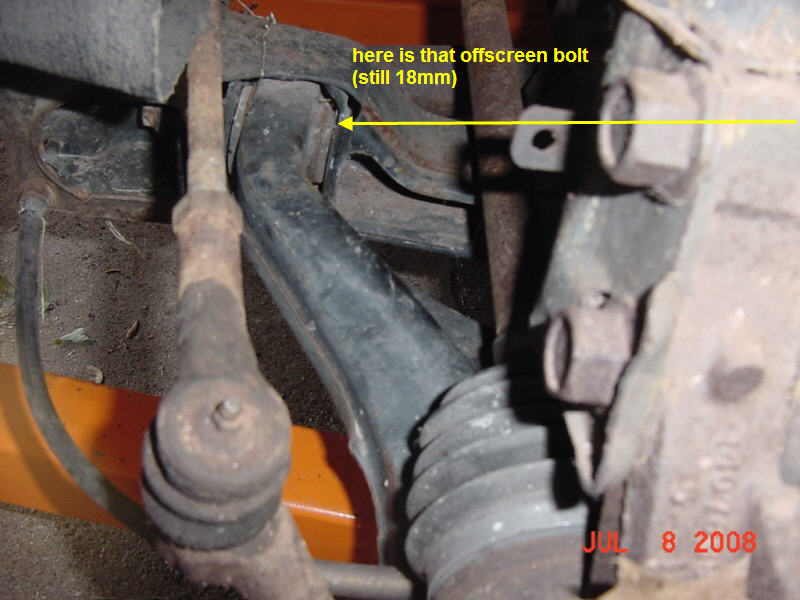 [This message has been edited by MulletproofMonk (edited 05-12-2024).]
|
|
09:57 AM
|
|
MulletproofMonk
Member Posts: 3092
From: Dayton, OH (Bellbrook, OH 45305)
Registered: Oct 2005
|
|
|
09:58 AM
|
|
MulletproofMonk
Member Posts: 3092
From: Dayton, OH (Bellbrook, OH 45305)
Registered: Oct 2005
|
|
MulletproofMonk
Member Posts: 3092
From: Dayton, OH (Bellbrook, OH 45305)
Registered: Oct 2005
|
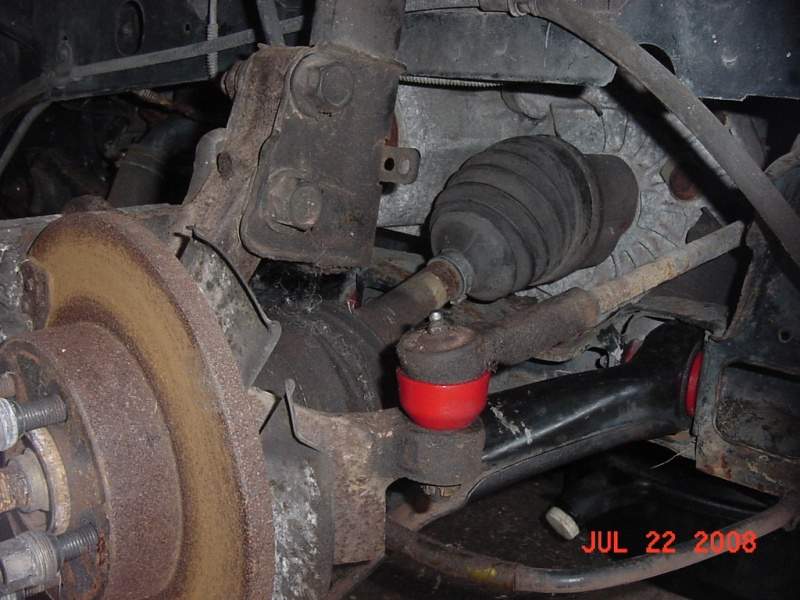
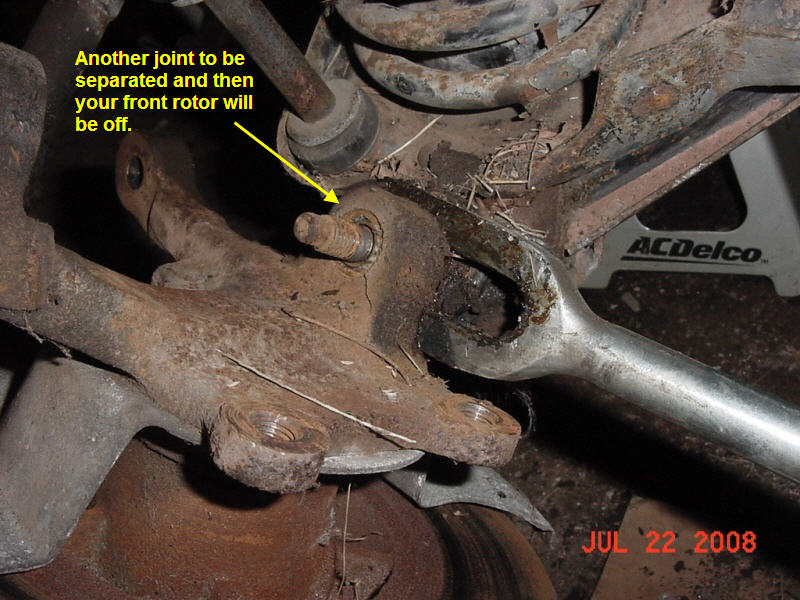
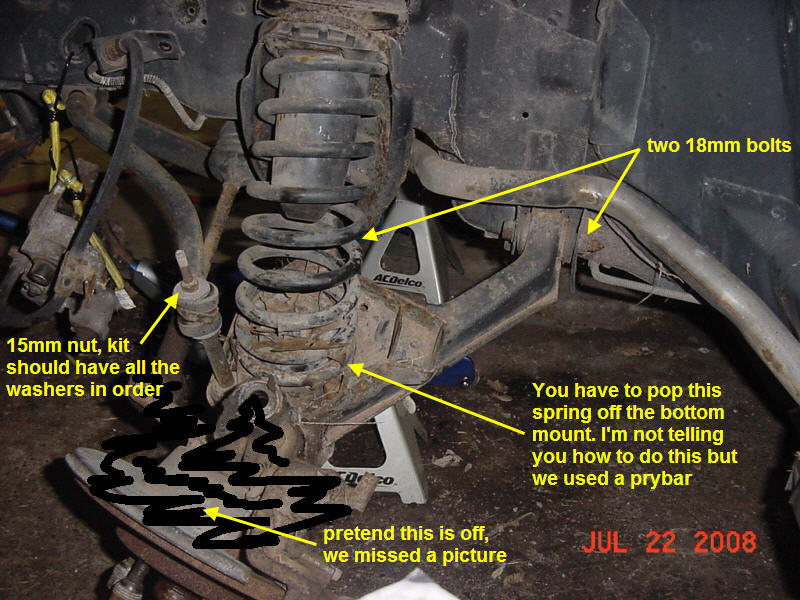
84-87 Front Poly Bushings  84-87 Front Torque Specs from Ryan's excellent site: 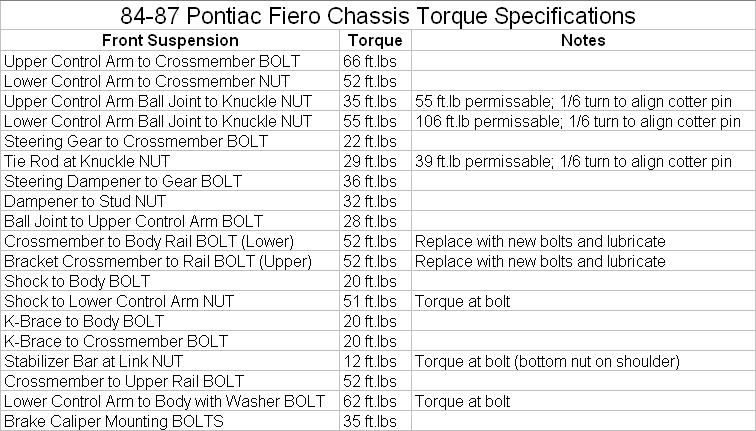 | | | quote | Originally posted by Raydar:
The 220 ft.lbs. for the hub/bearing bolt into the knuckle is horribly wrong.
I'll have to dig for the correct value. It's more like 62 ft/lbs. (Same as the rears.)
|
|
UPDATE 5/21/13Build one of these to keep track of your nuts and bolts... 84-87 Front Poly Suspension Upgrade Sway bar 13mm Tie Rod 17mm 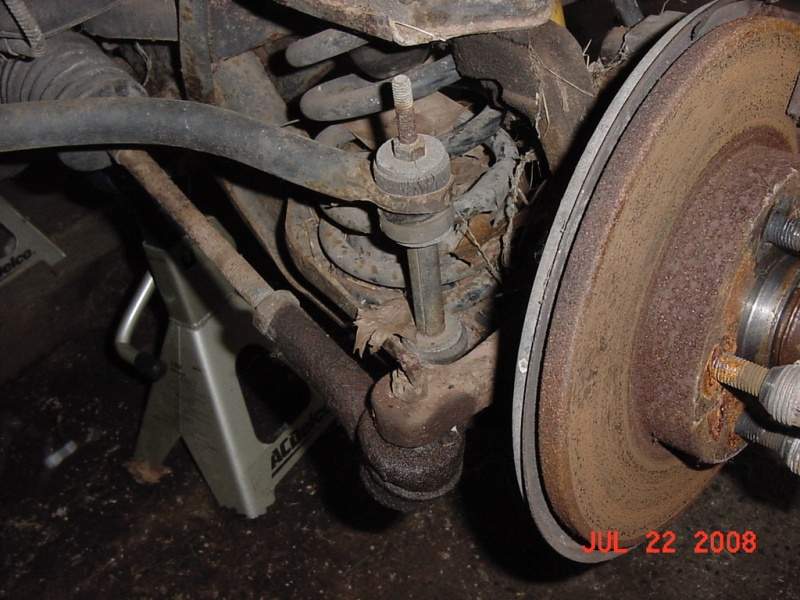 Brake Caliper bolts T-50 Lower shock 15mm  Upper shock 13mm 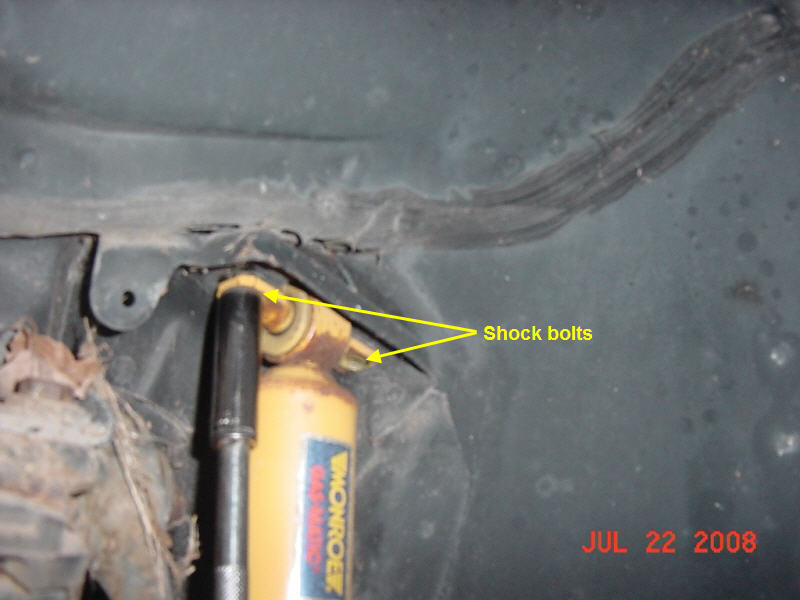 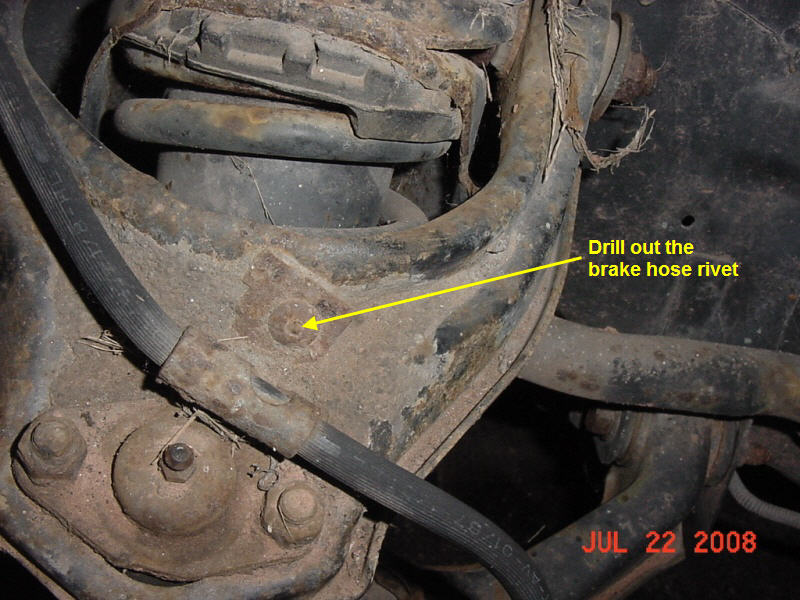 [This message has been edited by MulletproofMonk (edited 05-12-2024).]
|
|
10:01 AM
|
|
whodeanie
Member Posts: 3819
From: woodstock,Ga.,USA
Registered: Jan 2008
|
Nice step by step post.
sometimes it hard to understand without seeing it.
|
|
10:01 AM
|
|
MulletproofMonk
Member Posts: 3092
From: Dayton, OH (Bellbrook, OH 45305)
Registered: Oct 2005
|
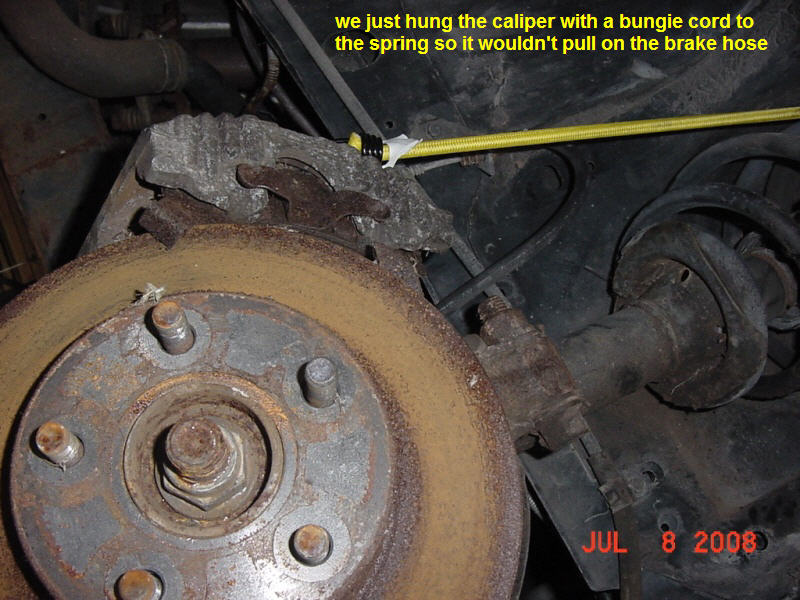
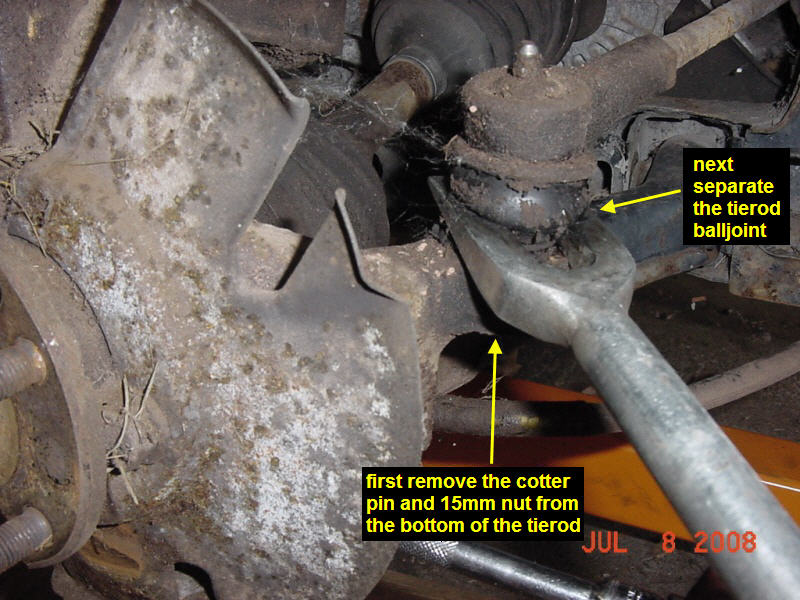
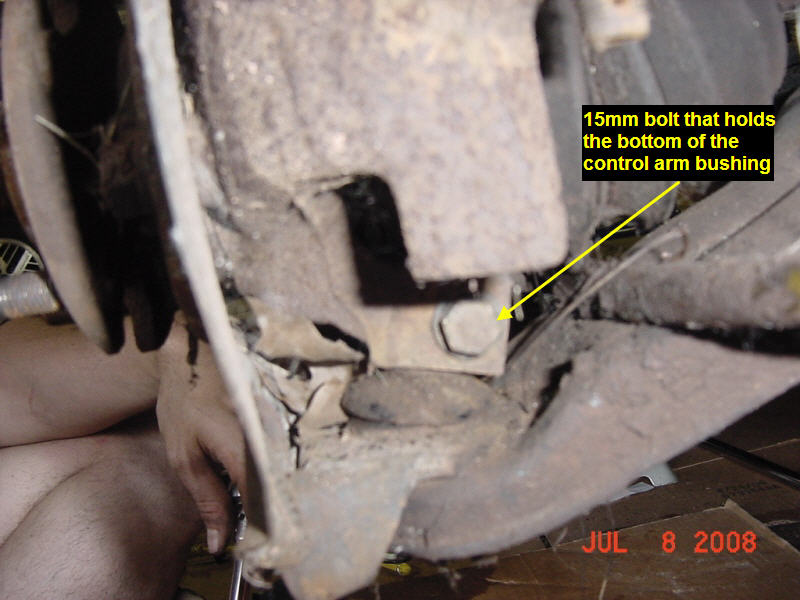
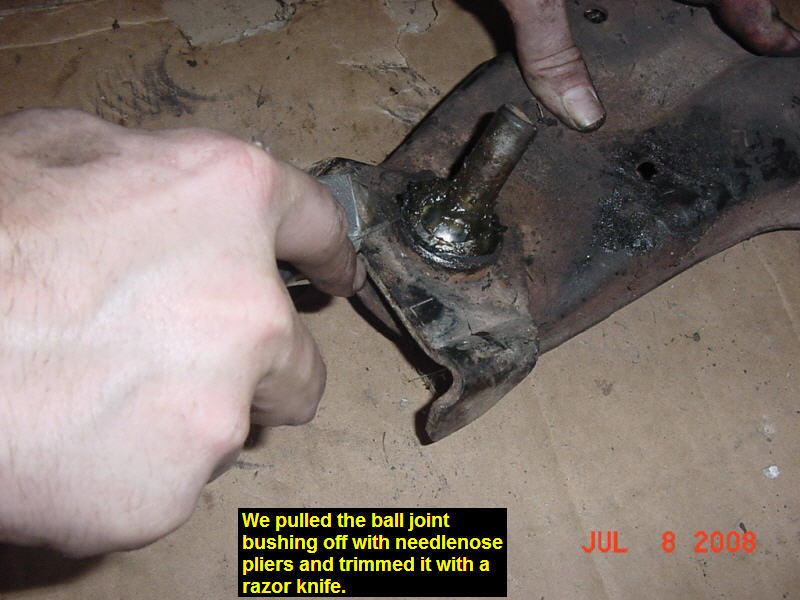
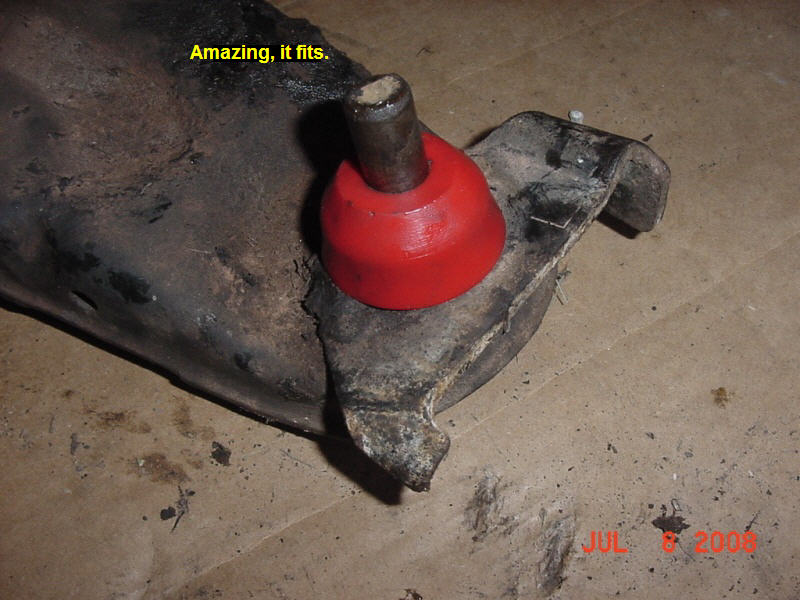
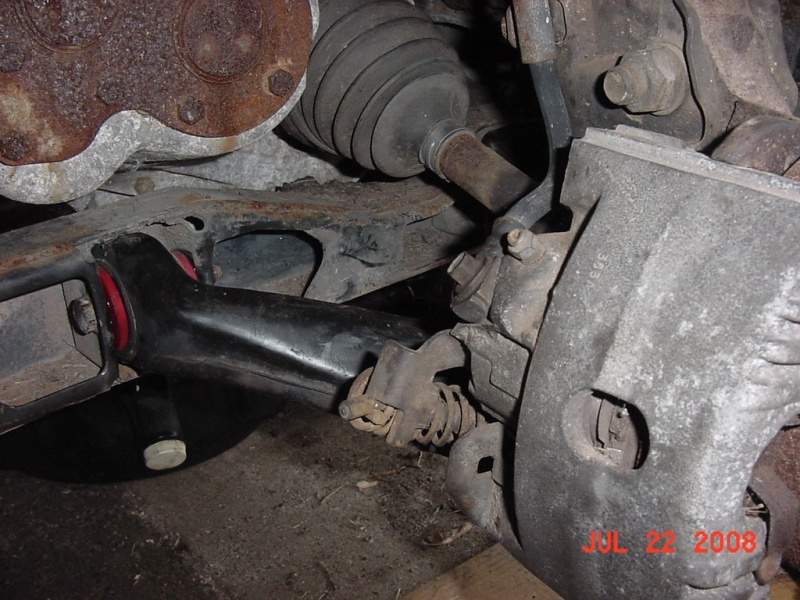
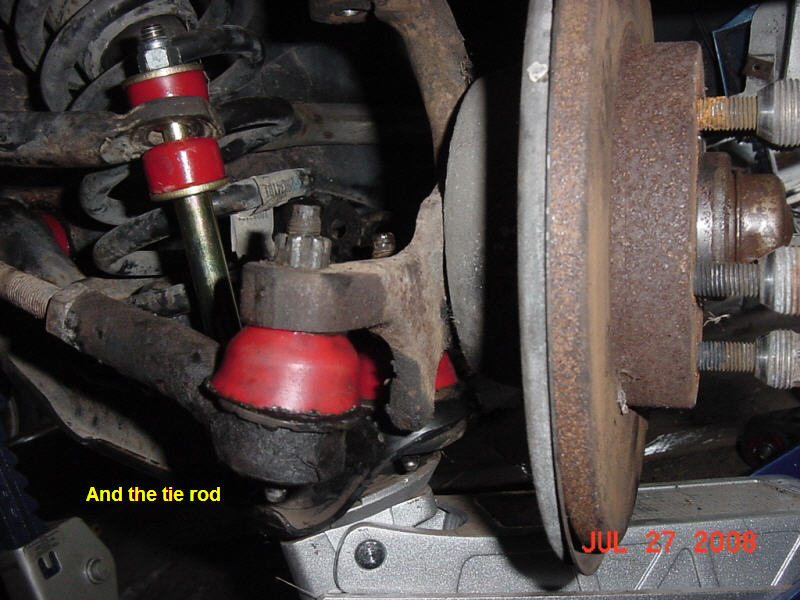
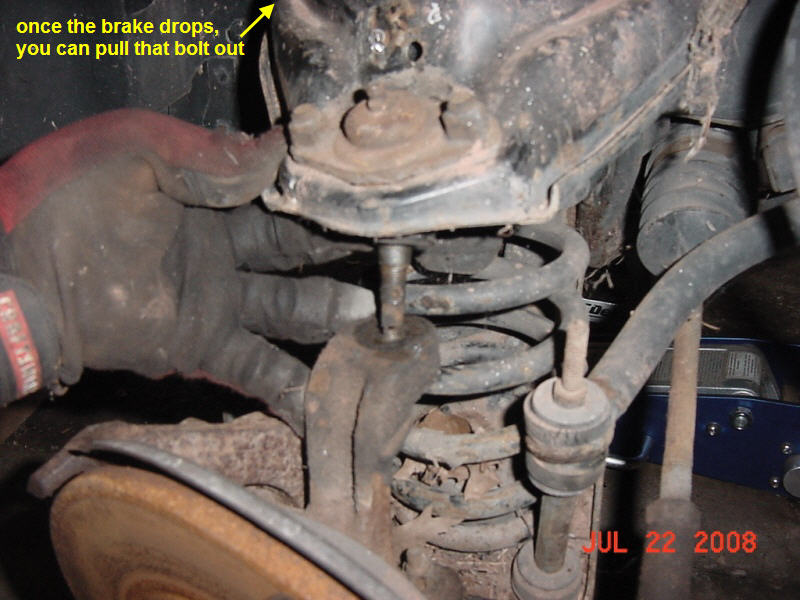
 Brake hose 10mm 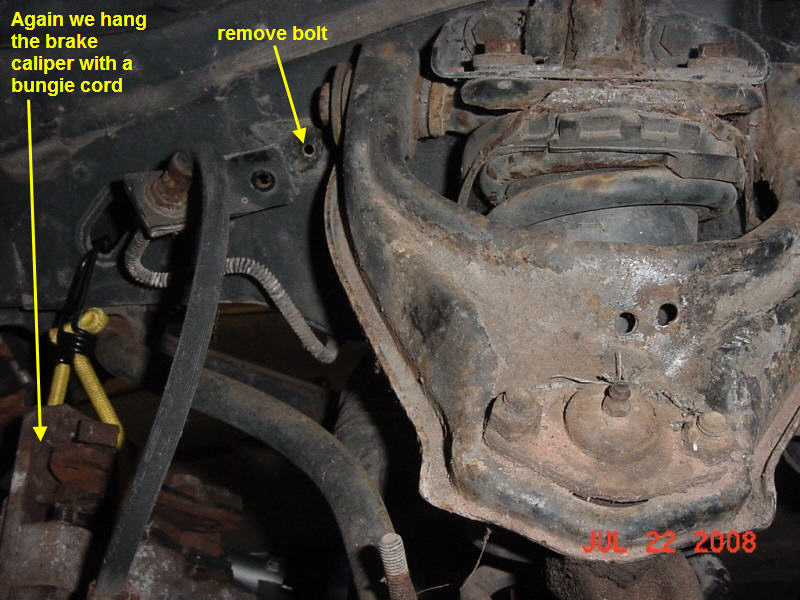 Guessing there could be a difference in sizes... Upper Control Arm 18mm 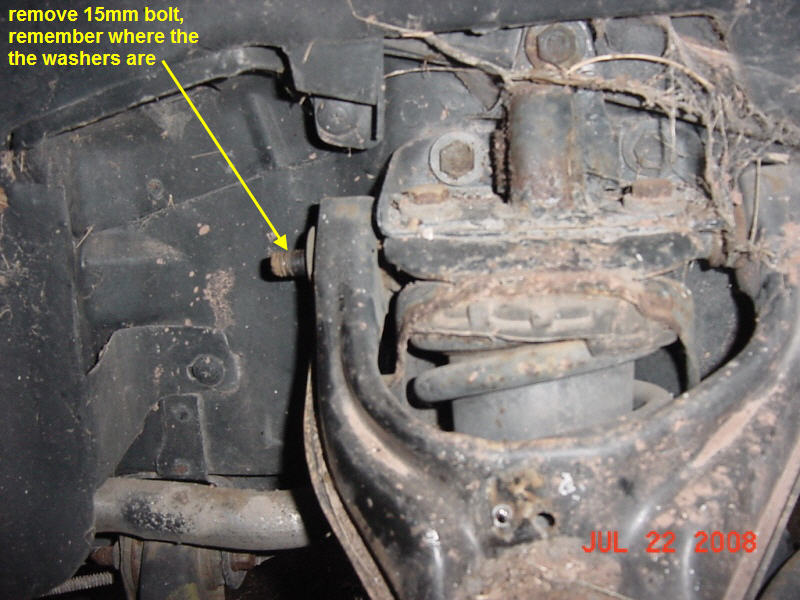 Upper Control Arm Ball Joint 17mm 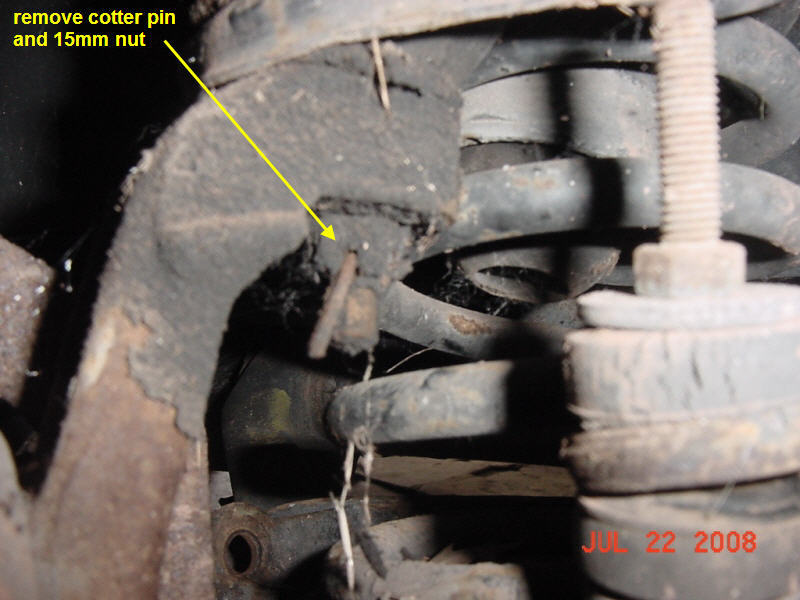 Since that first time I have been using Rodney Dickman's Fiero Balljoint Separator Tool and it is worth the money.  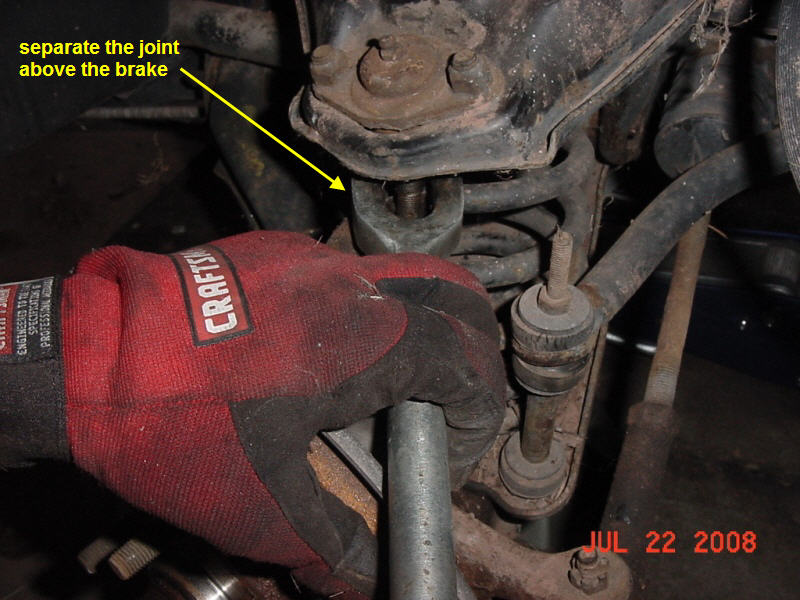 [This message has been edited by MulletproofMonk (edited 05-23-2013).]
|
|
10:02 AM
|
|
MulletproofMonk
Member Posts: 3092
From: Dayton, OH (Bellbrook, OH 45305)
Registered: Oct 2005
|
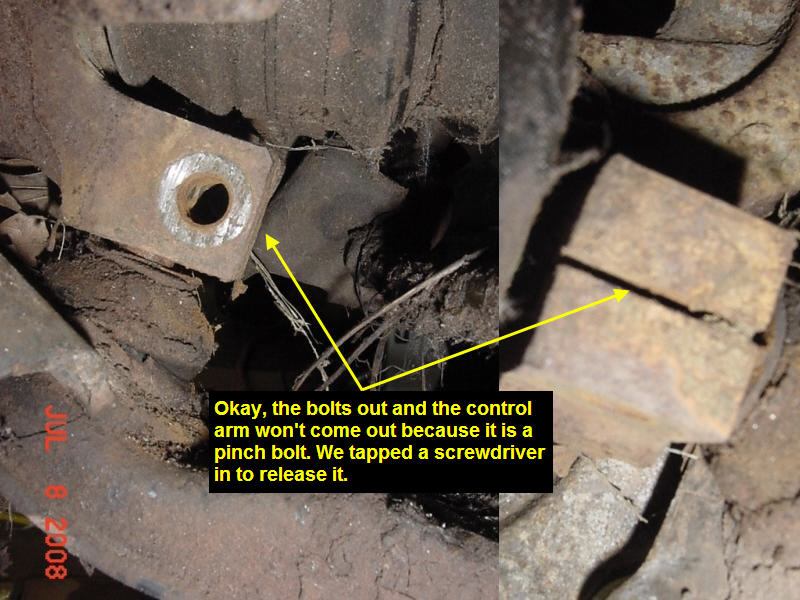
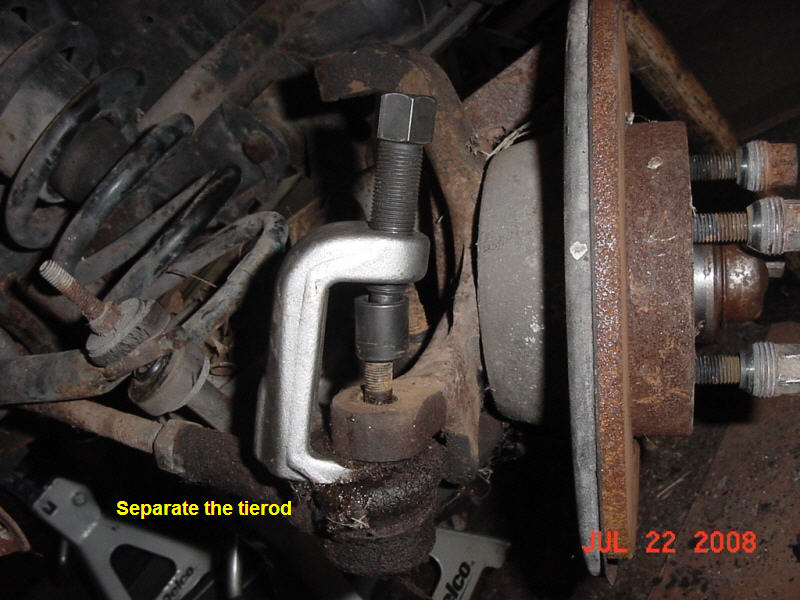
  UPDATE 5/9/13 UPDATE 5/9/13Here is a better way to remove the bushing, build a bushing removal tool so you don't have to inhale toxins. 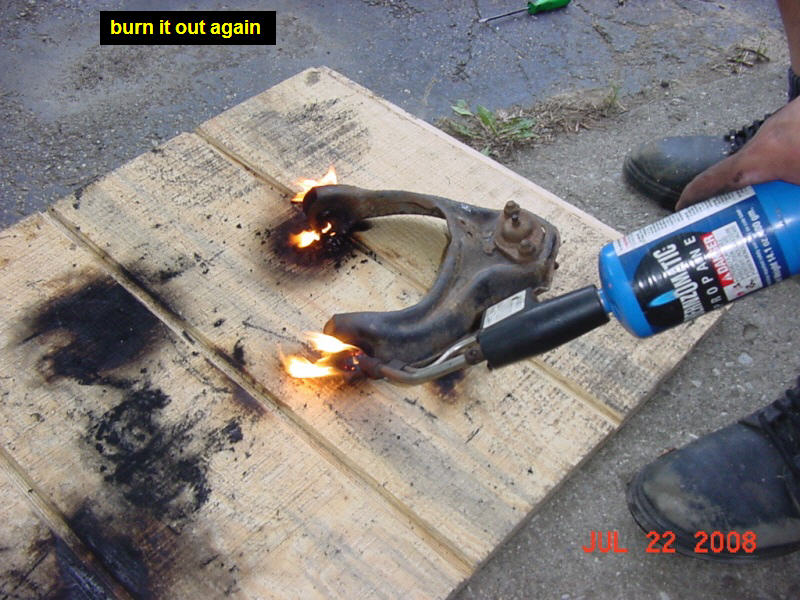 UPDATE 5/21/13 UPDATE 5/21/13Build one of these to help press your bushings in... 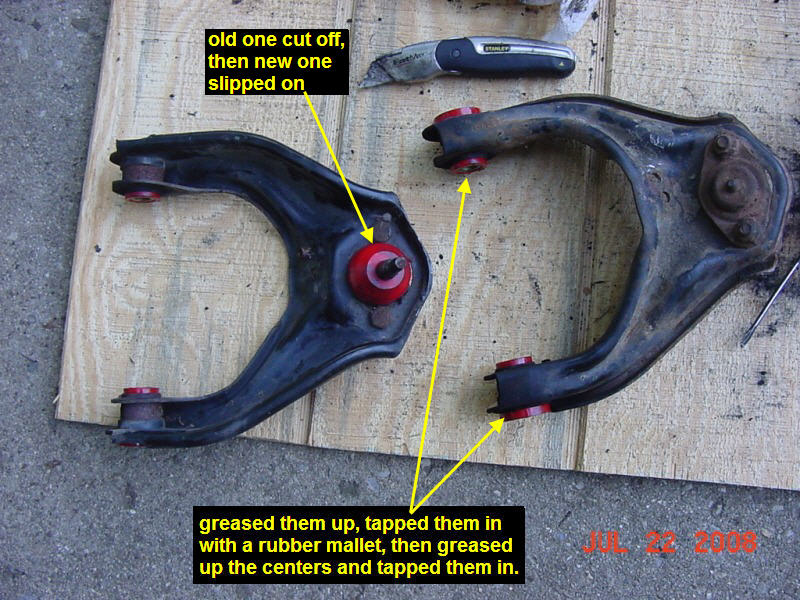 Tie Rod 17mm  Lower Control Arm Ball Joint 19mm 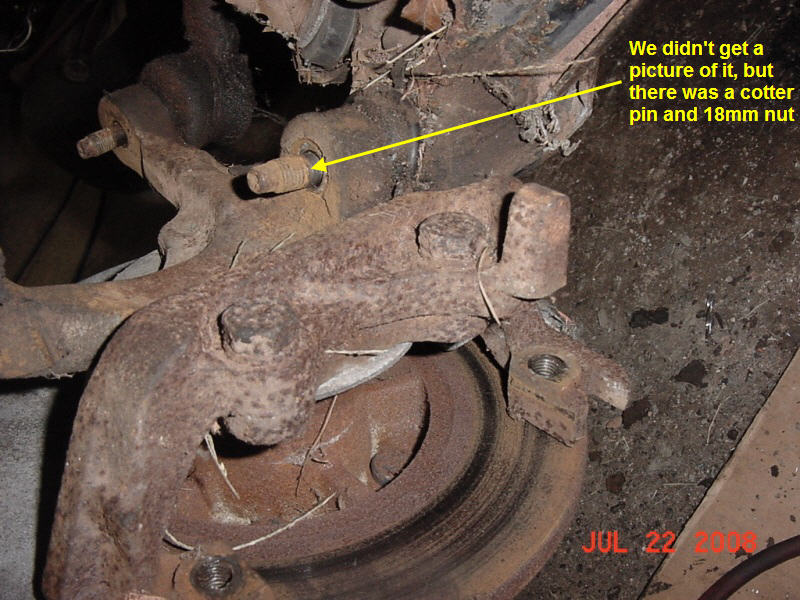 [This message has been edited by MulletproofMonk (edited 05-23-2013).]
|
|
10:03 AM
|
|
MulletproofMonk
Member Posts: 3092
From: Dayton, OH (Bellbrook, OH 45305)
Registered: Oct 2005
|
|
MulletproofMonk
Member Posts: 3092
From: Dayton, OH (Bellbrook, OH 45305)
Registered: Oct 2005
|
|
MulletproofMonk
Member Posts: 3092
From: Dayton, OH (Bellbrook, OH 45305)
Registered: Oct 2005
|
|
|
10:07 AM
|
|
|
PFF
System Bot
|
|
MulletproofMonk
Member Posts: 3092
From: Dayton, OH (Bellbrook, OH 45305)
Registered: Oct 2005
|
88 Rear Poly Bushings 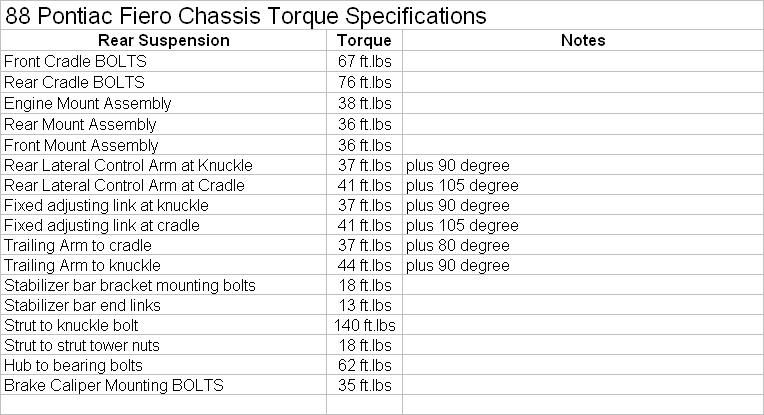 [This message has been edited by MulletproofMonk (edited 05-23-2013).]
|
|
10:08 AM
|
|
MulletproofMonk
Member Posts: 3092
From: Dayton, OH (Bellbrook, OH 45305)
Registered: Oct 2005
|
88 Front Poly Bushings 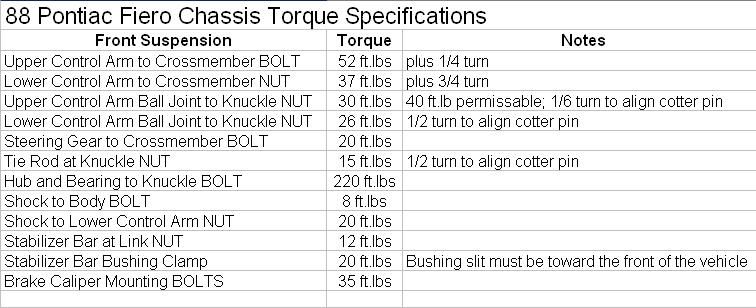 [This message has been edited by MulletproofMonk (edited 05-23-2013).]
|
|
10:14 AM
|
|
Hudini
Member Posts: 9030
From: Tennessee
Registered: Feb 2006
|
Awesome write up and pics. Did you tighten everything up with the suspension hanging or with it compressed?
|
|
10:17 AM
|
|
MulletproofMonk
Member Posts: 3092
From: Dayton, OH (Bellbrook, OH 45305)
Registered: Oct 2005
|
EDIT: Condensing to add space for 88 poly... whodeanie, how did you sneak in there? I thought I could get it all posted... =) I should also thank Modat5 for helping. I'll try to resize those ones that you have to click on so they show up... -Brian Well, that depends... The first time or the second when I got the caps cut down... =) We tightened up the arms and torqued them first. Then as we started adding parts (some you will feel go together) we torqued them. -Brian [This message has been edited by MulletproofMonk (edited 05-23-2013).]
|
|
10:21 AM
|
|
Hudini
Member Posts: 9030
From: Tennessee
Registered: Feb 2006
|
I asked because I had read you are *supposed* to torque it down with the weight of the car on the suspension. I simply let the car rest on the jack (under the lower ball joint) so as to simulate the wheel in place. Don't really know what difference it makes with poly.
|
|
10:27 AM
|
|
Fosgatecavy98
Member Posts: 2969
From:
Registered: Jul 2005
|
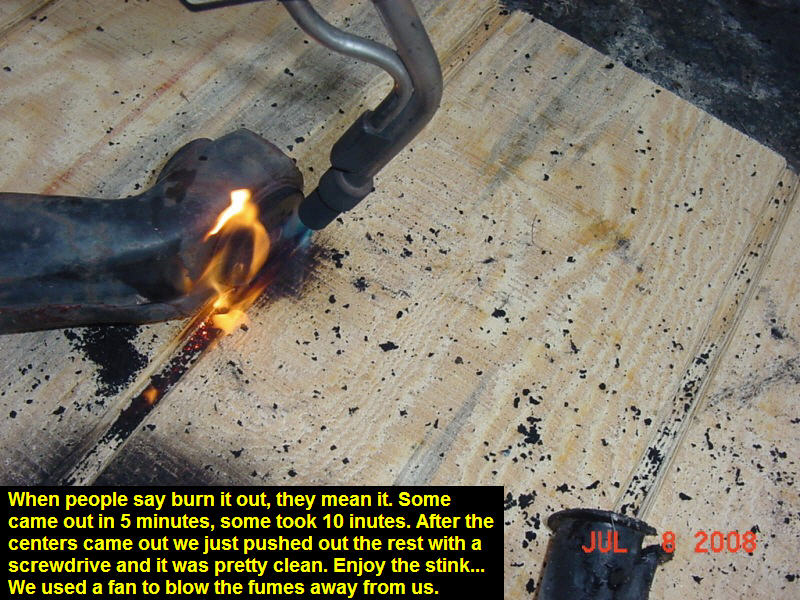
I'll add you can also cut the old rubber out with a saw-zaw. Lots of lets stink (still some tho)
I cant believe you didnt have any huge problems, I had all sorts of issues just doing the rear tie-rods and rear control arms, I still have yet to do the front :-(
|
|
10:48 AM
|
|
NW-Fiero
Member Posts: 447
From: Pierce County - WA
Registered: Aug 2008
|
Did I miss the install of the Trans , Engine and Cradle Mounts......Red is good! ------------------ Mark In the Great Northwest! [This message has been edited by NW-Fiero (edited 09-04-2008).]
|
|
10:57 AM
|
|
whodeanie
Member Posts: 3819
From: woodstock,Ga.,USA
Registered: Jan 2008
|
| | | quote | Originally posted by MulletproofMonk:
whodeanie, how did you sneak in there? I thought I could get it all posted... =)
I should also thank Modat for helping.
I'll try to resize those ones that you have to click on so they show up...
-Brian |
|
just luckie I guess. I just did the same thing on my 88 about 4 mounths ago plus the poly motor and trans mounts also (that was fun -- NOT!) have you had the alignment done yet? mine were so bad that when I did the poly the rear wheels were all out of wack. now it drives like a slotcar. then I went and tore the body off to do other mods so I have not driven it since
|
|
11:00 AM
|
|
Modat5
Member Posts: 104
From: Dayton, OH.
Registered: Mar 2005
|
Nice job Brian.
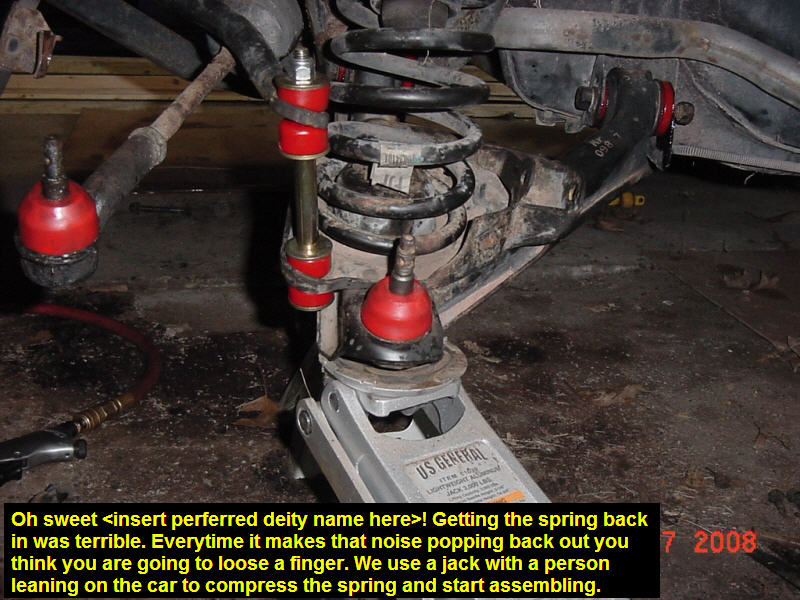
Having helped on two of these now, I personally think the hardest part is removing and then
re-installing the springs....
Matt
88gt
88formula (fixing up to sell)
Dayton, OH
|
|
12:54 PM
|
|
americasfuture2k
Member Posts: 7131
From: Edmond, Oklahoma
Registered: Jan 2006
|
wow, that rotor looks outstanding! ------------------
1987 Fiero GT built by my brother, merlot566jka, 3500 LX9 from 06 Malibu, WOT-TECH.com 1280 grind stage 3 cam, LS6 valve springs, 1227730 ECM conversion, Darrel Morse solid aluminum cradle mounts, Truleo headers modified to fit the 3500, 36# inectors, 70mm 4.3 throttle body adapted to 3500 intake, ported heads, upper and lower intakes, lightly polished, tcemotorsports.com crank trigger wheel, CenterForce dual friction clutch, Flowtech Afterburner muffler, 2.5" piping, cat deleted, EGR deleted, SinisterPerformance tuning, C6 Corvette exhaust tips. projected to be 35 MPG with a guesstimate of 250 hp to the wheels
|
|
01:25 PM
|
|
|
PFF
System Bot
|
|
|
|
FieroGeneral
Member Posts: 92
From: Norway
Registered: Oct 2007
|
A + from me...Good writeup!
|
|
01:40 PM
|
|
Austrian Import
Member Posts: 3919
From: Monterey, CA
Registered: Feb 2007
|
MulletproofMonk, thank you. I really appreciate threads with step-by-step pics.  Too many threads just have before and after, or are very stingy on pics.  Thanks for being detailed.  -Max
|
|
01:54 PM
|
|
MulletproofMonk
Member Posts: 3092
From: Dayton, OH (Bellbrook, OH 45305)
Registered: Oct 2005
|
| | | quote | Originally posted by NW-Fiero:
Did I miss the install of the Trans , Engine and Cradle Mounts......Red is good! |
|
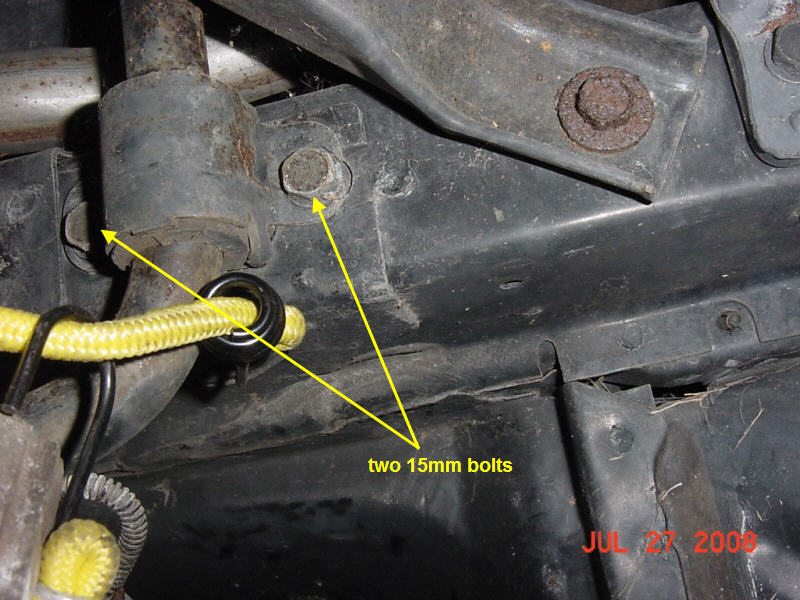
We are also doing the Grand Am brake upgrade and I blew my little 5 gallon compressor up shaving the caliper brackets from 21mm to 18mm. I just got a 60 gallon compressor so I hope to cut those bolts out holding the cradle bushings in the front... When I do it I will post some pictures. Doing the cradle bushings seems a lot more straight forward to me. I didn't buy any trans, engine or cradle mounts so I don't have any pics... -Brian
|
|
02:02 PM
|
|
crab daddy
Member Posts: 119
From: Attleboro, MA
Registered: Feb 2007
|
Excellet write up! ------------------
86 Fiero GT, 99 GTP (L67 swap will begin soon)
12.466 @ 114.15 INTENSE S1X/ZZP IC/TOG Headers
|
|
04:31 PM
|
|
Steven Snyder
Member Posts: 3326
From: Los Angeles, CA
Registered: Mar 2004
|
The things you are calling "ball joint bushings" are dust boots. They are designed to keep the grease in and the dust out. The polyurethane ones don't really perform either function very well, and you shouldn't use them. Even if the rubber boot has a small tear it works better than the polyurethane covers.
|
|
08:13 PM
|
|
MulletproofMonk
Member Posts: 3092
From: Dayton, OH (Bellbrook, OH 45305)
Registered: Oct 2005
|
| | | quote | Originally posted by Steven Snyder:
The things you are calling "ball joint bushings" are dust boots. |
|
People have told me different things in their writeups, that is why I like pictures to see what people did. You could call it a tea cup and I can match the picture to the item on my (garage) floor. | | | quote | Originally posted by Steven Snyder:
The polyurethane ones don't really perform either function very well, and you shouldn't use them. Even if the rubber boot has a small tear it works better than the polyurethane covers. |
|
My build thread is not what you should do, what you should use, it is simply what I did and how we did it. I happened to buy everything there on eBay for $100.00 (minus the dogbone and cradle bushings). -Brian [This message has been edited by MulletproofMonk (edited 09-05-2008).]
|
|
08:45 PM
|
|
|
Sep 5th, 2008
|
MulletproofMonk
Member Posts: 3092
From: Dayton, OH (Bellbrook, OH 45305)
Registered: Oct 2005
|
| | | quote | Originally posted by americasfuture2k:
wow, that rotor looks outstanding!
|
|
Now that I had time to think about it, maybe I should post those in the mall... I know that if it's cheap enough someone will buy it... =) I'll probably have them turned down for the next brake upgrade. -Brian
|
|
06:36 AM
|
|
Back On Holiday
Member Posts: 6238
From: Downingtown, PA
Registered: Jul 2001
|
Good writeup, skimmed through it but gave you a + !
|
|
07:21 AM
|
|
USFiero
Member Posts: 4877
From: Everywhere and Middle of Nowhere
Registered: Mar 2002
|
I agree on the covers for the ball joints, they don't seal well. All the trouble you went through, and you didn't replace your ball joints? Especially the lower fronts? You reall, really, really want to replace those. ------------------
John DuRette
Custom 85 SE/86 GT
"Kinda makes you nostalgic for a Members Only jacket"
|
|
08:50 AM
|
|
MulletproofMonk
Member Posts: 3092
From: Dayton, OH (Bellbrook, OH 45305)
Registered: Oct 2005
|
| | | quote | Originally posted by USFiero:
All the trouble you went through, and you didn't replace your ball joints? Especially the lower fronts? You reall, really, really want to replace those.
|
|
No, my ball joints are all in great shape. The car only has about 70k miles and has that surface rust because it was parked so long without moving... -Brian
|
|
09:02 AM
|
|
|
PFF
System Bot
|
|
Blacktree
Member Posts: 20770
From: Central Florida
Registered: Dec 2001
|
| | | quote | | Originally posted by Hudini: I asked because I had read you are *supposed* to torque it down with the weight of the car on the suspension... Don't really know what difference it makes with poly. |
|
With urethane bushings, you don't have to worry about that.
|
|
11:13 AM
|
|
Jeckel
Member Posts: 113
From: Nampa, ID USA
Registered: Mar 2008
|
This is a great write up. I need pictures to go from as well. Are you going to post pics of your brake upgrade too?
|
|
01:26 PM
|
|
MordacP
Member Posts: 1300
From: Clovis, California, US
Registered: Sep 2007
|
This is a great write up. I'll probably have to refer to this when I polyurethane-ize my suspension.
PS, I hope you plan on doing ALOT more before you drive the car. Dont have lots of confidence in those rotors.
|
|
01:36 PM
|
|
katatak
Member Posts: 7136
From: Omaha, NE USA
Registered: Apr 2008
|
Great Write up.... In the process of doing this on my 86. I tried a couple different ways to remove the old cradle and a arm bushings. All of which worked. This is what worked for me:
I took a 1/4" bit in my cordless drill and started to drill along side the inner steel tube (bolt tube). The drill bit pulled itself into the rubber but also would rotate around the outside of the steel tube breaking it free from the rubber. As I pulled the bit back out, it pulled the tube out too. I had to tap it out the rest of the way with a punch. At this point, I was going to burn it out but when I went to light the torch, empty! So I took my sawsall and made several cuts in the rubber from the inside out to the cradle. Then, ran the sawsall around the outside of the rubber and pushed the pieces of the bushing out. I still had to go get a refill and finish burning what was left of the bushing. Of course the first one took the longest as I was "learning" the rest went very quick and I did not have burn that much rubber. In the long run, I used a combination of others ideas and it worked well. I even gave a hole saw a try. It works to but you have to have a deep one so that you can cut clear through the bushing. I have 2 a arms left to do. I will try and take pics for an update.
Pat
|
|
02:46 PM
|
|
NW-Fiero
Member Posts: 447
From: Pierce County - WA
Registered: Aug 2008
|
When I burned all my bushings out my neighbors were not impressed with the smoke or smell. But what the heck... they don't know how to change oil either....... ------------------
Mark
In the Great Northwest!
|
|
02:59 PM
|
|
|
Sep 6th, 2008
|
theogre
Member Posts: 32520
From: USA
Registered: Mar 99
|
1. Polly joint covers are crap. You get far less protection as they do not seal anywhere near as well as the original ones. (Leaving out torn ones for now...) They will let in dirt and water. If you hit them with a pressure washer, you can wash out the lube and and drive water/dirt into the joint so deep you never get it out. The OEM type have a reinforced hole for the joint stem and a spring in the bottom to keep the big end shut. The major reason that these fail isn't age but morons with grease guns, especially power grease guns, that force them so full they cannot move properly. That's when they don't burst them when adding grease. When rubber covers look like balloons, you've got way bloody too far much grease in them. You have to let some out. That is done by using a bit of dull metal, a small screwdriver usually works, to shift the small end so that grease can get out. Many after market ones that come on replacement joints are formed to have an easier escape path here than allot of factory ones had. Even then sometimes you've got to slip something between the top of the cover and whatever so that grease can get out. 2. Never split a joint you intend to reuse with a fork. Besides trashing the cover, you very often damage the joint itself that way. 3. Now that you're fairly stuck with poly covers, make sure you check the grease frequently. Make sure you use a grease that is hard to wash out. This is on top of the regular greasing poly bushings often need. ------------------ Dr. Ian Malcolm: Yeah, but your scientists were so preoccupied with whether or not they could, they didn't stop to think if they should.
(Jurassic Park)The Ogre's Fiero Cave (It's also at the top of every forum page...) [This message has been edited by theogre (edited 09-06-2008).]
|
|
03:46 PM
|
|
Steven Snyder
Member Posts: 3326
From: Los Angeles, CA
Registered: Mar 2004
|
| | | quote | Originally posted by MulletproofMonk:
My build thread is not what you should do, what you should use, it is simply what I did and how we did it. I happened to buy everything there on eBay for $100.00 (minus the dogbone and cradle bushings).
|
|
A lot of people are going to end up using your thread as a guide, so it's important that they are aware of the problem. See Ogre's post above mine for a more detailed explanation of why the polyurethane dust boots should not be used.
|
|
04:23 PM
|
|
Fierology
Member Posts: 1195
From: Eastern Tennessee
Registered: Dec 2006
|
ABOUT POLY DUST BOOTS: I was told by I forget who that the polys work well on the tie rod ends. Do you guys agree? Should I use the rubber, or can I stick w/ poly? I haven't torqued it yet, I believe, so it should be easy to switch them out. thanks -Michael ------------------
"A guy know's he's in love when he loses interest in his car for a few days." -Tim Allen
He who dies with the most toys... still dies.
Check out my restoration! 
|
|
04:39 PM
|
|
|
Sep 8th, 2008
|
Steven Snyder
Member Posts: 3326
From: Los Angeles, CA
Registered: Mar 2004
|
| | | quote | Originally posted by Fierology:
ABOUT POLY DUST BOOTS:
I was told by I forget who that the polys work well on the tie rod ends. Do you guys agree? Should I use the rubber, or can I stick w/ poly? I haven't torqued it yet, I believe, so it should be easy to switch them out.
|
|
I would use the rubber ones as long as they aren't badly torn. A little hole would probably be alright; once you fill it with grease some will squeeze out of the hole and keep the dust out...
|
|
04:12 AM
|
|